

Placing an entryway mirror as if it were a slightly open door allows you to see yourself even in a narrow hallway. It is fixed to the wall with wooden strips and metal brackets available at hardware stores. The mirror surface can be created using many small panels glued with double-sided tape. This offers an optimal solution for a full-length mirror in a tight corridor, plus hidden storage for shoes, jackets, and hats. With a mirror flat against the wall, there wouldn't be enough space to step back for a full view, but with an angled mirror—like a half-open door—you can step back along the hallway.
Why Choose an Angled Entry Mirror?
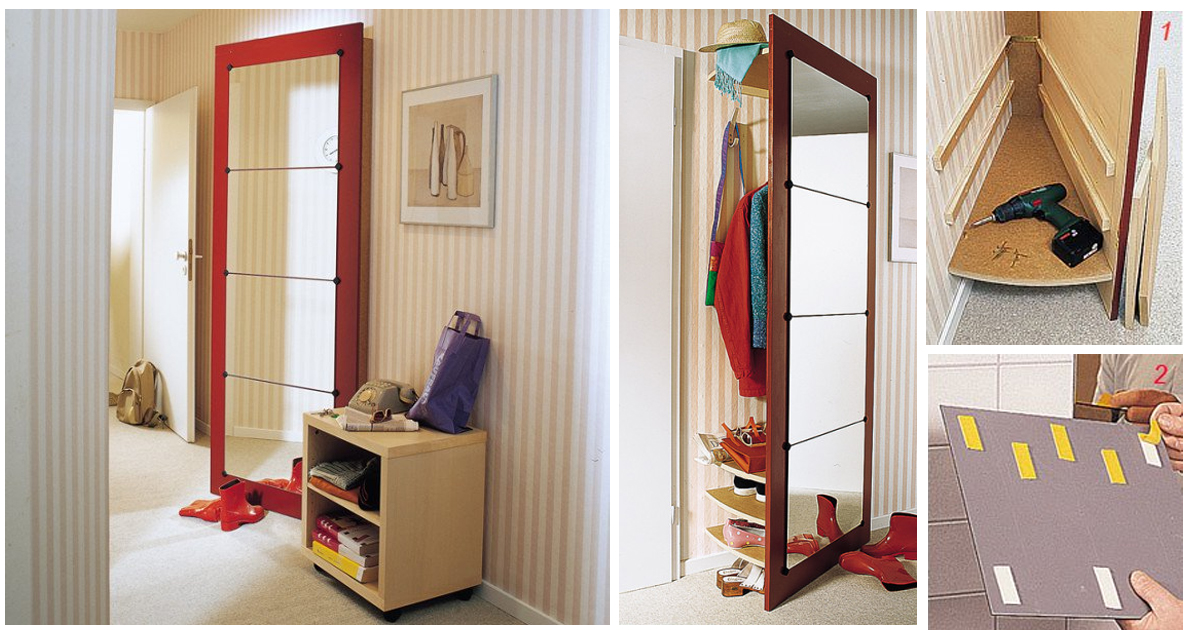
Full-length mirrors with frames can be quite expensive, but you can replace them with many smaller elements fixed onto a simple wooden panel. The flat surface on the back makes it easy to anchor obliquely to the wall using wedge-shaped shelves. You don't need to have mirrors custom-cut by a glazier because you can find various sizes with polished edges commercially. Use L-shaped hooks, round corner brackets, or double-sided tape to secure them.
Get the #1 Wireless Door Camera
REOLINK Bestseller: 2K Weatherproof Video Doorbell, No Monthly Fees.

Materials You'll Need
- Wooden panel (for the mirror base)
- Small mirror tiles or panels (with polished edges)
- Double-sided tape or L-shaped hooks
- Metal brackets and wooden strips
- Expansion wall plugs
- Drill (consider a home improvement drill for wall mounting)
Step-by-Step DIY Guide
1. Prepare the Wooden Panel
Cut the wooden panel to your desired size. Sand the edges smooth. This panel will act as the backing for your mirror tiles.
2. Attach Mirror Tiles
Using strong double-sided tape or L-shaped hooks, attach the mirror tiles to the panel. Ensure they are evenly spaced and aligned. For a seamless look, use tiles with polished edges.
3. Create the Angled Support
Fix wooden strips to the wall using expansion plugs. Attach metal brackets to these strips to hold the mirror panel at an angle. The bracket should allow the panel to lean like a slightly open door.
4. Install Storage Shelves
Use the triangular space behind the mirror to add wedge-shaped shelves. These can hold shoes, hats, or small accessories. Secure them with additional brackets.
Tips for a Perfect Finish
- Choose mirror tiles with beveled edges for a premium look.
- Use a level to ensure the panel is straight before tightening brackets.
- Consider adding accent lighting above or beside the mirror for better visibility.
Frequently Asked Questions
Can I use a single large mirror instead of tiles?
Yes, but a single large mirror is heavier and more expensive. Tiles are easier to handle and replace if broken.
How much space do I need behind the mirror for storage?
Typically, 6–12 inches (15–30 cm) is enough for shoes and small items. Adjust the angle of the mirror to create more depth.
What type of double-sided tape works best?
Use heavy-duty construction tape rated for mirrors. It should hold up to 10 lbs per strip.

Can I mount this on drywall?
Yes, but use drywall anchors or toggle bolts for a secure hold. For heavier mirrors, attach to wall studs.
How do I clean the mirror tiles?
Use a soft microfiber cloth and a gentle glass cleaner. Avoid abrasive sponges that could scratch the surface.
Enhance Your Entryway
Once your mirror is installed, complete the look with wall decor and a runner rug. For additional entryway storage, consider a storage bench or a small console table. If you have outdoor gear, a shed or garden storage can keep things organized. For a cohesive design, match your mirror frame with curtains or other mirrors in your home.
Final Thoughts
This angled entry mirror is a clever DIY project that maximizes both space and functionality. It’s perfect for narrow hallways where a traditional mirror won’t work. With basic tools from GrandGoldman's home improvement collection and a few mirror tiles, you can create a stylish and practical addition to your home.
Browse Grand Goldman Home Decor
Discover unique craftsmanship home decor and furniture at the Grand Goldman Shop.
Home Decor Shop
 Acacia frida deluxe solid wood bed frame |
Bedroom bench |
Bed chest drawers |
Lingerie dresser |
Frame base |
Mirror with jewelry storage |
30 Bathroom Vanity |
Memory foam queen mattress |
Mattresses for back pain |
Nightstand set of 2 |
Grand Goldman Shop |
Civil Lawyer
Deutschland Trikot WM 2026
Acacia frida deluxe solid wood bed frame |
Bedroom bench |
Bed chest drawers |
Lingerie dresser |
Frame base |
Mirror with jewelry storage |
30 Bathroom Vanity |
Memory foam queen mattress |
Mattresses for back pain |
Nightstand set of 2 |
Grand Goldman Shop |
Civil Lawyer
Deutschland Trikot WM 2026







