

We’re building a DIY tool box by modifying a classic rigid suitcase. Most frequently used tools will be accessible without constantly opening and closing the case or rummaging for the right tool. For a DIY enthusiast, a tool box needs to be as functional and complete as possible—and even more so for a professional. In daily use, repeatedly opening and closing a rigid case to grab the right tools wears out the hinges, and at least once a year the box needs replacing; the elastic straps that hold tools in place, if present, eventually tear or become loose. In the end, there’s only one path: take a traditional case and modify it to meet your needs—creating a DIY tool box, a hybrid model that combines the advantages of both systems and minimizes their functional limits.
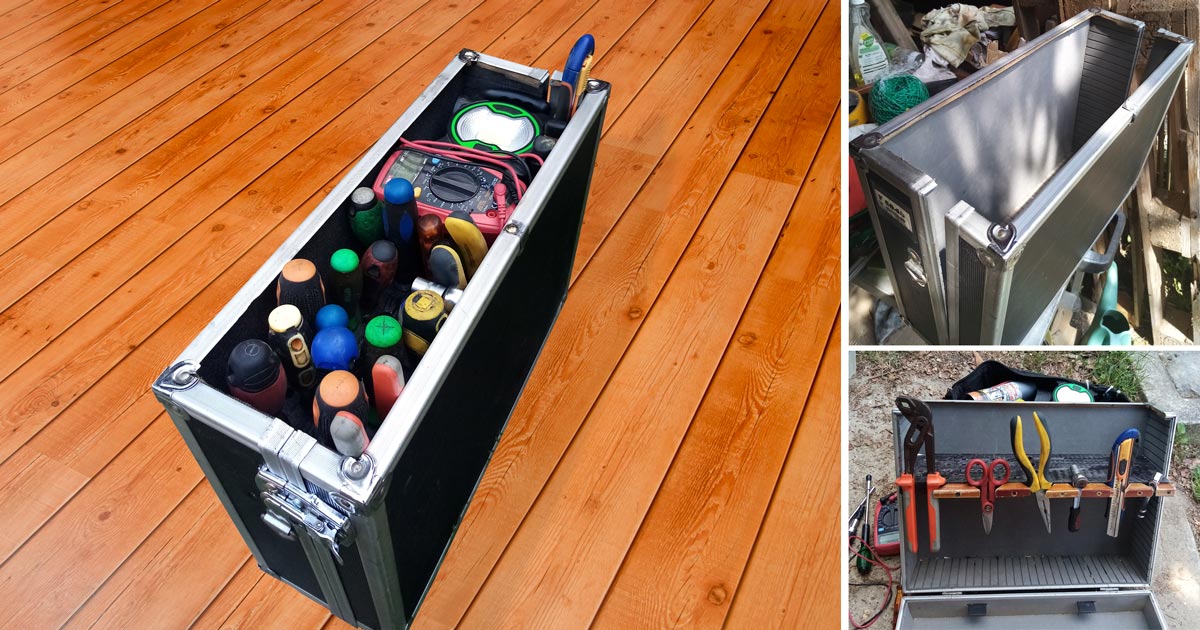
By removing the front side, we insert a small board where the most frequently used tools are fitted and supported, so they can be grabbed even without opening the case; the depth at which to fix it should be calibrated to the longest screwdriver handle, ensuring it protrudes just slightly from the opening.
Find Original, High-end Home Decor that spark conversation at Grand Goldman Shop.

Next to the screwdrivers, there’s useful space for organizing frequently used tools and products like a tester, a flashlight, or a can of lubricant. The rest of the internal volume of the DIY tool box is organized accordingly to store other accessories—and only to access these do you need to open the case, for which the snap hooks removed from the front are fixed to the sides for closure.
Materials and Tools Needed
- A rigid suitcase (wood structure with plastic laminate and aluminum profiles)
- Screwdrivers and tools (check out our home improvement collection for quality options)
- Jigsaw
- Sandpaper or file
- Measuring tape
- Small wooden board (approx. 1/4 inch thick)
- Strong adhesive or screws
- Optional: tester, flashlight, lubricant spray—find these in our garden supplies or home improvement categories
Step-by-Step Instructions
1. Recover the Suitcase
Start with a rigid suitcase—wood structure covered with plastic laminate and reinforced with aluminum profiles. If you need a new one, browse our storage benches for similar sturdy options.
2. Disassemble Closures and Handle
Remove the closures and handle. Cut away the two halves of the closing side by running the jigsaw blade flush with the outer aluminum profiles; the two profiles that meet in the center must be eliminated. Sand the inner edges of the remaining profiles smooth.
3. Prepare the Tool Board
Measure the interior width of the case and cut a wooden board to fit snugly. Drill holes or cut slots to hold your most-used tools—screwdrivers, pliers, etc. For precision work, consider a desk or work surface from our collection as a sturdy base.
4. Install the Board
Fix the board inside the case at a depth that allows the longest tool (e.g., a screwdriver) to protrude slightly from the opening. Use strong adhesive or screws to secure it in place.
5. Organize Side Space
Use the space beside the screwdrivers for frequently used items like a tester, flashlight, or lubricant. Keep your workspace tidy with bookcases and shelving units for additional storage.
6. Reattach Closures
Remove the snap hooks from the front and fix them to the sides of the case for closing. This way, you only need to open the case for less frequently used accessories.

Tips for Customization
- Add a lighting solution like a small LED strip inside the case for better visibility.
- Use rugs or foam padding to protect delicate tools.
- For outdoor projects, pair your tool box with outdoor patio furniture for a complete workshop setup.
FAQ
Q: Can I use any suitcase for this project?
A: Yes, but a rigid case with aluminum profiles works best for durability. For similar sturdy options, check our storage benches.
Q: How do I prevent tools from falling out?
A: Ensure the board is snug and tools fit tightly. You can also add elastic straps or foam inserts—find supplies in our home improvement collection.
Q: What if my tools are too long?
A: Adjust the board depth so the longest tool protrudes slightly. For very long tools, consider a shed or larger storage solution.
Q: Can I use this for gardening tools?
A: Absolutely! Modify the board for pruners, trowels, and more. Pair with our garden supplies for a complete kit.
Q: How long does this project take?
A: About one day, including drying time for adhesive. For faster results, use screws instead.
Browse Grand Goldman Home Decor
Discover unique craftsmanship home decor and furniture at the Grand Goldman Shop.
 trending gym mats ideas for home |
best gym mats for small spaces |
affordable gym mats under budget |
stylish table tennis tables for modern homes |
affordable table tennis tables on a budget |
best rated table tennis tables this season |
trending home improvement ideas for home |
best home improvement for small spaces |
affordable home improvement under budget |
best deck boxes patio storage for decluttering bedroom |
affordable deck boxes patio storage for garage organization |
premium deck boxes patio storage for entryway mudroom |
espresso wall mounted coat rack |
wooden entryway storage shelf |
4 dual hook entry organizer |
3 in 1 entryway hall tree |
storage bench with coat hooks |
black shoe storage organizer |
grey power reclining sofa set |
3 piece leather recliner couch |
modern sectional reclining sofa |
modern executive computer desk |
wooden storage cabinet desk |
large office desk with doors |
trending gym mats ideas for home |
best gym mats for small spaces |
affordable gym mats under budget |
stylish table tennis tables for modern homes |
affordable table tennis tables on a budget |
best rated table tennis tables this season |
trending home improvement ideas for home |
best home improvement for small spaces |
affordable home improvement under budget |
best deck boxes patio storage for decluttering bedroom |
affordable deck boxes patio storage for garage organization |
premium deck boxes patio storage for entryway mudroom |
espresso wall mounted coat rack |
wooden entryway storage shelf |
4 dual hook entry organizer |
3 in 1 entryway hall tree |
storage bench with coat hooks |
black shoe storage organizer |
grey power reclining sofa set |
3 piece leather recliner couch |
modern sectional reclining sofa |
modern executive computer desk |
wooden storage cabinet desk |
large office desk with doors |
Best Products We’ve Tested and Rated

Our testing team has hands-on reviews of where is it hide spy camera house, antitheft systems cars, guard dog breeds protect home, search camouflaged safe home, and antibumping locks comparison security guide. Every option below was compared across price, build quality, and real-world performance, with honest pros and cons. We update these guides regularly as new models arrive, so the recommendations stay current.
Our testing team has hands-on reviews of ip camera or cctv camera which one choose each case, what security systems hotels, locks on market electric scooters, gadgets prevent being robbed on street, and security systems protect home. Every option below was compared across price, build quality, and real-world performance, with honest pros and cons. We update these guides regularly as new models arrive, so the recommendations stay current.
Browse the Shop
 Acacia frida deluxe solid wood bed frame |
Bedroom bench |
Bed chest drawers |
Lingerie dresser |
Frame base |
Mirror with jewelry storage |
30 Bathroom Vanity |
Memory foam queen mattress |
Mattresses for back pain |
Nightstand set of 2 |
Grand Goldman Shop |
Civil Lawyer
Deutschland Trikot WM 2026
Acacia frida deluxe solid wood bed frame |
Bedroom bench |
Bed chest drawers |
Lingerie dresser |
Frame base |
Mirror with jewelry storage |
30 Bathroom Vanity |
Memory foam queen mattress |
Mattresses for back pain |
Nightstand set of 2 |
Grand Goldman Shop |
Civil Lawyer
Deutschland Trikot WM 2026







