

If you're looking to upgrade your garage, basement, or utility room, a self-leveling floor is a smart and durable solution. This DIY-friendly technique creates a smooth, even surface that’s perfect for workshops, storage areas, or even as a base for home improvement projects. Below, we walk you through the process step by step, from removing the old floor to pouring the self-leveling compound.
Removing the Old Floor
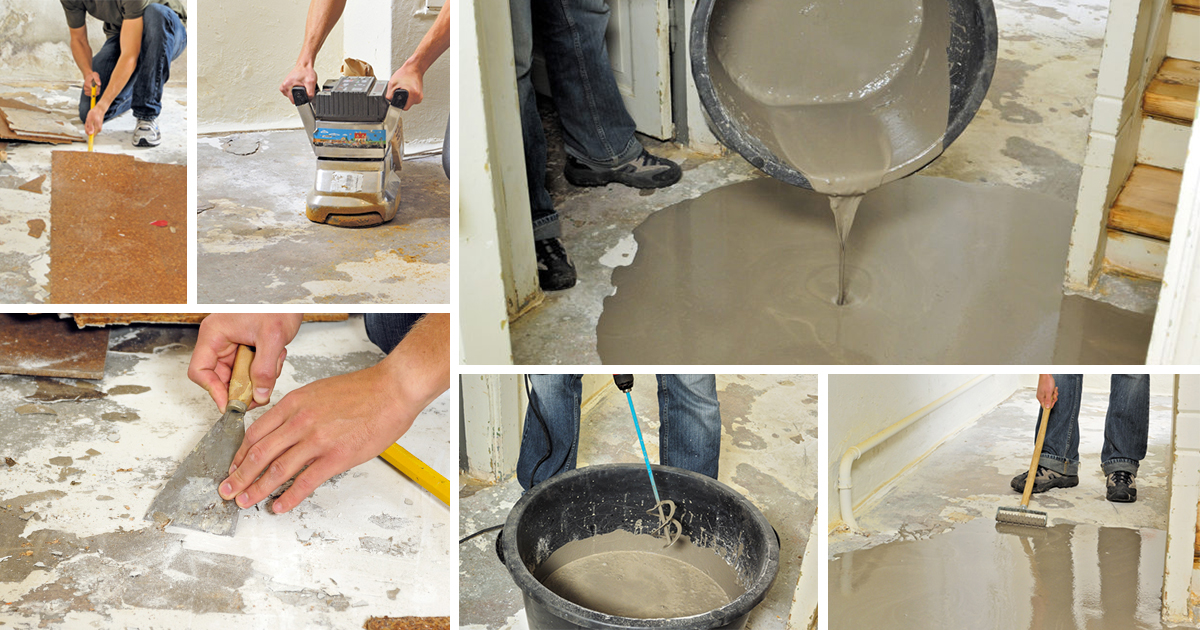
Before you can pour your new self-leveling floor, you need to remove the existing flooring. Flexible materials like carpet, PVC, or cork tiles are usually easy to take up. Use a pry bar or crowbar to slip under the tiles and lift them off. Wear gloves to protect your hands as you pull them away.
Find Bleeding Edge Supplements at Scandalous Prices on iHerb.

Even with careful work, it’s nearly impossible to remove every bit of adhesive or small debris. You’ll need to scrape away leftover glue and cork pieces with a putty knife. For stubborn glue, a heat gun softens it, making removal much easier. Don’t forget to wear a dust mask and ear protection when using power tools.
Finish the cleaning process with a floor sander fitted with coarse-grit sandpaper (40 or 60 grit). These machines are powerful and can be a handful, so take your time. Some models have long handles so you can work standing up. This step ensures a clean, rough surface that helps the new garden supplies and other materials bond well.
Pouring the Self-Leveling Compound
Self-leveling compound—often called “leveler”—comes in 25 kg bags. To prepare, empty the bag into a large bucket with about 8 liters of clean water. Mix thoroughly at low speed (around 500 rpm) until you get a smooth, fluid paste. Let it rest for 5 minutes, then pour a small amount onto the floor.
Spread this first layer evenly, scraping it down to create a bonding coat. After a few minutes, pour the rest of the mixture in a strip along the longest centerline of the room. If the compound has the right consistency, it will spread out on its own, forming a perfectly level layer. The thickness depends on how much you use—typically 1.5 kg per square meter per millimeter of thickness. The floor is walkable after 2–3 hours.
Tips for a Perfect Self-Leveling Floor
- Always clean the subfloor thoroughly before pouring.
- Use a primer designed for self-leveling compounds to improve adhesion.
- Mix only as much as you can pour within 10–15 minutes.
- Work in small sections if the room is large.
- Keep the room temperature stable during curing.
Frequently Asked Questions
How long does a self-leveling floor last?
With proper installation and maintenance, a self-leveling floor can last 10–20 years. It’s highly durable and resistant to cracking when applied correctly. For long-lasting results, pair it with quality outdoor patio furniture and other furnishings that won’t damage the surface.
Can I install self-leveling compound over tiles?
Yes, but the tiles must be clean, sound, and free of wax or sealants. You’ll need to scuff the surface with sandpaper and apply a bonding primer first. This works well for lighting upgrades in basements or garages.
Do I need to use a primer?
Yes, a primer is essential to prevent the compound from drying too quickly and to ensure a strong bond. Skipping this step can lead to peeling or cracking. It’s a small step that makes a big difference in kitchen islands & carts and other high-traffic areas.

What thickness should I pour?
For most residential garages and utility rooms, a thickness of 3–5 mm is sufficient. For heavier loads or uneven floors, you may need up to 10 mm. Always check the manufacturer’s instructions for your specific dining tables and other furniture placement needs.
Can I paint or seal a self-leveling floor?
Absolutely. Once cured, you can apply epoxy paint, polyurethane sealant, or floor paint. This adds color, gloss, and extra protection. It’s a great way to match your sofas and other decor.
Similar Projects
If you enjoyed this guide, you might also like our article on beds and other furniture assembly tips. For more outdoor projects, check out our bathroom vanities collection or browse outdoor decor for finishing touches.
Looking for more inspiration? Explore our wall decor, rugs, and curtains to complete your space. For storage solutions, check out storage benches and bookcases & shelving units.
Browse Grand Goldman Home Decor
Discover unique craftsmanship home decor and furniture at the Grand Goldman Shop.
 best outdoor decor for entertaining guests |
affordable outdoor decor for patio relaxation |
premium outdoor decor for al fresco dining |
best sheds for garden tool organization |
affordable sheds for backyard workspace |
premium sheds for lawn equipment storage |
trending water fountains ideas for home |
best water fountains for small spaces |
affordable water fountains under budget |
trending statues sculptures ideas for home |
best statues sculptures for small spaces |
affordable statues sculptures under budget |
espresso wall mounted coat rack |
wooden entryway storage shelf |
4 dual hook entry organizer |
3 in 1 entryway hall tree |
storage bench with coat hooks |
black shoe storage organizer |
grey power reclining sofa set |
3 piece leather recliner couch |
modern sectional reclining sofa |
modern executive computer desk |
wooden storage cabinet desk |
large office desk with doors |
best outdoor decor for entertaining guests |
affordable outdoor decor for patio relaxation |
premium outdoor decor for al fresco dining |
best sheds for garden tool organization |
affordable sheds for backyard workspace |
premium sheds for lawn equipment storage |
trending water fountains ideas for home |
best water fountains for small spaces |
affordable water fountains under budget |
trending statues sculptures ideas for home |
best statues sculptures for small spaces |
affordable statues sculptures under budget |
espresso wall mounted coat rack |
wooden entryway storage shelf |
4 dual hook entry organizer |
3 in 1 entryway hall tree |
storage bench with coat hooks |
black shoe storage organizer |
grey power reclining sofa set |
3 piece leather recliner couch |
modern sectional reclining sofa |
modern executive computer desk |
wooden storage cabinet desk |
large office desk with doors |
Best Products We’ve Tested and Rated

Our testing team has hands-on reviews of gaming headsets under, golf drivers, toddler toothbrush, shoes neuropathy, and electric tankless water heater. Every option below was compared across price, build quality, and real-world performance, with honest pros and cons. We update these guides regularly as new models arrive, so the recommendations stay current.
Our testing team has hands-on reviews of organic coffee, tankless water heater, shoes flat feet, iron clothes, and digital radio off roading. Every option below was compared across price, build quality, and real-world performance, with honest pros and cons. We update these guides regularly as new models arrive, so the recommendations stay current.
Browse the Shop
 Acacia frida deluxe solid wood bed frame |
Bedroom bench |
Bed chest drawers |
Lingerie dresser |
Frame base |
Mirror with jewelry storage |
30 Bathroom Vanity |
Memory foam queen mattress |
Mattresses for back pain |
Nightstand set of 2 |
Grand Goldman Shop |
Civil Lawyer
Deutschland Trikot WM 2026
Acacia frida deluxe solid wood bed frame |
Bedroom bench |
Bed chest drawers |
Lingerie dresser |
Frame base |
Mirror with jewelry storage |
30 Bathroom Vanity |
Memory foam queen mattress |
Mattresses for back pain |
Nightstand set of 2 |
Grand Goldman Shop |
Civil Lawyer
Deutschland Trikot WM 2026







