
A walk-in shower tray requires a stable support, a well-positioned drain, correct slope toward the drain trap, continuous waterproofing, and careful perimeter sealing. The installation also works in renovations, provided that measurements, leveling, and final testing are carried out with precision.
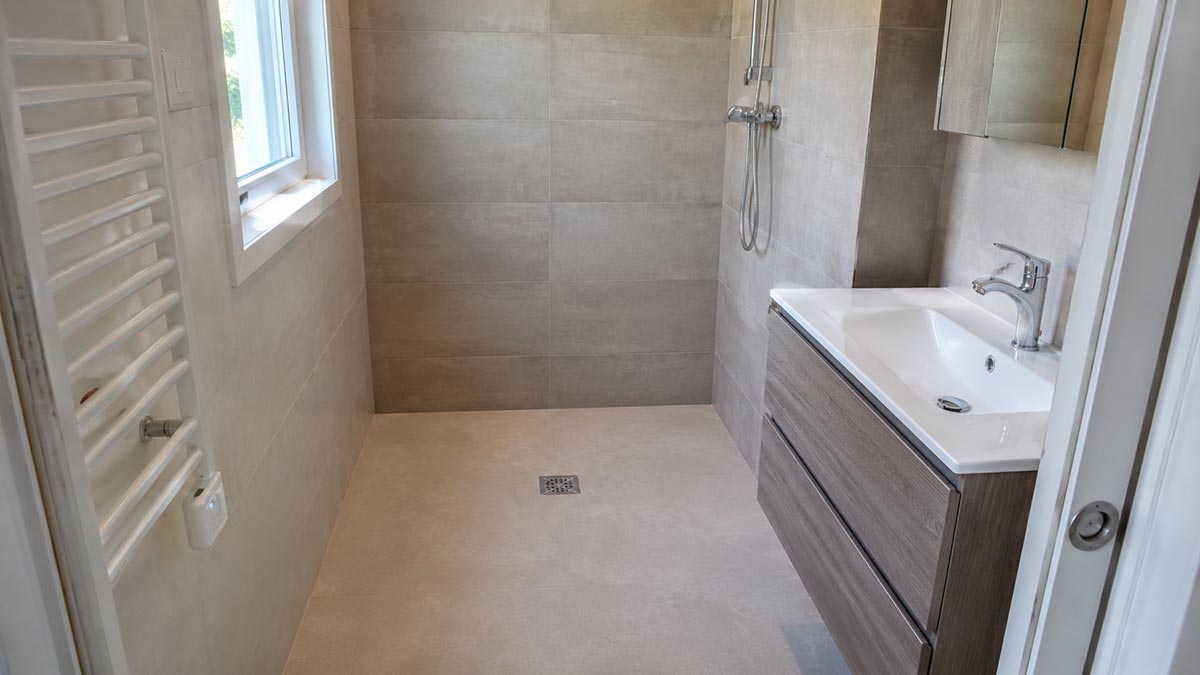
The walk-in shower tray offers aesthetic continuity and easy access, but it requires technically correct installation.
Find Bleeding Edge Supplements at Scandalous Prices on iHerb.

| Detail | Information |
|---|---|
| Necessary Materials | Shower tray, drain trap, cement mortar or high-adhesion tile adhesive, liquid membrane or waterproofing membrane, butyl tape or joint band, anti-mold silicone, adjustable support feet if needed |
| Essential Tools | Spirit level, tape measure, notched trowel, float, roller or brush, silicone gun, bucket, cutter, clean cloth |
| Estimated Time | 1 working day plus drying times for waterproofing, adhesive, and sealant |
| Difficulty — 1-5 | 4/5: requires precision on levels, slope, waterproofing, and drain connection |
| Estimated Cost | Medium-variable: depends on tray size, support type, drain trap, membrane, and final covering |
When to Choose a Walk-In Shower Tray
A walk-in shower tray is ideal for modern bathrooms, small spaces, and renovation projects where you want a continuous, accessible, and easy-to-clean surface. For related home improvement ideas, check out our curated collections.
However, installation requires more attention than a traditional raised tray. The key factor is the relationship between the finished floor level, tray thickness, drain trap position, and available space in the screed.
A well-designed system allows you to place the shower area in different spots than the original layout, provided the drain maintains an effective and inspectable slope.
Materials and Components Needed
Before starting, it's a good idea to prepare all materials. You'll need a shower tray, drain trap, cement mortar or high-adhesion tile adhesive, liquid waterproofing membrane or sheet membrane, butyl tape for joints, anti-mold silicone, and adjustable support feet if your tray requires them. For a complete bathroom renovation, browse our vanities and storage solutions.
Preparing the Substrate and Checking Levels
The substrate must be solid, clean, and dry. Use a spirit level to check that the floor is perfectly flat. If necessary, apply a self-leveling compound to correct any unevenness. The finished floor height must account for the tray thickness, adhesive layer, and final covering (tiles, resin, or decking). For garden supplies and outdoor projects, visit our dedicated section.
Slope Toward the Drain Trap
The drain must have a minimum slope of 1-2% toward the trap. This ensures water flows freely without pooling. Use a level to verify the slope during installation. A proper slope is crucial for preventing standing water and mold growth. For lighting solutions to complement your bathroom, explore our collection.
Waterproofing: The Step That Prevents Leaks
Apply a continuous waterproofing membrane over the entire shower area, extending at least 20 cm up the walls. Use a liquid membrane or sheet membrane, and reinforce all corners and joints with butyl tape or joint band. Allow the membrane to dry completely before proceeding. For wall decor ideas, check out our selection.

Installing the Shower Tray
Place the tray on the prepared substrate, using adjustable feet if needed to achieve the correct height and slope. Ensure the tray is level and the drain connects properly to the trap. Apply a layer of mortar or adhesive under the tray for full support. For outdoor patio furniture, browse our latest arrivals.
Final Covering: Tiles, Resin, or Decking
Once the tray is set, apply the final covering. Tiles are a popular choice for their durability and water resistance. Resin coatings offer a seamless look, while wooden decking provides a warm, natural feel. Ensure the covering is compatible with the waterproofing system. For rugs to add comfort, explore our collection.
Perimeter Sealing and Finishing
Seal all gaps between the tray and walls with anti-mold silicone. Apply the silicone in a continuous bead and smooth it with a wet finger or tool. Allow the sealant to cure fully before using the shower. For curtains to complete your bathroom, check out our options.
Testing: Check the Seal Before Using the Shower
Before regular use, perform a water test. Pour a bucket of water down the drain and check for leaks around the tray, joints, and seals. Also, inspect the waterproofing membrane for any damage. For mirrors to enhance your bathroom, visit our collection.
Expert Tips
- Always use a flexible adhesive and grout for tiled showers to accommodate minor movements.
- Install a linear drain for a modern look and efficient water drainage.
- Consider a heated floor under the tray for added comfort.
- Use a shower screen or curtain to contain splashes.
Common Mistakes to Avoid
- Insufficient slope toward the drain, leading to standing water.
- Poor waterproofing at corners and joints, causing leaks.
- Using non-waterproof materials for the substrate or covering.
- Not allowing adequate drying time for sealants and membranes.
Frequently Asked Questions
Can I install a walk-in shower tray over an existing floor?
Yes, but you must ensure the substrate is solid and level. You may need to raise the floor or use a low-profile tray. For storage benches and other solutions, browse our collection.
What is the best waterproofing method for a walk-in shower?
A liquid-applied membrane is effective for complex shapes, while sheet membranes offer consistent thickness. Both work well when applied correctly.
How long does the installation take?
Allow one day for installation plus drying times for adhesives, waterproofing, and sealants. Total time can be 2-3 days.
Can I use any type of tile on a walk-in shower tray?
Use tiles with low water absorption (porcelain or ceramic) and ensure they are suitable for wet areas. For kitchen islands and carts, explore our selection.
Do I need a professional to install a walk-in shower tray?
While DIY is possible, professional installation is recommended for complex projects to ensure proper waterproofing and drainage.
Browse Grand Goldman Home Decor
Discover unique craftsmanship home decor and furniture at the Grand Goldman Shop.
 stylish desks work surfaces for modern homes |
affordable desks work surfaces on a budget |
best rated desks work surfaces this season |
best office chairs for home workspace |
affordable office chairs for small home office |
premium office chairs for corner desk setup |
best file cabinets storage cabinets for decluttering bedroom |
affordable file cabinets storage cabinets for garage organization |
premium file cabinets storage cabinets for entryway mudroom |
best safes decor for every home |
stylish safes accessories online |
affordable safes for any room |
espresso wall mounted coat rack |
wooden entryway storage shelf |
4 dual hook entry organizer |
3 in 1 entryway hall tree |
storage bench with coat hooks |
black shoe storage organizer |
grey power reclining sofa set |
3 piece leather recliner couch |
modern sectional reclining sofa |
modern executive computer desk |
wooden storage cabinet desk |
large office desk with doors |
stylish desks work surfaces for modern homes |
affordable desks work surfaces on a budget |
best rated desks work surfaces this season |
best office chairs for home workspace |
affordable office chairs for small home office |
premium office chairs for corner desk setup |
best file cabinets storage cabinets for decluttering bedroom |
affordable file cabinets storage cabinets for garage organization |
premium file cabinets storage cabinets for entryway mudroom |
best safes decor for every home |
stylish safes accessories online |
affordable safes for any room |
espresso wall mounted coat rack |
wooden entryway storage shelf |
4 dual hook entry organizer |
3 in 1 entryway hall tree |
storage bench with coat hooks |
black shoe storage organizer |
grey power reclining sofa set |
3 piece leather recliner couch |
modern sectional reclining sofa |
modern executive computer desk |
wooden storage cabinet desk |
large office desk with doors |
Best Products We’ve Tested and Rated

Our testing team has hands-on reviews of pickleball equipment beginners paddles gear, breakfast champions morning meals fuel day, wimbledon awards player epic matches drama, 35mm rangefinder, and mat garage. Every option below was compared across price, build quality, and real-world performance, with honest pros and cons. We update these guides regularly as new models arrive, so the recommendations stay current.
Our testing team has hands-on reviews of gloves arthritic hands, gifts men, gloves on amazon, wedges beginners high handicappers, and golf pants. Every option below was compared across price, build quality, and real-world performance, with honest pros and cons. We update these guides regularly as new models arrive, so the recommendations stay current.
Browse the Shop
 Acacia frida deluxe solid wood bed frame |
Bedroom bench |
Bed chest drawers |
Lingerie dresser |
Frame base |
Mirror with jewelry storage |
30 Bathroom Vanity |
Memory foam queen mattress |
Mattresses for back pain |
Nightstand set of 2 |
Grand Goldman Shop |
Civil Lawyer
Deutschland Trikot WM 2026
Acacia frida deluxe solid wood bed frame |
Bedroom bench |
Bed chest drawers |
Lingerie dresser |
Frame base |
Mirror with jewelry storage |
30 Bathroom Vanity |
Memory foam queen mattress |
Mattresses for back pain |
Nightstand set of 2 |
Grand Goldman Shop |
Civil Lawyer
Deutschland Trikot WM 2026







