

Building custom ceiling-suspended shelves lets you make the most of the empty vertical space in a room when your walls are already packed with furniture, cabinets, artwork, or shelving. All you need are wooden shelves, threaded rods, the right anchors for your ceiling type, nuts, washers, and precise assembly — because stability depends above all on accurate drilling, strong fixings, and careful leveling.
| What to Check | Practical Tip | Common Mistake to Avoid |
|---|---|---|
| Ceiling type | Must be suitable for fixing with load-rated anchors | Using generic anchors without knowing the ceiling structure |
| Shelf weight | Evaluate the weight of the shelves plus everything you’ll place on them | Loading shelves without considering total load capacity |
| Drill hole alignment | Holes in the shelves must align perfectly with holes in the ceiling | Drilling “by eye” without a template |
| Threaded rods | Must pass smoothly through the wood holes | Using holes that are too tight or angled |
| Leveling | Adjust with nuts, washers, and cable tensioners | Tightening everything immediately without a final level check |
| Safety | Work with a stable ladder, safety glasses, and dust extraction | Drilling overhead without protection |
When to Build Custom Ceiling-Suspended Shelves
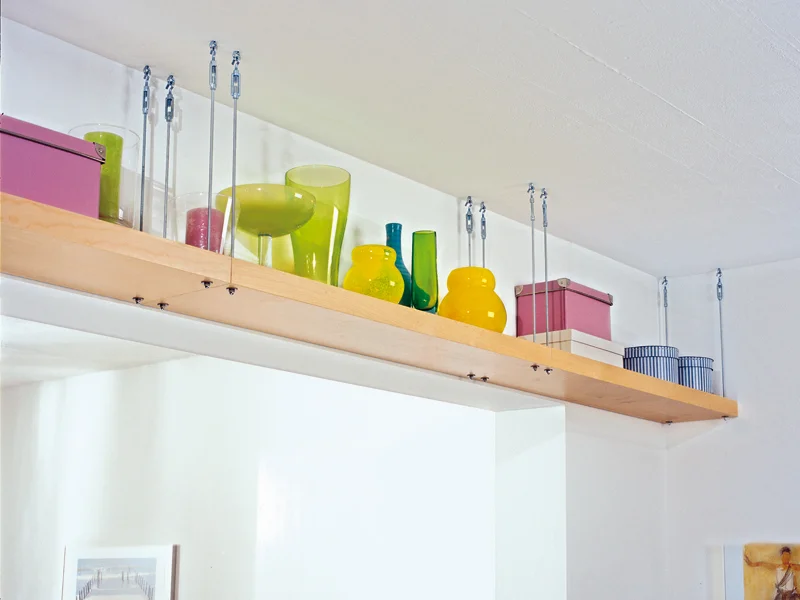
Ceiling-suspended shelves are ideal when your wall space is already taken up by bookcases and shelving units, wall cabinets, paintings, or other wall-mounted items — but there’s still usable volume near the ceiling. They’re perfect for storing lightweight objects, decorative pieces, tidy containers, or materials you don’t need to reach every day.
Find Original, High-end Home Decor that spark conversation at Grand Goldman Shop.

The biggest advantage is the ability to build shelves in any custom length and shape to fit your room. However, this project demands precision: a suspended shelf works differently from a wall-mounted one and transfers all its weight directly to the ceiling anchor points.
Materials & Tools for Ceiling-Suspended Shelves
- Wooden boards (solid wood or plywood) for the shelves — sanded and finished as desired
- Threaded steel rods (M8 or M10 recommended)
- Ceiling anchors rated for the total load (toggle bolts, expansion anchors, or chemical anchors for concrete; special anchors for hollow ceilings)
- Nuts, washers, and lock washers for each rod
- Drill with masonry bits (for concrete ceilings) or wood bits
- Spirit level (at least 1 m long)
- Measuring tape, pencil, masking tape
- Safety glasses, dust mask, and a sturdy ladder
For a professional finish, consider pairing your new shelves with stylish ceiling lighting to highlight your display.
Before Drilling: Essential Checks
- Ceiling type: Is it concrete, wood joists, or a hollow ceiling? Each requires different anchors. For concrete, use expansion anchors or chemical anchors. For hollow ceilings, use toggle bolts or spring anchors rated for the weight.
- Load capacity: Calculate the total weight of the shelves plus the items you’ll place on them. Distribute the load across multiple anchor points.
- Utility lines: Use a stud finder or cable detector to avoid drilling into electrical wires or pipes in the ceiling.
- Alignment: Plan the exact position of each shelf and the corresponding ceiling holes. Use a laser level or chalk line for precision.
Step-by-Step Procedure
Marking and Drilling the Shelves
Lay your wooden boards on a flat surface. Mark the positions for the holes that will hold the threaded rods. Typically, you’ll need at least two rods per shelf — one near each end. For longer shelves, add a third rod in the center. Drill the holes slightly larger than the rod diameter (e.g., 10 mm for an M8 rod) to allow for easy threading and adjustment. Sand the edges smooth.
Ceiling Suspension
Step 1 — Transfer the Holes to the Ceiling
Hold the shelf in its final position (or use a template) and mark the ceiling through each hole. Double-check the alignment with a spirit level. Drill the ceiling holes to the depth and diameter required by your chosen anchors. Insert the anchors according to the manufacturer’s instructions.
Step 2 — Attach the Threaded Rods to the Shelf
Thread a nut and washer onto each rod, then insert the rod through the shelf hole from above. Add another washer and nut underneath the shelf. Tighten the top nut to lock the rod in place, but leave the bottom nut loose for now — you’ll adjust it later for leveling.
Step 3 — Connect Multiple Shelves (Optional)
If you’re building a multi-tier system, you can use longer rods that pass through several shelves. Space the shelves with additional nuts and washers above and below each shelf. This creates a clean, continuous vertical line.
Step 4 — Hang and Level
Lift the shelf assembly and insert the top ends of the rods into the ceiling anchors. Tighten the nuts at the ceiling to hold the rods in place. Use a spirit level to check the shelf. Adjust the bottom nuts under the shelf to raise or lower each corner until the shelf is perfectly horizontal. Once level, tighten all nuts securely with a wrench.

Expert Tips
- Use a laser level to mark ceiling holes — it’s far more accurate than measuring tape alone.
- For a cleaner look, countersink the nuts and washers into the top surface of the shelf and cover them with wood plugs.
- If your ceiling is sloped, you can still install suspended shelves by cutting the rods to different lengths.
- Consider adding wall decor or mirrors on nearby walls to balance the visual weight of the shelves.
Safety & When to Call a Professional
Working overhead with power tools always carries risks. Always wear safety glasses and a dust mask. Use a stable ladder — never a chair or box. If you’re unsure about your ceiling’s structure (e.g., old plaster, suspended ceiling, or unknown joist spacing), consult a professional. For very heavy loads or complex multi-shelf systems, hiring a carpenter or handyman is money well spent.
For other home improvement projects, check out our home improvement collection for tools and supplies.
Final Checks & Maintenance
- After installation, test the stability by gently pushing each shelf. There should be no wobble.
- Check all nuts and bolts after a week — wood can compress slightly, loosening the connections.
- Dust the shelves regularly. If you store heavy items, periodically inspect the ceiling anchors for any signs of movement.
- To refresh the look, consider pairing your shelves with new curtains or rugs to complement the room’s style.
Frequently Asked Questions
1. Can I install ceiling-suspended shelves in a rental apartment?
Yes, but you’ll need to patch and paint the holes when you move out. Use toggle bolts for hollow ceilings — they leave only small holes. Always get your landlord’s permission first.
2. What is the maximum weight these shelves can hold?
It depends on your ceiling anchors and the number of rods. A typical M8 rod with a concrete anchor can support 50–100 kg per anchor. Distribute the load evenly and never exceed the anchor’s rated capacity.
3. Can I use these shelves in a bathroom or kitchen?
Yes, but use moisture-resistant wood (like teak or sealed plywood) and stainless steel rods and hardware to prevent rust. In kitchens, avoid placing shelves directly over cooking zones.
4. How do I cut threaded rods to length?
Use a hacksaw or an angle grinder. After cutting, file the end to remove sharp burrs and add a drop of oil to help threading the nut.
5. Can I install shelves on a sloped or vaulted ceiling?
Absolutely. Cut each rod to the exact length needed for that position. Use a laser level to ensure the shelf remains horizontal. It’s a bit more work, but the result is stunning.
For more DIY inspiration, browse our outdoor decor and garden supplies collections — perfect for extending your shelving projects to the patio or balcony.
Browse Grand Goldman Home Decor
Discover unique craftsmanship home decor and furniture at the Grand Goldman Shop.
 trending gym mats ideas for home |
best gym mats for small spaces |
affordable gym mats under budget |
stylish table tennis tables for modern homes |
affordable table tennis tables on a budget |
best rated table tennis tables this season |
trending home improvement ideas for home |
best home improvement for small spaces |
affordable home improvement under budget |
best deck boxes patio storage for decluttering bedroom |
affordable deck boxes patio storage for garage organization |
premium deck boxes patio storage for entryway mudroom |
espresso wall mounted coat rack |
wooden entryway storage shelf |
4 dual hook entry organizer |
3 in 1 entryway hall tree |
storage bench with coat hooks |
black shoe storage organizer |
grey power reclining sofa set |
3 piece leather recliner couch |
modern sectional reclining sofa |
modern executive computer desk |
wooden storage cabinet desk |
large office desk with doors |
trending gym mats ideas for home |
best gym mats for small spaces |
affordable gym mats under budget |
stylish table tennis tables for modern homes |
affordable table tennis tables on a budget |
best rated table tennis tables this season |
trending home improvement ideas for home |
best home improvement for small spaces |
affordable home improvement under budget |
best deck boxes patio storage for decluttering bedroom |
affordable deck boxes patio storage for garage organization |
premium deck boxes patio storage for entryway mudroom |
espresso wall mounted coat rack |
wooden entryway storage shelf |
4 dual hook entry organizer |
3 in 1 entryway hall tree |
storage bench with coat hooks |
black shoe storage organizer |
grey power reclining sofa set |
3 piece leather recliner couch |
modern sectional reclining sofa |
modern executive computer desk |
wooden storage cabinet desk |
large office desk with doors |
Best Products We’ve Tested and Rated

Our testing team has hands-on reviews of pickleball equipment beginners paddles gear, breakfast champions morning meals fuel day, wimbledon awards player epic matches drama, 35mm rangefinder, and mat garage. Every option below was compared across price, build quality, and real-world performance, with honest pros and cons. We update these guides regularly as new models arrive, so the recommendations stay current.
Our testing team has hands-on reviews of gloves arthritic hands, gifts men, gloves on amazon, wedges beginners high handicappers, and golf pants. Every option below was compared across price, build quality, and real-world performance, with honest pros and cons. We update these guides regularly as new models arrive, so the recommendations stay current.
Browse the Shop
 Acacia frida deluxe solid wood bed frame |
Bedroom bench |
Bed chest drawers |
Lingerie dresser |
Frame base |
Mirror with jewelry storage |
30 Bathroom Vanity |
Memory foam queen mattress |
Mattresses for back pain |
Nightstand set of 2 |
Grand Goldman Shop |
Civil Lawyer
Deutschland Trikot WM 2026
Acacia frida deluxe solid wood bed frame |
Bedroom bench |
Bed chest drawers |
Lingerie dresser |
Frame base |
Mirror with jewelry storage |
30 Bathroom Vanity |
Memory foam queen mattress |
Mattresses for back pain |
Nightstand set of 2 |
Grand Goldman Shop |
Civil Lawyer
Deutschland Trikot WM 2026







