

Installing a traditional intercom requires a basic electrical system, but we can make our lives even easier by installing a wireless doorbell. With a radio actuator, you can also install a wireless doorbell where one wasn't originally planned, activating one or more chimes and visual indicators (even with multiple devices for a single transmitter). This is useful, for example, for a secondary home entrance, a tavern, an attic room, or a workshop that is out of range of the main doorbell.
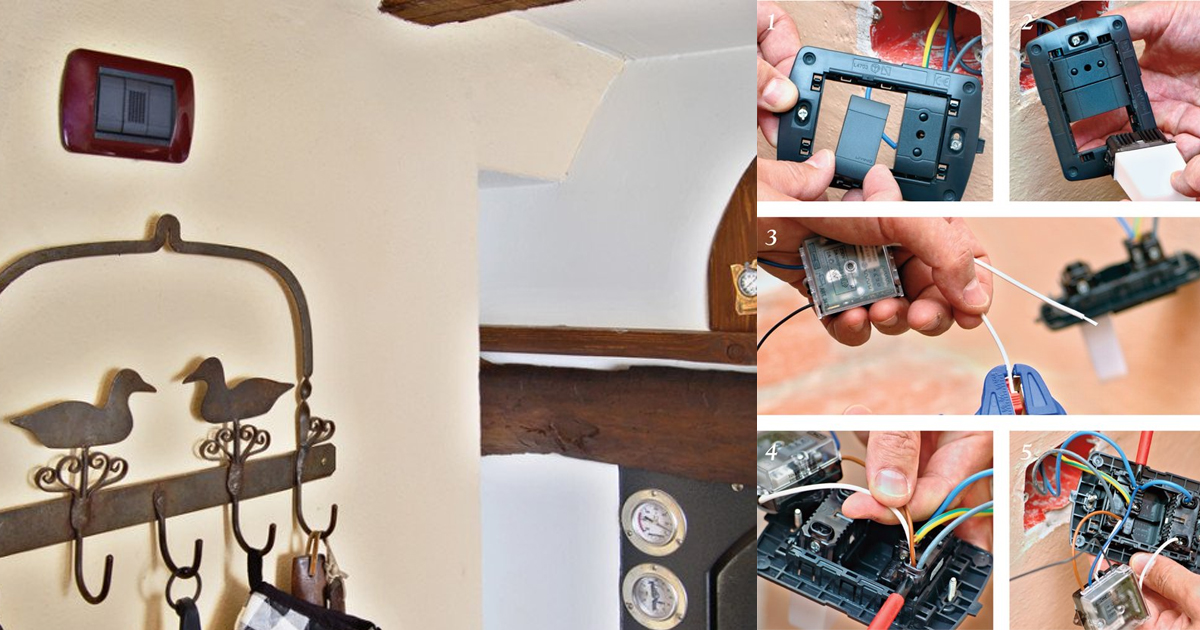
Thanks to the radio system and battery power, the wireless doorbell requires no wires or conduits, so it can be placed anywhere, fixed with two wall plugs or two strips of double-sided tape. The chime, visual indicator, and radio actuator, however, require a 220V mains power supply and must be installed in a junction box where electricity is accessible.
Find Bleeding Edge Supplements at Scandalous Prices on iHerb.

The devices required for installation are: a battery-powered radio button, a radio actuator, a chime, and a flush-mounted visual indicator (one module size), all powered by 220V.
Wireless Doorbell – Installation
For housing the devices, it's best to choose the box of an existing power outlet. After cutting the power from the main electrical panel, move the outlet to one side; then close the empty space in the center with a blanking plate. Insert the visual indicator into the remaining empty space.
Using wire strippers, prepare all the terminals of the radio actuator conductors that need to be connected, plus a wire to make a jumper. The outlet unit has double connection points, so after loosening the terminal screws without removing the existing connectors, insert the additional wires into the slots and tighten the terminals again.
The connections are complete: the small brown and blue wires carry phase and neutral to power the actuator; the blue jumper carries neutral to the visual indicator (or chime); the white wire carries phase to the visual indicator (or chime).
Choosing the Right Tools & Materials
Before starting, gather all necessary components. A reliable wireless doorbell kit from our Home Improvement collection simplifies the process. You'll also need basic electrical tools like wire strippers and screwdrivers.
Step 1: Prepare the Junction Box
Safety first: turn off the main power. Remove the existing outlet from its box. Carefully reposition the outlet to one side of the box to free up space. Install a blanking plate over the now-empty central area of the box.
Step 2: Install the Visual Indicator
Snap the flush-mounted visual indicator into the newly created empty space in the junction box. Ensure it fits securely.

Step 3: Wire the Radio Actuator
Strip about 8mm of insulation from the ends of the actuator's wires and your jumper wire. Loosen the terminal screws on the outlet (do not remove existing wires). Insert the new wires: brown (phase) and blue (neutral) to power the actuator. Then, connect the blue jumper from the actuator's neutral terminal to the visual indicator's neutral terminal. Finally, connect the white wire from the actuator's switched output to the visual indicator's phase terminal. Tighten all screws.
Step 4: Mount the Battery-Powered Button
The button can be placed anywhere, as it communicates wirelessly. Use the included double-sided tape for a renter-friendly installation or screw it in place for a permanent fix. For outdoor use, ensure it's weather-resistant. Pair it with stylish outdoor decor from our collection for a cohesive look.
Step 5: Test the System
Restore power at the main panel. Press the wireless button. The chime and visual indicator should activate. If not, check all connections and the button's battery. For a more powerful chime, consider adding a matching outdoor light fixture that integrates with your doorbell system.
Frequently Asked Questions (FAQ)
Can I install a wireless doorbell myself?
Yes, this is a beginner-friendly DIY project. The button is battery-powered and requires no wiring. The receiver plugs into a standard outlet or can be hardwired if you choose a wired model. Always turn off power when working with electrical connections.
What is the range of a wireless doorbell?
Most wireless doorbells have a range of 100 to 300 feet in open air. Walls and metal objects can reduce the range. For larger homes or workshops, look for models with extended range or multiple receivers. You can place a second receiver in a garden shed or workshop to ensure you never miss a visitor.
Do wireless doorbells work during a power outage?
Battery-powered push buttons will still work, but receivers that plug into the wall will not. Some models have battery backup for the receiver. For peace of mind, choose a model with a long-lasting battery for the receiver or a fully battery-powered system.
Can I use multiple chimes with one doorbell button?
Yes, most wireless doorbell systems allow you to pair multiple receivers (chimes) with a single transmitter (button). This is perfect for large homes, multi-story buildings, or properties with greenhouses and workshops. Simply follow the manufacturer's instructions to pair additional chimes.
How do I fix a wireless doorbell that isn't working?
- Check the battery: Replace the battery in the push button with a fresh one.
- Reset the connection: Unplug the receiver, remove the button's battery, wait 30 seconds, then reinstall and re-pair them.
- Check the range: Move the button closer to the receiver to test if distance is the issue.
- Inspect for interference: Other wireless devices (Wi-Fi routers, baby monitors) can cause interference. Change the channel on your doorbell if possible.
For a complete upgrade, consider pairing your new doorbell with modern lighting fixtures to enhance your entryway. A well-lit entrance not only improves security but also complements your new doorbell system.
Browse Grand Goldman Home Decor
Discover unique craftsmanship home decor and furniture at the Grand Goldman Shop.
Best Products We’ve Tested and Rated

Our testing team has hands-on reviews of espresso machine coffee truck, truck bed air mattress, gps device truckers, door locks dementia patients, and folding cane. Every option below was compared across price, build quality, and real-world performance, with honest pros and cons. We update these guides regularly as new models arrive, so the recommendations stay current.
Our testing team has hands-on reviews of walking cane seat, recliners neck pain, chairs inc glider, retainer cleaner, and bed rails seniors. Every option below was compared across price, build quality, and real-world performance, with honest pros and cons. We update these guides regularly as new models arrive, so the recommendations stay current.
Browse the Shop
 Acacia frida deluxe solid wood bed frame |
Bedroom bench |
Bed chest drawers |
Lingerie dresser |
Frame base |
Mirror with jewelry storage |
30 Bathroom Vanity |
Memory foam queen mattress |
Mattresses for back pain |
Nightstand set of 2 |
Grand Goldman Shop |
Civil Lawyer
Deutschland Trikot WM 2026
Acacia frida deluxe solid wood bed frame |
Bedroom bench |
Bed chest drawers |
Lingerie dresser |
Frame base |
Mirror with jewelry storage |
30 Bathroom Vanity |
Memory foam queen mattress |
Mattresses for back pain |
Nightstand set of 2 |
Grand Goldman Shop |
Civil Lawyer
Deutschland Trikot WM 2026







