

Creating a large DIY wall clock requires finding a mechanism that can move proportional hands, but the real challenge lies in coming up with a good idea for the clock face itself—without falling into the banal or venturing into extremely demanding work. Werner Varetton found the solution to both problems: by following a repetitive geometric pattern linked to the intersections of rays with other connecting lines between the vertices of an octagon, he noticed that the entire surface could be divided into identically sized rhombuses, one attached to the next.
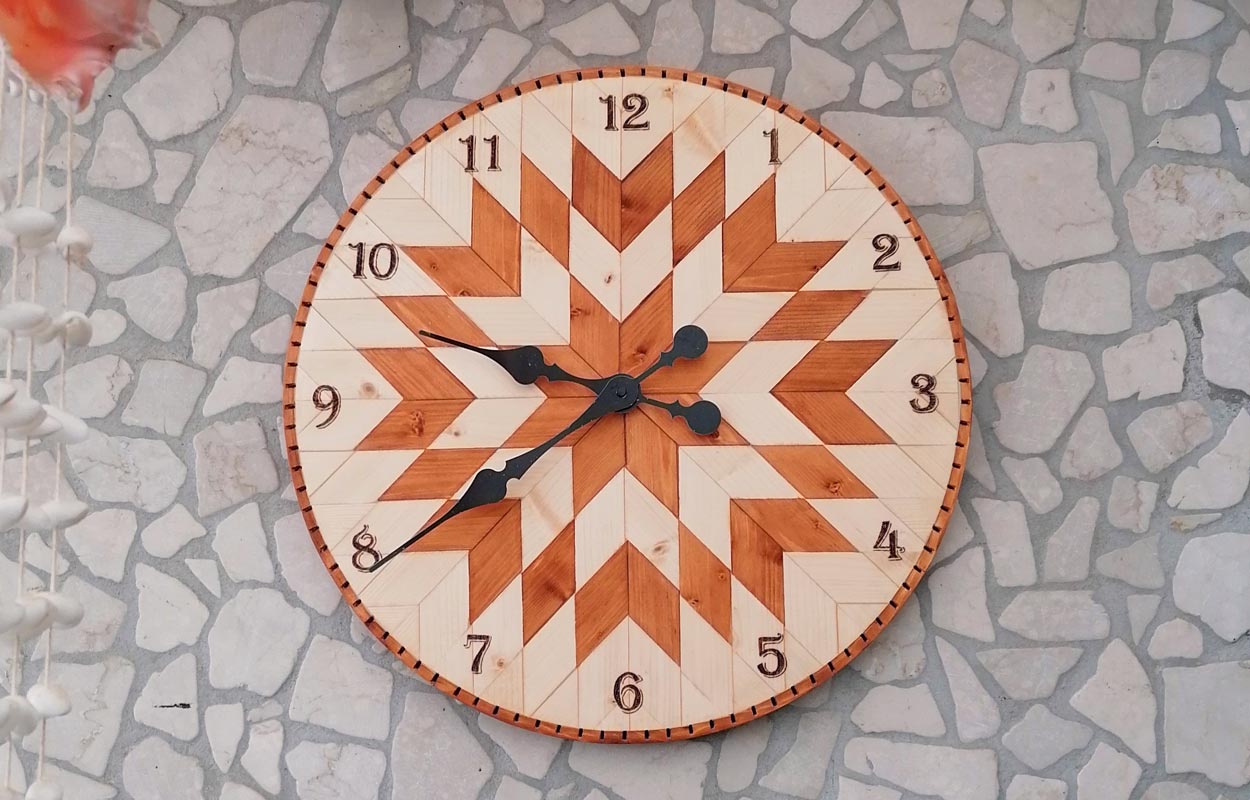
This involved drawing the design to final dimensions, ensuring that the rhombuses could be made from easily available fir strips—in this case, 35 mm wide. The thickness of the strips doesn't matter much, as long as it's around 10 mm. The diamond tiles are cut from strips into 90 mm lengths, trimmed at 45°. These are assembled on a particle board panel, and then the whole thing is cut into a disk with a diameter of 440 mm. To finish the outer edge, a strip is prepared with a series of parallel cuts 15 mm apart on one face, allowing it to be bent and glued around the border.
Find Bleeding Edge Supplements at Scandalous Prices on iHerb.

Time required: 1 day
Materials and Tools
- Fir strips (35 mm wide, 10 mm thick)
- Cherry-colored wood stain
- Particle board panel
- Clock mechanism with large hands
- Wood glue
- Miter saw or miter box
- Compass and pencil
- Pyrography tool (for marking hours)
- Sandpaper
For a project like this, having the right home improvement tools on hand makes all the difference. A quality miter saw ensures precise 45° cuts for your diamond tiles.
Step-by-Step Instructions
1. Draw the Pattern on Paper
Using a compass, draw a large circle (440 mm diameter) and a smaller inner circle (180 mm diameter) on paper. Mark 8 vertices of an imaginary octagon on the small circle, then extend rays from these points to the outer circle to create the diamond grid.
2. Prepare the Strips
Stain some of the fir strips with cherry-colored wood stain before cutting. Using a miter saw set to a 45° angle, cut all strips into 90 mm pieces. You'll need 32 stained tiles and 88 natural ones.
Keep your workspace organized with garden supplies like storage bins for sorting tiles by color.
3. Transfer the Design to the Panel
Following your paper pattern, lightly sketch the design onto the particle board panel, shading only the areas that will receive colored tiles.
4. Assemble the Tiles
Glue each diamond tile onto the panel according to your pattern. Work from the center outward for best alignment. Allow the glue to dry completely.

A sturdy work surface is essential for precise assembly. Consider using a large desk or workbench to keep everything flat and stable.
5. Cut the Clock Face
Once all tiles are glued and dried, cut the entire assembly into a perfect 440 mm diameter disk using a jigsaw or band saw.
6. Create the Edge Banding
Prepare a thin strip of wood with parallel cuts every 15 mm on one face. Soak the strip in warm water for flexibility, then bend it around the disk's edge and glue it in place.
For finishing touches, browse wall decor ideas to complement your new clock.
7. Mark the Hours
Use a pyrography tool to burn the hour numbers onto the tile surface. This creates a permanent, elegant marking that won't fade over time.
8. Install the Mechanism
Drill a center hole for the clock mechanism shaft. Attach the mechanism according to manufacturer instructions, then add the large hands.
Illuminate your creation with lighting that highlights the diamond pattern. A well-placed wall sconce can make the geometric design pop.
Design Variations
- Color scheme: Try different stain colors or paint for a modern look. Match your sofas or existing room palette.
- Size: Adjust the dimensions for smaller or larger clocks. A 600 mm version makes a dramatic statement in a large living room.
- Material: Use hardwood strips like oak or walnut for a premium feel that coordinates with your dining tables.
- Pattern: Experiment with different geometric layouts—hexagons or triangles create entirely different effects.
Display Ideas
This clock works beautifully above a bookcase or as a focal point on a large wall. Pair it with mirrors to reflect light and make the space feel larger. Add rugs with geometric patterns to echo the diamond theme throughout the room.
FAQ
How long does this project take?
About one full day, including drying time for glue and stain. Cutting and assembling the tiles takes the most time—roughly 4-5 hours.
What type of wood is best for the tiles?
Fir is affordable and easy to work with, but pine, oak, or walnut also work well. Choose a wood that matches your TV entertainment furniture for a cohesive look.
Can I use this technique for other projects?
Absolutely! The diamond mosaic technique works for tabletops, kitchen islands, or even nightstands. Scale the pattern to fit any surface.
How do I clean the finished clock?
Dust gently with a soft cloth. For deeper cleaning, use a slightly damp cloth and dry immediately. Avoid harsh chemicals that could damage the wood or pyrography markings.
What if I don't have a pyrography tool?
You can use stencils and paint, wood-burning markers, or even small metal numbers. For a rustic look, consider adding outdoor decor elements like natural twine or driftwood accents.
Outdoor Version
This project can be adapted for outdoor use with weather-resistant materials. Use marine-grade plywood and exterior wood glue. Seal the finished clock with outdoor varnish. Place it in a pergola or on a shed wall for a unique garden timepiece. Add outdoor lighting to make it visible at night.
For comfortable seating nearby, consider outdoor patio furniture that complements your garden aesthetic. A storage bench provides both seating and a place to keep gardening tools.
Browse Grand Goldman Home Decor
Discover unique craftsmanship home decor and furniture at the Grand Goldman Shop.
Best Products We’ve Tested and Rated

Our testing team has hands-on reviews of gaming chairs comfort support serious play, summer jigsaw puzzles fun when its too hot, low priced game camera, game camera money, and sd card game camera. Every option below was compared across price, build quality, and real-world performance, with honest pros and cons. We update these guides regularly as new models arrive, so the recommendations stay current.
Our testing team has hands-on reviews of keyboards under, antivirus software, pc build under, dac pc, and subnet mask. Every option below was compared across price, build quality, and real-world performance, with honest pros and cons. We update these guides regularly as new models arrive, so the recommendations stay current.
Browse the Shop
 Acacia frida deluxe solid wood bed frame |
Bedroom bench |
Bed chest drawers |
Lingerie dresser |
Frame base |
Mirror with jewelry storage |
30 Bathroom Vanity |
Memory foam queen mattress |
Mattresses for back pain |
Nightstand set of 2 |
Grand Goldman Shop |
Civil Lawyer
Deutschland Trikot WM 2026
Acacia frida deluxe solid wood bed frame |
Bedroom bench |
Bed chest drawers |
Lingerie dresser |
Frame base |
Mirror with jewelry storage |
30 Bathroom Vanity |
Memory foam queen mattress |
Mattresses for back pain |
Nightstand set of 2 |
Grand Goldman Shop |
Civil Lawyer
Deutschland Trikot WM 2026







