

Transform a common mountain bike into a DIY snow bike with this step-by-step guide. For snow, you don't need wheels—the main challenge is inventing two attachment and hinge systems for a pair of very short skis on the fork and rear swingarm. Secondarily, you need to design a braking system.
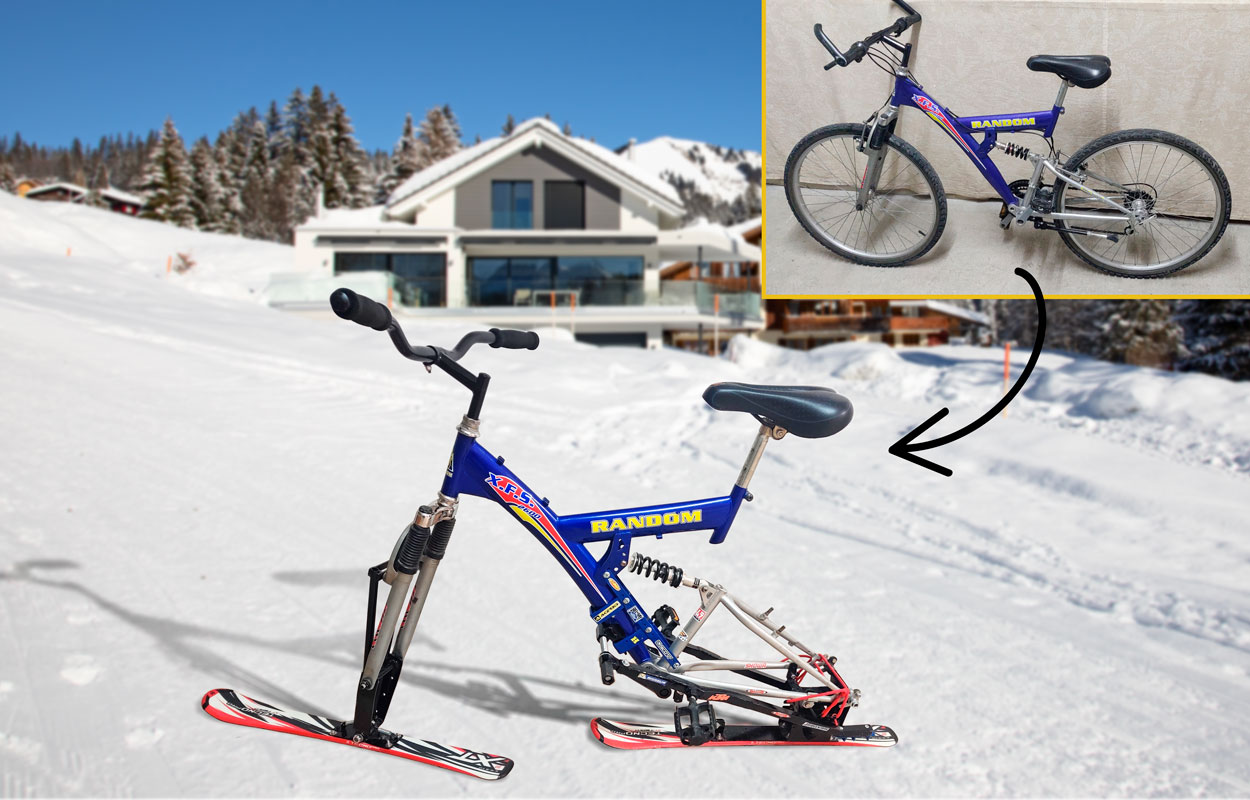
A strong passion and a pronounced do-it-yourself spirit strongly motivated Carlo Mariani in this project—calling it challenging is an understatement. Transforming a standard mountain bike into a DIY snow bike requires a significant design phase and, during the process, continuous dry runs and functional tests. Often, despite calculations and prior reflection, in constructions like this you end up making variations or opting for alternative solutions.
Find Bleeding Edge Supplements at Scandalous Prices on iHerb.

So how do you build a ski bike? For the transition to a DIY snow bike, the first phase involves almost completely disassembling the bike. In place of the wheels, you need to attach a pair of very short skis, and the system to connect them must be invented from scratch, considering that removing the wheels creates the need to raise the frame for balance and comfort: at the front a bit more, by creating a lift and reinforcement system for the fork, and at the rear less, to keep the center of gravity low. At the rear, in fact, to achieve a valid overall height, the complex hinge and ski attachment system is sufficient. Additionally, for dynamic reasons, based on tests conducted, the need arose to add aids capable of keeping the skis in the correct alignment.
The chainring and gears are no longer useful in the DIY snow bike, while the pedal levers are used for the braking system, consisting of two long square tubular profiles shaped to follow the side of the ski bike.
Complex Rear Axle Hinge
The rear hinge system is the heart of the conversion. You'll need to fabricate a sturdy bracket that attaches to the swingarm and allows the ski to pivot. For this project, having a reliable home improvement toolkit is essential for cutting and welding metal parts.
Fork Lift
To raise the front end, you'll need to extend the fork with a custom lift kit. This improves ground clearance and handling on soft snow. Consider adding some lighting to your snow bike for those shorter winter days.
Ski Attachment Plates for the DIY Snow Bike
The ski mounting plates must be precisely machined to hold the skis firmly. Use stainless steel hardware to resist corrosion from snow and salt. A sturdy storage bench in your garage can keep all your tools organized during this build.
Two Brake Levers with Pedals
The braking system uses the original pedal levers connected to long square tubes that act as snow anchors. This clever mechanism lets you stop effectively on slopes. For comfort during long rides, consider upgrading your office chair for the planning phase at your desk.
FAQ
Q: Can I use any mountain bike for this conversion?
A: Yes, but a sturdy frame with a strong fork and swingarm is recommended. Steel frames are easier to weld modifications onto.

Q: Do I need special skis?
A: Short skis (around 60-80 cm) work best. You can often find used kids' skis at thrift stores.
Q: How long does the conversion take?
A: Expect to spend 20-40 hours depending on your fabrication skills and available tools.
Q: Is the snow bike safe on steep slopes?
A: With proper brake design and testing, yes. Always start on gentle slopes and wear protective gear.
Q: Can I convert it back to a regular bike?
A: If you keep the original parts, yes. The frame modifications are reversible if you use bolt-on components.
- For your workshop, browse home improvement essentials
- Store your snow bike gear in a durable shed
- Add outdoor lighting for evening rides
- Keep your workspace tidy with shelving units
- Relax after building with a comfortable sofa
- Plan your next project at a desk
- Protect your bike with a gazebo cover
- Use patio furniture for outdoor work breaks
- Cook outdoors with a BBQ grill after a successful build
- Warm up with outdoor heating on cold days
Browse Grand Goldman Home Decor
Discover unique craftsmanship home decor and furniture at the Grand Goldman Shop.
 best lighting for energy savings |
affordable lighting for bedroom ambiance |
premium lighting for kitchen task lighting |
best dining room lighting for energy savings |
affordable dining room lighting for bedroom ambiance |
premium dining room lighting for kitchen task lighting |
best living room lighting for energy savings |
affordable living room lighting for bedroom ambiance |
premium living room lighting for kitchen task lighting |
best bedroom lighting for energy savings |
affordable bedroom lighting for bedroom ambiance |
premium bedroom lighting for kitchen task lighting |
espresso wall mounted coat rack |
wooden entryway storage shelf |
4 dual hook entry organizer |
3 in 1 entryway hall tree |
storage bench with coat hooks |
black shoe storage organizer |
grey power reclining sofa set |
3 piece leather recliner couch |
modern sectional reclining sofa |
modern executive computer desk |
wooden storage cabinet desk |
large office desk with doors |
best lighting for energy savings |
affordable lighting for bedroom ambiance |
premium lighting for kitchen task lighting |
best dining room lighting for energy savings |
affordable dining room lighting for bedroom ambiance |
premium dining room lighting for kitchen task lighting |
best living room lighting for energy savings |
affordable living room lighting for bedroom ambiance |
premium living room lighting for kitchen task lighting |
best bedroom lighting for energy savings |
affordable bedroom lighting for bedroom ambiance |
premium bedroom lighting for kitchen task lighting |
espresso wall mounted coat rack |
wooden entryway storage shelf |
4 dual hook entry organizer |
3 in 1 entryway hall tree |
storage bench with coat hooks |
black shoe storage organizer |
grey power reclining sofa set |
3 piece leather recliner couch |
modern sectional reclining sofa |
modern executive computer desk |
wooden storage cabinet desk |
large office desk with doors |
Best Products We’ve Tested and Rated

Our testing team has hands-on reviews of rod reel combo, line, baitcast reel, reels freshwater saltwater, and sunglasses. Every option below was compared across price, build quality, and real-world performance, with honest pros and cons. We update these guides regularly as new models arrive, so the recommendations stay current.
Our testing team has hands-on reviews of kayak, braided line, bass lures, catfish bait, and gaming chairs comfort support. Every option below was compared across price, build quality, and real-world performance, with honest pros and cons. We update these guides regularly as new models arrive, so the recommendations stay current.
Browse the Shop
 Acacia frida deluxe solid wood bed frame |
Bedroom bench |
Bed chest drawers |
Lingerie dresser |
Frame base |
Mirror with jewelry storage |
30 Bathroom Vanity |
Memory foam queen mattress |
Mattresses for back pain |
Nightstand set of 2 |
Grand Goldman Shop |
Civil Lawyer
Deutschland Trikot WM 2026
Acacia frida deluxe solid wood bed frame |
Bedroom bench |
Bed chest drawers |
Lingerie dresser |
Frame base |
Mirror with jewelry storage |
30 Bathroom Vanity |
Memory foam queen mattress |
Mattresses for back pain |
Nightstand set of 2 |
Grand Goldman Shop |
Civil Lawyer
Deutschland Trikot WM 2026







