

Adjustable Solar Panel Mount and Free Power Equipment, panels with a tilt increases the electricity it produces due to the angle at which the sun's rays hit the panel.
PLEASE NOTE: Panel orientation is very important. A tilted panel facing the wrong direction will not produce the required power. If you are in the Northern Hemisphere, the panels should face true south, not magnetic south. If in the south, the panels need to face true north (not magnetic north). The panels are placed with little or no shadow.
Find Bleeding Edge Supplements at Scandalous Prices on iHerb.

You can also have tilt correction; adjustable tilt; or a solar tracking mount. The solar tracker is the most efficient of all. It tracks the movement of the sun in the sky capturing almost 100% of the Sun's energy.
Step 1: Materials


So why build an adjustable mount? Prefab ones cost too much or it's because it's more challenging and fun to build one. Maybe because every little bit of energy I can get counts towards being able to stay a little later at our shelter. The panel had to be mounted on an adjustable bracket.
Materials under $100
- 1 Set of Ceiling Z Bracket
- 4 Pressure treated lumber 2x4x8
- 1 4x4x8 pressure treated post
- 1 Carriage bolt with washers and nut (galvanized).
- 1 Heavy Duty Galvanized Hinge
- 3 Bags of concrete mix
- 2 Galvanized corner square.
- Some gravel; screws (1.25, 2.5 and 3.5 inches) and wood strips to level the post and place the concrete.
Step 2: Tools needed


- A post hole digger (electric or manual) and shovel
- Circular saw or hand saw
- A regular drill
- One level
- Tape measure
- Bit a little wider than carriage screw
- Carpenter's squares (optional)
- Clamp
- Smartphone
Step 3: Install the pole


A 4x4x8 foot post should be at least 2 feet deep and 1 foot wide for proper stability. Dig a little deeper to accommodate the gravel (about 2 to 4 inches) which I recommend pouring into the bottom of the hole. This facilitates drainage
After digging the hole, pour the gravel and use the column to manipulate it
At the end of the post that will be inserted into the ground, some screws are usually used. In my opinion, it helps the pole stick. Insert the post and flatten it (make sure to place one face of the post in the same direction you have determined for the panel) and use braces to keep it straight
Use regular, fast-setting concrete: We didn't want to wait the 2-3 days for the concrete to dry before installing the support.
Frame around the post (optional) and add the mixture until it reaches the desired height (above ground level)
Tip the mixture, as it dries, away from the base of the post for proper drainage
Step 4: Panel and post


Determine whether you want the panel to be mounted vertically or horizontally.
- Install the Z brackets into the panel.
- Measure the distance from the top of one Z bracket to the bottom of the other on the longer side, then measure across the panel from the end of one Z bracket to the other. You can make the measurement wider or longer than one. Cut 2x4s according to measurements (two for each). Label the long side V1 and V2; and W1 and W2 for the others.
- If mounted vertically, placeue V1 and V2 on top of W1 and W2. *1: Align corners flush; Pre-drill screw holes near the inside edge (this leaves room to attach the panel without hitting the frame screws). Join the frames with 2.5″ screws (Fig. 1)
- If mounted horizontally, place W1 and W2 on top of V1 and V2. *1-. Figure 2.
- At this point, you should check the position of the panel in the frame. See where the screw holes will be; and, as in my case, you may have to drill additional holes in the mount. Drill the holes, but do not attach the panel yet.
- For vertical mounting, center the heavy duty hinge on W1 and the attached hinge. For horizontal mounting, center the heavy duty hinge on V1 and position the hinge
- I found a T type hinge in HD, make sure the top of the T is attached to V1 or W1. (Fig. 3)
Step 5: Frame and Tilt Lever Installation


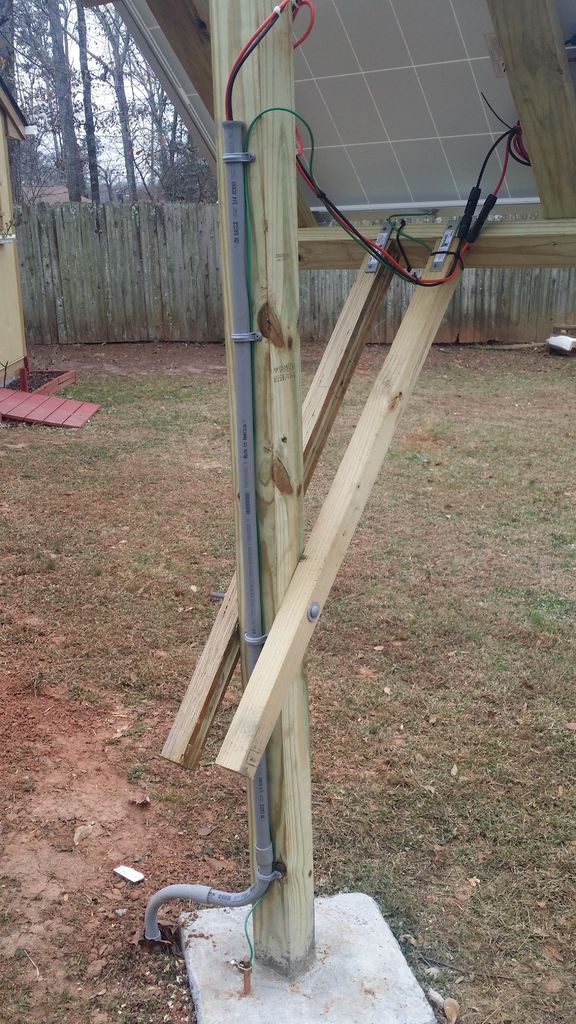
Attach the frame to the post. You will need help at this point. Use the 3.5′ screws for maximum depth. The hinge knuckle is joined slightly above the post for maximum upward movement.
Next:
- Let the frame fall to place mark the edges of the post with V2 (W2)
- Drill two holes 3/4 inch from the post marks on each side. Place the screws in the center of the 2x4
- Place 2x4x10 on both sides of post and secure to V2 (W2) using at least one 2.5″ screw (Do not cut 2x4 until you calculate slope) See Fig. 4
- Attach corner bracket (optional) for reinforcement
Step 6: Fix the panel and calculate the inclination


The panel is attached with the bolts supplied from the Z mount or 2.5″ screws.
For the 2-season adjustment, most data suggests adding 15° to your latitude in winter or subtracting 15° from your latitude in summer.
Step 7: The final countdown

Download any mobile application that can be used to find angles in the Play Store.
- When you find your angle, mark the spot on the 2x4 where you need to drill.
- Drill holes through each angle mark.
- You can label each hole by season or simply write down the °
- Install the carriage bolt, washer and nut.
- Cut off the excess 2x4
- Try
Now we will need an environment where you can operate power tools, charge your cordless batteries and smartphone, work late into the night, and relax with TV and games.
We will install a free power kit! It can be very expensive, so have a budget in mind. It's always best to start small and add as needed.


Step 8: What you'll need to get free energy

A source of energy; something to regulate power; something to store the power and something to convert the stored energy into usable AC (Alternating Current). In other words, you would need solar panels and a wind generator; a solar and wind charge controller; batteries (deep cycle preferably) and an inverter. The information provided will refer to the use of solar energy.
Step 9: Power source (previously built)

Before purchasing solar panels, one must determine how much power they will need. It is the batteries that supply voltage to the inverter. However, if the batteries drain faster than they charge, then there will be a problem. The solar panels should be able to keep the batteries adequately charged. We use a 12V 100w polycrystalline panel.
Note: There are other types of monocrystalline panels (more expensive) and higher panels with higher voltages than 24V.
Step 10: Locating the power source
Most people find it easier to install the panels on their roof. But due to the location of my garage, the roof (too many trees) was out of the question for me. Also, the panels need to be cleaned from time to time (panels on the ceiling = too much work). I needed a sunny spot that was close to the shed. A place where it would have sun in both summer and winter. After watching the Sun rise and fall for a few days, and consultation from my resident solar astronomer I choose a location just 19 feet from the shed and about 24 feet from the charge controller and batteries. Proximity is important because it helps determine the size of wires I need to efficiently carry flow to the batteries.
10 AWG solar cables. Research showed that 8AWG would have been ideal (larger wire = less heat loss over distance). But in the imperfect world of not having all the resources at your disposal, 10 AWG wire would have to do. If I ever decided to add 2 more panels, in parallel, to draw more current, then I will have to increase the cable size.
The next thing was the assembly of the panel and the placement of the cables. The panel needed to face south because I'm in the northern hemisphere (and I thought living in the south meant I was in the southern hemisphere) and it needed to be angled by certain degrees each season to get maximum sun rays. You can also leave it fixed at a fixed angle. A quick search will turn up how to calculate this. I chose to adjust the panels twice a year, summer and winter. So I built a tilting solar stand.
Step 11: Regulating power

Connecting batteries directly to the panels is a very bad idea. Your batteries will be damaged and possibly explode from overcharging without a regulator or controller. Spend a little more and save more in the long run.
Controls ranged from basic 1- or 2-stage controls to mid-range PWM (pulse width modulated) to best-in-class MPPT (maximum power point tracking). The best is always more expensive. Additionally, I needed a controller that can also handle wind power. So I chose a 12V 400 amp 10k Watt charge controller for wind turbines.
Step 12: Energy Storage


When I start this project, we immediately thought that a car battery could work. After all, a battery is a battery and car batteries are reasonably priced. But soon I was educated by Internet University. Car batteries, although they can work, would not be suitable for long-term energy storage. You would have to use deep cycle batteries. Of course, anything deep would mean I have to dig deep into my pocket. These batteries are rated by amps. The more amp hours a battery can deliver, the more it will cost. We decided on a 12V 35ah battery. In fact, we have 2 to put them in parallel (to increase the current and maintain the voltage). This would theoretically double my amps but keep the battery banks at 12V.
To connect 2 batteries in parallel, connect the positive terminals together, and the negative terminals together. The load and/or source is then connected to the positive terminal of one battery and the negative terminal of the other. Use 1/0 AWG pure copper wires for battery connection. This ensures minimal power loss between the battery connections.
We didn't mention above that your voltage rating should remain the same across all your devices. That is, if you are using 12v panels, you need to use a 12v controller with a 12v battery.
Step 13: ConvertDC to AC

The current up to this point is DC. To operate your devices and tools, you need to convert this DC to AC. This is where an investor comes. Inverters have different watts. Additionally, there is the continuous watt and the peak watt. For example, a 500 watt inverter might have a peak watt of 1000. The peak would typically double (or more) the rated watts. This peak wattage is important because most motor devices need to double their power (called surge) at startup. For example, a 120v 5.8 amp device needs 696 watts to operate continuously (P = IV). However, it needs 1392 watts to get going.
Then there is the pure sine wave, the modified sine wave and the square wave inverter. The PSW is more expensive and should do everything you need without any problems. The MSW inverter is reported to cause some batteries to overheat while charging, along with noise in some lights and malfunction of some motor devices. SW is the cheapest and most problematic of all. I'm using a Radio Shack 350W PSW inverter that I've had for several years. I will have to get a higher power PSW inverter (1.5kW/3kW) in the future.
Step 14: The connection

Choose the best location to mount your devices. Follow the manufacturer's recommendations for connecting your panels to your charge controller and the controller to the batteries. I used 10AWG wire for all my connections from the panels to the batteries. I added a wattmeter between the solar panel and the charge controller and a power meter on the inverter. This is just to monitor what is coming in and what is going out. It is not necessary for the operation.
Use a switch box and run a couple of switches and outlets (using a power strip would work well). Also connect a 20w and 5w light.
It was also recommended to add ground (ground) to the circuit. So add 2 (1 for the shed and 1 for the solar panel) and ground the batteries; charge controller; investor; solar panels and switch (almost anything with metal).
Step 15: Testing and Completion


Test settings.

That's all friends. I hope this information has been of some help. Greetings!
Learn more at perfectionidea.com and on our Facebook for more. Use 7 kitchen cabinets to make something incredible.
Popular Content
How to make a rocket stove for outdoors
Cardboard Drawers Lined with Jeans
Ideas and Advantages of Window Grilles for the Home!
Latest Articles
How to make a refrigerator out of insulating material: Practical step-by-step guide
How to make a Kilim for the Home: Complete Step by Step Guide
How to protect ourselves from accidents in our workplace: Complete prevention and safety guide
Related Content
Benks that will help you decorateHome
How to Make a PVC Bed Protector for Babies!
10 Useful Interior and Inexpensive Furniture Ideas
How to Build Wooden Shutters
Creative Home Decor Ideas to Transform Every Space
Refreshing your home starts with smart design choices that combine comfort, personality, and functionality. Whether you want to modernize a small apartment, upgrade outdoor areas, or create cozy rustic interiors, these trending ideas can completely change the atmosphere of your space.
Outdoor Spaces That Increase Style and Functionality
Outdoor living continues to dominate modern home trends. Homeowners are increasingly investing in practical entertainment zones inspired by these BBQ shed ideas, which create the perfect setup for gatherings and weekend cooking sessions.
First impressions also matter when designing exteriors. Elegant farm entrance gates design ideas help properties stand out while improving privacy and curb appeal.
Compact living solutions are also gaining popularity. These inspiring 16x40 shed house interior design ideas show how smaller spaces can still feel luxurious and functional.
To enhance patios and entryways, homeowners are adding stylish protection with these creative porch awning exterior DIY ideas that blend aesthetics with practicality.

Rustic and Cozy Interior Design Trends
Warm and natural interiors remain timeless. These charming rustic decor ideas combine wood textures, vintage accents, and earthy tones to create welcoming spaces.
Bedrooms are becoming more personalized with curated wall arrangements. Many homeowners use these stylish picture wall ideas for bedroom spaces to display memories and artwork creatively.
Textured wall treatments are another major trend. Installing a board and batten wall adds architectural character while keeping interiors elegant and modern.
Similarly, bold accent wall ideas can instantly transform plain rooms into eye-catching focal points without requiring a full renovation.
Smart Kitchen and Organization Inspiration
Functional kitchens are essential for modern homes. These practical kitchen wall cabinet ideas maximize storage while maintaining a clean and stylish appearance.
Organization also starts at the entrance. Well-designed mud room ideas help families keep shoes, coats, and daily essentials neatly arranged.
Colorful and Personalized Home Styling
Vibrant interiors are becoming increasingly popular thanks to playful dopamine decor ideas that use bright colors and joyful accessories to improve mood and energy.
Gallery walls also continue to evolve as a major decorative feature. These trendy gallery wall inspiration ideas offer creative ways to combine prints, photos, and statement art.
Young renters and new homeowners are especially embracing these stylish first apartment aesthetic ideas to create sophisticated interiors on a budget.
Finally, selecting the right shades can dramatically influence any room’s atmosphere. These modern trendy color ideas help homeowners choose palettes that feel fresh, elegant, and timeless.
Final Thoughts
From rustic charm and colorful interiors to outdoor entertaining areas and functional storage solutions, today’s home decor trends focus on creating spaces that feel both beautiful and livable. By combining smart layouts, modern textures, and personalized decorative elements, any home can become more stylish, comfortable, and inspiring.
Browse Grand Goldman Shop
rocking chair office | teak wood rocking chair | mid century rocking chairs | cream sectional couch | plush couch sectional | Ivory sectional | King sofa bed | sofa bed click clack full size | rv sofa bed replacement | rv sofa bed | leather sofa and recliner | M1 three Seater Sofa | ashley tov furniture lillian velvet storage bench | walnut storage bench | john louis home solid wood shoe storage bench | Rustic storage bench | bluetooth fireplace tv stand | 70in tv stand | corner cabinet tv stand | polycarbonate chair mat | patio chair material replacement | gaming chair mat for carpet | gwang felt desk pad | maruse large leather desk pad | faux leather desk pad | acme ievi writing desk | ashley furniture carynhurst home office desk | acme furniture gorden writing desk | corner vanity bathroom cabinet | gun wooden cabinet | Cecotec secador | 3 draw file cabinet
Browse the Shop
 Acacia frida deluxe solid wood bed frame |
Bedroom bench |
Bed chest drawers |
Lingerie dresser |
Frame base |
Mirror with jewelry storage |
30 Bathroom Vanity |
Memory foam queen mattress |
Mattresses for back pain |
Nightstand set of 2 |
Grand Goldman Shop |
Civil Lawyer
Deutschland Trikot WM 2026
Acacia frida deluxe solid wood bed frame |
Bedroom bench |
Bed chest drawers |
Lingerie dresser |
Frame base |
Mirror with jewelry storage |
30 Bathroom Vanity |
Memory foam queen mattress |
Mattresses for back pain |
Nightstand set of 2 |
Grand Goldman Shop |
Civil Lawyer
Deutschland Trikot WM 2026







