

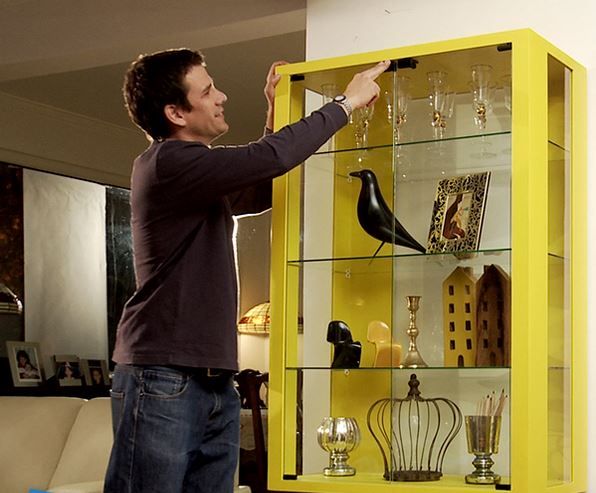
How to make your own minimalist display case, a display case is a very useful piece of furniture for the house, since in addition to serving to store and keep crockery, kitchenware and ornaments in view, it helps to decorate an environment. They are generally very well designed structures, and are built with wood and glass. The one we will make in this project is a display case with very simple lines, which makes it a very light piece of furniture to look at and that does not take up much space.
Find Bleeding Edge Supplements at Scandalous Prices on iHerb.

Tools to use:
- · Square
- · Spatula
- · Measuring tape
- · Electric drill
- · Square press
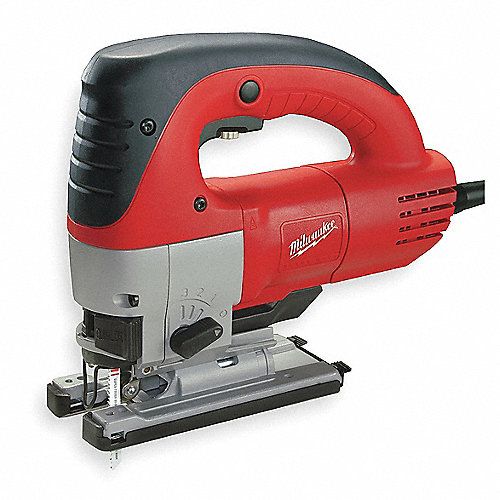
- · Jigsaw
- · Circular saw
- · Milling machine
- · Graphite pencil
- · Screw tip
- · Brush
- · Paint tray
- · Milling machine
- · Orbital Sander
- · Wagner pistol
- · Safety gloves
Materials to use:
- · Cold cola
- · Door
- · 15mm MDF board 152x244cm
- · Wetproof Waterproofing Varnish
- · Pack of 28 3M dining felts
- · Wetproof retape paste
- · First Kölor
- · Screw 1 5/8
- · Sayerlack Concentrated TopColor Chocolate Dye
- · Brushed pine 2×3” 3.2 m
- · Zinc-plated 8×3” wood screw 100 units
- · Turbo Screw 5×5/8” 12 units
- · Wetproof famous pine retape paste 1/2 kg
- · Glass hinge set 1 door 63344-5, 2
- · Kolor semi-gloss water-based enamel
- · White fixed shelf support 4 units, 3
- · 5 mm glass
PDF of the project can be downloaded from here.
Procedure:
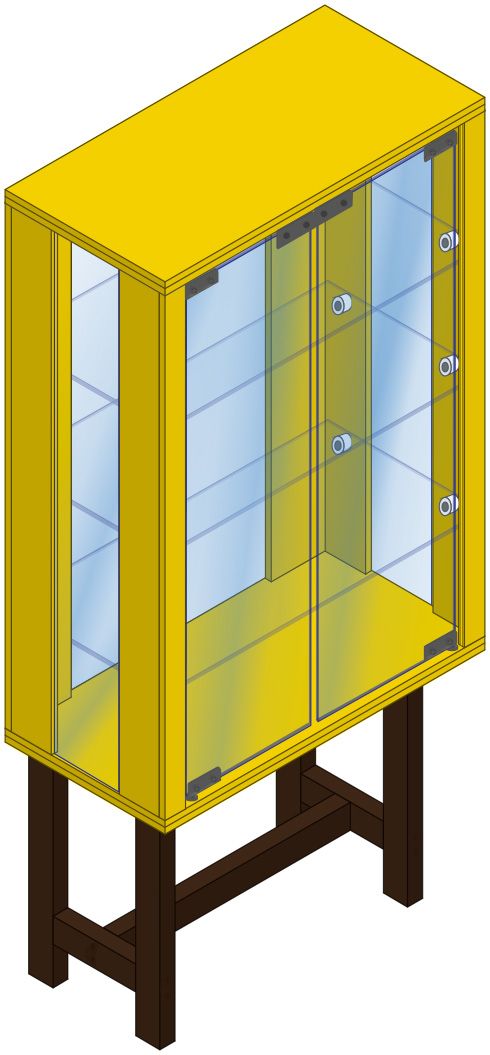
The display case that we propose has a height of 1.80 m and a width of 80 cm. It is built with wood and glass, and is made up of 2 parts, the upper one, which is made of MDF, is the body of the display case, and the lower one, which is made of brushed pine, is the base or support.
Before you start:
- Order the cuts of the MDF board at the Wood Sizing Service. You need: 4 pieces of 40x80cm, 2 of 15x114cm and 5 of 10x114cm.
- In the Sizing Service, cuts of a minimum of 10 cm are made, so 1 of the 10×114 pieces must be cut in half at home, to have 2 pieces of 5×114 cm. These pieces need to be thinner, since as they are on the front they will not block vision into the interior of the display case.
- The minimum cut to size is 10 x 30 cm.
#1. Cut the pieces
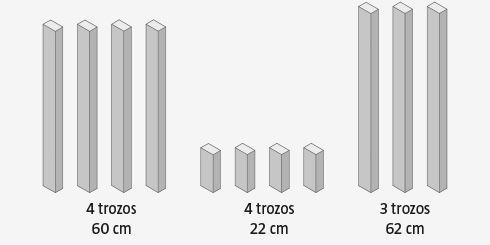
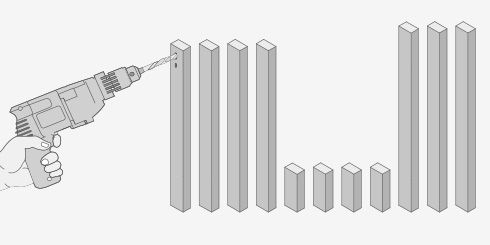
Using the jigsaw, cut the 2x3” planed pine into 4 pieces of 60cm, 4 of 22cm and 3 pieces of 62cm.
#2. Assemble the base
- All the pieces must be countersunk in the place where the fixings will go so that the screws enter more easily, the wood does not crack and their heads can be covered. The fixings are made with cold glue and a 3” screw.
- The sides are first fixed and assembled with 2 pieces of 60 and 2 of 22 cm each. Then the 2 sides are joined with the 3 pieces of 62 cm, 2 at the top and the third in the middle to square and give firmness.

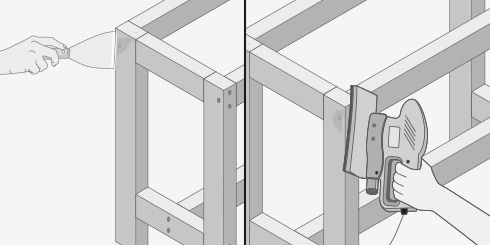
#3. Cover the screws
- Use the pine-colored retape paste to cover the heads of the screws, apply with a spatula, and remove the excess.
- Let dry and then sand.
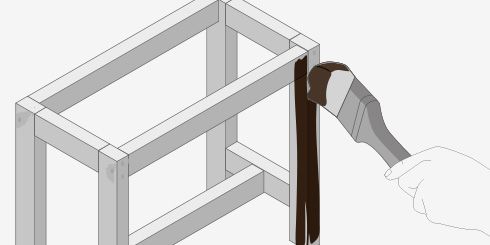
#4. Apply the ink
Paint the brushed pine structure with a chocolate stain. It is applied with a brush and can be applied in 2 coats so that the color is more even and darker. Let dry.
#5. Attach the display case to the base
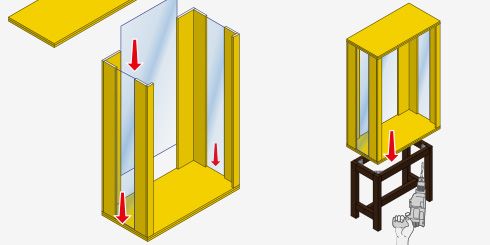
- Attach some reinforced squares to each corner of the base, which will be used to screw the body of the display case. These squares are very firm since they are fixed on both sides.
- Remove the upper part of the body from the display case (which was left without cold glue) and put the glasses in the display case.
- Assemble the body of the display case on top of the base and screw it from below into the reinforced brackets.
Glasses
The glasses can be ordered sized in the store, but it is good to ask for them with polished edges to prevent cuts.
For the back of the display case you need 1 cutout measuring 48x114 cm, for the sides 2 measuring 20x114 cm, for the doors 2 measuring 34.3x113 cm and the interior shelves are 3 measuring 36x76.5 cm.
#6. Shelf support
Inside the display case there are glass shelves, in total there are 6 and they are every 30 cm. They are mounted on shelf supports.
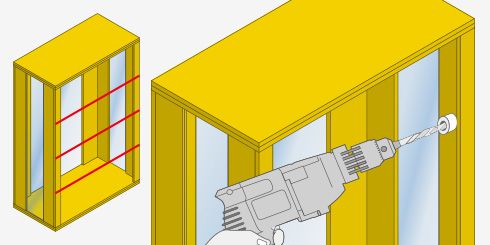
#7. Put the glass doors
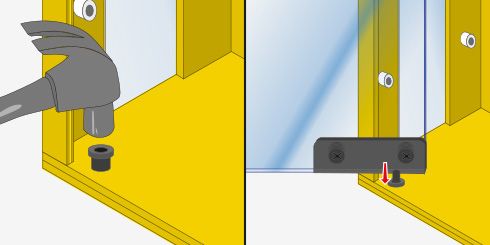
- We make the doors with 2 glass cuts and 2 pairs of door hinges, which are very easy to install thanks to their pivot system. To do this, you have to make a hole, with an 8 mm wood drill bit, in the bottom and top edge, at the same distance from the corner.
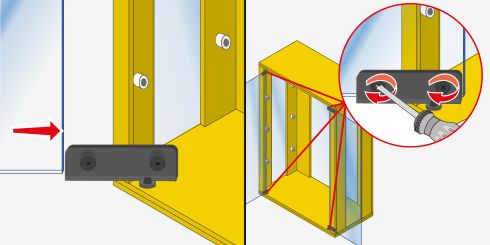
- Place the pivot of the hinge in the hole and hit it with a hammer so that it is well embedded. The edge of the glass is fitted to the hinge and the screws are adjusted so that it is tight.
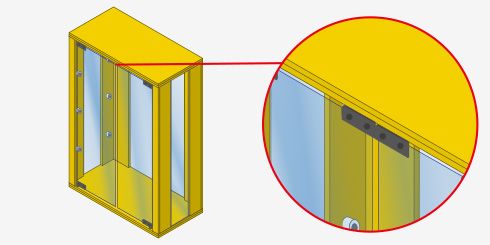
- In the center where the 2 glass doors meet, the magnetic retainers are fixed in the same way, which prevents the use of handles.

Glass hinges
It is the appropriate hardware to use with glass, they are made of steel, resist up to 50 kg and are suitable for glass up to 12 mm thick.
Second part: Body of the display case
#1. Groove the sides
- So that the glass can fit inside the wood, some slots must be made with the 1/4" straight cutter and the router. These slots are made along the side and rear pieces, that is, just one side of the cuts that measure 15×114 and 10×114 cm.
- The slot will be 6 mm wide, a perfect measurement for glass that measures 5 mm. The cutter must be adjusted so that the slot has a depth of 1 cm.

#2. You thicken the covers
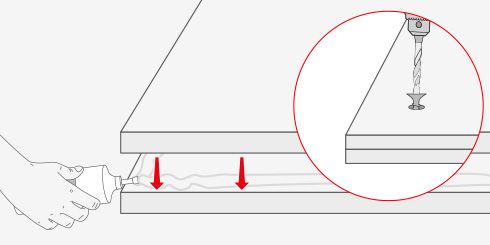
- With the 4 40x80 cm cuts you have to make 2 covers, one for the top and one for the bottom of the display case. The 2 cuts are glued with cold glue to have thicker lids and left pressed for 24 hours.
- Also, if you do not have much time or want to ensure the bonding, it can be fixed with a 5/8” screw, since later they will be covered with retape putty.
Palm milling machine
This type of power tool is characterized by its precision and productivity for making cuts, openwork, slots and moldings. It is very versatile since depending on the strawberry the use given to it changes. It has a parallel guide and another for making circular cuts, and a transparent base, which provides optimal visibility.
#3. Assemble the body of the display case
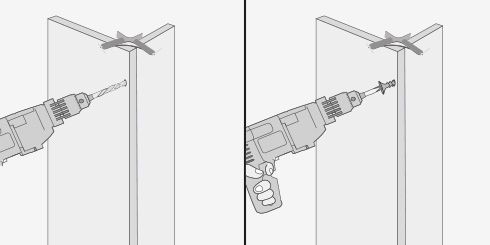
- Using the square presses, join the MDF pieces that form the body of the wood. 2 pairs must be joined with the 15x114 cm and 10x114 cm cuts, which are the back pieces; and you must also form 2 pairs with the 10×114 cm and 5×114 cm pieces, which are the front pieces.
- Once joined with the presses, cold glue is put on their edge, the wood is countersunk and they are fixed with 1 5/8” screws.
- Attach the lower cover also with cold glue and screws, but the upper cover only goes with screws since it has to be removed to put the glasses on.

#4. Cover the screws
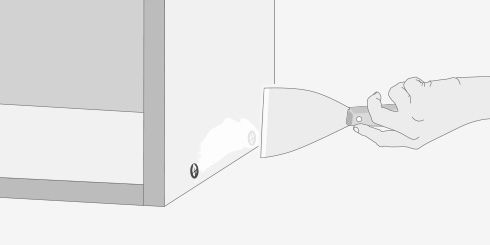
- Using a spatula, spread the retaping putty over the heads of the screws and the MDF edges, sinceThis will improve the finish.
- Let the paste dry and polish with an orbital sander.
#5. Paint
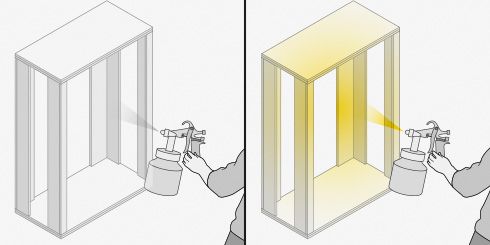
- Apply a coat of Kolor Primer with a spray gun to seal the MDF.
- Wait 2 hours for the sealing base to dry, and paint with semi-gloss water-based enamel.
How to improve the finish of the paint?
When making furniture it is very important that the paint finish has a good finish, for this it is necessary to seal the wood and then apply the paint with a spray gun, it can be with the use of a compressor or also with Wagner guns, which have an air turbine that expels the paint, but not in a spray form to avoid a cloud of paint that makes a mess, but rather it launches a jet that, depending on the position of the nozzle, can be transformed into a vertical, horizontal or a thinner fan to paint details.
For further explanation or details you can watch the following video below.
Explanatory video:
Source: hagaloustedmismo.cl
Thank you for visiting perfect ideas 🙂
Get more information at perfectionidea.com and on our Facebook for more How to make your own minimalist display case.
Popular Content
How to make a rocket stove for outdoors
Cardboard Drawers Lined with Jeans
Ideas and Advantages of Window Grilles for the Home!
Latest Articles
How to make a refrigerator out of insulating material: Practical step-by-step guide
How to make a Kilim for the Home: Complete Step by Step Guide
How to protect ourselves from accidents in our workplace: Complete prevention and safety guide
Related Content
Ideas to renew the environments in your home
Make your own garden table with recycled pallets
How to make your own elevating table with pallets
How to restore a dresser
Creative Home Decor Ideas to Transform Every Space
Refreshing your home starts with smart design choices that combine comfort, personality, and functionality. Whether you want to modernize a small apartment, upgrade outdoor areas, or create cozy rustic interiors, these trending ideas can completely change the atmosphere of your space.
Outdoor Spaces That Increase Style and Functionality
Outdoor living continues to dominate modern home trends. Homeowners are increasingly investing in practical entertainment zones inspired by these BBQ shed ideas, which create the perfect setup for gatherings and weekend cooking sessions.
First impressions also matter when designing exteriors. Elegant farm entrance gates design ideas help properties stand out while improving privacy and curb appeal.
Compact living solutions are also gaining popularity. These inspiring 16x40 shed house interior design ideas show how smaller spaces can still feel luxurious and functional.
To enhance patios and entryways, homeowners are adding stylish protection with these creative porch awning exterior DIY ideas that blend aesthetics with practicality.

Rustic and Cozy Interior Design Trends
Warm and natural interiors remain timeless. These charming rustic decor ideas combine wood textures, vintage accents, and earthy tones to create welcoming spaces.
Bedrooms are becoming more personalized with curated wall arrangements. Many homeowners use these stylish picture wall ideas for bedroom spaces to display memories and artwork creatively.
Textured wall treatments are another major trend. Installing a board and batten wall adds architectural character while keeping interiors elegant and modern.
Similarly, bold accent wall ideas can instantly transform plain rooms into eye-catching focal points without requiring a full renovation.
Smart Kitchen and Organization Inspiration
Functional kitchens are essential for modern homes. These practical kitchen wall cabinet ideas maximize storage while maintaining a clean and stylish appearance.
Organization also starts at the entrance. Well-designed mud room ideas help families keep shoes, coats, and daily essentials neatly arranged.
Colorful and Personalized Home Styling
Vibrant interiors are becoming increasingly popular thanks to playful dopamine decor ideas that use bright colors and joyful accessories to improve mood and energy.
Gallery walls also continue to evolve as a major decorative feature. These trendy gallery wall inspiration ideas offer creative ways to combine prints, photos, and statement art.
Young renters and new homeowners are especially embracing these stylish first apartment aesthetic ideas to create sophisticated interiors on a budget.
Finally, selecting the right shades can dramatically influence any room’s atmosphere. These modern trendy color ideas help homeowners choose palettes that feel fresh, elegant, and timeless.
Final Thoughts
From rustic charm and colorful interiors to outdoor entertaining areas and functional storage solutions, today’s home decor trends focus on creating spaces that feel both beautiful and livable. By combining smart layouts, modern textures, and personalized decorative elements, any home can become more stylish, comfortable, and inspiring.
Browse the Shop
 Acacia frida deluxe solid wood bed frame |
Bedroom bench |
Bed chest drawers |
Lingerie dresser |
Frame base |
Mirror with jewelry storage |
30 Bathroom Vanity |
Memory foam queen mattress |
Mattresses for back pain |
Nightstand set of 2 |
Grand Goldman Shop |
Civil Lawyer
Deutschland Trikot WM 2026
Acacia frida deluxe solid wood bed frame |
Bedroom bench |
Bed chest drawers |
Lingerie dresser |
Frame base |
Mirror with jewelry storage |
30 Bathroom Vanity |
Memory foam queen mattress |
Mattresses for back pain |
Nightstand set of 2 |
Grand Goldman Shop |
Civil Lawyer
Deutschland Trikot WM 2026







