

Incredible Concrete Lamp, this is an incredible lamp made of concrete, glass and steel. It will be a fascinating decoration accessory…
Step 1: Materials
You will need:
Find Bleeding Edge Supplements at Scandalous Prices on iHerb.

- Concrete
- Plywood or melamine (for formwork). Foam core can also be used.
- 16″ 1 1/2″ x 1/4″ steel bar
- 3 Pieces of glass: 1/4″ thick; 12″ x 4″ – 1/8″ thick: 12″ x 3 1/2″ – 1/16″ thick: 12″ x 3 1/2″
- Screws, drill, bits, driver
- Glue gun
- 150 watt ceramic lamp, using 32 watts
- 4″ threaded light pole
- Light bulb (bright)
- Cable for the lamp
- Lamp switch
- Screwdriver
Step 2: Making the exterior formwork


First, you need to make the formwork. The interior volume should be exactly 4″ square. You can use melamine, which will give you a smooth surface. You can also use wood or plywood, and it can give the texture of concrete.
If using 3/4″ material, you will need 2 pieces at 4″ x 14″, and 2 at 5 1/2″ x 14″. And 1 bottom (which is actually the top) in a 5 1/2″ square.
Again, make this as precise as possible. If you don't have access to a store, you can use 1/2″ foam core, a knife, and a ruler.
Use a glue gun to glue everything together. If you cover the inner surface of the foam core with a transparent tape, the concrete will not stick, and you will get a smooth, glassy surface on the concrete.
The foam tip method is probably easier and less forgiving, and works the same way. Just be sure to seal the seams really well, with the glue gun or packing tape. Otherwise, it will leak everywhere.
The concrete will be very liquid, like heavy cream. Don't underestimate the ability to find cracks and leaks.
Step 3: Lamp Base


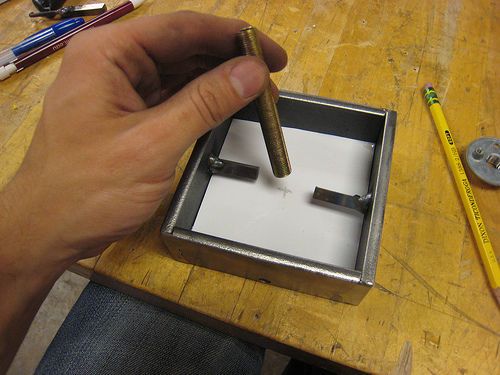


You can do this in many different ways. I used steel, filled with concrete (concrete). This requires welding and grinding equipment. You can also just throw a piece of concrete. Or, a block of wood. Just remember that you need to get the cable somehow.
- I used 1/4" thick to 1 1/2" wide steel bar stock. To make a 4" square, you need 2 to 4" and 2 to 3 1/2". Solder these joints, grind the welds. (Images 1-4)
- Then, because I am going to pour concrete into the volume, I welded two small pieces of 1/4″ bar to prevent the piece of concrete from coming off one day… (Photo 5). Next, drill a 1/4″ hole as far down one side as possible. This is for the cable. We won't fill the bottom with concrete so the wire can come off the post and out through our small hole.
- So place a piece of foam tip on the top level of the hole we just drilled. Seal the edges with the glue gun. We will pour the concretefrom the top.
- Then glue the threaded rod onto the foam core with the glue gun. Make sure it's not at an angle. The last two photos are what it looks like when it's dry, above and below. Do you get the idea?
- Now for our first pour. This will be good practice for the big one.
- Pour it just before the top of the steel base.
- Now, this is the annoying part. I don't think I'll ever do this this way again, but here goes. I wanted the thing to "float" off the base a little. So I decided to put in some 1/4″ steel bar legs. I loosened these little pieces of wire on the legs so they would adhere well to the concrete. I won't go into details, you need to make sure the cable doesn't interfere with the main pour glass.
- For this step, I simply place them on the base about 1/4 inch, so that the screen sits firmly on the base.
- These will be easy to remove and then I'll throw the legs into the shade. I know, it's ridiculous.
- The trick is that you have to somehow hold these little guys in position while the concrete dries. This can be achieved with small clamps.
- Or maybe duct tape But have a plan before you pour. I didn't have one, so this is my improvised effort. It worked
Step 4: Preparing the mold


Well, you'll have to build a formwork for the void in the middle. I used foam and melamine. I think it would be best to use all foam core, or a solid piece of foam insulation (usually pink or blue).
The reason for this is because you have to remove it once the concrete dries. Use foam and you can cover it with tape for a better finish and easier release.
In any case, it should be 3″ square, exactly, and the same length as the outer pan, PLUS how much you want to “float” above the base, if you want to do that. I used 3/4″.
This way the base can rest on this while we cast the legs into the shade, and it will maintain the correct spacing (see photos).
You can glue the glass directly to the internal formwork, as shown.
This way, the glass will be exposed inside the shade. This glue will come off easily when you release it. The thick piece of glass sticks out 1/2″ on each side of the internal formwork. The other 2 pieces insert into it and protrude 1/2″ on their respective sides.
Obviously, you can modify this design. There should be at least 3/4 at the top and bottom. This is critical for the concrete to have some structure, since we are cutting everything with the glass.
Now slide it into the exterior formwork. This may require loosening some screws. This is not an easy step. You'll have to work with that.
If your measurements were good, it will be easier. It is essential that the glass catches on the exterior formwork so that the edge is exposed, and that it is firmly attached to the interior formwork, so that it will be exposed on the inside, so that light can escape.
This will take patience. Trial, error and control.
The last step, once the formwork is tight and SEALED (you can use glue putty if necessary), invert the base over the top so you can place the legs in the shade.
Make sure they are fairly straight and that everything looks good. Carry it out. Next step: Pour.
Step 5: Pour


Mix enough mortar. I'll leave this for you to figure out.Pour it slowly into the mold, until it is flush with the top edge.
You can fill it a little and then smooth it flush after about 10 minutes. Invert the base onto it to attach the legs (you can temporarily glue them to the base with a glue gun, or use tape or something. You don't want to lose them in the concrete abyss).
Once everything looks good. Let dry for at least 12 hours.
Step 6: Break the mold


It's time to break the mold. Remove the base, but leave the sides attached. It's tempting to look, but it will be easier and safer to rescue the middle if you leave the sides tied. If you used solid foam, get a large, thick, long drill bit and dig it out again. Put screwdrivers inside, putty knives, whatever you need to do to get that foam out.
After cleaning the center well, you can remove the outer mold. Make sure it doesn't break anywhere (if it did, you can fix the cracks with glue).
You may need to excavate the edges of the glass a little so they are exposed.
Be gentle. You can use a flathead screwdriver to do this. You might also need to do this on the inside, if any of the concrete got between the formwork and the glass. It should chip. Be gentle.
Finally you can lightly sand the sharp corners and rinse everything in the sink. Make sure all glass is exposed cleanly inside and out.
If it came first, good job. If not, hopefully you can use the glass again and pour it again.
Step 7: Assemble the Lamp


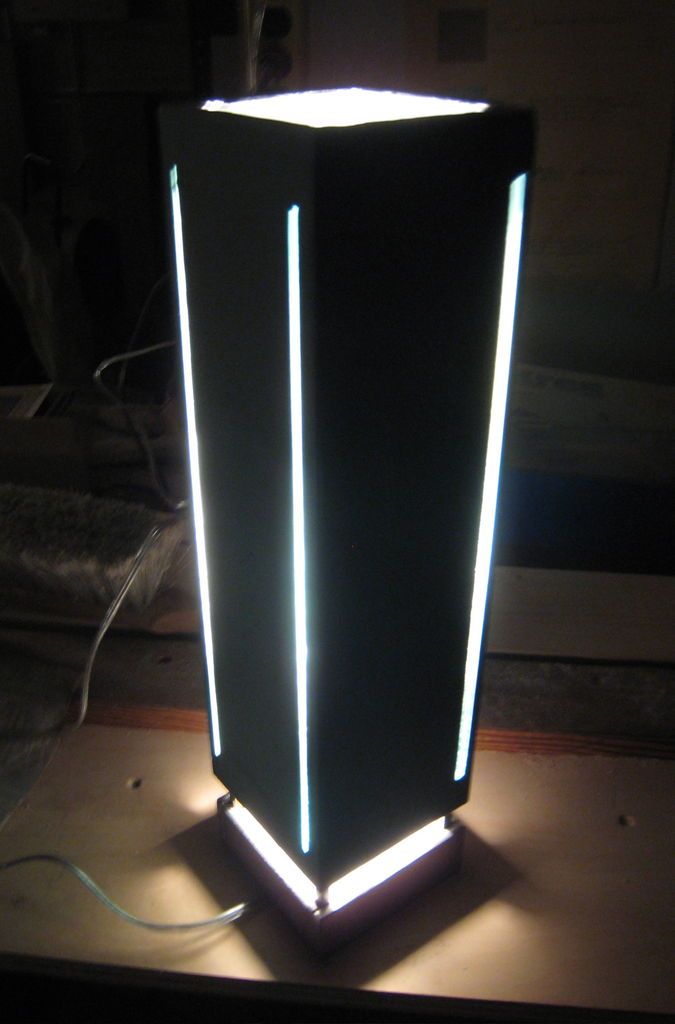
Put the lamp together. Run the wire through the holes in the base, screw the thing on top. You can put a switch on the cable too, if you want. I'm not going to go into more details here. If you don't know what you're doing, ask someone who does.
Use a bright light bulb. I found this fluorescent (incandescents will make things really hot, better to use compact fluorescents (and less energy!). This bulb is equivalent to 150 watts, which uses 32 watts.
The curtain blocks a lot of light. Notice that you can see through the curtain into the thick piece of glass (even when it's off!)
- Tags
- Cement
Popular Content
How to make a rocket stove for outdoors
Cardboard Drawers Lined with Jeans
Ideas and Advantages of Window Grilles for the Home!
Latest Articles
How to make a refrigerator out of insulating material: Practical step-by-step guide
How to make aKilim for the Home: Complete Step by Step Guide
How to protect ourselves from accidents in our workplace: Complete prevention and safety guide
Related Content
Retro Stand Made of Recycled Wood for Smartphones
Crystal Bathtubs That Would Like in Any Home
Simple Steps to Build a Brick Road!
Manufacturing a High-End Plywood Table for the Dining Room
Creative Home Decor Ideas to Transform Every Space
Refreshing your home starts with smart design choices that combine comfort, personality, and functionality. Whether you want to modernize a small apartment, upgrade outdoor areas, or create cozy rustic interiors, these trending ideas can completely change the atmosphere of your space.
Outdoor Spaces That Increase Style and Functionality
Outdoor living continues to dominate modern home trends. Homeowners are increasingly investing in practical entertainment zones inspired by these BBQ shed ideas, which create the perfect setup for gatherings and weekend cooking sessions.
First impressions also matter when designing exteriors. Elegant farm entrance gates design ideas help properties stand out while improving privacy and curb appeal.
Compact living solutions are also gaining popularity. These inspiring 16x40 shed house interior design ideas show how smaller spaces can still feel luxurious and functional.
To enhance patios and entryways, homeowners are adding stylish protection with these creative porch awning exterior DIY ideas that blend aesthetics with practicality.

Rustic and Cozy Interior Design Trends
Warm and natural interiors remain timeless. These charming rustic decor ideas combine wood textures, vintage accents, and earthy tones to create welcoming spaces.
Bedrooms are becoming more personalized with curated wall arrangements. Many homeowners use these stylish picture wall ideas for bedroom spaces to display memories and artwork creatively.
Textured wall treatments are another major trend. Installing a board and batten wall adds architectural character while keeping interiors elegant and modern.
Similarly, bold accent wall ideas can instantly transform plain rooms into eye-catching focal points without requiring a full renovation.
Smart Kitchen and Organization Inspiration
Functional kitchens are essential for modern homes. These practical kitchen wall cabinet ideas maximize storage while maintaining a clean and stylish appearance.
Organization also starts at the entrance. Well-designed mud room ideas help families keep shoes, coats, and daily essentials neatly arranged.
Colorful and Personalized Home Styling
Vibrant interiors are becoming increasingly popular thanks to playful dopamine decor ideas that use bright colors and joyful accessories to improve mood and energy.
Gallery walls also continue to evolve as a major decorative feature. These trendy gallery wall inspiration ideas offer creative ways to combine prints, photos, and statement art.
Young renters and new homeowners are especially embracing these stylish first apartment aesthetic ideas to create sophisticated interiors on a budget.
Finally, selecting the right shades can dramatically influence any room’s atmosphere. These modern trendy color ideas help homeowners choose palettes that feel fresh, elegant, and timeless.
Final Thoughts
From rustic charm and colorful interiors to outdoor entertaining areas and functional storage solutions, today’s home decor trends focus on creating spaces that feel both beautiful and livable. By combining smart layouts, modern textures, and personalized decorative elements, any home can become more stylish, comfortable, and inspiring.
Browse Grand Goldman Shop
cafe drapes curtains | ottoman furniture leather | restroom mirror with lights | Buffet server | Piano Bench | leather loveseat recliner | full xl mattress | storage bench white | farmhouse kitchen island | 70 inch industrial tv stand
Browse the Shop
 Acacia frida deluxe solid wood bed frame |
Bedroom bench |
Bed chest drawers |
Lingerie dresser |
Frame base |
Mirror with jewelry storage |
30 Bathroom Vanity |
Memory foam queen mattress |
Mattresses for back pain |
Nightstand set of 2 |
Grand Goldman Shop |
Civil Lawyer
Deutschland Trikot WM 2026
Acacia frida deluxe solid wood bed frame |
Bedroom bench |
Bed chest drawers |
Lingerie dresser |
Frame base |
Mirror with jewelry storage |
30 Bathroom Vanity |
Memory foam queen mattress |
Mattresses for back pain |
Nightstand set of 2 |
Grand Goldman Shop |
Civil Lawyer
Deutschland Trikot WM 2026







