

Even if we've gotten used to it, let's be honest—a washing machine isn't exactly a beautiful piece of furniture. Our reader Gino Selmi, for instance, just couldn't stand its look, so he decided to give it a makeover by building a DIY washing machine cabinet that fits the room (bathroom or kitchen) and is even more functional.
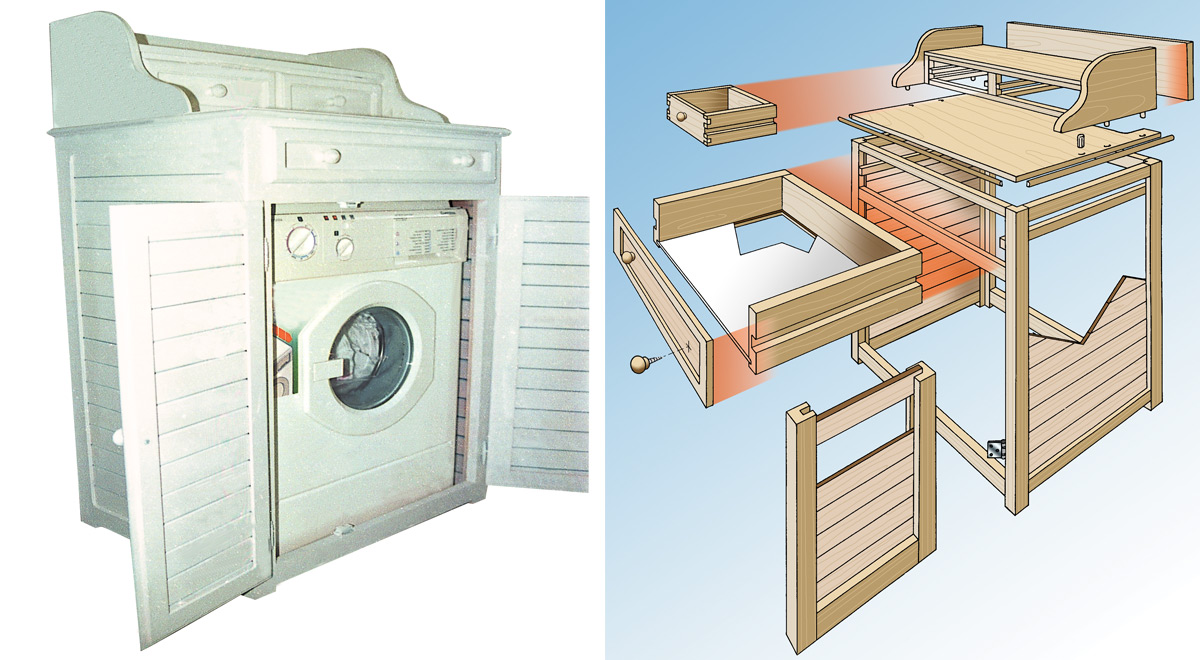
By increasing the original dimensions only slightly, with a large drawer and a raised section featuring a shelf and two small drawers, you gain plenty of extra storage space.
Find Bleeding Edge Supplements at Scandalous Prices on iHerb.

The final dimensions of the washing machine cabinet are 700 x 515 x 1000 mm in height, depending on the appliance used. You need to allow at least 20 mm of free space on each side so the washing machine doesn't transfer vibrations to the covering during the spin cycle.
The DIY washing machine cabinet has no bottom, ensuring the appliance gets the necessary cooling, and it's designed to be slipped on from above, like a piece of clothing.
What You Need to Build a Washing Machine Cabinet
- Bench circular saw
- Router
- Jigsaw
- Planer (edge and thickness or hand plane)
- Drill
- Screwdriver
- Random orbital sander
- Recovered slats, section 55×10 mm (32 pieces of 440 mm; 26 of 230 mm)
- Battens, section 50×50 mm and 50×23 mm for uprights
- Battens, section 15×10 mm for drawer guides
- Battens, section 20×20 mm for the raised frame
- Battens, section 30×15 mm for drawer frames
- Solid fir wood, 15 mm thick for drawer sides and fronts
- Hardboard, 4 mm thick for drawer bottoms
- Plywood, 18 mm thick for the raised section
- 6 turned wooden knobs
- 4 hinge butt joints
- Wood filler
- Finishing enamel
- Magnetic catches
Missing some materials? Check out our home improvement collection for tools and supplies.
How to Build a DIY Washing Machine Cabinet
Step 1: Prepare the Wooden Slats
Start by recovering old slats from shutters or use new timber. Cut them to size using a bench circular saw—you'll need 32 pieces at 440 mm and 26 at 230 mm.
Step 2: Build the Frame
Assemble the uprights using 50×50 mm and 50×23 mm battens. Secure them with screws and wood glue. Ensure the frame is square before moving on.
Step 3: Attach the Slats
Fix the slats to the frame, leaving a 20 mm gap around the washing machine area for vibration isolation. Use a screwdriver for quick assembly.
Step 4: Create the Drawers
For the large drawer and two small ones, cut solid fir wood (15 mm thick) for sides and fronts. Use 15×10 mm battens as drawer guides. The drawer bottoms are made from 4 mm hardboard. Add turned wooden knobs for handles.

Step 5: Build the Raised Section
Cut 18 mm plywood for the raised top. Use 20×20 mm battens for the frame. Add a shelf and two small drawers as shown in the plan.
Step 6: Install Hinges and Catches
Attach the cabinet door using 4 hinge butt joints. Fit magnetic catches to keep drawers closed securely.
Step 7: Sand and Finish
Sand all surfaces with a random orbital sander. Apply wood filler to any gaps, then paint with finishing enamel. Let it dry completely.
Step 8: Position the Washing Machine
Slide the washing machine into the cabinet from above. Ensure it sits level and has at least 20 mm clearance on all sides. No bottom panel is needed for airflow.
Frequently Asked Questions
Can I use new wood instead of reclaimed slats?
Absolutely! Reclaimed wood adds character, but new timber works just as well. Browse our home improvement supplies for quality lumber.
What if my washing machine is a different size?
Adjust the dimensions accordingly. The key is to maintain a 20 mm gap on all sides for vibration control. Measure your appliance first.
Do I need special tools for this project?
A bench circular saw, router, jigsaw, planer, drill, screwdriver, and sander are recommended. All are available in our home improvement collection.
How do I ensure the cabinet doesn't tip over?
Secure the cabinet to the wall using brackets or screws. This is especially important if you have children or pets.
Can I paint the cabinet any color?
Yes! Use a durable finishing enamel suitable for high-moisture areas. Consider matching your bathroom or kitchen decor.
Browse Grand Goldman Shop
Discover unique craftsmanship home decor at Grand Goldman Shop.
modern home improvement tools | eco friendly renovation supplies | luxury home upgrade essentials | kids wooden bed frame | baby nursery dresser set | childrens study desk chair | pre lit artificial Christmas trees | slim pencil Christmas tree | flocked snowy Christmas tree | outdoor garden canopy gazebo | heavy duty pop up canopy | wooden pergola gazebo kit | grey power reclining sofa set | 3 piece leather recliner couch | modern sectional reclining sofa | modern executive computer desk | wooden storage cabinet desk | large office desk with doors
Browse the Shop
 Acacia frida deluxe solid wood bed frame |
Bedroom bench |
Bed chest drawers |
Lingerie dresser |
Frame base |
Mirror with jewelry storage |
30 Bathroom Vanity |
Memory foam queen mattress |
Mattresses for back pain |
Nightstand set of 2 |
Grand Goldman Shop |
Civil Lawyer
Deutschland Trikot WM 2026
Acacia frida deluxe solid wood bed frame |
Bedroom bench |
Bed chest drawers |
Lingerie dresser |
Frame base |
Mirror with jewelry storage |
30 Bathroom Vanity |
Memory foam queen mattress |
Mattresses for back pain |
Nightstand set of 2 |
Grand Goldman Shop |
Civil Lawyer
Deutschland Trikot WM 2026







