

Look at this great idea of how to make an Owl piñata, perfect to implement at children's parties.
Whether you're an adult or a child, piñatas are a lot of fun at parties, and being able to design your own makes destroying them feel that much more special...
Find Bleeding Edge Supplements at Scandalous Prices on iHerb.

Or maybe it makes you feel sad and guilty...
But non-attachment exercises are always healthy, right? So let's make something beautiful and destroy it for candy! What are you saying?!
A great way to make an owl pinata is to use paper mache.
Paper mache is cheap and easy to work with, making it a perfect medium for something temporary.
For my piñata, I'm going to make an owl, because I love owls and it's an easy way.
There are many ways to make a piñata with paper mache, but we are going to use a balloon as our base, so if you want to create something other than an owl, it is best to choose a design that has a round shape.
Other great options are things like fish, muppet heads, disco balls, the death star, giant flowers, the heads of certain world leaders...
Steps to make Owl piñata
Step 1: Tools and materials

- Newspaper, newspaper or towels
- Crepe paper
- Balloons
- White flour
- Adhesive tape
- Cardboard
- Acrylic paint
- Strong twine
- Scissors
- Mixing bowls
- Measuring cups and spoons
- Airtight container or ziplock bag
- Handmade knife and extra blades
- Brushes
- Pencil and paper
- Cloth or other plastic covering
- Immersion blender (optional)
- Clove or cinnamon oil (optional)
- Candy or something else to put in your piñata.
- At least 2-3 days to work + dry.
Step 2: Make a simple paste of flour and water

Making the flour and water paste for paper mache is so simple that it almost needs no explanation. There is also no exact ratio of flour to water, you just have to experiment as you go.
In a large bowl, start by mixing:
1 Cup of white flour
1 1/2 Cups water (warm water feels good and can help the ingredients mix, but it's not necessary)


You can mix this mixture with just your hands. Stir it, move it, and run it through your fingers until it's as smooth as you can make it, with very few lumps.


If you want to make it really smooth, you can also use an immersion blender. I like to do this, but it is not absolutely necessary.


Once your paste has been mixed, it should have the consistency of a thick, creamy soup.

If it is too fine or too thick, add more flour and water and mix again.

Step 3: Make the base of the piñata

Shaping on a balloon is the classic paper mache project, you could even have made the ever popular "pig with toilet paper legs in a classroom" in a classroom, but just because it's a simple method, doesn't mean it's not worth it. Depending on how you add details to your basic shape, you can make some great projects using a balloon. Balloons are also useful armor because they are soft and can be easily pulled out and removed later.

You can even use oddly shaped balloons, combine more than one balloon, or use twine to shape the balloon.
To create my owl pinata, I'm going to blow up a medium-sized balloon, then use masking tape to cover the tied end of the balloon, flattening the end.to. Be careful because if you try to pull the masking tape off the balloon, it will POP!


With a plastic cloth on your work surface and the pasta mixture and paper strips prepared, begin rolling out the strips on the balloon. The smaller of the two mixing bowls can act as a base to keep the balloon upright while you work.

Cover the entire balloon with a layer of strips, rotating it so that it also covers the bottom section that is in the bowl. Pull the strips tight and smooth them as you work. If your strips are not laying flat along the curve of the balloon, you may want to tear thinner strips.

Now you have to ask yourself a question: Who is going to hit this piñata? If you are making a piñata for adults or teens, you will want to make it stronger than one for a toddler's birthday party. More layers means a stronger piñata, so for kids cover the balloon with 3-4 layers, for adults use 4-5.

Step 4: Dry
Let your piñata dry overnight in a well-ventilated area. You will need to partially turn it over during the drying process so that both ends are exposed to air.
Try to keep it somewhere where temperatures don't fluctuate too much. The expansion and contraction of air can cause the paper to crack around the balloon as it changes size. If you have put at least 3 layers of paper on your balloon, this shouldn't be a problem, but less than that, and this can happen.

If your paper cracks, you may be able to repair it with a few new strips of paper, but the expanding balloon may distort the shape of the paper like mine did, in which case you're kind of ruined.
Step 5: Add simple shapes and details

When your balloon shape feels dry enough, you can begin creating the details of your owl. At this point, the pasta doesn't have to be absolutely dry because we're going to let everything dry one more time before finishing it.
You will also need to have your candy or whatever you are going to fill with your piñata ready to use.
On the top front of the balloon, draw two large circles next to each other, these will be the circles around the owl's eyes. Don't make the holes too close together. If you can find a container with the right size opening, this can be a good guide because drawing circles is difficult.


Now take your craft knife and cut out each circle.

Do not cut in the center of the circle because we will use the pieces we cut as well. If you are a child working on this project, have an adult help you because this cutting part can be a little difficult.

Reach into one of the holes and take out the balloon.

Use a sharp object or construction knife to make two small holes about 6″ apart in the top of the piñata. At this point, I think it's important to reinforce the inside of the piñata with cardboard where the string is going to go so that it doesn't tear through the paper when you hit it. Then take your twine and feed it through the cardboard and feed it through one small hole and out the other, tying them up a few inches and leaving plenty of extra twine.


Now it's time to fill your piñata with candy or whatever you decided to put inside.

When it's full, take the two pieces you cut from the eyes and put them in the opposite way! This creates eye sockets! Use masking tape to tape the edges, and don't worry if they don't match exactly, we'll do paper mache again.


Now we are going to add some simple details that will make our owl look like an owl. If you want, look at some photos of owls for inspiration. Adding ears, wings, a tail, and a beak will definitely help you look owl-like. Add all the details you want and have fun with it!
You can cut and fold a piece of cardboard for the beak and glue it to the owl's face.


To get the correct shape for the forehead and ears, place a folded piece of paper on top of the face and draw a rough shape with a pen. Then cut out the shape and unfold the paper. I traced the shape onto cardboard and then glued this piece onto the pinata. You don't have to worry too much about making the tape look clean because you're just going to use paper mache anyway.


You can make wings that sit against the owl's body, or open wings like mine. To create wings like mine, you can look at pictures of owls and draw a rough wing shape on cardboard. Cut it out, then make some cuts and folds and glue them together to add some shape and dimension.


You can also make a flat wing, but it's very easy to manipulate the cardboard this way to create something with a little more shape.
If you try to just glue the wings in place, they will move around and not stay stable, so you can cut slots in the body and insert the ends of the wings, then glue them in place.


Use the same strategy to add the tail, cut a simple shape out of cardboard, then attach it with a cut to the back of the owl.

Prop the owl on some bowls and then begin adding strips of paper mache over the new face, wings, and tail details. At this point, you could start using blank newspaper if you want to give yourself a blank canvas to paint on later.
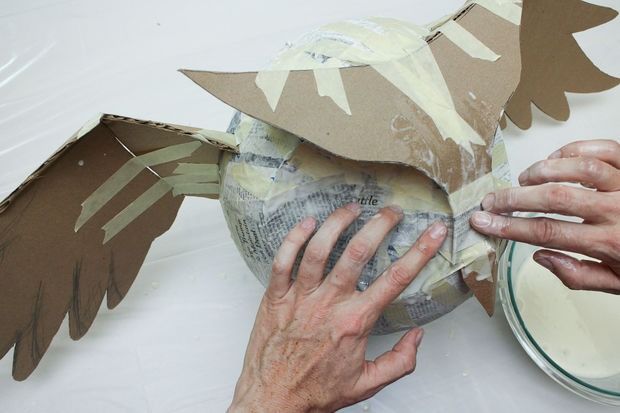

It can be a little difficult to make paper mache around all the angles, points and curves you have created. Use small strips of paper for the detailed areas, and don't worry if everything looks perfect, you'll end up breaking this thing, right?

It's also a good idea to reinforce the areas around the rope with a few layers of strips so that when you hit your piñata, everything doesn't fall before the rest opens.
Again, let your project dry overnight before continuing to decorate.
Step 6: Decorate with tissue paper

There are many ways to decorate a piñata, it just depends on how complicated you want to get it.
The traditional way is usually to cover the entire shape in strips of paper fringe or crepe paper, but you can also paint a piñata or decoupage, which means combining it with decorative paper and glue. I even like the look of regular newspaper here, but to show you some of the decorating options, we're going to paint our owl and add some paper details.

Look at the pictures to decide how you want your owl to look. If you want it to look like a snowy owl, like I did, you can start by painting it white with acrylic paint. If you did not add a layer of blank newspaper to your owl, you will need to add approximately two or three layers of white to cover the newspaper print.

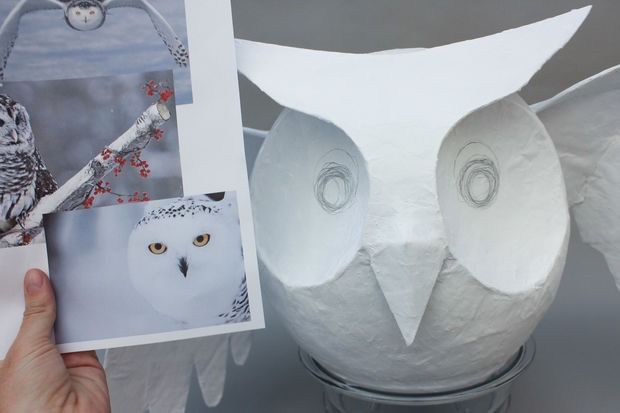
At this point, you can also paint on your owl's eyes and its beak.

Once the paint has dried, add some feather details with crepe paper. It's good to have two types of crepe paper for this design, rolls of narrow streamers and longer black and white pieces.

To create small feathers for the chest, take a piece of paper about 3 feet long and fold it in half, then in half again until it is about 3 inches long. Use your scissors to cut a serrated edge along the bottom of the wire, without cutting into either end.
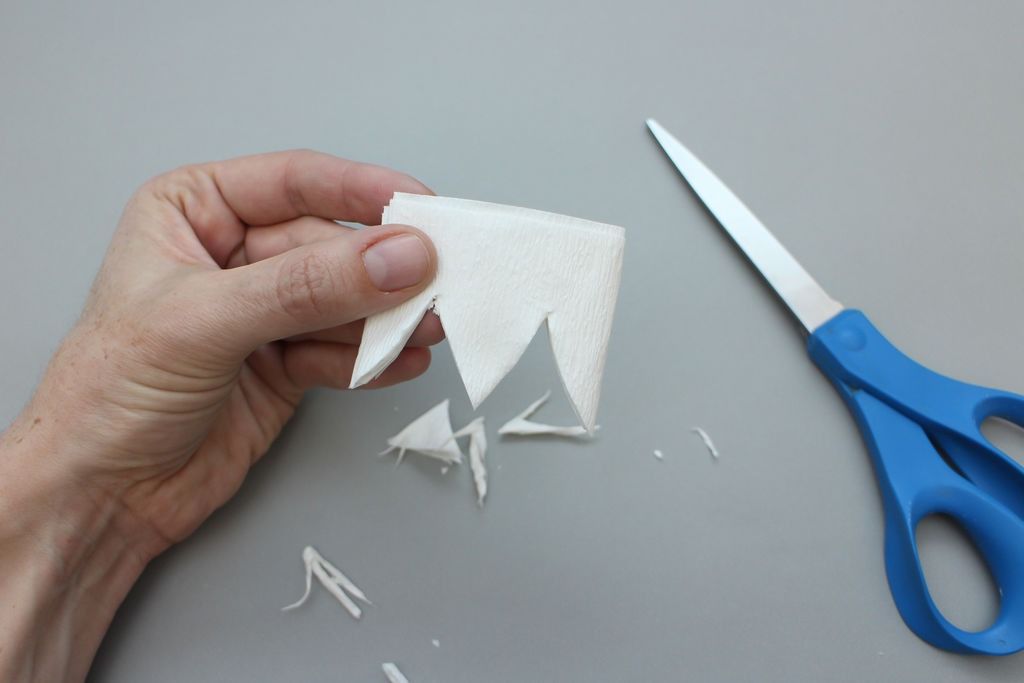
Unfold the strip and you will have a strand of small feathers. Do this with both black and white streamers.
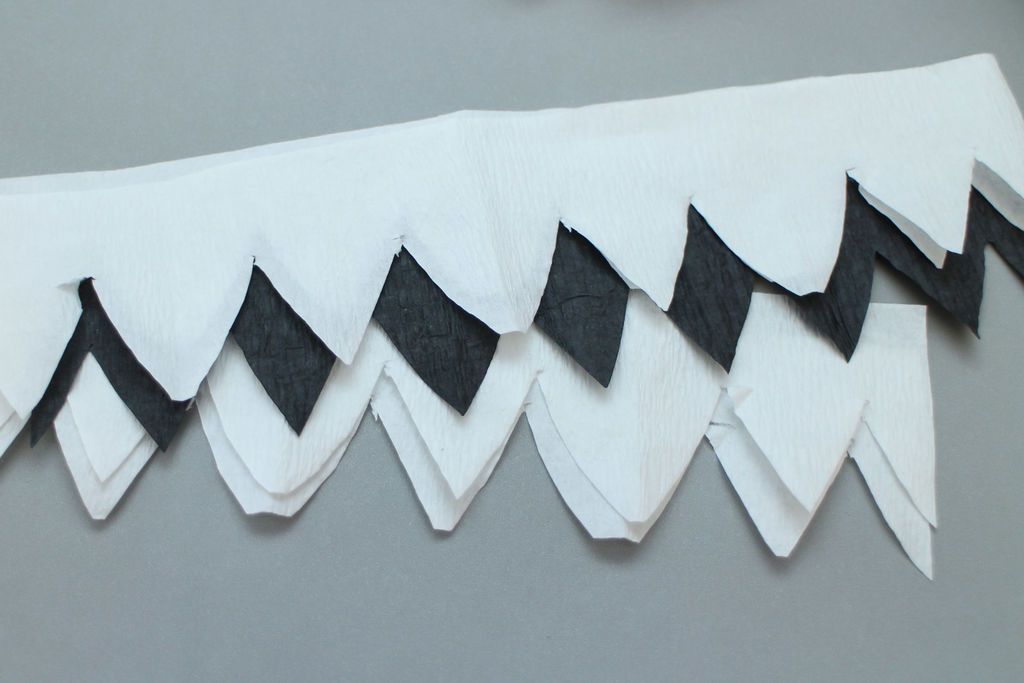
Take some white glue and pour it into a disposable cup and add a small amount of water. Cut a short strip from your white stripe and, using a paintbrush, paint some glue on the owl near the bottom front where you want to stick the strip. Glue the top edge of the strip down and paint more glue over the top.

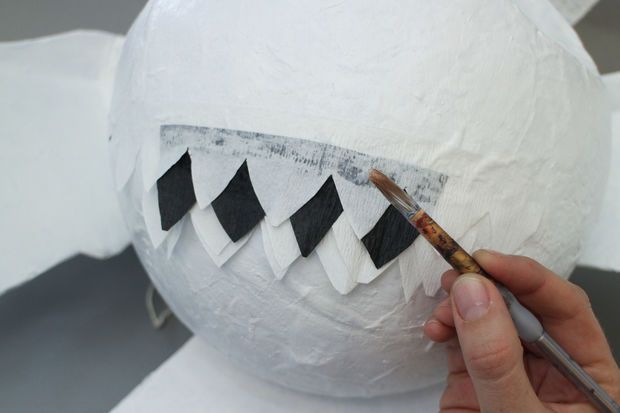
Add another row of white, then an overlapping shorter row of black.
Keep moving forward, alternating rows and making them wider and then narrower as you go.

You can also add some paper around the owl's eyes to mimic the very small furry feathers on the face. To do this, use the same folding method but cut the edge of the wire in a very thin jagged line. Cut wedges from this strip and glue them around the eye. You can start with one row of black, then make the rest white.

Use bunches of the same cut strip to fill around the nose and add a few whiskers to each side of the beak and on the ears.
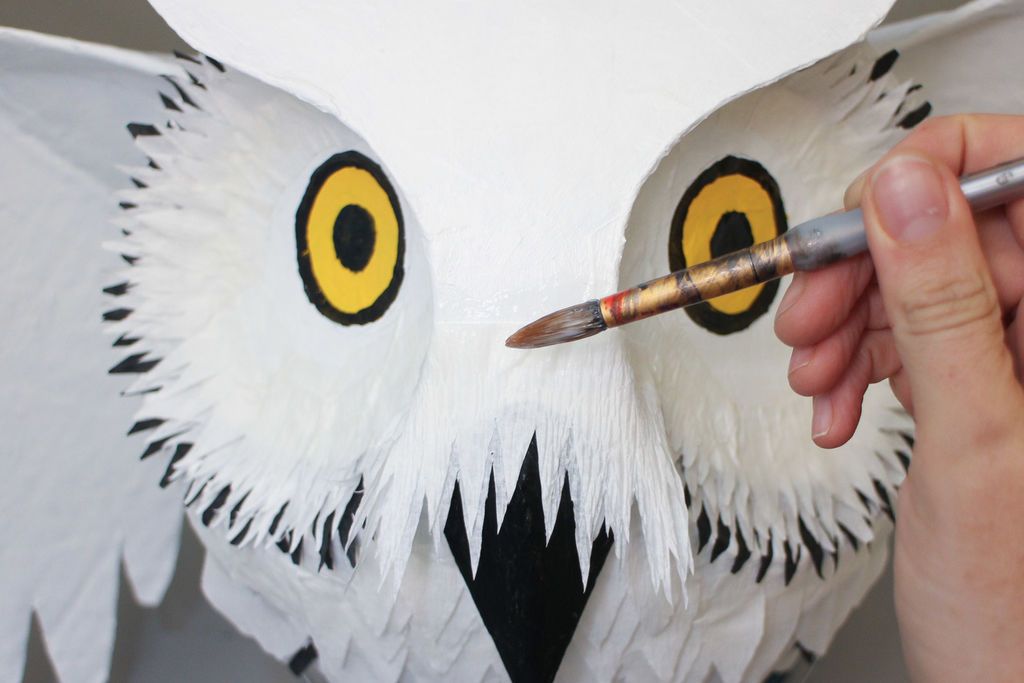
To add long flight feathers to the wings, cut individual pieces of larger crepe paper and glue them onto the wings. To cover the top ends of these feathers, you can also add another white strip of the same trimming thread you used on the chest.

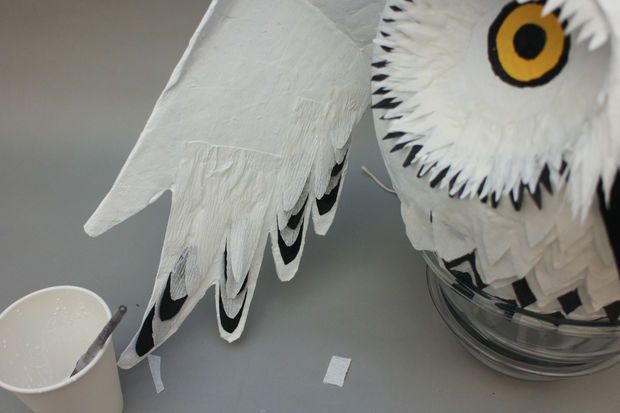

You can also add some similar long feather pieces to the tail if you want.
You could take it as far as you would like with the addition of crepe paper to your piñata. Cover the whole thing if you want! I just decided I liked the way it looked with just a few touches of paper, so I stopped here.
Step 7: Destroy your owl pinata!

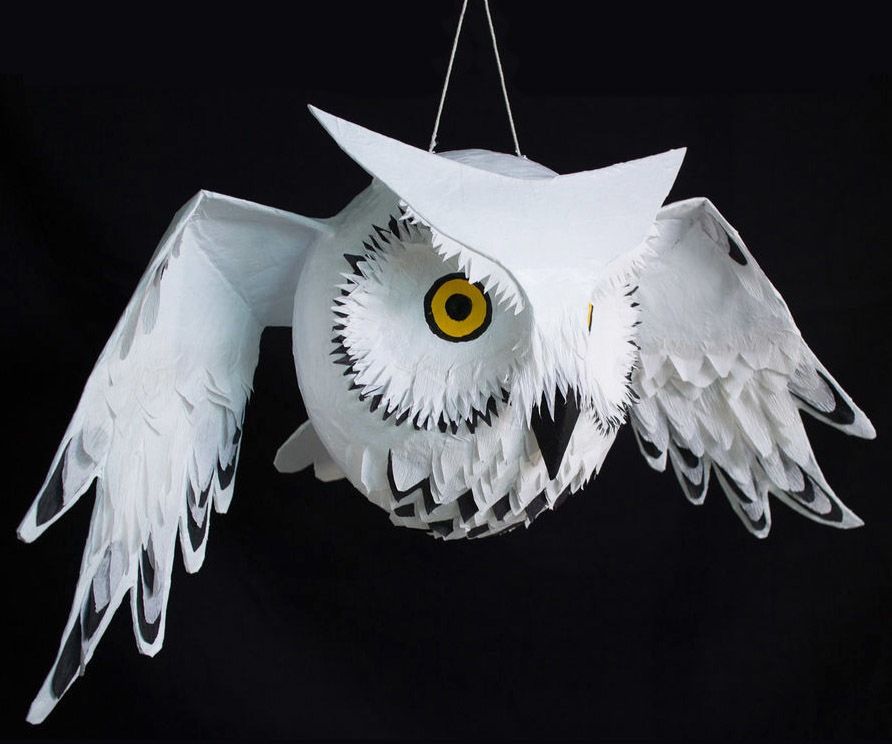
And now, for the exercise in non-attachment. If you have the heart, use your piñata to add excitement to a festive gathering… ORIf you're not feeling homicidal, just hang it somewhere and look at it. I eventually destroyed mine, but I felt a little bad about it. However, the best thing about Papel Marche is that you can always make another one easily and cheaply.
As you can see from this project, creating quite complex shapes with paper mache is really easy, and the way you decorate your creations can make all the difference. The techniques I used to make this project can be used to create all types of projects, not just making an owl piñata.
Remember that you can make an owl piñata in the comfort of your home.
Don't forget to follow us on our social networks for more news!
Popular Content
How to make a rocket stove for outdoors
Cardboard Drawers Lined with Jeans
Ideas and Advantages of Window Grilles for the Home!
Latest Articles
How to make a refrigerator out of insulating material: Practical step-by-step guide
How to make a Kilim for the Home: Complete Step by Step Guide
How to protect ourselves from accidents in our workplace: Complete prevention and safety guide
Related Content
How to Make an Eclipse Lamp
How to Display your Photos at Home
Outdoor Furniture Made with Recycled Pallets
Build a Fabulous Mug with Recycled Wood!
Creative Home Decor Ideas to Transform Every Space
Refreshing your home starts with smart design choices that combine comfort, personality, and functionality. Whether you want to modernize a small apartment, upgrade outdoor areas, or create cozy rustic interiors, these trending ideas can completely change the atmosphere of your space.
Outdoor Spaces That Increase Style and Functionality
Outdoor living continues to dominate modern home trends. Homeowners are increasingly investing in practical entertainment zones inspired by these BBQ shed ideas, which create the perfect setup for gatherings and weekend cooking sessions.
First impressions also matter when designing exteriors. Elegant farm entrance gates design ideas help properties stand out while improving privacy and curb appeal.
Compact living solutions are also gaining popularity. These inspiring 16x40 shed house interior design ideas show how smaller spaces can still feel luxurious and functional.
To enhance patios and entryways, homeowners are adding stylish protection with these creative porch awning exterior DIY ideas that blend aesthetics with practicality.

Rustic and Cozy Interior Design Trends
Warm and natural interiors remain timeless. These charming rustic decor ideas combine wood textures, vintage accents, and earthy tones to create welcoming spaces.
Bedrooms are becoming more personalized with curated wall arrangements. Many homeowners use these stylish picture wall ideas for bedroom spaces to display memories and artwork creatively.
Textured wall treatments are another major trend. Installing a board and batten wall adds architectural character while keeping interiors elegant and modern.
Similarly, bold accent wall ideas can instantly transform plain rooms into eye-catching focal points without requiring a full renovation.
Smart Kitchen and Organization Inspiration
Functional kitchens are essential for modern homes. These practical kitchen wall cabinet ideas maximize storage while maintaining a clean and stylish appearance.
Organization also starts at the entrance. Well-designed mud room ideas help families keep shoes, coats, and daily essentials neatly arranged.
Colorful and Personalized Home Styling
Vibrant interiors are becoming increasingly popular thanks to playful dopamine decor ideas that use bright colors and joyful accessories to improve mood and energy.
Gallery walls also continue to evolve as a major decorative feature. These trendy gallery wall inspiration ideas offer creative ways to combine prints, photos, and statement art.
Young renters and new homeowners are especially embracing these stylish first apartment aesthetic ideas to create sophisticated interiors on a budget.
Finally, selecting the right shades can dramatically influence any room’s atmosphere. These modern trendy color ideas help homeowners choose palettes that feel fresh, elegant, and timeless.
Final Thoughts
From rustic charm and colorful interiors to outdoor entertaining areas and functional storage solutions, today’s home decor trends focus on creating spaces that feel both beautiful and livable. By combining smart layouts, modern textures, and personalized decorative elements, any home can become more stylish, comfortable, and inspiring.
Browse the Shop
 Acacia frida deluxe solid wood bed frame |
Bedroom bench |
Bed chest drawers |
Lingerie dresser |
Frame base |
Mirror with jewelry storage |
30 Bathroom Vanity |
Memory foam queen mattress |
Mattresses for back pain |
Nightstand set of 2 |
Grand Goldman Shop |
Civil Lawyer
Deutschland Trikot WM 2026
Acacia frida deluxe solid wood bed frame |
Bedroom bench |
Bed chest drawers |
Lingerie dresser |
Frame base |
Mirror with jewelry storage |
30 Bathroom Vanity |
Memory foam queen mattress |
Mattresses for back pain |
Nightstand set of 2 |
Grand Goldman Shop |
Civil Lawyer
Deutschland Trikot WM 2026







