

How to make an oven with a drum and bricks! Hello, welcome to perfect ideas, this time we will teach you how to make your own oven with a drum and refractory bricks so you can enjoy those weekends with your family.
Make your own oven with refractory bricks to enjoy an afternoon with the family

Tools:
- Orbital Sander
- Plain
- Mask
- Angle grinder
- Safety clothing for welding (bib, gloves, m
- Arc welder
- Welding mask
- Flat
- Pop riveter
- Concrete bucket
- Bat
- Metal cutting disc
- Magnetic angle
- 4mm metal drill bit
- Caulker Gun
- 4.5” roughing disc
Materials:
- 4″ Nylon Swivel Plate Wheels with Brake, 2
- Refractory adhesive bag 10kg, 5
- Straight refractory bricks 23×11.4×6.3 cm, 10
- Refractory refractory bricks 23×6.5×2.5 cm 12 units, 20
- Igol Primer, 2
- Black high temperature spray paint
- 3.5” galvanized tube
- Refractory putty
- Pop rivets 4×8
- 16 gal drum 68×35 cm
- Galvanized sheet 0.35 mm x 1m x2.5 m
- Super 11 3/32 Electrode
- Folded angle profile 25x25x3 mm and 6 m
- Laminated angles 50x50x5 mm x 6 mt, 2
Step by Step:
Recommendations:
Find Bleeding Edge Supplements at Scandalous Prices on iHerb.

In the store you can order the angle profile strip to be cut into 3 pieces of 2 m, which is mainly used for transport, but for this project you need pieces of 60, 70 and 82.5 cm, the rest are smaller measurements that must be cut at home.
#1 Metal Structure

Make a 70x60 cm metal base that will be proportional to the drum and the size of the bricks.
Cut 4 pieces of 82.5 cm of laminated angle profile. This will be the height of the iron base. You also need 4 cuts of 60 cm and another 4 of 70 cm. Use two of each to form the 60x70 cm foot on which the structure will be supported.
At 40 cm from the base, weld the other 2 cuts of 60 and 70 cm to form the base of the combustion chamber. Weld the pieces together, using the metal angles so that the joints are straight.

Apply high temperature spray paint on the structure.
Assemble the iron sheet to form the base of the combustion chamber and join the structure with the welding machine.

Use safety elements such as a welding mask, gloves and a meat jacket. To move the oven, weld the wheels to the base. Each one supports 120 kg and is 4 inches.

#2 Base for combustion chamber

Prepare the refractory glue in the proportion of 10 kg x 6.5 liters of water. Apply the mixture to the iron plate to smooth the surface and to the smooth façade of the refractory bricks as a glue.

Wet the bricks before applying adhesive so that they do not absorb the water from the mixture and stick them on the metal plate without overlapping. For the walls of the combustion chamber, use straight refractory bricks that are larger and thicker than the previous ones. Arrange bricks on the sides, putting adhesive on the base and at the joints.
Leave an opening in the center of one of the sides of 70 cm (the size of a brick), then we will make the chamber door in that place, through which the firewood can be introduced. Overlap the bricks in the second row so that the structure is firm. To cut them, use an angle grinder and a stone cutting disc.

Once dry, clean the stonework to remove excess adhesive and improve theaesthetics and finish of the project.
#3 Door for firewood

Measure the space intended for the door, in this case approximately 22 cm wide by 23 cm high. Build a frame with a bent angle profile and weld it to the structure.
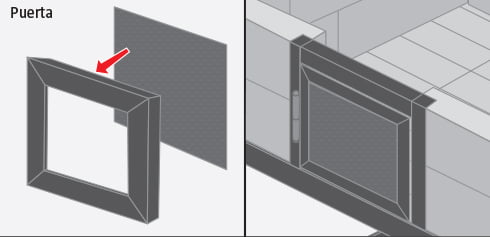
Make a door with the internal measurements of the frame. To do this, weld the pieces and put a piece of metal sheet in the center. Weld the knob to the frame and the door, and add a lock so that the door does not open and thus not lose heat when using it
#4 Drum
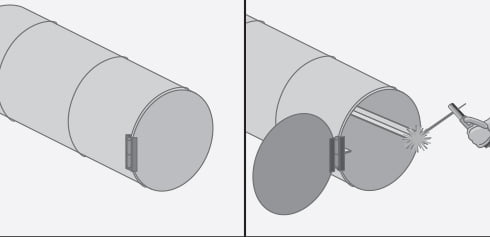
We remove the rubber from the edge of a drum with a removable lid and put a hinge on the left side to form the oven door.
Inside the drum, in the center, weld two profiles to the sides to support the grill.

To mount the drum on the bricks, make an interior iron frame with the measurements of the upper edge of the combustion chamber. In this case the measurement is 61×51 cm
In the center, arrange two 61 cm angles facing each other 18 cm apart. These are the ones that will support and keep the drum in place.

Arrange the drum on the structure, it should protrude forward and leave enough space at the back to install another row of bricks. Weld
To support the roof, install 5 cm pieces of iron with welding; 2 at the top and two on each side.
#5 Roof Base

Cut a piece of iron sheet measuring 56×200 cm for the base of the oven roof.
To install the tube or pipe that will be the chimney through which the combustion gases will be eliminated, mark the diameter of the tube in the center of the plate and 15 cm from the rear edge.
Drill with a drill bit to be able to cut the circumference contour with tin snips. If necessary, hammer any uneven edges to smooth them.

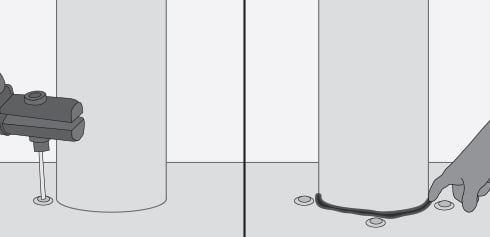
At one end of the tube, cut fins of approximately 1 cm. and fold them outwards.
Pass the pipe through the newly cut circumference and make four holes in total, passing through the plate and the fins. Join both with pop rivets.
Seal the union of tube and metal plate with refractory putty.

Following the curvature of the drum, place the plate on it and secure it inside the frame to some previously welded steel bars. Secure the metal plate to these bars with 1/2 inch self-drilling screws with a 1/2 inch bob head drill bit.
Refractory bricks and cement
These bricks are made of 80% aluminum oxide, a very poor conductor of heat. Thanks to this characteristic, the heat takes time to heat the brick, making it ideal for use as cladding or veneer for fire or direct heat places such as fireplaces, wood-burning kitchen walls, barbecue areas, grills, barbecue pits, etc.

#6 Cover the ceiling

Finally, install a third row of bricks in the structure.
- On the front side, cut the bricks following the curvature of the drum to fill all the available spaces.
- From the fourth row upwards, complete the structure with refractory bricks with a smooth façade.
- To give the roof a curved shape, tilt the bricks on the inside, so that their union appears like a fan.
- In the front area, fill the spaces with pieces of bricks. The measurement will depend on each space.
- Clean up excess adhesivesive with a cloth.
- Allow to dry 72 hours before use.
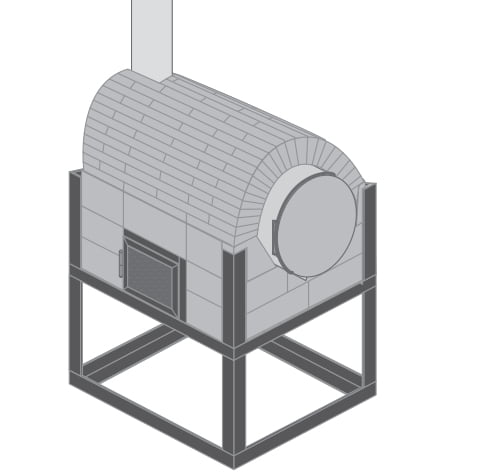
If you liked the content, I hope you share it with your friends 🙂
Get more information at Perfectidea.com and on our Facebook for more How to make an oven with a drum and bricks.
Popular Content
How to make a rocket stove for outdoors
Cardboard Drawers Lined with Jeans
Ideas and Advantages of Window Grilles for the Home!
Latest Articles
How to make a refrigerator out of insulating material: Practical step-by-step guide
How to make a Kilim for the Home: Complete Step by Step Guide
How to protect ourselves from accidents in our workplace: Complete prevention and safety guide
Related Content
How to assemble a resistant laminate countertop
Perfect pallet table for your bedroom
Original ideas to decorate the interior of your home with plants
12 basic care to extend the life of your refrigerator
Creative Home Decor Ideas to Transform Every Space
Refreshing your home starts with smart design choices that combine comfort, personality, and functionality. Whether you want to modernize a small apartment, upgrade outdoor areas, or create cozy rustic interiors, these trending ideas can completely change the atmosphere of your space.
Outdoor Spaces That Increase Style and Functionality
Outdoor living continues to dominate modern home trends. Homeowners are increasingly investing in practical entertainment zones inspired by these BBQ shed ideas, which create the perfect setup for gatherings and weekend cooking sessions.
First impressions also matter when designing exteriors. Elegant farm entrance gates design ideas help properties stand out while improving privacy and curb appeal.
Compact living solutions are also gaining popularity. These inspiring 16x40 shed house interior design ideas show how smaller spaces can still feel luxurious and functional.
To enhance patios and entryways, homeowners are adding stylish protection with these creative porch awning exterior DIY ideas that blend aesthetics with practicality.

Rustic and Cozy Interior Design Trends
Warm and natural interiors remain timeless. These charming rustic decor ideas combine wood textures, vintage accents, and earthy tones to create welcoming spaces.
Bedrooms are becoming more personalized with curated wall arrangements. Many homeowners use these stylish picture wall ideas for bedroom spaces to display memories and artwork creatively.
Textured wall treatments are another major trend. Installing a board and batten wall adds architectural character while keeping interiors elegant and modern.
Similarly, bold accent wall ideas can instantly transform plain rooms into eye-catching focal points without requiring a full renovation.
Smart Kitchen and Organization Inspiration
Functional kitchens are essential for modern homes. These practical kitchen wall cabinet ideas maximize storage while maintaining a clean and stylish appearance.
Organization also starts at the entrance. Well-designed mud room ideas help families keep shoes, coats, and daily essentials neatly arranged.
Colorful and Personalized Home Styling
Vibrant interiors are becoming increasingly popular thanks to playful dopamine decor ideas that use bright colors and joyful accessories to improve mood and energy.
Gallery walls also continue to evolve as a major decorative feature. These trendy gallery wall inspiration ideas offer creative ways to combine prints, photos, and statement art.
Young renters and new homeowners are especially embracing these stylish first apartment aesthetic ideas to create sophisticated interiors on a budget.
Finally, selecting the right shades can dramatically influence any room’s atmosphere. These modern trendy color ideas help homeowners choose palettes that feel fresh, elegant, and timeless.
Final Thoughts
From rustic charm and colorful interiors to outdoor entertaining areas and functional storage solutions, today’s home decor trends focus on creating spaces that feel both beautiful and livable. By combining smart layouts, modern textures, and personalized decorative elements, any home can become more stylish, comfortable, and inspiring.
Home Decor ShopAcacia frida deluxe solid wood bed frame | Bedroom bench | Bed chest drawers | Lingerie dresser | Frame base | Mirror with jewelry storage | 30 Bathroom Vanity | Memory foam queen mattress | Mattresses for back pain | Nightstand set of 2
Browse the Shop
 Acacia frida deluxe solid wood bed frame |
Bedroom bench |
Bed chest drawers |
Lingerie dresser |
Frame base |
Mirror with jewelry storage |
30 Bathroom Vanity |
Memory foam queen mattress |
Mattresses for back pain |
Nightstand set of 2 |
Grand Goldman Shop |
Civil Lawyer
Deutschland Trikot WM 2026
Acacia frida deluxe solid wood bed frame |
Bedroom bench |
Bed chest drawers |
Lingerie dresser |
Frame base |
Mirror with jewelry storage |
30 Bathroom Vanity |
Memory foam queen mattress |
Mattresses for back pain |
Nightstand set of 2 |
Grand Goldman Shop |
Civil Lawyer
Deutschland Trikot WM 2026







