

Building a Work Table/PVC Pipe Organizer Table, being a DIY enthusiast and PVC is the material of choice for me in almost all my DIY projects. Due to the flexibility, reliability and ease with which this material is available in countless shapes, sizes and colors, this material is available and helps me a lot in completing most of my projects.
Let's build...
Find Bleeding Edge Supplements at Scandalous Prices on iHerb.

Step 1: Required Materials


The only material required for this Project is:
- A PVC pipe 20 feet long and 4 inches in diameter
- A sheet of 3 mm plywood
- A handful of 3.2mm aluminum rivets
Step 2: Slice the PVC pipe and cut the legs


I first started by cutting the PVC pipe into small lengths so I could easily cut the pieces needed without hanging the entire length on the miter saw bed. After cutting the tubing into considerably smaller lengths, I began cutting the legs for the Table. There will be four, each 28 inches long.
Note: To ensure that each leg is exactly identical in length to the others, I made a temporary jig using a spare piece of 3mm plywood sheet clamped to the miter saw table. This allows me to limit the length of cut on the miter saw and produces an identical length almost each and every time.
Step 3: Cut slices for the table


Now here comes the most intense part of this. According to my plans, I have to cut 29 slices, each almost 3.5 inches tall. So again I have set the template as stated in the previous step to make the overall process quick and accurate. I cut 29 pieces of the PVC pipe and arranged them together with the legs to get an idea about the feel of the actual dimension of the table.
I decided to keep the size of the table so that it has a maximum of 7 sections of PVC pipes in columns and that they have 5 rows. The table legs go into the corner of the table and the PVC slices come between them. The arrangement is made in such a way that the middle slices are arranged in a hexagonal shape thus touching the corner with their neighboring PVC slices.
This formation appears to be the strongest possible amount of the rest formation, most likely a honeycomb formation.
Step 4: Cut the plywood tops


To close the bottom end of the PVC pipe, I decided to go with a 3mm sheet of plywood. First, I cut the plywood sheet into smaller sheets so that I can sandwich three to four sheets at a time and cut the circular pieces to close the ends of the pipes.
An easy way is to use a circular saw, but the problem with this tool is that it leaves an unwanted hole in the middle of each piece which is not favorable in this case, so I decide to go with a jigsaw... Yes, a little more effort, but it will be worth it... I cut almost 40 pieces withthis technique and kept the diameter a little larger, which will be sanded to ensure a smooth, defect-free finish.
Step 5: Washing the PVC pieces


As I cut most of the parts of the table, during the process it seems that some parts got dirty. Well, the best part about PVC is its flexibility, so I decided to wash these pieces, which ended up giving each piece a clean look.
After washing each part, I let them dry in a clean place.
Step 6: Gluing the covers
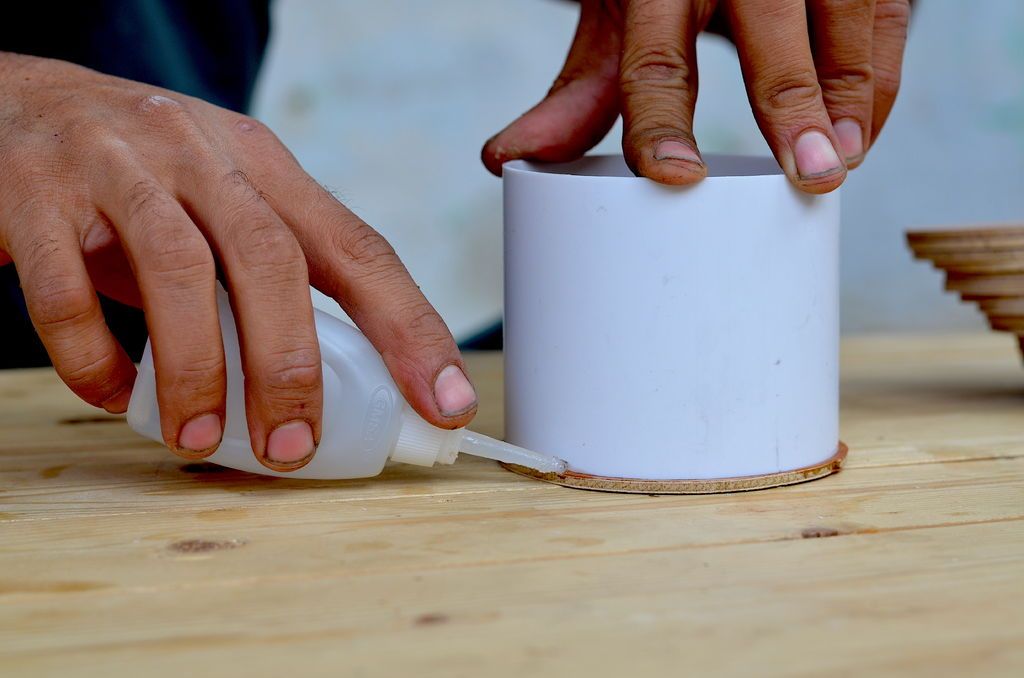


After cleaning the PVC pieces I began gluing the end caps to each leg as well as each of the table top parts using a little glue to set the process and give each piece a cleaner look.
Each piece is well glued, ensuring that it does not fall apart under the weight.
Step 7: Sand the End Caps


Just like begging, I kept the caps a little larger than the PVC pipes, followed by the gluing process. I have done a lot of sanding work to ensure a smooth and perfectly round finish. I have sanded the larger edges first using a file and then given a fine finish with a belt sander.
After a lot of sanding, I ended up getting a bunch of very well finished pieces, ready to put together.
Step 8: Staining


Followed by the sanding process is the staining of the wooden pieces. It gives the wooden pieces a classic look and is weatherproof too.
After the varnish dries, the combination of PVC and wood looks amazing.
Step 9: Drilling Holes


Initially I was planning to join all the pieces together with some super glue, but at this stage I decided to jump to a more reliable method of joining everything together and ended up finding use of a bunch of aluminum rivets. Since the structure is hexagonal type, I have to make sure that each piece has the correct number of holes and, more importantly, the exact location. Again, to speed up the whole process, I made a template to mark the holes in each piece of PVC using a sheet of card. I carefully marked six equidistant points on the card sheet dividing the circumference of the PVC pipe into six parts. I later formed a ring from the card leaf using a ribbon.
I have now marked and drilled holes in each piece depending on the position of each piece. The number of holes and PVC sheets for this formation are given below:
- 2 Holes: Four legs
- 3 Holes: Two pieces
- 4 Holes: Ten pieces
- 5 Holes: Four pieces
- 6 Holes: Thirteen pieces
After carefully drilling all the holes, all the parts are ready to be assemblede.
Step 10: Table Assembly


I started assembling the center pieces of the PVC slices with 6 holes. All parts of the table and table legs are joined together with 3.2 mm rivets. First, I attached all the PVC slices to the table top and attached the four legs at the corner with two rivets for each of them.
Using aluminum rivets helps me obtain stability. the job done neatly in a limited time and also gives the entire table a firm grip.
But a problem occurred, as I joined all the pieces from the holes that were near the top of the PVC pieces so the whole table seems to bend in a curved shape towards the edges of the table. Well, let's solve this problem in the next step...
Step 11: Strengthening the foundation


To flatten the table and give more strength to the entire structure, I used a bungee cord to flatten the entire table structure and remove the curvature. I then began gluing the edges of all the PVC pieces together using super glue which added considerable strength and stability.
Later I made a base support structure using four sticks that I cut from 1 inch thick lumber with a width of 1/2 for each sliced stick. I have formed a rectangular structure with these wooden sticks. The two longer sticks are screwed to the plywood end caps by drilling a hole and using some wood screws and using a washer between them to ensure that the screw does not tear the sheet of wood.
The shorter wooden sticks were screwed to the PVC legs and then screwed to the bin to the longer wooden sticks. This gives the entire structure firm support and stability.
Step 12: Make the drawers


I have decided to build three drawers using the remaining PVC pipe left afterCut the pieces for the table top and table legs to fully utilize the 20 foot length of PVC pipe.
First I cut five pieces, each 11 inches long. Three of these pipes are glued together with 3mm plywood caps that we cut earlier. These pieces will now act as supports for the drawers and are now screwed to the base frame just below the table keeping an equal distance between each piece.
Later, the drawers are made by cutting the other two PVC pipes in half. I now reduced the semicircles to close both ends of the drawers and followed with a circular piece of plywood to serve as a drawer front for each drawer. The front of the drawer measures a little larger than the diameter of the PVC pipe to give it a nice look. Each drawer front is drilled and mounted with a polished acorn nut to act as a handle for the drawer... A neat little one...
Step 13: Glass lid


The table is made from a 5mm thick sheet of clear glass that I got from a warehouse.
The glass lid has the following dimensions:
- Width: 18 Inches
- Length: 28 Inches
- Thickness: 5mm
The glass top sits on the table with four rubber pads, which keeps the glass securely in place, while making it easier to remove the top to access the partitions just below the table. These rubber pads fit tightly between the gaps in the PVC parts.
The idea behind using a clear glass is that we can use any background color by placing a colored sheet of cardboard while having a smooth glass top to work with. Even in stock condition, the table is adorable to have as a background.
Step 14: PVC table lamp


To give this table its full finished look, I decided to build a removable, movable table lamp using 1 inch PVC pipe and a bunch of PVC gaskets. The lamp measures 12 inches tall and 5 inches wide approximately, so all pieces are cut as shown in the images above.
The base is made with a T-joint that has a slot cut into it that makes everything move around the edges of the table. The lamp is made from a 12v SMD LED which are super bright and available at a low price. The LED simply connects to the adapter cord which has a 5mm connector that can be connected to any 12v adapter for power. The LED is glued to the top end of the PVC joint and the wire comes through the PVC pipe and out the bottom T-joint.
This table lamp looks super neat and practical.
Step 15: Final results


As always, the project ended up very well due to the fact that this material is amazing and can be shaped into thousands of new shapes for DIYers.
Get more information at Perfectidea.com and on our Facebook for more Building a MePVC Pipe Organizer Work/Table.
- Tags
- plastic
Popular Content
How to make a rocket stove for outdoors
Cardboard Drawers Lined with Jeans
Ideas and Advantages of Window Grilles for the Home!
Latest Articles
How to make a refrigerator out of insulating material: Practical step-by-step guide
How to make a Kilim for the Home: Complete Step by Step Guide
How to protect ourselves from accidents in our workplace: Complete prevention and safety guide
Related Content
What to Put Above the Headboard of the Bed
How to Make Your Own Concrete Island for Your Kitchen!
Coffee Tables with Lots of Storage Space
How to Prevent Water Damage in Your Home
Creative Home Decor Ideas to Transform Every Space
Refreshing your home starts with smart design choices that combine comfort, personality, and functionality. Whether you want to modernize a small apartment, upgrade outdoor areas, or create cozy rustic interiors, these trending ideas can completely change the atmosphere of your space.
Outdoor Spaces That Increase Style and Functionality
Outdoor living continues to dominate modern home trends. Homeowners are increasingly investing in practical entertainment zones inspired by these BBQ shed ideas, which create the perfect setup for gatherings and weekend cooking sessions.
First impressions also matter when designing exteriors. Elegant farm entrance gates design ideas help properties stand out while improving privacy and curb appeal.
Compact living solutions are also gaining popularity. These inspiring 16x40 shed house interior design ideas show how smaller spaces can still feel luxurious and functional.
To enhance patios and entryways, homeowners are adding stylish protection with these creative porch awning exterior DIY ideas that blend aesthetics with practicality.

Rustic and Cozy Interior Design Trends
Warm and natural interiors remain timeless. These charming rustic decor ideas combine wood textures, vintage accents, and earthy tones to create welcoming spaces.
Bedrooms are becoming more personalized with curated wall arrangements. Many homeowners use these stylish picture wall ideas for bedroom spaces to display memories and artwork creatively.
Textured wall treatments are another major trend. Installing a board and batten wall adds architectural character while keeping interiors elegant and modern.
Similarly, bold accent wall ideas can instantly transform plain rooms into eye-catching focal points without requiring a full renovation.
Smart Kitchen and Organization Inspiration
Functional kitchens are essential for modern homes. These practical kitchen wall cabinet ideas maximize storage while maintaining a clean and stylish appearance.
Organization also starts at the entrance. Well-designed mud room ideas help families keep shoes, coats, and daily essentials neatly arranged.
Colorful and Personalized Home Styling
Vibrant interiors are becoming increasingly popular thanks to playful dopamine decor ideas that use bright colors and joyful accessories to improve mood and energy.
Gallery walls also continue to evolve as a major decorative feature. These trendy gallery wall inspiration ideas offer creative ways to combine prints, photos, and statement art.
Young renters and new homeowners are especially embracing these stylish first apartment aesthetic ideas to create sophisticated interiors on a budget.
Finally, selecting the right shades can dramatically influence any room’s atmosphere. These modern trendy color ideas help homeowners choose palettes that feel fresh, elegant, and timeless.
Final Thoughts
From rustic charm and colorful interiors to outdoor entertaining areas and functional storage solutions, today’s home decor trends focus on creating spaces that feel both beautiful and livable. By combining smart layouts, modern textures, and personalized decorative elements, any home can become more stylish, comfortable, and inspiring.
Browse the Shop
 Acacia frida deluxe solid wood bed frame |
Bedroom bench |
Bed chest drawers |
Lingerie dresser |
Frame base |
Mirror with jewelry storage |
30 Bathroom Vanity |
Memory foam queen mattress |
Mattresses for back pain |
Nightstand set of 2 |
Grand Goldman Shop |
Civil Lawyer
Deutschland Trikot WM 2026
Acacia frida deluxe solid wood bed frame |
Bedroom bench |
Bed chest drawers |
Lingerie dresser |
Frame base |
Mirror with jewelry storage |
30 Bathroom Vanity |
Memory foam queen mattress |
Mattresses for back pain |
Nightstand set of 2 |
Grand Goldman Shop |
Civil Lawyer
Deutschland Trikot WM 2026







