

Boat Bed with Secret Compartments, the hatch in the bow of the boat opens to store blankets and other large items. The nameplate…
The starboard side is a small drawer in which to hide the goodies. My boy put a Mickey Mouse toy there at first glance. Also on the port side is a flagpole that pushes down to reveal a hidden panel. That's a good idea. You can also raise the mattress and store things under the bed...
Find Bleeding Edge Supplements at Scandalous Prices on iHerb.

Step 1: Design and materials

I'm not much for making an exact drawing of what I build. I tend to go for that. So for this project I made a basic sketch (on paper) with the dimensions of the mattress, the final height and the space I had to work with.
So I just used my tape measure and took a look at the shape I wanted. Another big design factor was that I wanted to be able to take it apart easily if I end up moving in the next two years.
That made it a little more difficult. As I progressed through the project, I had to make some minor adjustments to my original dimensions to allow for bending of the plywood and the tools I had on hand.
I bought a 5/8″ sheet for the mattress to sit on and 2 1/8″ sheets to cover the boat.
The frame is made primarily of 3/4″ material. More paint and polyurethane. Nails, screws, glue... All the basics.
Tools used:
- Circular saw
- Jigsaw
- Router
- Cordless drill
- Hammer
- Sander
- Japanese style pull saw
- Various drill bits
- Tape measure
- Clamps
Step 2: Build the framework


I drew the side profile of the full-size "boat" on cardstock material and used it as my pattern (photo 1). This is the exact profile on the back of the boat.
Then I cut four of those, two for each side. These are the rearmost studs. As they get closer to the front, they need to be taller for the gentle curve from stern to bow.
So I changed my pattern 3/4″ for two more and then an inch more for the last two.
I glued and screwed them to a 1x4 that is 2 inches longer than the mattress.
Then I drew the pattern on a 1/2 inch layer I had (crib) and calculated the width of the bed/boat based on the width of the mattress.
I temporarily screwed it to the back to keep the sides up (photo 3).
I cut one for the front as well but based on the studs in the front.
Then I placed a 1x2 on top of the notch I had planned on my pattern. Glue and screw everything.
Step 3: Top Rails

The top rail to overlap the 1/8″ plywood sheets.
Then I used a 5/16″ bit to counter the sink, where I could screw directly into the studs. Glue and screw.
Step 4: Begin the Bow

This was a bit complicated. I had to eyeball where I wanted the bow to end without making the boat too long for my kids' room.
I also wanted it to be big enough to store a duvet.
First, I put a 1/2″ layer on the soil.
Then I lifted the 2x4 at an angle to see where it should go, then marked it and cut it. Then I had a better idea of where I would end up.
I then drew the curve on the cape that is sitting on the ground for the bottom of the bow and cut it with a saw.
After making sure the curve was nice, I screwed the 2/4 into the bottom.
Step 5: Finish the top of the bow


Then I had to figure out where the top of the bow should be, so I bent a board front to back with an approximation of the curve of the rails.
Then I cut it at that mark.
I then used two 1x8s from the front of the rails to the bow.
I pinned them in place and then drew the curve on the top side. Then I cut one with the saw and tried it on both sides.
Once it fit well, I flipped it over and traced over the other board, cut it out, and then put them in place.
I turned the bow over to a workbench and put the 2x2 uprights in place.
Once everything was lined up nicely, I used a quarter turn bit and routed all the edges.
Step 6: Cover the sides


I used 1/8″ plywood to cover the boat. My dad built a 1/4″ ply kayak, so I thought it would be much stronger for a fake boat.
Once everything was glued and dry, it was surprisingly strong and light.
For the side panels, I wanted 4 "boards" to run the length of the boat.
I divided the front and rear uprights into four equal parts that would be the bottom of each board.
Then I ripped up the cape with the saw because I wanted a rough old ship type of look.
Starting at the bottom, I glued and nailed the cape to the frame, gluing along the entire overlay as well.
The overlay didn't want to stay together, so I used a couple of 1″ screws to hold it together until they dried.
Then I removed them and filled the holes.
The top ply "board" has that slight curve that runs along the top rail of the entire boat. I pinned that piece of fabric where the background should go and outlined the back with the curve. Then I carefully cut it with the saw.
Step 7: Cover the bow


This was probably the most difficult part of the entire project. It's hard to describe how I did it and I was in a hurry to finish.
Due to the more aggressive curve around the bow, I ran the ply across the grain because it bends more easily that way. They also make "folds" which would have been great for this, but I couldn't get any.
I again marked all the studs where the bottom of the board should be.
Then I made an 18″ cut of fabric and just held it in place roughly and marked the angle along the 2x4. Once the angle was cut, I was able to hold it in place and draw the curve on the back using the bottom of it and only added an inch.
I only had to figure one side and cut the other from the other.
Each "board" has a different radius because the bow widens towards the top.
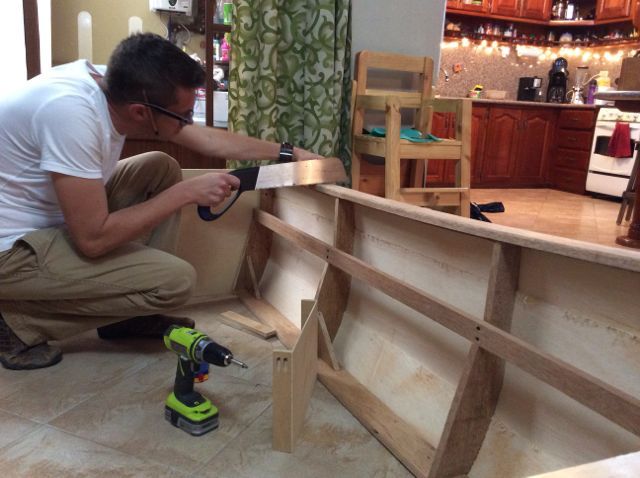
I let the boards run long and trimmed them with a hand saw flush with the back of the bow.
Step 8: Secret Panel


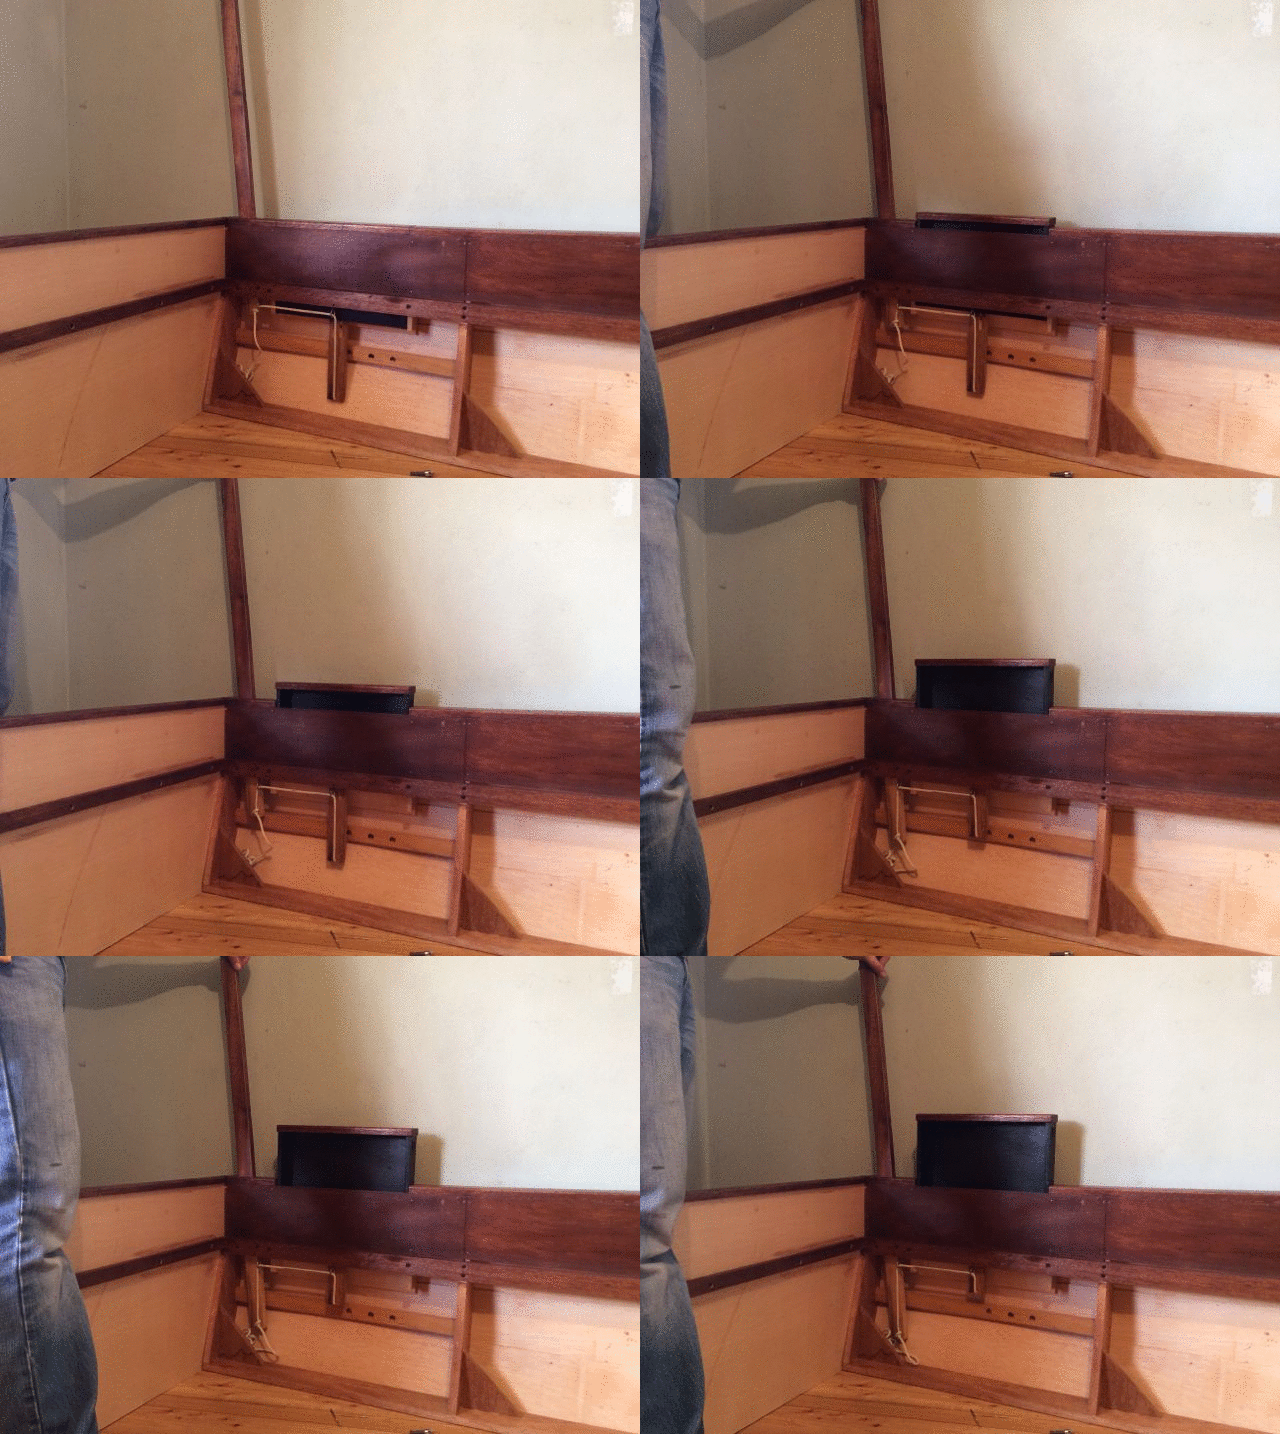
I had a rough idea of how I was going to make a secret panel that would rise when something else was pushed or pulled.
I used a fine-cut Japanese style removal saw to cut the top bar where the panel would rise.
Then I built a basic drawer that served as a panel.
It took a bit of trial and error to figure out the mechanics, but basically it's two eyelets screwed into the bottom of the 1x2 that has a string running through it.
When you push down on the flag pull pull on the rope that lifts the panel. Simple as that!
Perfect place for an iPad… And some books…
Step 9: Secret Drawer


From the beginning, I wanted a plaque with my son's name on it, so I decided to open it.
I just built a small drawer with a back that extended over the sides, so when it was in place, the drawer couldn't be pulled out too far and fall over.
Stained theforehead. I printed a font I liked and transferred it to the wood.
Painted with diluted acrylics.
Polyurethane all in the end. Added some brass rivets to the front corners to make it look like they are screwed to the bolt and can't move.
Step 10: Storage


I used the space in the bow to hide quilts and big things like that. He used another piece of cloth from the crib.
I cut it out and added some hinges and a handle.
Eventually I'll put something up to hold it while it's open, but for now my son won't be able to open it on his own for a couple of years.
Step 11: Finishing


I stained the top rails and the inside of the side where the mattress will sit. I then painted the outside of the boat solid green.
Once the green dried, I brushed on the dark green and white in that order to give it a worn look.
I also brush the stained wood so that it also has the same appearance.
I used a damp cloth to soften the contrast of the white.
Then I painted with the dark green to paint over moss to give it more details.
Then I sprayed everything with satin polyurethane. I didn't want glitter because... I don't like glitter 🙂 and I wanted it to look old.
Step 12: Add some trees


Once I installed it he seemed alone in his room. So I grabbed some dried eucalyptus branches I had sitting around for another idea I had for the bed (I was going to make a rustic loft bed...)
And I supported them in the corners. Once I knew where I wanted them, I put them together so they wouldn't move if my son attacked them.
Then the sticks seemed kind of lonely, so I painted some of them too. That filled him up a little more.
Step 13: Jolly Roger (Pirate Flag)


I added a Jolly Roger flag to the pole to make it a little more fun.
I used a piece of black canvas, a white pencil, and some white acrylic paint.
When it was dry, I added a piece of gray cardboard to stiffen it a little more on the back.
Step 14: Ready!


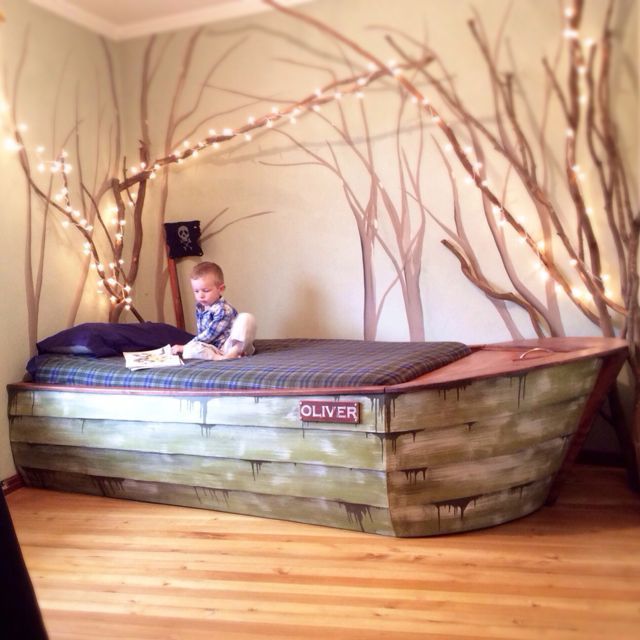



Here is just a review of the spacesThe secrets I have included.
- Hidden panel that lifts up when the flagpole is pushed
- Drawer behind the nameplate
- Hatch in the bow of the ship
- The panel under the mattress lifts up
Thank you for reading!
Get more information at perfectionidea.com and on our Facebook for more How to Make a Book Header.
- Tags
- Bed
Popular Content
How to make a rocket stove for outdoors
Cardboard Drawers Lined with Jeans
Ideas and Advantages of Window Grilles for the Home!
Latest Articles
How to make a refrigerator out of insulating material: Practical step-by-step guide
How to make a Kilim for the Home: Complete Step by Step Guide
How to protect ourselves from accidents in our workplace: Complete prevention and safety guide
Related Content
Building a Curved Concrete Bench!
Ideas to Have Star Wars Themed Toilets
How to Decorate Your Kitchen Refrigerator
How to Fix Loose Tiles in the Living Room or Bathroom
Creative Home Decor Ideas to Transform Every Space
Refreshing your home starts with smart design choices that combine comfort, personality, and functionality. Whether you want to modernize a small apartment, upgrade outdoor areas, or create cozy rustic interiors, these trending ideas can completely change the atmosphere of your space.
Outdoor Spaces That Increase Style and Functionality
Outdoor living continues to dominate modern home trends. Homeowners are increasingly investing in practical entertainment zones inspired by these BBQ shed ideas, which create the perfect setup for gatherings and weekend cooking sessions.
First impressions also matter when designing exteriors. Elegant farm entrance gates design ideas help properties stand out while improving privacy and curb appeal.
Compact living solutions are also gaining popularity. These inspiring 16x40 shed house interior design ideas show how smaller spaces can still feel luxurious and functional.
To enhance patios and entryways, homeowners are adding stylish protection with these creative porch awning exterior DIY ideas that blend aesthetics with practicality.

Rustic and Cozy Interior Design Trends
Warm and natural interiors remain timeless. These charming rustic decor ideas combine wood textures, vintage accents, and earthy tones to create welcoming spaces.
Bedrooms are becoming more personalized with curated wall arrangements. Many homeowners use these stylish picture wall ideas for bedroom spaces to display memories and artwork creatively.
Textured wall treatments are another major trend. Installing a board and batten wall adds architectural character while keeping interiors elegant and modern.
Similarly, bold accent wall ideas can instantly transform plain rooms into eye-catching focal points without requiring a full renovation.
Smart Kitchen and Organization Inspiration
Functional kitchens are essential for modern homes. These practical kitchen wall cabinet ideas maximize storage while maintaining a clean and stylish appearance.
Organization also starts at the entrance. Well-designed mud room ideas help families keep shoes, coats, and daily essentials neatly arranged.
Colorful and Personalized Home Styling
Vibrant interiors are becoming increasingly popular thanks to playful dopamine decor ideas that use bright colors and joyful accessories to improve mood and energy.
Gallery walls also continue to evolve as a major decorative feature. These trendy gallery wall inspiration ideas offer creative ways to combine prints, photos, and statement art.
Young renters and new homeowners are especially embracing these stylish first apartment aesthetic ideas to create sophisticated interiors on a budget.
Finally, selecting the right shades can dramatically influence any room’s atmosphere. These modern trendy color ideas help homeowners choose palettes that feel fresh, elegant, and timeless.
Final Thoughts
From rustic charm and colorful interiors to outdoor entertaining areas and functional storage solutions, today’s home decor trends focus on creating spaces that feel both beautiful and livable. By combining smart layouts, modern textures, and personalized decorative elements, any home can become more stylish, comfortable, and inspiring.
Browse the Shop
 Acacia frida deluxe solid wood bed frame |
Bedroom bench |
Bed chest drawers |
Lingerie dresser |
Frame base |
Mirror with jewelry storage |
30 Bathroom Vanity |
Memory foam queen mattress |
Mattresses for back pain |
Nightstand set of 2 |
Grand Goldman Shop |
Civil Lawyer
Deutschland Trikot WM 2026
Acacia frida deluxe solid wood bed frame |
Bedroom bench |
Bed chest drawers |
Lingerie dresser |
Frame base |
Mirror with jewelry storage |
30 Bathroom Vanity |
Memory foam queen mattress |
Mattresses for back pain |
Nightstand set of 2 |
Grand Goldman Shop |
Civil Lawyer
Deutschland Trikot WM 2026







