

This is a step by step instruction on how to make an antler lamp to give a unique look to your bedroom.
A lamp project will be combined with professional style horn plate mounting techniques.
Find Bleeding Edge Supplements at Scandalous Prices on iHerb.

Typical antler lamps are constructed with multiple deer shed antlers that have no meaning to the buyer/builder.
I hope the instructions are helpful. If something is not clear enough, feel free to ask a question in the comments section.
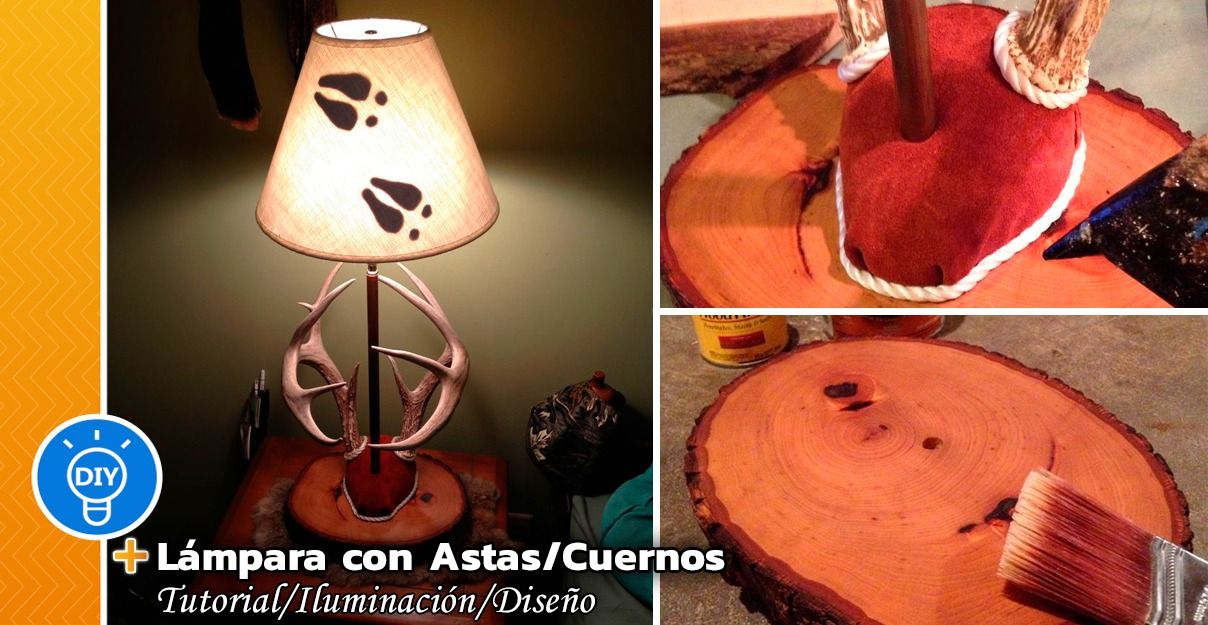
Steps to make a lamp with horns
Step 1: Tools and materials
- Drill
- Hacksaw
- Sawzall or other type of mechanical saw (jigsaw or band saw)
- Paint brush
- Nails
- Wooden lamp base of your choice (I used a slab cut from a log)
- Piece of suede or fabric with a print of your choice.
- Staple or tack gun
- Small rope
- Lighter
- Copper tube
- Tube cutter
- Lamp kit
- 30″ lamp tube (picked up at Lowe’s with the lamp kit)
- Crayola Model Magic (Craft Store)
- Lampshade
- Silicone gun
- Utility knife
- Sander
- Wood finish
- Polyurethane
- Router
- Assembly of antlers
Step 2: Preparing the antlers and the base


- Once you have cleaned your antlers and cleaned them, you will need to cut them with a saw so that they are upright on the plate.
- Draw a teardrop shape on your piece of scrap wood that you are using for your base.
- I used a cover from a cheap antler plate mounting kit to make my shape. It doesn't have to be exact.
- Once the leather is placed later in the process, you won't be able to tell if it's not perfect.
- Once I had my shape, I used a saw to cut it out.
- There are better tools for the job, but I used what I had. I then sanded the rough edges to give it a better shape, but it doesn't have to be exact.
Step 3: Placing the antlers on the base


- You will need to raise your antlers slightly off the base board.
- I cut another piece of wood to raise the antlers a little.
- I then used metal bands and screws to secure the antlers to the wood.
- Metal bands are not necessary, you can simply screw the antlers directly to the boards. Be sure to drill a pilot hole first.
- Drill a hole the same size as the lamp tube through the base plate where you want the lamp tube to exit through the bracket.
- If you're wondering why I have JB weld on my antler base, it's because the antlers fell off my workbench and broke in half.
- I had to fix them with JB glue and solder, this is the reason I chose to use the metal bands because I couldn't drill the center anymore.
- Luckily for me, it was a clean break and they turned out to be very solid and perfectly in place after correction.
Step 4: Cut the pipes


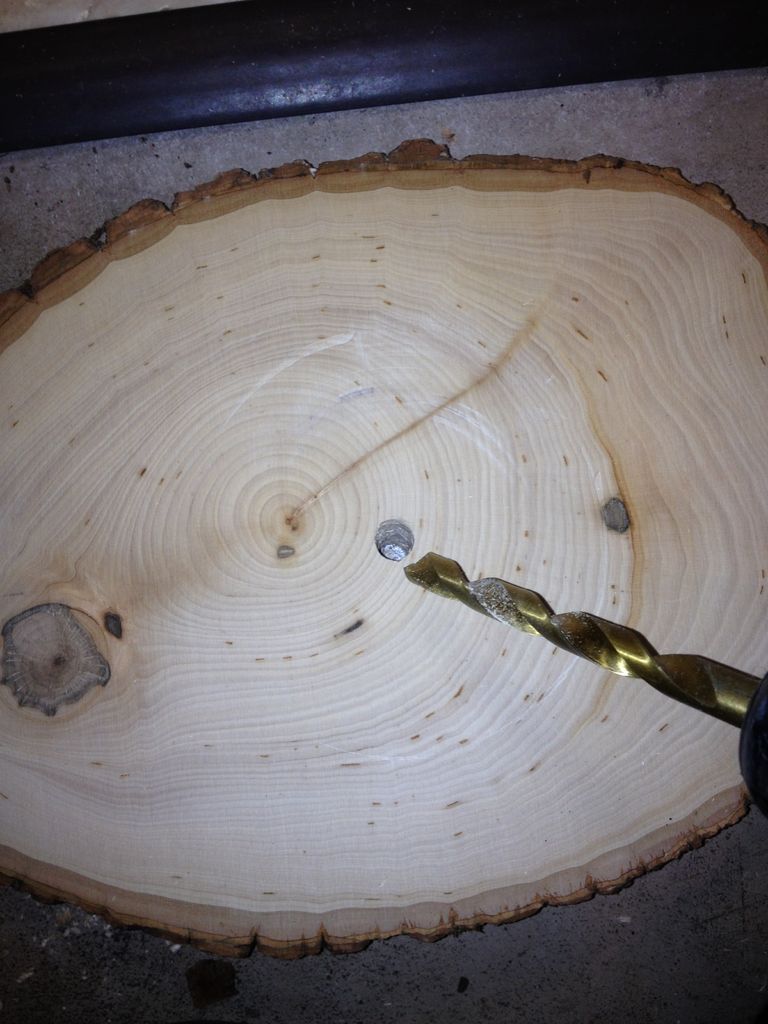

- Cut your copper tubing with a tubing cutter to the length you need, depending on the height of your antlers.
- Also cut the lamp tube to the size you need.
- At this point, youYou will need to drill a hole in the base of the lamp so you can put everything together temporarily to make sure everything is the correct length.
- The lamp tube should be long enough to pass through the entire lamp. How the copper tube will also be shorter.
- This copper tube will rest on the base of the wooden shaft (scrap wood) and the lamp tube will extend through the base of the lamp (slab).
Step 5: Shaping the Base

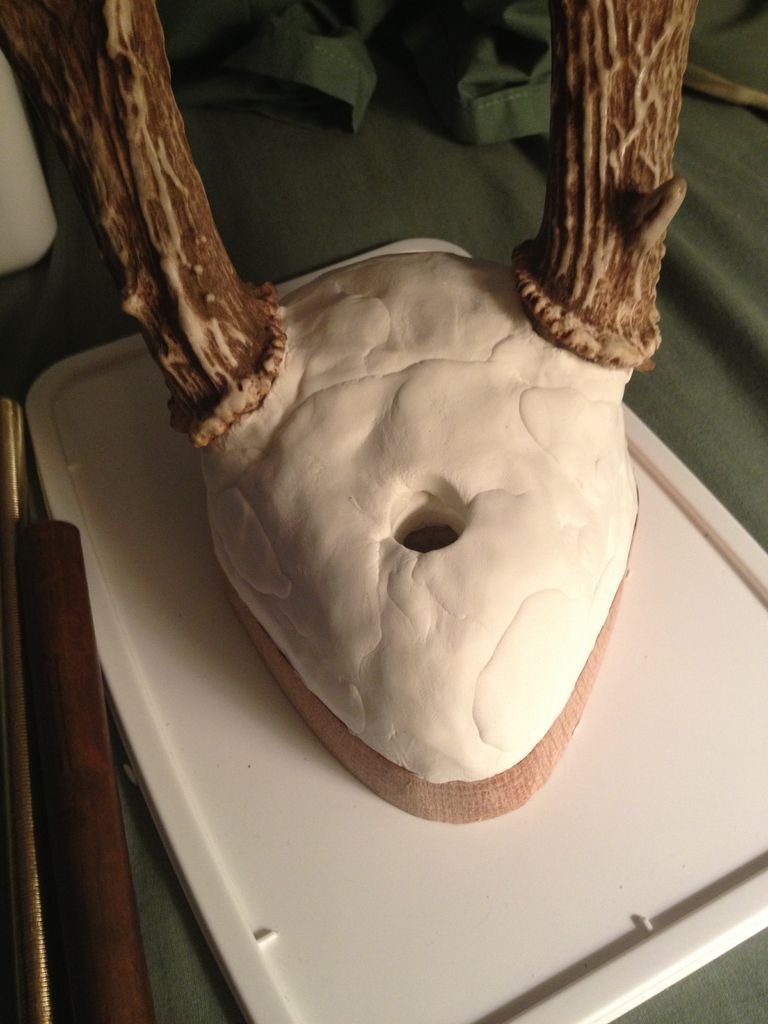
- I usually use Plaster of Paris when making an antler plate mount.
- However, since there is a lamp tube running up through this assembly, I decided to use Crayola Model Magic instead.
- Plaster is sticky and dries extremely quickly. Crayola clay is non-sticky and takes three days to dry, making it very easy to leave a hole to fit the pipes.
- You don't need a lot of clay, the pictured bucket I bought contained four of those smaller packets pictured.
- I only used half of one of the packages. The clay can be purchased in individual packages, I bought it in bulk because I plan to make more of these.
- I place a small piece of copper tubing where the actual tubing will be placed so I can shape it.
- Once you have shaped the head, remove the tubes and allow it to dry for 72 hours.
- The clay will not harden, but it will be hard enough. Make sure you don't put too much clay around the bases of the antlers.
- You will need the space there later when you place the rope around the bases.
Step 6: Preparation of the lamp base
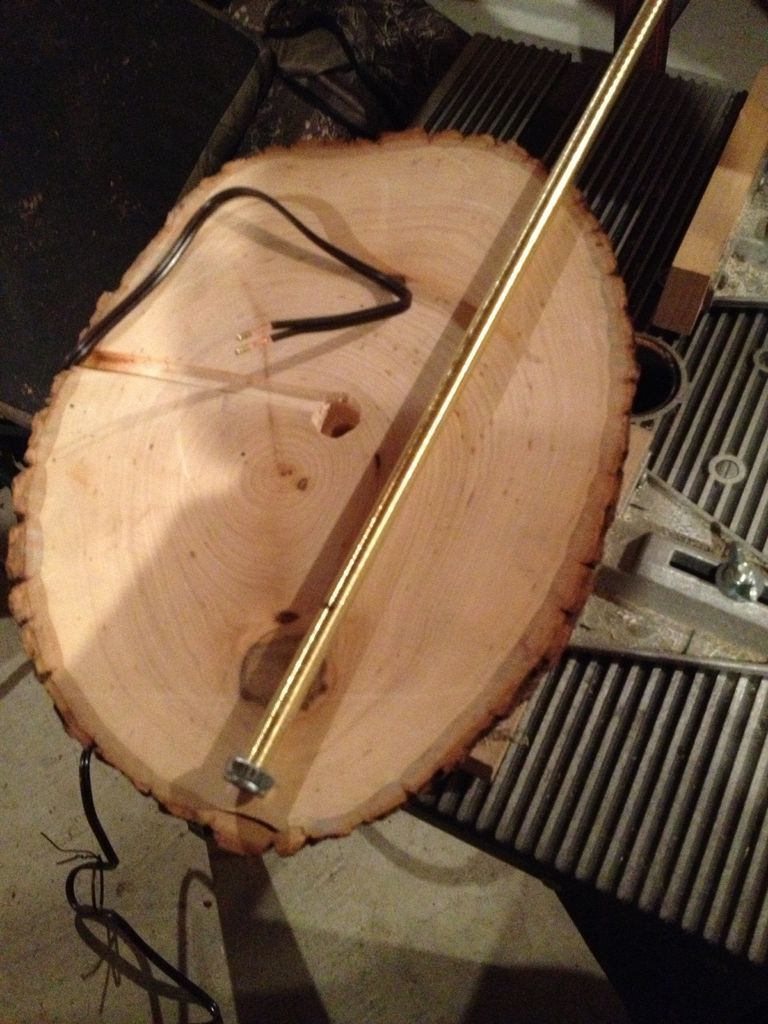

- While you have a few days for the clay to dry, you can prepare the lamp base. I used a slab.
- Cut and sand one yourself if you want.
- I picked up mine at a craft store.
- It's up to you whether you want to save time or money here, I chose time in this case.
- Using a Router, cut a channel for your lamp cord so that the base lies flat once the cord is inside.
- Place a nut on the bottom of the lamp tube and the router facing out to make it fit.
- Apply a few coats of wood stain and polyurethane for a good finish. Be sure to allow enough drying time between coats.
Step 7: Leather and rope
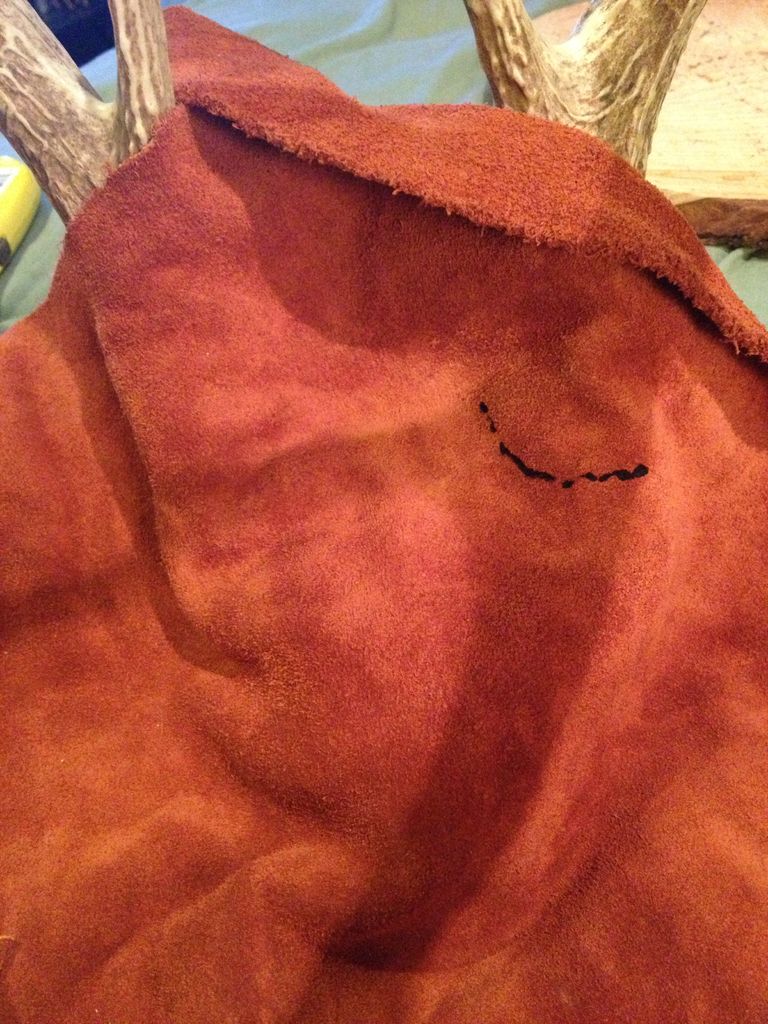

- Now that your clay is dry, you need to place your suede on the molded base. Fabric would be much easier to work with, but suede looks great once you get it right.
- Take your time, start with a piece that is more than big enough and slowly cut it a little at a time until you get a good fit.
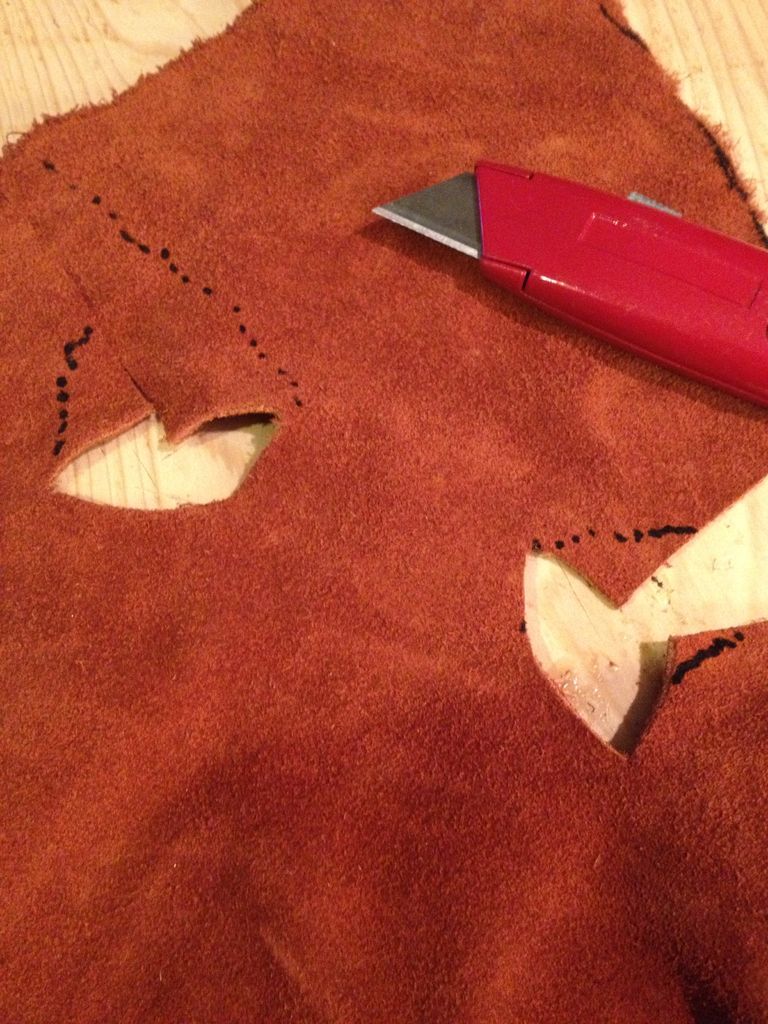
- Use a pencil sharpener to mark your cuts where you need them. Place the suede on the base, make your marks, cut and repeat.
- Be sure to use a utility knife with a new blade as it will make your life much easier.
- Don't worry about placing the leather perfectly against the bottom of the antlers, as long as it's close enough, the rope will cover the gap later in the process.
- Secure the suede to the bottom as you go with a staple or tack gun.
- Once you have secured the entire piece in place, run the lamp tube through the underside of the wood so you can feel where you are pushing on the suede.
- Cut a hole for it to come through.
- Then you will have to enlarge the hole for the copper tube to go down.
- I placed the copper tube over the hole I had already madefor the lamp tube and applied pressure creating an impression in the suede, so I knew exactly how big the hole needed to be for the copper tube.
- In fact, it doesn't hurt if it's a small hair.
- The excess will push down into the hole when you put the tube in making a tight fit.
Tip:
Once the impression was made on the suede, I removed the razor blade from the knife. It was much easier to cut this hole precisely by holding the razor itself, rather than the entire blade.
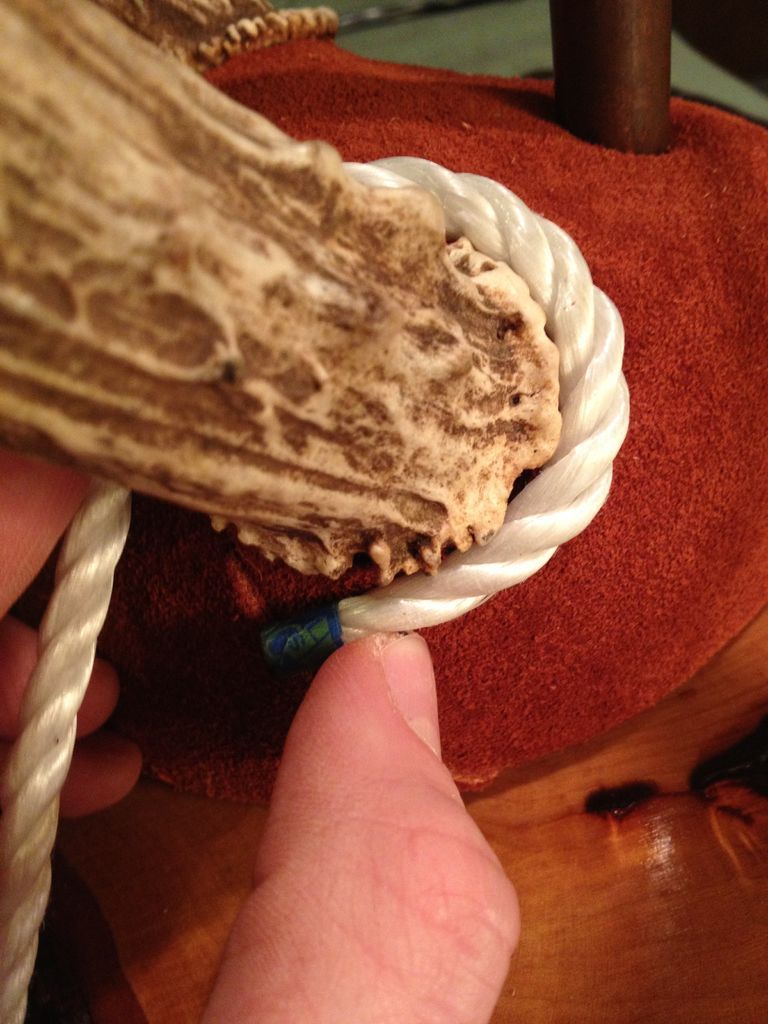
Measure the lengths of rope you will need to go around each antler base.
Be sure to tape the rope before cutting it and burn the ends with a lighter to prevent it from fraying on you.
Attach the rope around the antler bases with a hot glue gun.
This will cover any gaps between the leather and the base of the antlers while giving it a clean, finished look.
Step 8: Putting it all together


- Now is the time to put it all together. Place your antlers on your base where you want them and place the lamp on top of your pipes.
- This will keep the antlers in place once screwed in.
- You will still need to pass a screw through the base of the lamp to the base of its stems.
- Drill a pilot hole and slide in the screw.
- Now that everything is in place, attach the last piece of rope around the bottom of the main piece using a hot glue gun.
- Wire your lamp kit following the instructions you received with the kit.
- I used additional pieces of suede that I cut out to cut out deer hooves that I tied to the inside of my lampshade with double-sided tape.
- This is an extra finishing touch that isn't necessary, but I think it brings the whole lamp together.
Plug in your new lamp and enjoy your new light source! Also remember that you can make a lamp with antlers to place on the wall of your home.
Don't forget to follow us on our social networks for more news!
Popular Content
How to make a rocket stove for outdoors
Cardboard Drawers Lined with Jeans
Ideas and Advantages of Window Grilles for the Home!
Latest Articles
How to make a refrigerator out of insulating material: Practical step-by-step guide
How to make a Kilim for the Home: Complete Step by Step Guide
How to protect ourselves from accidents in our workplace: Complete prevention and safety guide
Related Content
Original Nightstand Made of Pallet!
Winter Decoration Reusing Old Things
11 Unique Hardwood Flooring Designs and Ideas for Your Home!
Learn How to Decorate Your Ceramic Plates
Creative Home Decor Ideas to Transform Every Space
Refreshing your home starts with smart design choices that combine comfort, personality, and functionality. Whether you want to modernize a small apartment, upgrade outdoor areas, or create cozy rustic interiors, these trending ideas can completely change the atmosphere of your space.
Outdoor Spaces That Increase Style and Functionality
Outdoor living continues to dominate modern home trends. Homeowners are increasingly investing in practical entertainment zones inspired by these BBQ shed ideas, which create the perfect setup for gatherings and weekend cooking sessions.
First impressions also matter when designing exteriors. Elegant farm entrance gates design ideas help properties stand out while improving privacy and curb appeal.
Compact living solutions are also gaining popularity. These inspiring 16x40 shed house interior design ideas show how smaller spaces can still feel luxurious and functional.
To enhance patios and entryways, homeowners are adding stylish protection with these creative porch awning exterior DIY ideas that blend aesthetics with practicality.

Rustic and Cozy Interior Design Trends
Warm and natural interiors remain timeless. These charming rustic decor ideas combine wood textures, vintage accents, and earthy tones to create welcoming spaces.
Bedrooms are becoming more personalized with curated wall arrangements. Many homeowners use these stylish picture wall ideas for bedroom spaces to display memories and artwork creatively.
Textured wall treatments are another major trend. Installing a board and batten wall adds architectural character while keeping interiors elegant and modern.
Similarly, bold accent wall ideas can instantly transform plain rooms into eye-catching focal points without requiring a full renovation.
Smart Kitchen and Organization Inspiration
Functional kitchens are essential for modern homes. These practical kitchen wall cabinet ideas maximize storage while maintaining a clean and stylish appearance.
Organization also starts at the entrance. Well-designed mud room ideas help families keep shoes, coats, and daily essentials neatly arranged.
Colorful and Personalized Home Styling
Vibrant interiors are becoming increasingly popular thanks to playful dopamine decor ideas that use bright colors and joyful accessories to improve mood and energy.
Gallery walls also continue to evolve as a major decorative feature. These trendy gallery wall inspiration ideas offer creative ways to combine prints, photos, and statement art.
Young renters and new homeowners are especially embracing these stylish first apartment aesthetic ideas to create sophisticated interiors on a budget.
Finally, selecting the right shades can dramatically influence any room’s atmosphere. These modern trendy color ideas help homeowners choose palettes that feel fresh, elegant, and timeless.
Final Thoughts
From rustic charm and colorful interiors to outdoor entertaining areas and functional storage solutions, today’s home decor trends focus on creating spaces that feel both beautiful and livable. By combining smart layouts, modern textures, and personalized decorative elements, any home can become more stylish, comfortable, and inspiring.
Browse Grand Goldman Shop
rocking chair office | teak wood rocking chair | mid century rocking chairs | cream sectional couch | plush couch sectional | Ivory sectional | King sofa bed | sofa bed click clack full size | rv sofa bed replacement | rv sofa bed | leather sofa and recliner | M1 three Seater Sofa | ashley tov furniture lillian velvet storage bench | walnut storage bench | john louis home solid wood shoe storage bench | Rustic storage bench | bluetooth fireplace tv stand | 70in tv stand | corner cabinet tv stand | polycarbonate chair mat | patio chair material replacement | gaming chair mat for carpet | gwang felt desk pad | maruse large leather desk pad | faux leather desk pad | acme ievi writing desk | ashley furniture carynhurst home office desk | acme furniture gorden writing desk | corner vanity bathroom cabinet | gun wooden cabinet | Cecotec secador | 3 draw file cabinet
Browse the Shop
 Acacia frida deluxe solid wood bed frame |
Bedroom bench |
Bed chest drawers |
Lingerie dresser |
Frame base |
Mirror with jewelry storage |
30 Bathroom Vanity |
Memory foam queen mattress |
Mattresses for back pain |
Nightstand set of 2 |
Grand Goldman Shop |
Civil Lawyer
Deutschland Trikot WM 2026
Acacia frida deluxe solid wood bed frame |
Bedroom bench |
Bed chest drawers |
Lingerie dresser |
Frame base |
Mirror with jewelry storage |
30 Bathroom Vanity |
Memory foam queen mattress |
Mattresses for back pain |
Nightstand set of 2 |
Grand Goldman Shop |
Civil Lawyer
Deutschland Trikot WM 2026







