

After making my table saw fence for my homemade workbench, I realized that I also need to build a crosscut sled as soon as possible.
A crosscut sled is a MUST HAVE FOR every table saw. This accessory makes cross cutting operations much more precise, cleaner and safer.
Find Bleeding Edge Supplements at Scandalous Prices on iHerb.

Reference video of a Cross Cut Sled:
Click to see the Video.
- Download 3D Model
- Block drawings
Materials for our Cross Cut Sled:
- Plywood board, 21 mm thick
- MDF sheet, 8 mm thick
- U-shaped aluminum profile
- Wood glue
- CA Glue
- T-Track Universal
- Nuts and washers
- Butterfly bolt
Types of tools I used:
- Circular saw
- Router
- Cordless drill
- Hacksaw
- Caliper
- Clamps
- Counterink the drill bit
- Router + Drill Bit Set
- Square ruler
- Self-adhesive measuring tape
Let's build it!
Step 1: Create Miter Slots with a Router


- This is a homemade work table, and I do not have miter slots. So, I created them with a router.
- First, I drew some parallel lines making sure they were square to the front of the table. Holding two pieces of scrap wood as guides will help me make precise cuts.
- The width of the slots is 15 m, and the depth is 10 mm. The diameter of the router bit is 12mm, so I need to make 2 passes to get the desired width.
- I am cutting the aluminum profile into a U shape with a hacksaw and then placing it in the slots. To do that, I pre-drilled some holes and used some countersunk screws since they need to sit flush with the surface.
Step 2: Make hardwood runners and a base


- I am using 8mm thick MDF for the base and cut it 70 by 50cm on my table saw.
- For the runners, I'm using beech, so I'm cutting 2 strips 13mm wide and 8mm thick. I should be able to push the runners from side to side very easily, but I have to be careful because they have to fit into the miter slots without causing side to side movement.
- To secure the runners to the bottom of the base, I'm using some washers to raise them a little higher.
- I will place these runners over the washers, apply wood glue, and place the MDF on top. The goal here is a base that is aligned with the top of the table saw and with the runners as well.
- Once the glue has dried, I turn it over and screw at least 5 countersunk screws into each runner to secure them permanently. I cut the excess length of the runners with a hand saw.
Step 3: Making the back and front fence


- I cut the plywood to the correct length and width and attached the back fence first.
Working on the back fence.
- To secure it to the base, I applied wood glue, placed it on the sled, and clamped it. I want the fence to be flush with the edge of the sled, but it doesn't need to be perfectly square and it doesn't need adjustment, so I'll insert some screws.
- Once this was done, I raised my blade, pushed the sled forward, and made about 80% of the cut across the entire sled.
Working on the front fence.
- The front fence is made of two strips of plywood, one 8 cm wide and the other 6.6 cm wide, as it needs a 21 by 14 mm grid on one of its edges, which I will use to install a stop block on it.
- On the bottom inside edge of this fence I made a small chamfer. It will serve as a dust channel when you are making cuts on the sled.
- It is extremely important that the face guide is square to the blade, so I will get it 90 degrees with the square ruler. After that, I'll clamp it in place, pre-drill and drive two screws to secure the guide in place.
- Then I continue the trimming cut across the entire sled.
Step 4: Apply cutting method 5 to verify squareness


To test the squareness I am going to apply cutting method 5. I took a larger piece of scrap MDF and marked the 4 edges with numbers 1 to 4, then started cutting. I made small cuts on each edge, rotating the MDF piece clockwise. When I returned to the first edge, I made a fifth cut about 2cm wide and removed it. I measured it with a caliper to see the error in the squareness.
Calculations:
- The width of the upper part is 2,490 cm. The width of the bottom is 2,513 cm. I subtracted the bottom from the top and the result is 0.023. I divided it by the 4 angles that are in this rectangle, and the result is 0.00575. I divided this number by the length of my fifth cut, which is 36 cm, and got 0.0001597. I then multiplied that number by the distance between my pivot screw and the point where I'm going to make an adjustment (which is 60cm). I got 0.009582 (or -0.00377 in inches), which is amazing. I'm happy with the result and won't make an adjustment here.
How to make the adjustment?
- If you have a negative number, you should raise your fence on the adjustment side, and if you have a positive number, you should move it down.
- Also, do not reuse the old screw hole. Instead, insert a new countersunk screw to secure the fence.
- To secure the fence to the base completely, I will insert more screws into the bottom.
Step 5: Placing a T-Track on the Front Fence


- Now it's time to attach a T-track for the stop block.
- I used a white aluminum curtain track for this purpose. I cut it to size and used a CA glue to make good contact between the track and the fence.
- After that I secured the track in place with some screws.
Step 6: Add a Blade Guard for Safety


- The blade protrudes from the back when making cross cuts. I cut 3 squares of plywood, glued them together, and glued this blade guard to the front fence with just wood glue.
- This guard will act as a reminder to push the sled from the sides of the guard when cutting.
Step 7: Make an Adjustable Stop Block


- To make repeat cuts possible I made a plywood stop block. It is made up of two parts.
- The first part is made of two pieces of plywood that are glued together. I needed to remove 12x41mm from the table saw. I made 2 holes in this piece because I need to use 2 bolts to connect it to the other part of the stop block and to the T-track.
- The other part is made of 3 pieces of plywood. I made a hole in the smaller one and attached all the pieces together with wood glue and some screws.
- I'm installing the stop block on the T-track, with a bolt and a butterfly. Then, I am connecting the two parts with a longer bolt and the two parts of the stop block and tighten them with washers and rubber seal nuts.
Step 8: How to Attach a Tape Measure to the Front Fence


- The last thing I want to do is apply a tape measure to the front fence. I attached it with a CA glue. To determine the starting point of the tape, I took into consideration the thickness of the stop block.
Step 9: Time for some test cuts

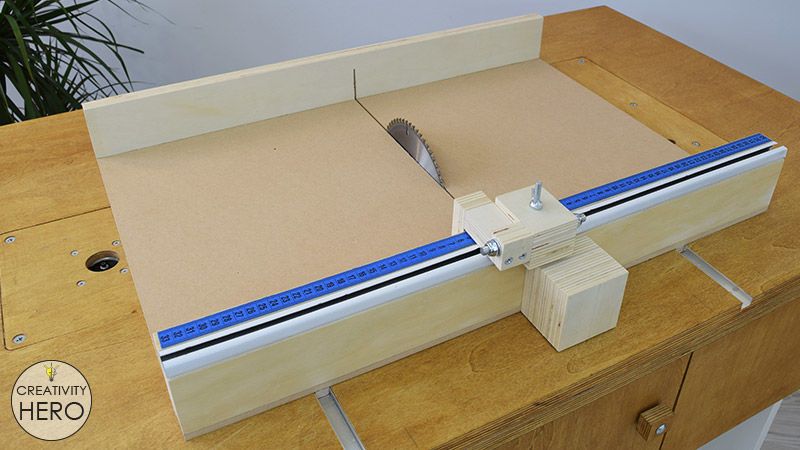
- Now I can make some test cuts to see how it works.
- I can make small cuts, I can also cut larger pieces, and I can also use the stop block to make repeated cuts at a perfect 90 degree angle. Most importantly, I am protected from bribery.
I really like how this Crosscut Sled turned out.
Don't forget to watch the video for a complete explanation. Greetings!
- Tags
- Sierra
Popular Content
How to make a rocket stove for outdoors
Cardboard Drawers Lined with Jeans
Ideas and Advantages of Window Grilles for the Home!
Latest Articles
How to make a refrigerator out of insulating material: Practical step-by-step guide
How to make a Kilim for the Home: Complete Step by Step Guide
How to protect ourselves from accidents in our workplace: Complete prevention and safety guide
Related Content
Kitchens Made with Concrete
Learn to Mount Planters on the Wall
Tutorial to Transfer Images on Wood!
Private Outdoor Spaces in an Elegant and Functional Way
Creative Home Decor Ideas to Transform Every Space
Refreshing your home starts with smart design choices that combine comfort, personality, and functionality. Whether you want to modernize a small apartment, upgrade outdoor areas, or create cozy rustic interiors, these trending ideas can completely change the atmosphere of your space.
Outdoor Spaces That Increase Style and Functionality
Outdoor living continues to dominate modern home trends. Homeowners are increasingly investing in practical entertainment zones inspired by these BBQ shed ideas, which create the perfect setup for gatherings and weekend cooking sessions.
First impressions also matter when designing exteriors. Elegant farm entrance gates design ideas help properties stand out while improving privacy and curb appeal.
Compact living solutions are also gaining popularity. These inspiring 16x40 shed house interior design ideas show how smaller spaces can still feel luxurious and functional.
To enhance patios and entryways, homeowners are adding stylish protection with these creative porch awning exterior DIY ideas that blend aesthetics with practicality.

Rustic and Cozy Interior Design Trends
Warm and natural interiors remain timeless. These charming rustic decor ideas combine wood textures, vintage accents, and earthy tones to create welcoming spaces.
Bedrooms are becoming more personalized with curated wall arrangements. Many homeowners use these stylish picture wall ideas for bedroom spaces to display memories and artwork creatively.
Textured wall treatments are another major trend. Installing a board and batten wall adds architectural character while keeping interiors elegant and modern.
Similarly, bold accent wall ideas can instantly transform plain rooms into eye-catching focal points without requiring a full renovation.
Smart Kitchen and Organization Inspiration
Functional kitchens are essential for modern homes. These practical kitchen wall cabinet ideas maximize storage while maintaining a clean and stylish appearance.
Organization also starts at the entrance. Well-designed mud room ideas help families keep shoes, coats, and daily essentials neatly arranged.
Colorful and Personalized Home Styling
Vibrant interiors are becoming increasingly popular thanks to playful dopamine decor ideas that use bright colors and joyful accessories to improve mood and energy.
Gallery walls also continue to evolve as a major decorative feature. These trendy gallery wall inspiration ideas offer creative ways to combine prints, photos, and statement art.
Young renters and new homeowners are especially embracing these stylish first apartment aesthetic ideas to create sophisticated interiors on a budget.
Finally, selecting the right shades can dramatically influence any room’s atmosphere. These modern trendy color ideas help homeowners choose palettes that feel fresh, elegant, and timeless.
Final Thoughts
From rustic charm and colorful interiors to outdoor entertaining areas and functional storage solutions, today’s home decor trends focus on creating spaces that feel both beautiful and livable. By combining smart layouts, modern textures, and personalized decorative elements, any home can become more stylish, comfortable, and inspiring.
Home Decor ShopVanity bench | Outdoor bar table | Dining bench | Dining set for 6 | Oval dining table furniture | Butcher block kitchen islands | Mid century modern dining chairs | Triple buffet server | Triple buffet server | Outdoor kid furniture
Browse the Shop
 Acacia frida deluxe solid wood bed frame |
Bedroom bench |
Bed chest drawers |
Lingerie dresser |
Frame base |
Mirror with jewelry storage |
30 Bathroom Vanity |
Memory foam queen mattress |
Mattresses for back pain |
Nightstand set of 2 |
Grand Goldman Shop |
Civil Lawyer
Deutschland Trikot WM 2026
Acacia frida deluxe solid wood bed frame |
Bedroom bench |
Bed chest drawers |
Lingerie dresser |
Frame base |
Mirror with jewelry storage |
30 Bathroom Vanity |
Memory foam queen mattress |
Mattresses for back pain |
Nightstand set of 2 |
Grand Goldman Shop |
Civil Lawyer
Deutschland Trikot WM 2026







