


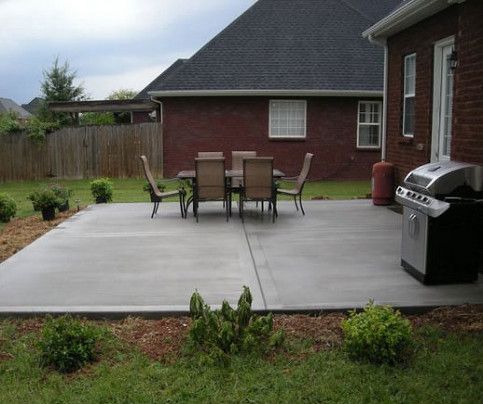
Tips and recommendations for building a concrete deck in your backyard, it is easy to pour and build a backyard made of concrete on a small scale, it is quite easy to work with concrete, but installing an entire patio can be a challenge.
It is possible to build an attractive concrete patio, but it requires careful planning and preparation. Be sure to place all the concrete at once; A large yard can be divided into smaller manageable sections with 2x4s.

Build a DIY concrete patio step by step

Once the concrete is in place, you're stuck with it forever; replacement is expensive and difficult. Planning is essential for a perfect DIY concrete patio.
RECOMMENDATION
If the patio will abut an existing patio or concrete slab, install insulating joint strips. Secure the strips flush with the top of an existing slab using hardened concrete nails or construction adhesive.
1#

2#
3#

4#

5#

6#

Procedure
Step 1: Pouring a Concrete Patio
Completely moisten the gravel. Start by placing the concrete in one corner of the form while a helper uses a shovel or hoe to spread it (above).

Pour the concrete against the form and compact in all corners with a square shovel or mortar hoe; with a hoe, push, do not drag the concrete.
But don't overwork the concrete, and don't spread it too much; Overworking will force heavy aggregate to the bottom of the slab and cause small particles that can cause defects in the finished concrete patio.
Instead, space your placement along the form, placing each batch against the previous batch to fill out the form.
If you plan to leave the spacers in place, finish and cure the concrete in alternating sections. (Imagine it as a chess board and make all the red squares first.)
Once they have cured for at least three days, remove the stakes from the inside of the remaining sections (black squares) and complete them.
Step 2: Hitting the concrete
Move a joint (example above, a straight wooden 2x4) across the form to level the concrete. On large jobs, do this batch by batch, rather than after all the cement is placed.

Move the board slowly along the form, using a side-to-side sawing motion; be sure to make two passes. Even on narrow shapes, two people will make the job faster and more efficient. If necessary, a third person can remove additional concrete at any corner to save time.
Step 3: Smoothing the Concrete Patio Surface
If you are working on a very small walkway leading to your patio, you can skip this step.) After striking, use a darby or float, depending on the size of your project, for initial finishing, to smooth out the high level. stains and fill small gaps left after hitting.

Use the darby (above, left) on small DIY concrete projects. Move it in overlapping arcs, then repeat with overlapping straight strokes and side to side.
Keep the tool flat, do notdrop. For larger jobs, use a float (above, right). Push away from you with its top edge raised slightly. Throw it almost flat; overlap your passes.
Step 4: Concrete Edges
Giving your DIY concrete patio or sidewalk a curved edge will help it resist chipping and prevent trips or tripping accidents.
To edge the cement, start by running a mason trowel between the concrete and the outside edges of the slab (above).
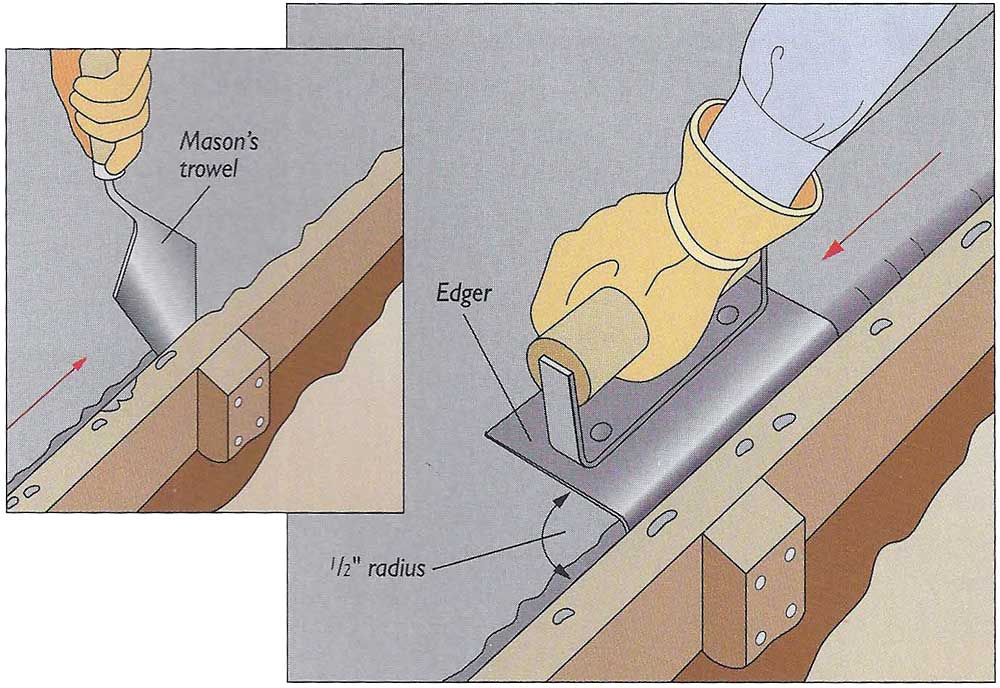
Follow with an edger (top right). Run it back and forth to smooth and compact the concrete. Unless the tool has a sled end, lift the leading edge slightly as you move it.
Step 5: Concrete Bonding for Controlled Cracks
Large slabs of concrete will crack. To control cracks in the patio you need to establish joints with a 1″ deep seam with a straight guide board to make control joints (above). Kneel on a board to reach the center of a wide slab.

The depth of the control joints should be one-quarter thickness. Slab control joints can be made at intervals of approximately 1.5 times the width of the slab, but the distance between them should not exceed 30 times the thickness of the patio; 10' for a 4" thick slab.
For concrete made with 3/4" coarse aggregate, reduce the maximum control joint spacing to 8' for a 4" slab. Hinged sections should never be more than 1.5 times longer than they are wide. BONUS TIP: It's better to have more joints, rather than fewer, to prevent cracking.
Measure along the forms to locate the seam and mark them with a pencil. Any binding or binding marks can be removed by floating, which is next!
Step 5: Floating concrete and trowel
Now comes the fun part of working with ready-mix concrete, (well, we think floating concrete is fun).
After the water sheen has disappeared from the concrete, but before the surface has become rigid, float with a wooden float or hand-held magnesium float. The latter gives a smoother surface.
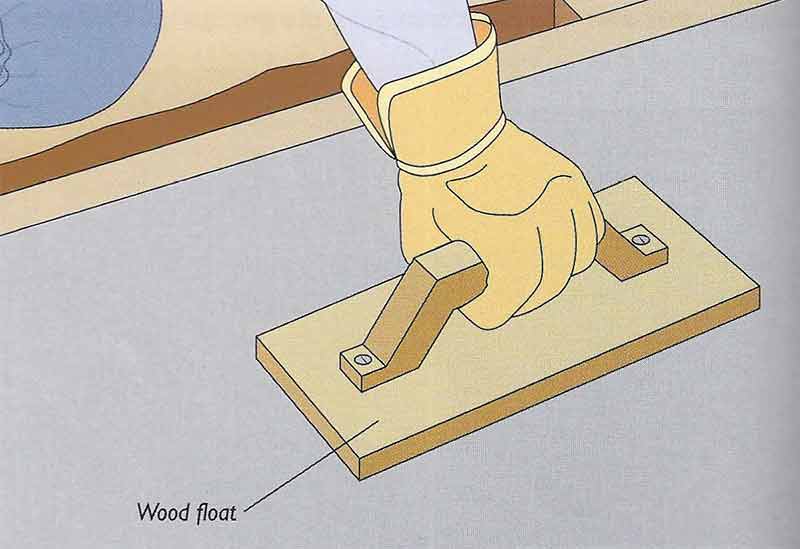
With air-trapped concrete (what we deliver) use a magnesium float - a wooden float can tear the surface of the patio.
With both types of float, keep the tool flat on the surface. Again, to reach the center of a large slab, kneel on boards and then finish on the marks on the board as you work backwards.
CAUTION: Do not use a steel trowel on exterior surfaces unless you are going to sweep the finish afterwards; creates a very smooth surface that can be dangerous when wet. So, positively, don't use a steel trowel on a patio next to a pool.
Step 6: Concrete Drying - DIY Patio Curing
Patio tiles should be wet cured to prevent their surfaces from drying out too quickly, especially in our Twin Falls, ID desert heat.
If the surface dries too soon, it will be weak and may later turn into dust or crumble. Cure your concrete by keeping it wet. Cover the slab with burlap, sand, straw or other material and wet it (above). Moisten as needed until curing is complete.

Another option is to use plastic sheeting (box above) or a commercial curing compound. Water that evaporates from the slab will be trapped, eliminating the need to moisten it.
Whichever method you choose, curing should take a minimum of three days, longer in cold climates, but it's best to let the slab cure for a week, just to be safe. Do not walk on it for at least 3-4 days, or drive a vehicle until 10 days have passed.
Get more information at Perfectidea.com and on our Facebook for more Tips and Recommendations for building a concrete floor in your backyard.
- Tags
- Concrete
- Tips
- Concrete
Popular Content
How to make a rocket stove for outdoors
Cardboard Drawers Lined with Jeans
Ideas and Advantages of Window Grilles for the Home!
Latest Articles
How to make a refrigerator out of insulating material: Practical step-by-step guide
How to make a Kilim for the Home: Complete Step by Step Guide
How to protect ourselves from accidents in our workplace: Complete prevention and safety guide
Related Content
Custom Stairs that will make your house look totally amazing!
Add more space to your kitchen by building a secret shelf!
Get organized with these ideas to have more space in your bathroom!
A simple project to create a beautiful piece of furniture with wooden logs
Creative Home Decor Ideas to Transform Every Space
Refreshing your home starts with smart design choices that combine comfort, personality, and functionality. Whether you want to modernize a small apartment, upgrade outdoor areas, or create cozy rustic interiors, these trending ideas can completely change the atmosphere of your space.
Outdoor Spaces That Increase Style and Functionality
Outdoor living continues to dominate modern home trends. Homeowners are increasingly investing in practical entertainment zones inspired by these BBQ shed ideas, which create the perfect setup for gatherings and weekend cooking sessions.
First impressions also matter when designing exteriors. Elegant farm entrance gates design ideas help properties stand out while improving privacy and curb appeal.
Compact living solutions are also gaining popularity. These inspiring 16x40 shed house interior design ideas show how smaller spaces can still feel luxurious and functional.
To enhance patios and entryways, homeowners are adding stylish protection with these creative porch awning exterior DIY ideas that blend aesthetics with practicality.

Rustic and Cozy Interior Design Trends
Warm and natural interiors remain timeless. These charming rustic decor ideas combine wood textures, vintage accents, and earthy tones to create welcoming spaces.
Bedrooms are becoming more personalized with curated wall arrangements. Many homeowners use these stylish picture wall ideas for bedroom spaces to display memories and artwork creatively.
Textured wall treatments are another major trend. Installing a board and batten wall adds architectural character while keeping interiors elegant and modern.
Similarly, bold accent wall ideas can instantly transform plain rooms into eye-catching focal points without requiring a full renovation.
Smart Kitchen and Organization Inspiration
Functional kitchens are essential for modern homes. These practical kitchen wall cabinet ideas maximize storage while maintaining a clean and stylish appearance.
Organization also starts at the entrance. Well-designed mud room ideas help families keep shoes, coats, and daily essentials neatly arranged.
Colorful and Personalized Home Styling
Vibrant interiors are becoming increasingly popular thanks to playful dopamine decor ideas that use bright colors and joyful accessories to improve mood and energy.
Gallery walls also continue to evolve as a major decorative feature. These trendy gallery wall inspiration ideas offer creative ways to combine prints, photos, and statement art.
Young renters and new homeowners are especially embracing these stylish first apartment aesthetic ideas to create sophisticated interiors on a budget.
Finally, selecting the right shades can dramatically influence any room’s atmosphere. These modern trendy color ideas help homeowners choose palettes that feel fresh, elegant, and timeless.
Final Thoughts
From rustic charm and colorful interiors to outdoor entertaining areas and functional storage solutions, today’s home decor trends focus on creating spaces that feel both beautiful and livable. By combining smart layouts, modern textures, and personalized decorative elements, any home can become more stylish, comfortable, and inspiring.


