


Making a triple bunk bed can be an interesting idea to save space in the little one's bedroom, since the standard format is 2 beds.
For most, this works, but there are some cases where you might need something else. I have 3 children and currently a house with only one room to accommodate them.

While a standard bunk bed would take care of 2/3 of the problem.
There was not enough space to accommodate another bed in addition to the others.
Then I knew that wouldn't work. I looked into triple bunk beds, but they are much harder to find and from what I saw, they mostly stuck to the standard stacked format.
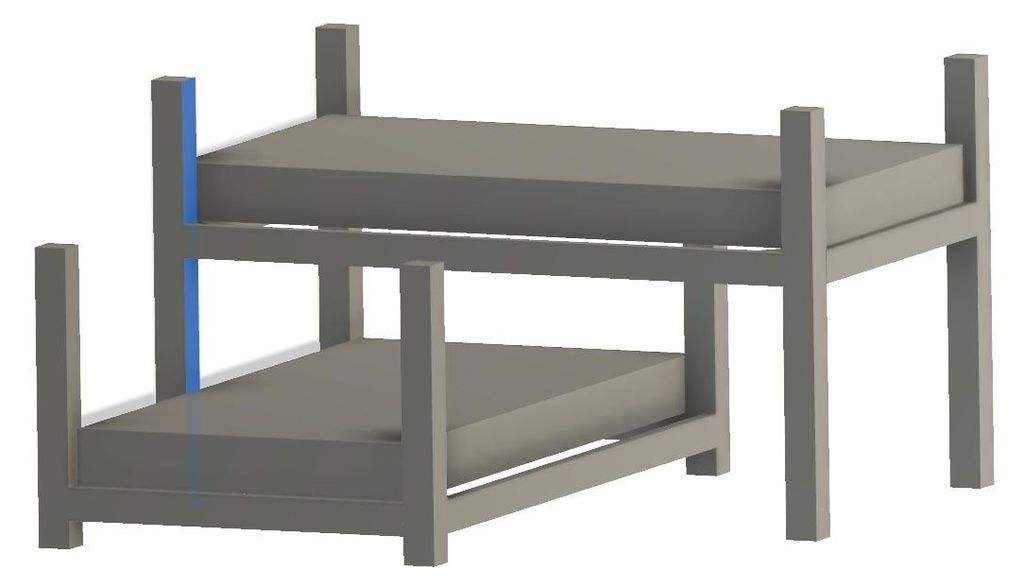
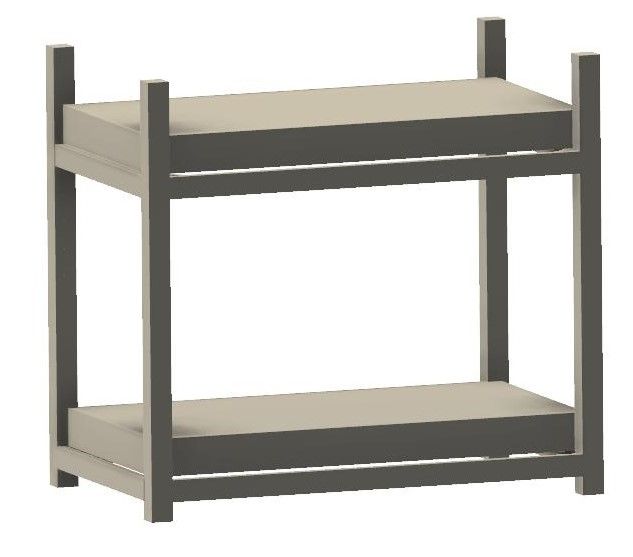
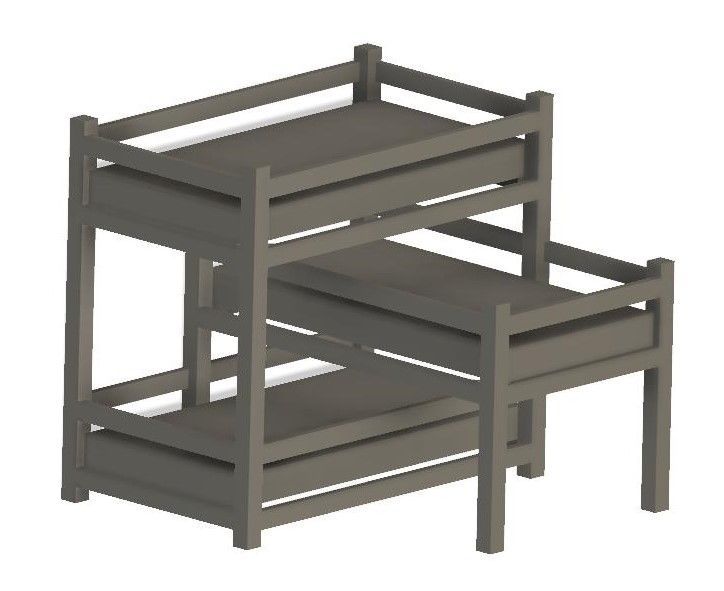
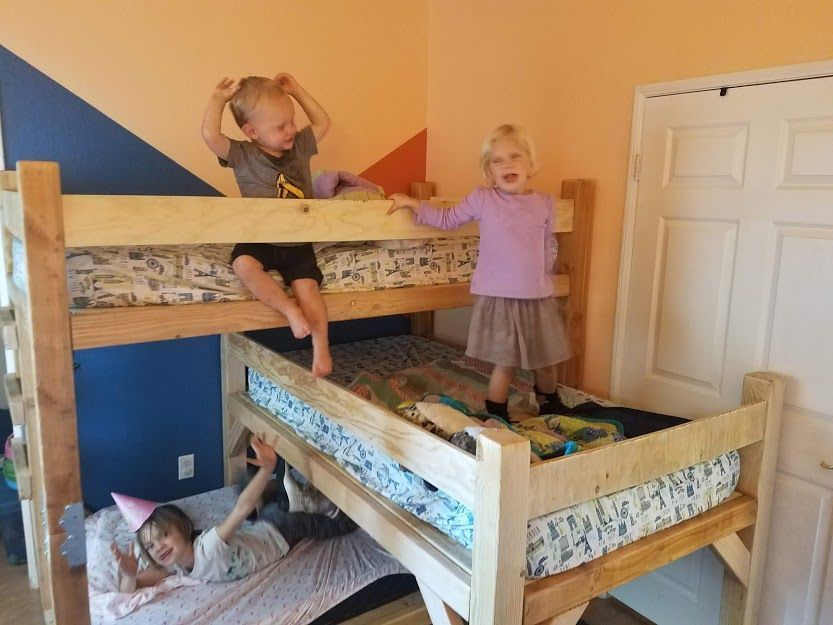
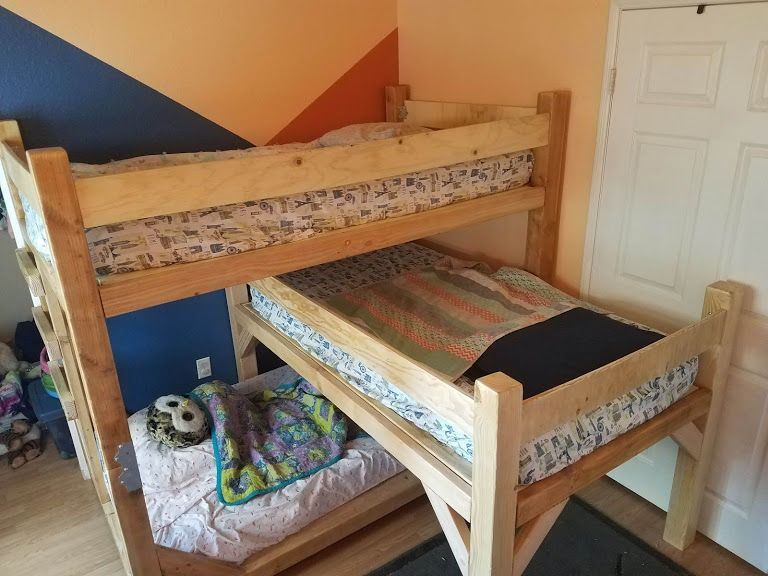
Three beds stacked end up being very high, making changing sheets (or catching kids who don't want to come down!) very difficult. So I decided to build my own that would be more compact.
By deactivating the middle bunk I was able to move the upper and lower bunk closer together.
Overall, the spacing between the beds was reduced so that the top bunk could be reached while standing on the floor (top bunk height is 5 feet).
I made the total spacing between beds 18 inches.
For adults it may feel a little tight, but that only applies to the overlaps where the child's paws would be.
Headroom was designed with a much more spacious 42″ between the bottom and top bunk.

This is a custom build, it was sized to fit the space available and designed to meet my main concern of reducing the overall height.
I appreciate that the sizes don't work for everyone, but the concept is intriguing and I hope you can at least use the design as inspiration.
I specifically designed the individual bunk beds to look alike so I could repeat the building steps with only slight modifications. That helped me build a little faster.
This also means that, one day, when the bed may start to feel claustrophobic for children, the space between the beds can be increased or each bunk bed can even be separated and used as separate beds.
Steps to make a triple bunk bed
NOTE: Remember that to make a triple bunk bed you can use any measurements you like, the following construction is designed around standard double size mattresses (39″ Width x 75″ Length)
#1: Prepare your tools!
Tools to make a triple bunk bed:
- Miter saw
- Table saw
- Belt sander
- Drill
- Hand saws
#2: Make your cuts
- In this step I will write out the full cut list, I will reference the cuts that will be used in specific parts of the build in their respective steps, but this way you will have it all in one place.
4×4:
- 45″ (x3)
- 37.5″ (x4)
- 31.5″ (x4)
2×4:
- 71″ (x4)
- 39″ (x8)
- 28.5″ (x2)
- 150″ for corner keys
2×2:
- 120″ for corner braces
- 4x8 plywood (.75″ thick) – 3x
- 75″ x 5″ (taken from scrap plywood)
- 71″ (x2)
- 39″ (x3)
- 75″ x 1.5″ (taken from scrap plywood)
- 61″ (x4)
- 29″ (x7)
- 22″ (x2)
#3: A suggestion: Sanding and finishing the wood pre-assembly

- There is a lot of wood that goes into this construction. Everything needs sanding and finishing. You can simplify the task by finishing only the exterior surfaces of the bed (legs, external faces of the frame, corner braces) and leaving out the surfaces that will be accessible during use (plywood, interior of the frame).
- However, the best way to simplify this step is to do it pre-assembled.
- Once all pieces are cut, perform the sanding steps up to 150 grit.
- Then apply coats of polyurethane sealant to the surfaces that will experience wear during use and allowed to dry.
- You can build the beds and then sand them once assembled, but that is much more difficult.
#4: Make the lower bunk
I started construction by working on the bottom bunk. The specific cut list for this part of the build is:
4×4:
- 31.5″ (x4)
2×4:
- 71″ (x1)
- 39″ (x3)
- 28.5″ (x1)
- 50″ for corner braces
2×2:
- 36″ for corner braces
- 4x8 plywood (.75″ thick) x1 – cut to 73.5″ x 42.75″
- 75″x 1.5″ (taken from scrap plywood)
- 61″ (x1)
- 29″ (x3)
- 22″ (x1)
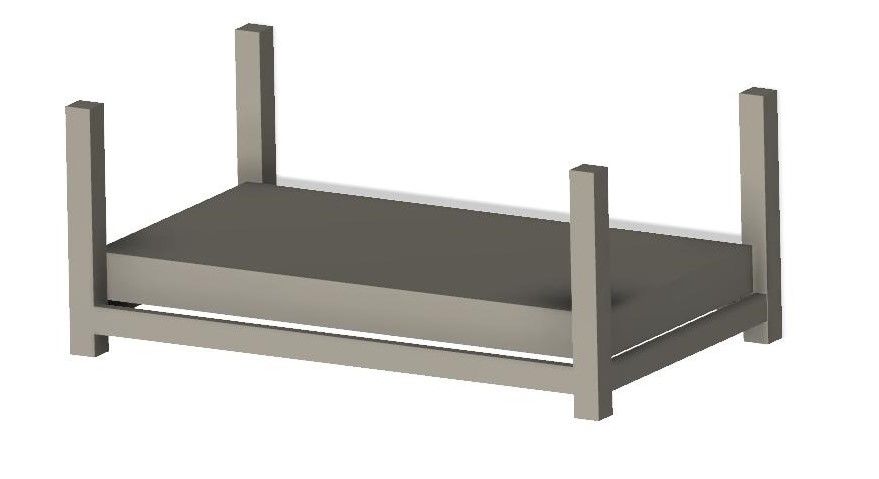
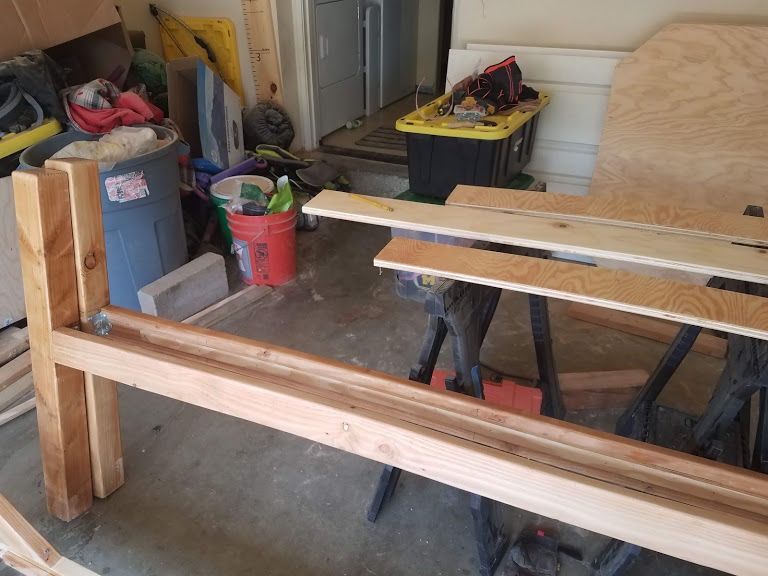
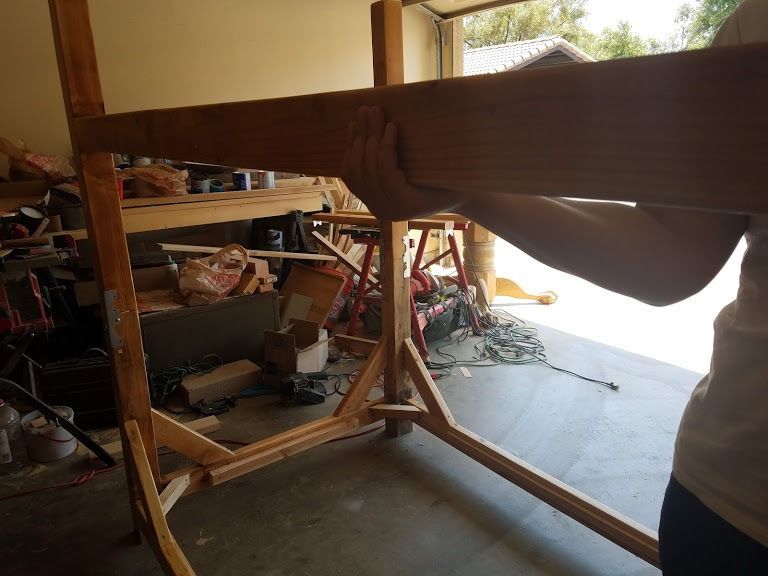
#5: Bunk Frame Construction
- Laying out the cut pieces for this bunk bed, place a 71″ piece of 2x4 with a 39″ 28.5″ piece in front of it (making the two long sides) and then place a 39″ 2x4 on each of the two short sides. The four 4×4s become the legs of the bed in each corner.
- Now you may be wondering why I didn't use a 71″ piece on each of the long sides of the bed…
- We will discuss this in more detail later, but essentially you need to take into account the leg clearance from the upper bunks. Remove them as they pass through the lower bed frames. I will call this allocation of space the “step.”
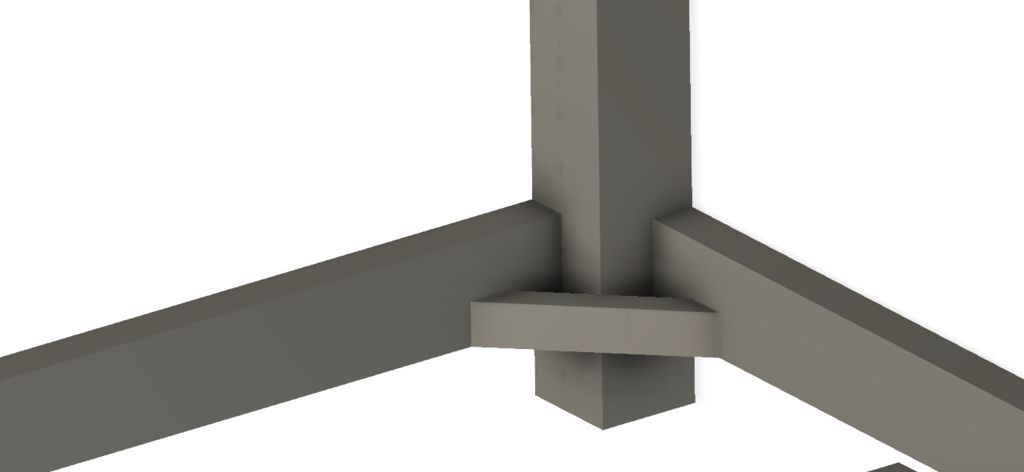
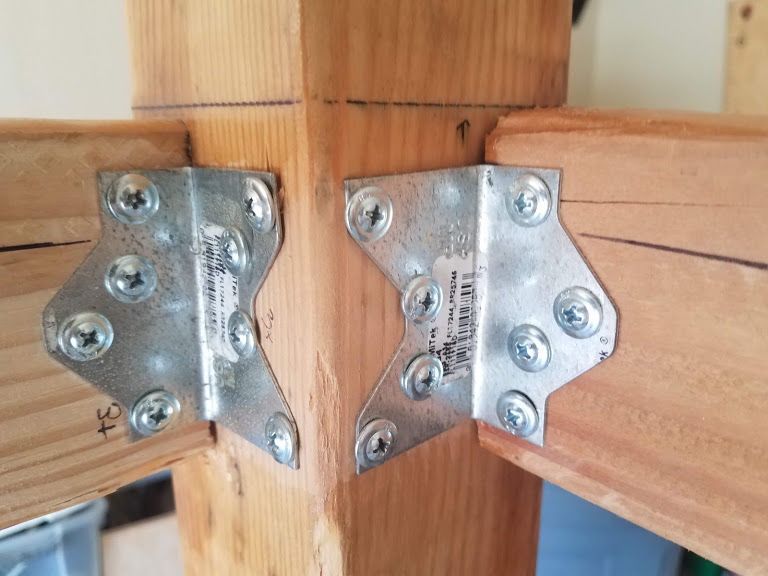
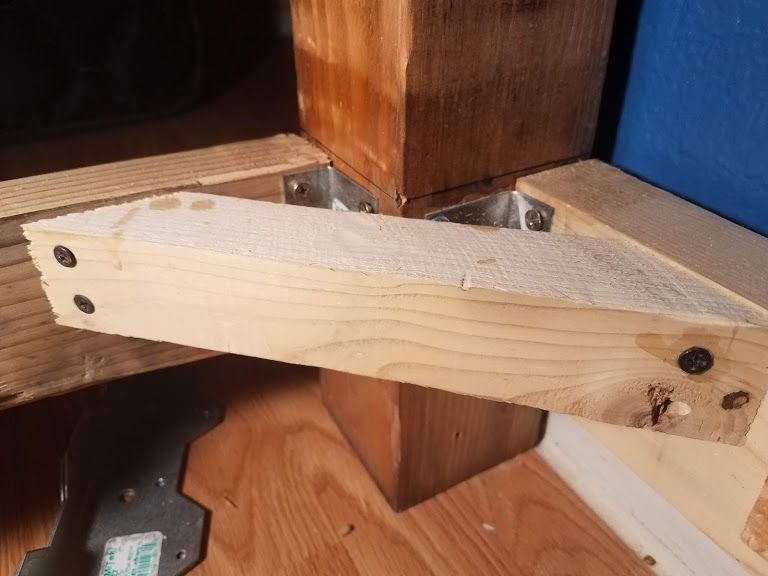
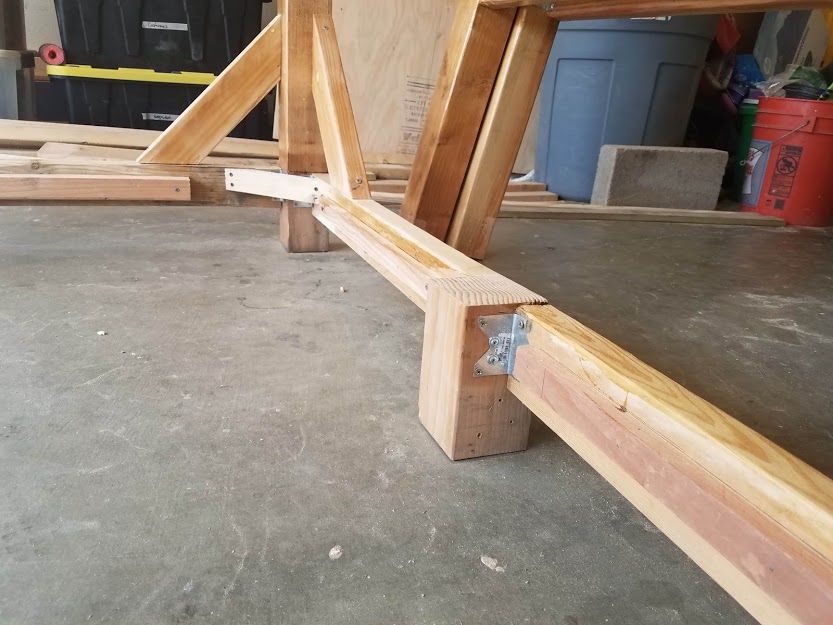
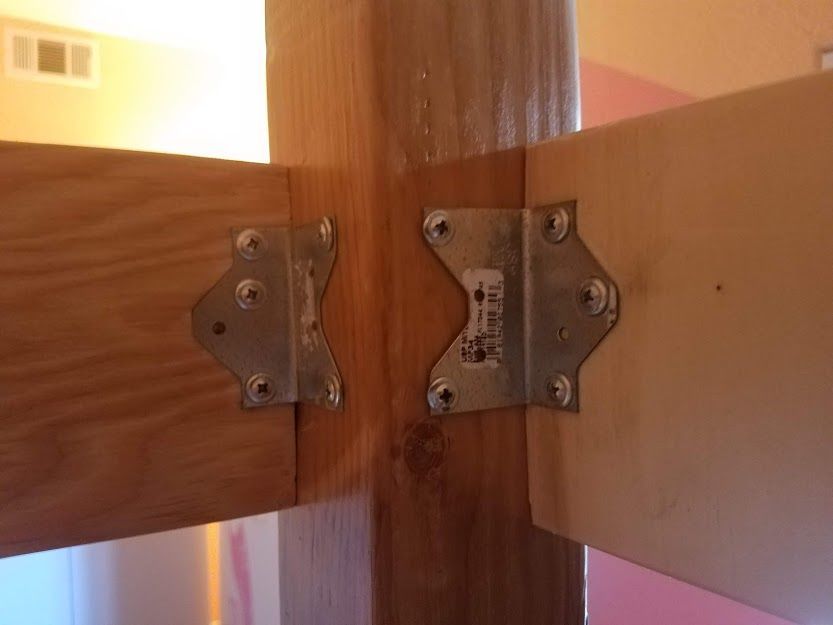
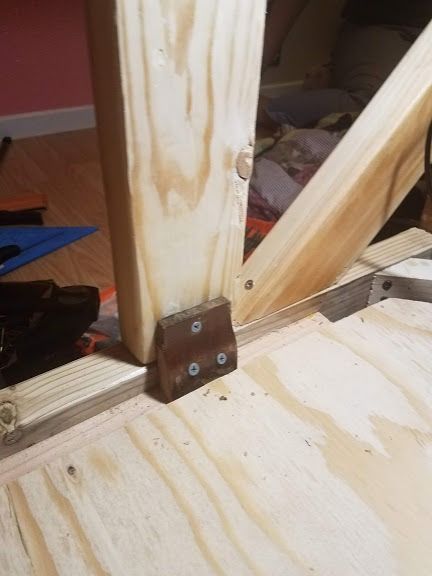
- The 2x4s are mounted on the legs using brackets. The brackets are positioned so that they support the 2x4 as it rests on the side of the bed leg. The brackets are mounted with #10 3/4″ screws as shown in the images. I bought the brackets from Lowes: https://www.lowes.com/pd/USP-1-1-2-in-18-Gauge-Woo… (I ended up getting about 50 for the entire build)
- Attach all 2x4s to the legs with the brackets. I marked where the top of each 2x4 should line up on the leg and then held the wood in place while I screwed the brackets into place. The distance from the top of the 2x4 to the bottom of each leg is 6.5″.
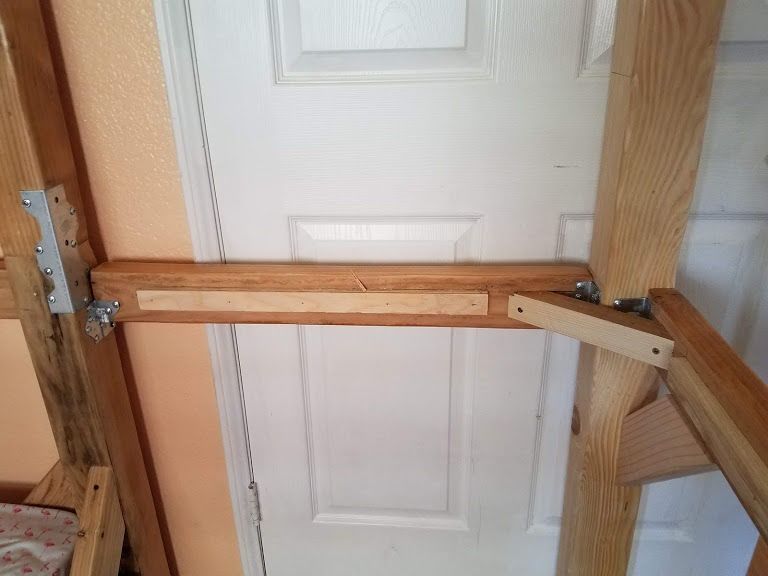
#6: The “Step Through”
Now for a quick discussion of "transfer"
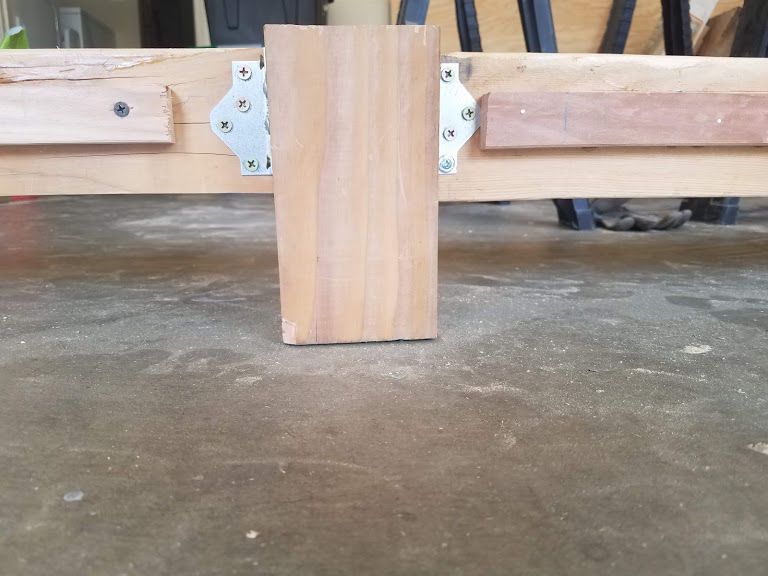
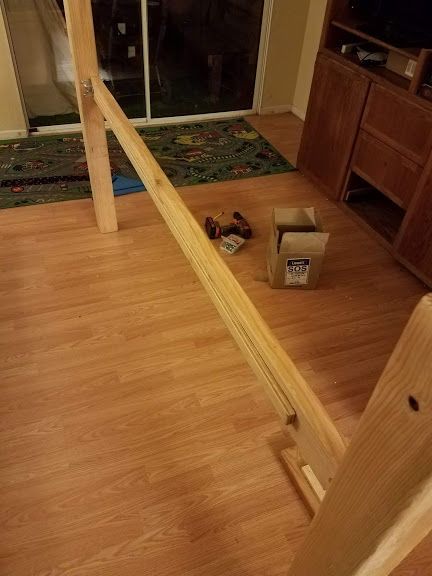
- For the middle and lower bunk, there must be a hole cut in the bunk frame to allow the leg of an upper bunk to pass through. This is why a single 71″ 2x4 was used to make one long side of the bottom bunk while the other was made using a 39″ piece and a 28.5″ piece.
- 39 + 28.5 = 67.5. The difference between 71 and 67.5 is 3.5. What is the actual size of the 4×4 legs (actual dimensions are 3.5×3.5). So the difference in length is taken in the width of the 4x4 leg that passes through that part of the frame.
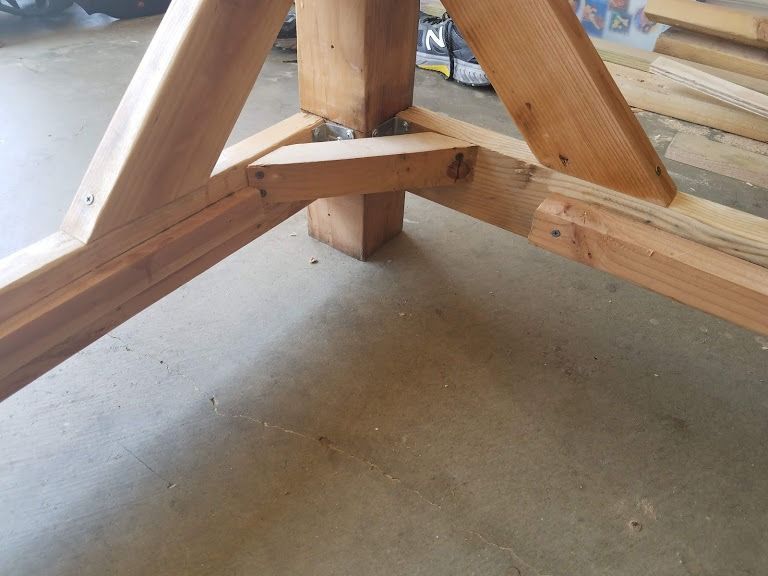
- At this point in construction, there is a leg from an upper bunk to tie to the frame. So I cut a 4x4 stump to screw into the frame so everything would stay together. Later, the placeholder will be removed to allow the actual bunk leg of the center bunk to take its place.
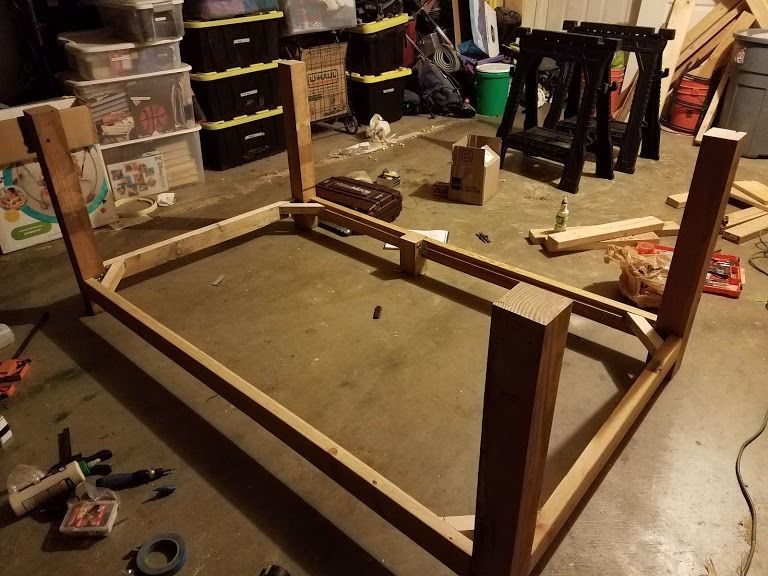
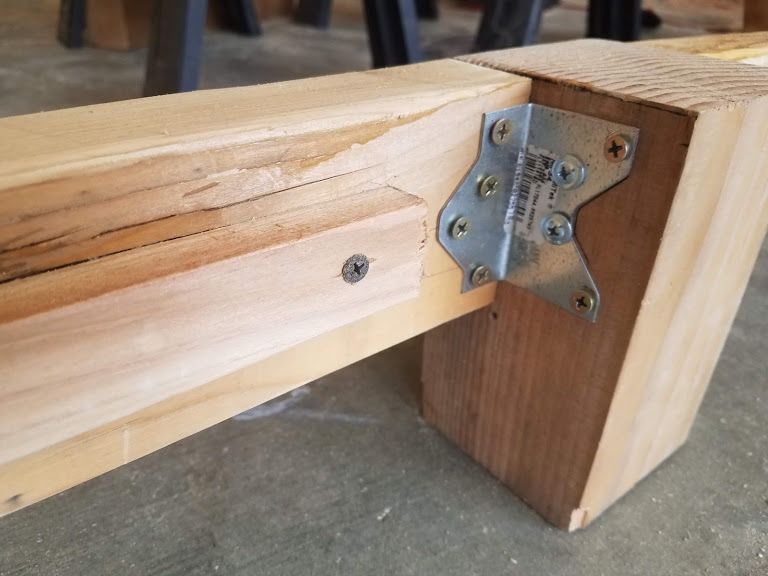
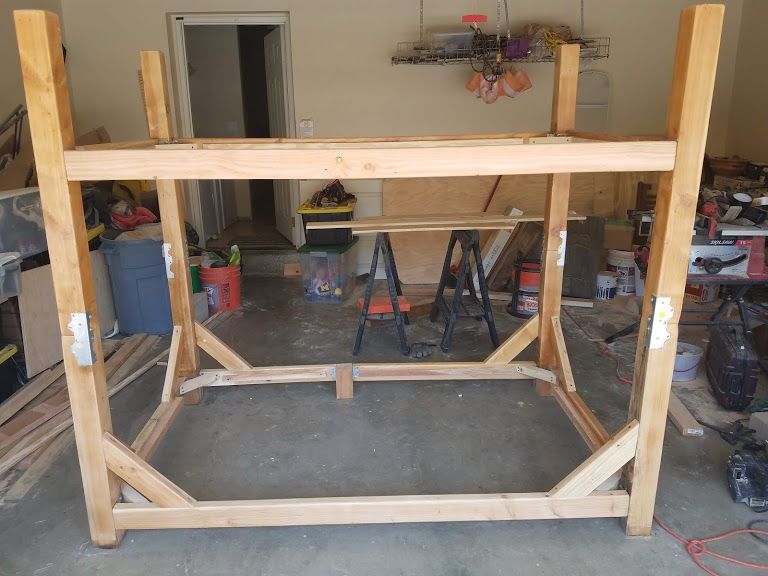
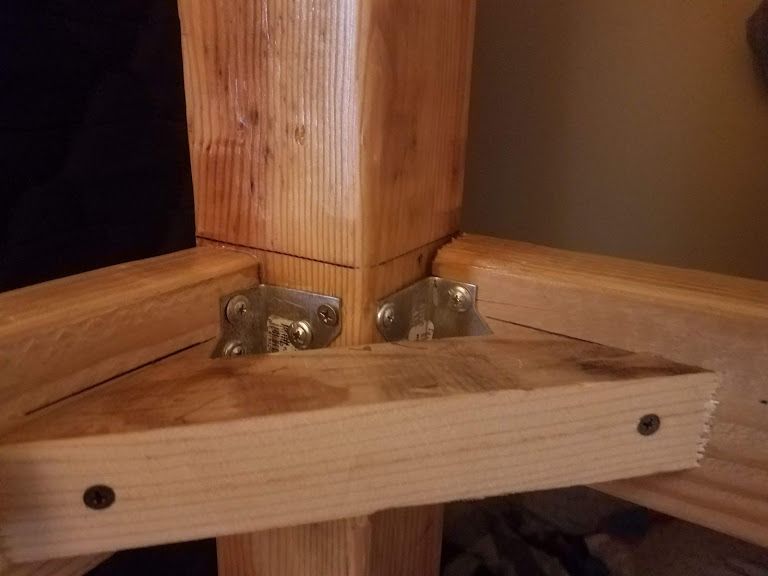
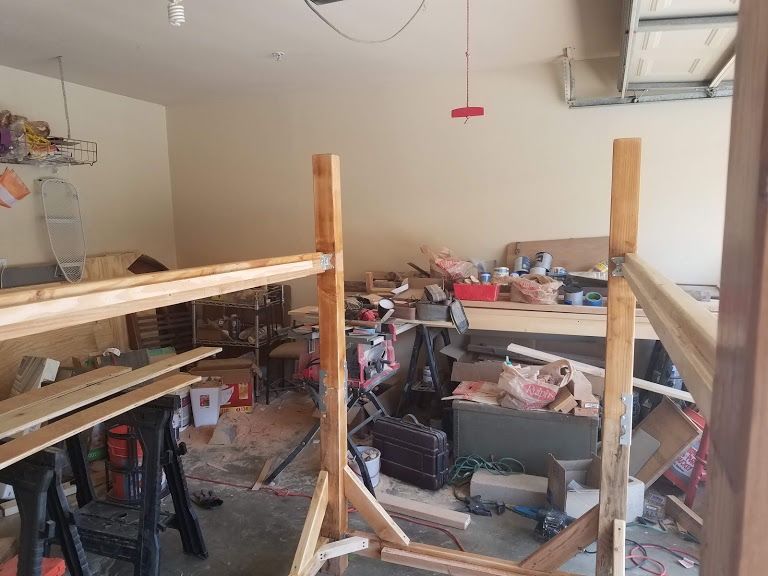
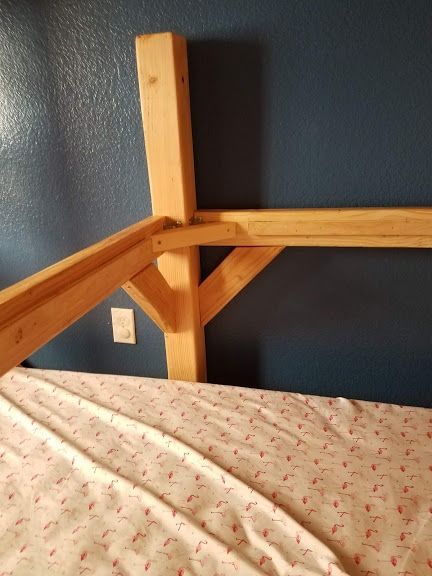
#7: Reinforcement of the corners of the frame

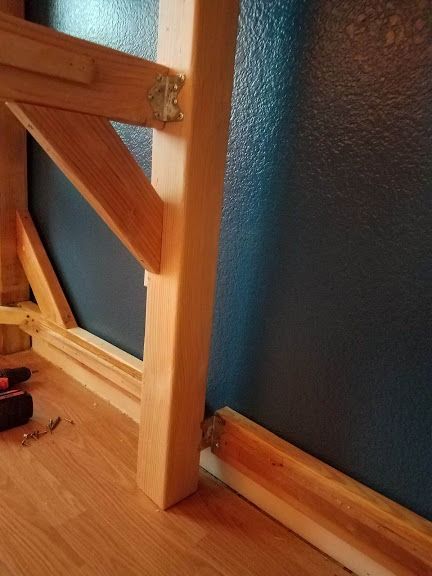
- With the basic frame assembled, it was time to reinforce the corners of the frame. These corners will not only support the load from the lower bunk, but they will also need to be rigid to keep the upper bunk stable.
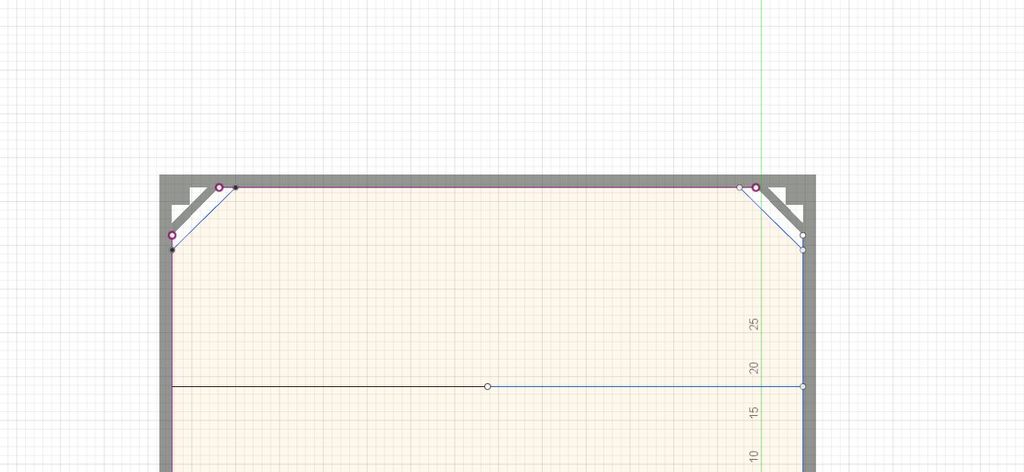
- The corners are reinforced by adding 45 degree keys on each main axis of each corner. First, the 2x4s are joined together by a 2x2 clamp, then the 2x4s are attached to the leg via 2x4 braces.
- The braces are attached via 1.5″ (for 2×2 braces) and 2″ (for 2×4 braces) deck screws.
- 2×2 braces should be around 7″ long, while 2×4 braces can be more flexible in length. I made them about 12″ long.
#8: Put the mattress support

- While slats can often be used to support a mattress, I decided to use a solid piece of wood to support the mattress. This is where plywood comes in. Cut the plywood to fit just inside the frame you just made.
- The frame should be 75″x43″, but it may need to be just a fraction of an inch smaller to fit smoothly (although ideally it should be a snug fit).
- However, if you cut a rectangle that size, you will run into problems with the clamps/legs along the way.
- Cut the corners of the plywood so that it goes beyond the braces. Additionally, you must mark the location of the step and cut a hole for it
- To hold the plywood in place, I built an inside edge on the 2x4s using the plywood pieces.
- The pieces were approximately 1.5″ wide and the length of 2x4s.
- I made sure to leave gaps near the braces/brackets so I would have room to access the gap later with my assembly/disassembly drill.
- I attached the shelf by marking a line 3/4″ down from the top of the 2x4 frame to the end. I then attached the strips and used a combo of woodworking glue and finishing nails to connect them along their length to the frame.
- The plywood rests on the shelf and is flush with the top of the 2x4 frame.
- Because I used 3/4″ thick plywood, it was stiff enough to support the weight of the person using the bed without additional wood in the middle of the span. I tried it myself, even jumping a little...
- Because you never know what crazy mischief the kids will get into. The frame and plywood were solid!
#9: Build the top bunk
Next, I made the top bunk.
The specific cut list for this part of the construction is as follows...
There is not much difference with the exception of the leg lengths and there are no special considerations for any steps (since there are no bunk beds above)
4×4:
- 37.5″ (x4)
2×4:
- 71″ (x2)
- 39″ (x2)
- 50″ for corner braces
2×2:
- 36″ for corner braces
- 4x8 plywood (.75″ thick) – x1 – cut to 73.5″ x 42.75″
- 75″ x 1.5″ (taken from scrap plywood)
- 61″ (x2)
- 29″ (x2)
#10: A frame without pass-through
- As I mentioned in the previous step, since this is the top bunk, you won't have to worry about this bed.
- That makes assembly quite easy. Reattach the long and short sides of the bed (two 71″ pieces and two 39″ pieces) and screw them to the 4x4 legs through the brackets used previously. There are some changes here, as will be discussed in the following steps.
- Mark on the legs where the top of the 2x4 pieces will connect to the legs. This happens 15 inches from the top of each leg.
- You will need to assemble the bunk bed on top of the bottom bunk bed, so I found it was made simpler by assembling the legs and long frame pieces and placing them as a unit aside until I was ready to assemble.
- Once in position, the shorter ends of the frame could be secured in place to complete the frame.
#11: More supports
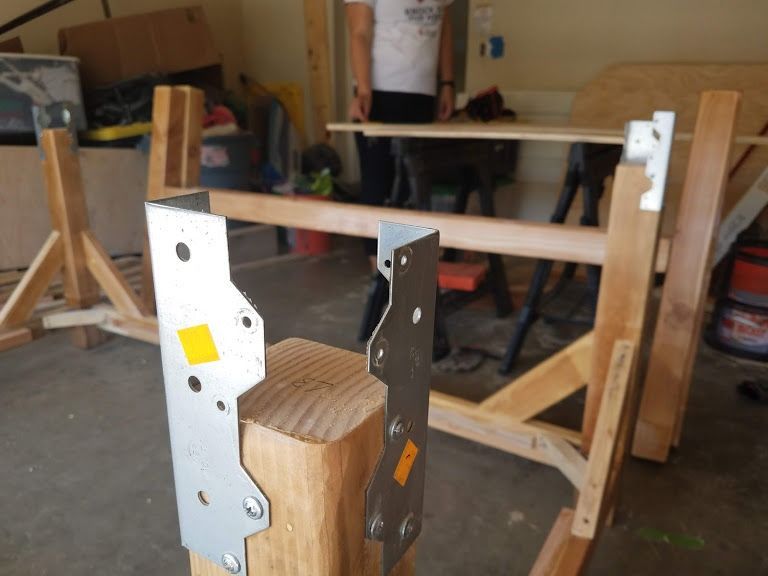
- I know there are many ways to secure a bed on top of another pato make bunk beds. I looked at several of them, including cross straps between the legs, a pin system between the legs, etc.
- I finally decided on the supports. It went with the rustic/farmhouse style that I like and was also a little simpler for me.
- One thing to remember is that this joint between the two beds is THE MOST CRITICAL OF THE CONSTRUCTION. You want to be more confident that the way they are mounted together is secure and durable. The last thing you want is for the top bunk to slide off the bottom bunk supports and collapse!
- So whatever you do, make sure you put in the time to think about it and have it tested or validated so you know it will be a strong and reliable joint.
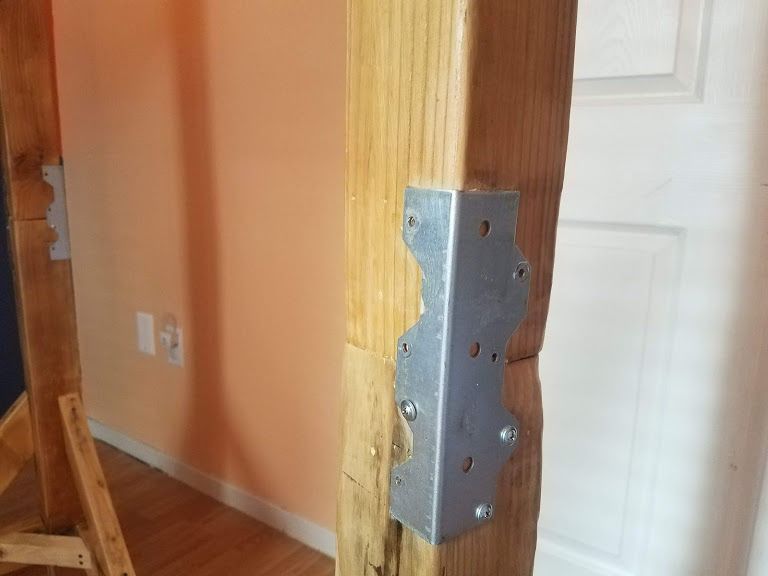
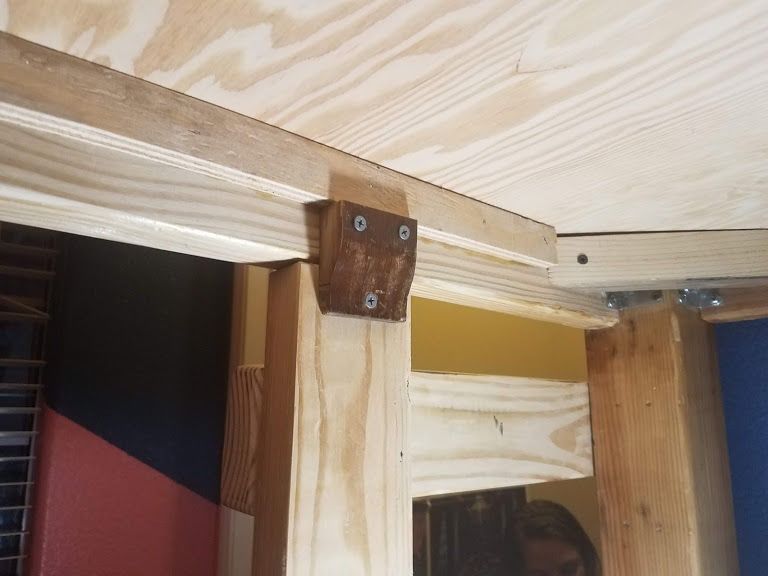
- I went with brackets to keep the two bunks together. The brackets are 16 gauge L braces (7 inches long) similar to these here: https://www.fastolnow.com/l70.html? Productid = l70 &…
- I bought 8 of these brackets and screwed them to the legs with 8 #10 3/4″ screws per bracket. The supports were placed in corners opposite each other. I first attached them to the bottom bunk and then slid the legs for the top bunk in place and screwed them in place.
#12: Up on top and reinforcing again (but with a touch!)
- The upper bunk frame continues much like the lower bunk, with the exception of being able to assemble the pieces separately and then lift them into place.
- You still use the same brackets on the corners of the frames, you still fasten the pieces of scrap plywood to the inside of the frame to hold the plywood, and you still need to reinforce the corners... Although there is a little change with that last part.
- Before, I had braces made of 2x4s that connected the 2x4 frame pieces to the 4x4 legs. That's not necessary here. These clamps were placed to prevent the legs of the lower bed from separating ("splitting") when the upper bunk is loaded.
- As the upper legs of the bunk bed are rigidly attached to the lower legs (through the supports mentioned in the previous step) they cannot be separated, the lower ones cannot.
- However, if this top bunk were ever to be separated and used individually, it would need braces at that time between the frame and legs.
- Another change here is that when you attach the 2x2 corner braces (between the 2x4s) they must be in line with the ledges that the plywood will be placed on.
- This is a detail that could be incorporated into the lower bunk, but it is more critical here.
- By placing the corner braces in the same line with the shelves, the plywood can also be placed on them.
- Increasing the support of the plywood minimizes the risk of it moving out of place.
- Also, making the plywood fit snugly into the frame will also add to that security.
#13: Mattress Support… Again (and a twist)
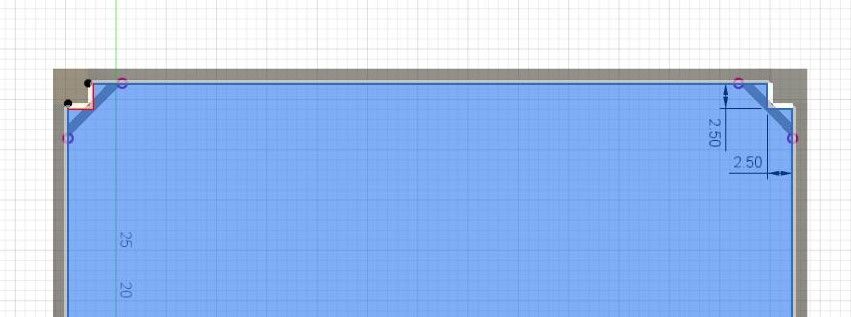
- Again, the basic idea is the same here as with the bottom bunk. The plywood is still cut to 74″ x 43″ to fit perfectly in the frame.
- The difference here is that, instead of cutting the corners of the plywood as previously done, you only cut a square from each corner to make room for each leg of the bed.
- Cutting a 2.5″ square will leave extra wiggle room to help the plywood fit around the leg.
- As a side note, this will be how you cut the plywood on the middle bunk as well.
- The reason the bottom bunk was cut differently was because, while I was testing the assembly process, I realized that it wouldn't work without modifying the plywood.
- I saw that, once fully assembled, the plywood for the bottom bunk could not be removed.
- The legs of the center bunk got in the way of the plywood and prevented it from coming out without the extra room to maneuver.
#14: A quick note on bed assembly
As this was a design/development process for me, I took things apart and put them back together several times.
Because of that, I was able to see several different assembly procedures. Here are my thoughts on how the bed should be built/assembled:
- Cut wood and sand/finish the pieces
- Assemble the lower bunk
- Assemble the legs and long sides of the upper bunk and prepare the short sides for later installation
- Assemble one long side and one short side of the center bunk (forming an “L” with 3 of the bunk legs) and prepare the other two sides for installation later
- Move the bottom bunk to its location (where the bed will be used)
- Attach brackets to lower bunk legs (to join upper and lower bunk beds)
- Lift the two long pieces of the top bunk frame into place, slide it into the brackets, and screw the legs into place
- Attach the short ends of the upper bunk and finish assembling the upper bunk frame
- Move the prepared pieces of the middle bed frame into position (remove the “step” support piece) and attach them to the brackets there
- Finish assembling the middle bunk frame
- Attach guards to top and middle bunks
- Attach the ladder to the upper bunk
- Place the plywood pieces on the top bunk, bottom bunk, and middle bunk (in that order)
#15: Construction of the middle bunk frame

You're almost there! You only need to build and install the middle bunk bed. The specific cut list for this part of the build is:
4×4:
- 45″ (x3)
2×4:
- 71″ (x1)
- 39″ (x3)
- 28.5″ (x1)
- 50″ for corner braces
2×2:
- 36″ for corner braces
- 4x8 plywood (.75″ thick) – x1 – cut to 73.5″ x 42.75″
- 75″ x 1.5″ (taken from scrap plywood)
- 61″ (x1)
- 29″ (x3)
- 22″ (x1)
#16: Frame Installation/Build (and Another Twist)
- To begin this part of the build, pre-assemble one long side and one short side of the frame (71″ and 39″ respectively) to the legs.
- You should have an L shape with the 3 legs joined together.
- Mark on each leg the height of the top of the 2x4 frame. That's 15 inches from the top of each leg.
- Attach the 2x4s as before with the supports you have been using until now.
- The support step should be removed from the bottom bunk to make room for the middle bunk leg. Move the pre-assembled section of the center frame into place and screw the leg into the crawlspace on the bottom bunk.
- Once the center bunk section has been moved into place, you can complete the frame assembly. Use the 39″ and 28.5″ frame pieces to make the other long side of the frame and the 39″ end piece to close the end side of the frame.
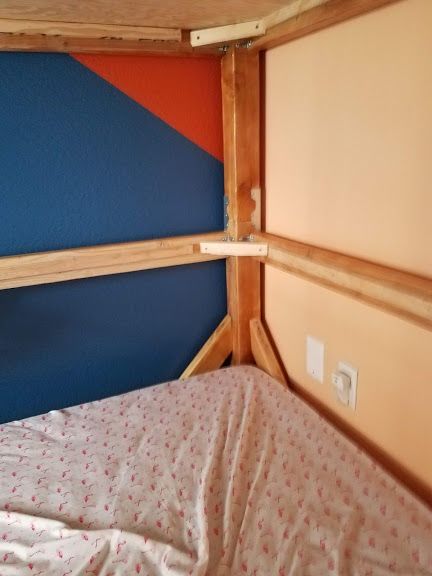
- The trick here is that you will need to work around the legs of the top and bottom bunk.
- The middle bunk frame has to be joined with two legs that are part of other bunk beds. Using these legs, mark the height from the floor to where the top of the frame will be (instead of the typical measurement from the top of the leg).
- The measurement must be 30 inches.
#17: Reinforce the corners
As done until now, reinforce the corners with 2x2 braces (between the 2x4s) and 2x4 braces (between the legs and the 2x4 frame).
The reinforcement done in the corners is the same as that done previously inthat:
- The 2x2 braces are in line with the shelves on the inside of the frame (like the top bunk)
- 2x4 keys are included (as was done on the bottom bunk). The slight change in the bracing this time is that the 2x4 braces are placed under the bed frame (instead of above)
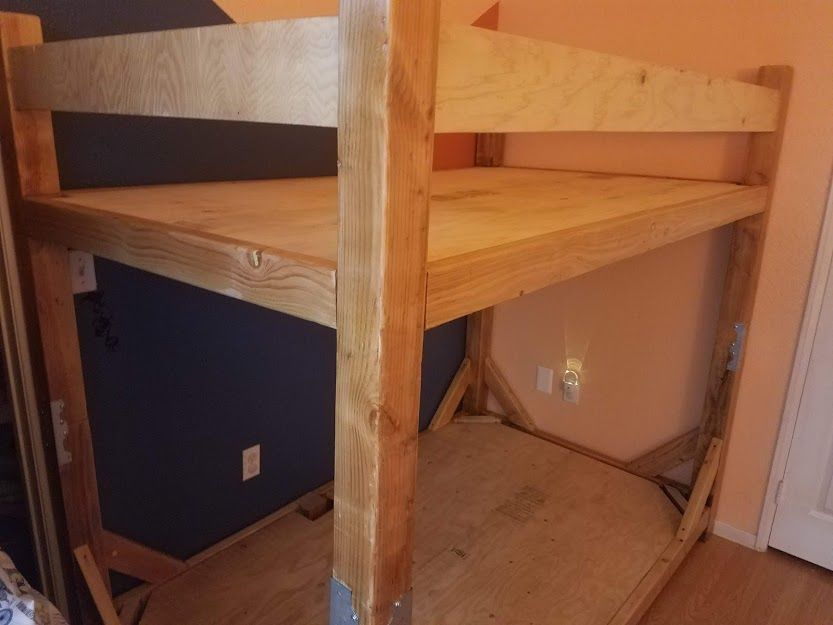
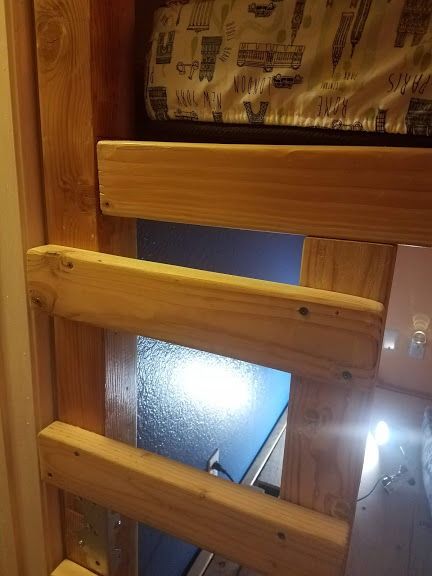
#18: Place railings on the bunk beds

- At this point, the beds are almost finished. However, they still need the safety feature of a railing on the upper and middle bunks.
- So far, the cut list has called for 5-inch wide strips to cut from the plywood pieces used with the beds.
- These strips will become the railings. The railings will surround each of the open faces of the raised beds and will be secured with the brackets currently used with the frame. Where you set them may vary depending on your needs.
- I placed them all so that the top of the protector was 3 inches below the top of the legs of each bunk bed... That seemed to work well for my kids.
#19: Construction/installation of the staircase
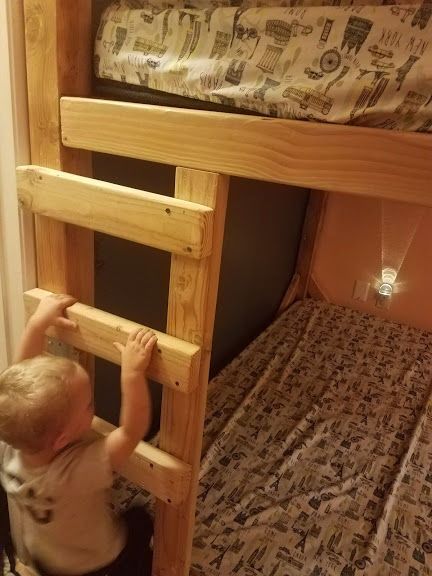
- Finally, you need a way to access the top bunk.
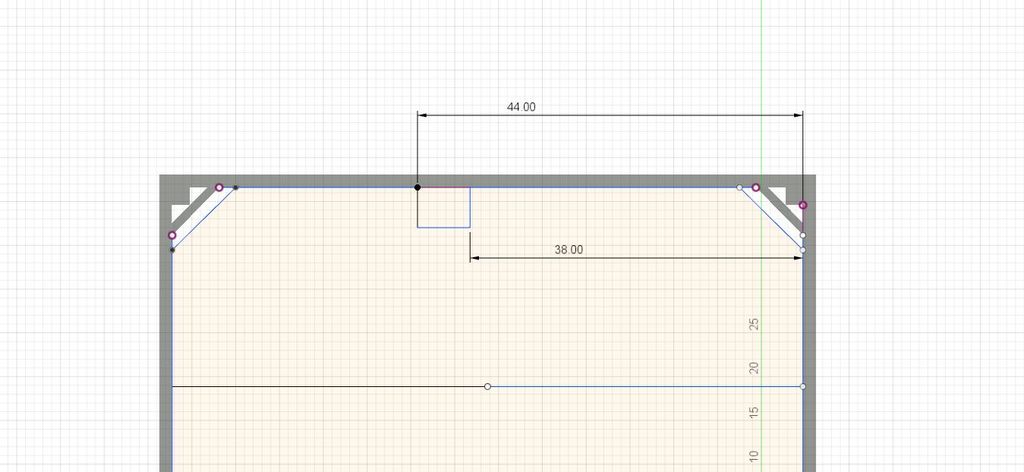
- I cut a 2x4 to match the space between the top and bottom bunk beds (~44 inches) and then 3 rungs of 2x4s (~18 inches)
- The rungs are screwed into the 4x4 leg and the 2x4 cutout for the ladder.
- Once connected via rungs, the 44″ 2x4 is connected to the top and bottom frames via some pieces of scrap wood I had in my garage.
- The idea is to have another connection point on that side of the ladder to stabilize it as it climbs.
- The spacing of the steps will vary depending on your needs.
- I had my kids test them to make sure they were positioned so they could be used.
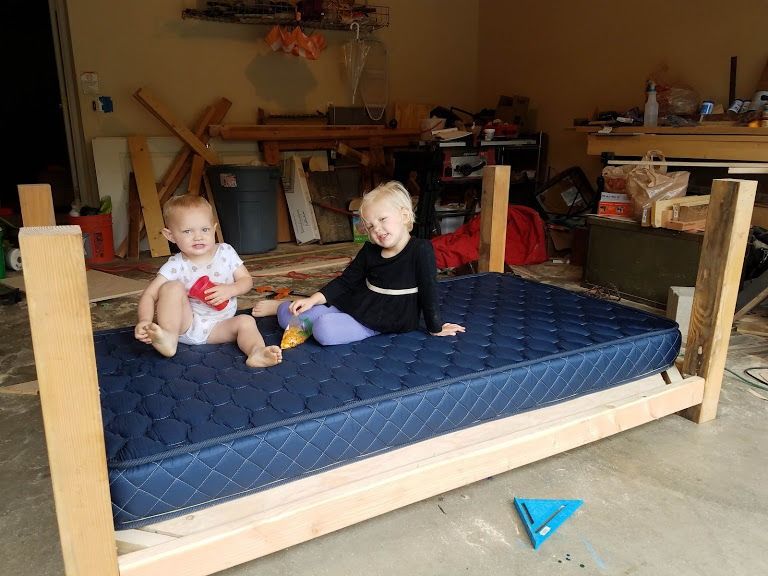
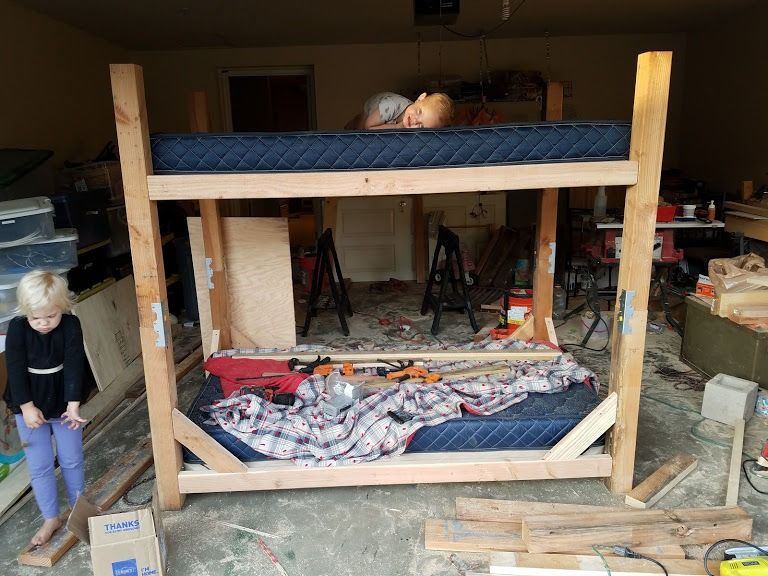
#20: Final
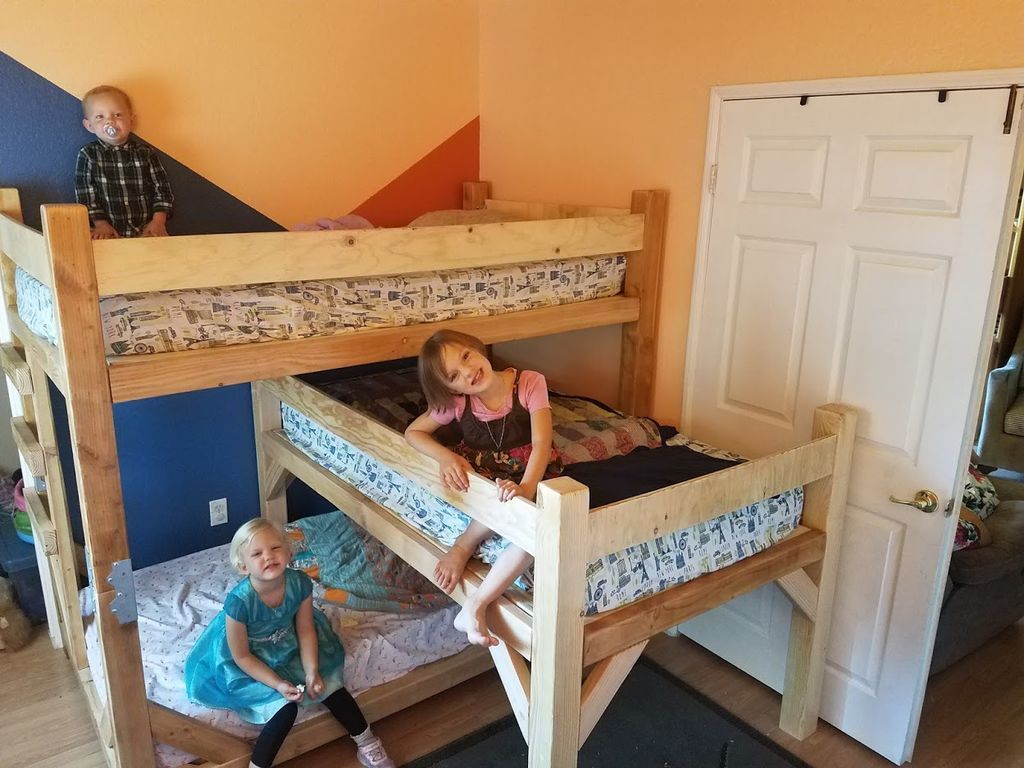
That's it! You have the bed assembled and ready to use. It was a great build, so pat yourself on the back.
My children love the bed and enjoy being able to have their own space to sleep.
It's great to see it all come together the way it did! If you have any questions, let me know and I'll do my best to help answer them and direct you to the build.
Enjoy!
Popular Content
How to make a rocket stove for outdoors
Cardboard Drawers Lined with Jeans
Ideas and Advantages of Window Grilles for the Home!
Latest Articles
How to make a refrigerator out of insulating material: Practical step-by-step guide
How to make a Kilim for the Home: Complete Step by Step Guide
How to protect ourselves from accidents in our workplace: Complete prevention and safety guide
Related Content
Ideas on How to Create Your Own Home Office
Floating Table Made of Acrylic W/Floating Mahogany Drawer!
Transparent Ceilings: Covers that Capture Natural Light
Pallet Projects That Anyone Will Love
Creative Home Decor Ideas to Transform Every Space
Refreshing your home starts with smart design choices that combine comfort, personality, and functionality. Whether you want to modernize a small apartment, upgrade outdoor areas, or create cozy rustic interiors, these trending ideas can completely change the atmosphere of your space.
Outdoor Spaces That Increase Style and Functionality
Outdoor living continues to dominate modern home trends. Homeowners are increasingly investing in practical entertainment zones inspired by these BBQ shed ideas, which create the perfect setup for gatherings and weekend cooking sessions.
First impressions also matter when designing exteriors. Elegant farm entrance gates design ideas help properties stand out while improving privacy and curb appeal.
Compact living solutions are also gaining popularity. These inspiring 16x40 shed house interior design ideas show how smaller spaces can still feel luxurious and functional.
To enhance patios and entryways, homeowners are adding stylish protection with these creative porch awning exterior DIY ideas that blend aesthetics with practicality.

Rustic and Cozy Interior Design Trends
Warm and natural interiors remain timeless. These charming rustic decor ideas combine wood textures, vintage accents, and earthy tones to create welcoming spaces.
Bedrooms are becoming more personalized with curated wall arrangements. Many homeowners use these stylish picture wall ideas for bedroom spaces to display memories and artwork creatively.
Textured wall treatments are another major trend. Installing a board and batten wall adds architectural character while keeping interiors elegant and modern.
Similarly, bold accent wall ideas can instantly transform plain rooms into eye-catching focal points without requiring a full renovation.
Smart Kitchen and Organization Inspiration
Functional kitchens are essential for modern homes. These practical kitchen wall cabinet ideas maximize storage while maintaining a clean and stylish appearance.
Organization also starts at the entrance. Well-designed mud room ideas help families keep shoes, coats, and daily essentials neatly arranged.
Colorful and Personalized Home Styling
Vibrant interiors are becoming increasingly popular thanks to playful dopamine decor ideas that use bright colors and joyful accessories to improve mood and energy.
Gallery walls also continue to evolve as a major decorative feature. These trendy gallery wall inspiration ideas offer creative ways to combine prints, photos, and statement art.
Young renters and new homeowners are especially embracing these stylish first apartment aesthetic ideas to create sophisticated interiors on a budget.
Finally, selecting the right shades can dramatically influence any room’s atmosphere. These modern trendy color ideas help homeowners choose palettes that feel fresh, elegant, and timeless.
Final Thoughts
From rustic charm and colorful interiors to outdoor entertaining areas and functional storage solutions, today’s home decor trends focus on creating spaces that feel both beautiful and livable. By combining smart layouts, modern textures, and personalized decorative elements, any home can become more stylish, comfortable, and inspiring.


