
Simple Tutorial to Build a Birch and Aluminum Desk, this desk was designed to meet specific needs, it had to be:
- Large enough to extend a textbook, laptop and writing notebook.
- Durable, with legs that don't wobble or a span that bends under weight.
- No nooks and crannies to fill with knick-knacks.
- Modern, clean, stylish and a positive addition to my workspace.
My finished product has douglas spruce legs, a birch top with steel panels, and an acrylic overlay. The edges are finished with aluminum angle.

And then we start with the materials:
- 1 4×8′ 3/4″ birch plywood
- 1 Sheet of acrylic 3×6′ 0.118″
- 1 12′ 4×4″ Oregon Pine
- 2 8′ 1″ Aluminum Angle
- 12 8x12″ galvanized steel sheets in pre-cut sections
- 10 3/4″ #8 stainless screws
- 4 4″ 3/8″ Suspension Bolts
- 4 3/8″ T-nuts
- 1 Polyurethane finish
- Double adhesive tape
- Glue
- Wide tape
- Polish aluminum
- Car wax


Tools:
- Circular saw
- Hand saw
- Carpentry square
- Tape measure
- Drill
- Wood router
- Tin cuttings

Step 1: Plan and cut to size

This step was relatively simple for me, since my steel panels were 8×12″. My final dimensions for the top were therefore 32×60″. But get a design on your available plywood and see what works best. With an acrylic top, you can place almost anything underneath, consider photos, lights and many other designs.
I used a circular saw to cut the wood, a table saw or hand saw would also work well.
Step 2: Cut the legs to length

The best advice is to find a table you like, measure its height, and copy the length of the legs. I cut my legs to 29″, and they are on the verge of being too long. But I am a tall guy, and with an adjustable chair it is very comfortable, if you make a higher desk it forces you to sit with better posture. .
When working with a 12′ beam, we choose to cut it into quarters, then cut it down to our desired size. It's wasteful, but it's easier to manage and keep in order.
Step 3: Cut acrylic to match the top

Keep the plastic on the acrylic until the end; It will stay clean and shiny. Place the acrylic over the top of the plywood, then use a flush bit on a router to match the top of the plywood.
If you don't have a router, a circular saw or even a wood saw would be fine.
Step 4: Cut and bend the aluminum edges


Now you will cut the aluminum angle to match your plywood. Measure your lights, we chose to use two eight foot ones, cut and bent to 16″ 60″ and 16″. This positions you at your sides, away from your elbows while you work.
To cut the aluminum, measure a 90 degree angle and cut it with the jigsaw. Then hold it at a right angle, and gently bend it to 90.
Step 5: Drill holes for the legs


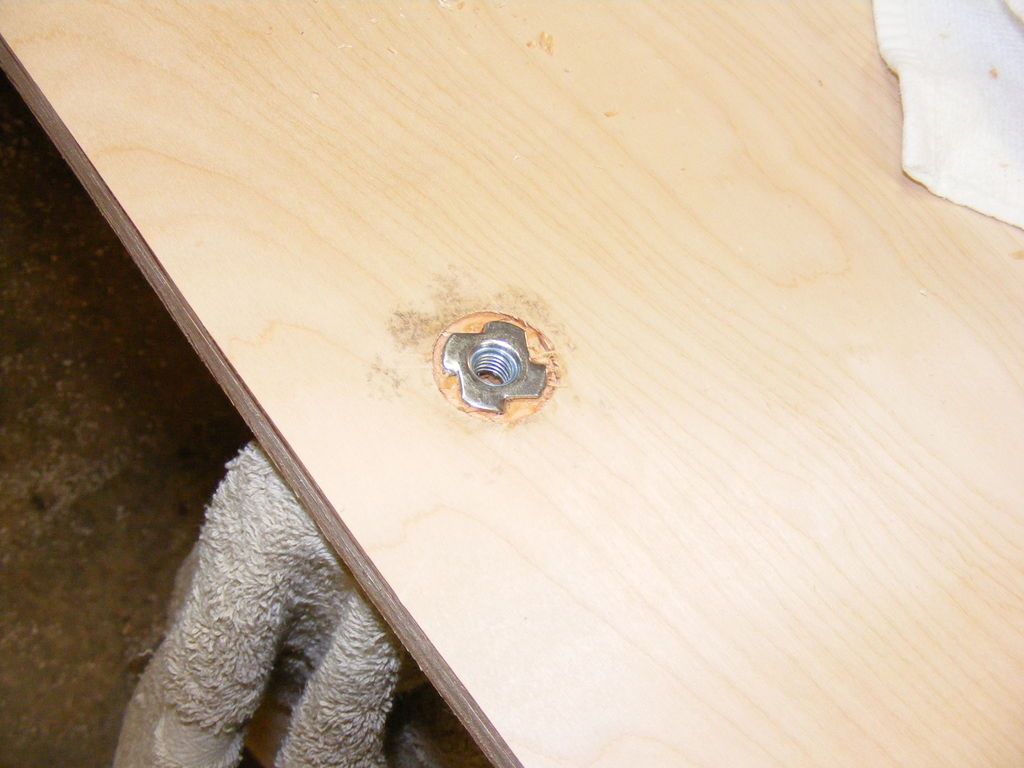
You will now drill four holes in the plywood. These should be just a little more than 3/8″ to accommodate the T-nuts, and should be countersunk to about 1/16″. The legs are six inches inside, and two inches in front.
A better plan would be to go a few inches further from the front, so the legs can be rotated and removed without removing the aluminum angle. Once you drill the holes, put a small amount of glue around the hole and gently tap the nuts.
Step 6: Drill holes in the legs

Here you will drill holes a little smaller than 3/8″ for the hangar bolts. Drill in the center of the 4x4. Screw in the suspension bolts by placing two nuts on the threaded section to act as locknuts, then use a hex wrench or ratchet to screw them to the desired depth.
Step 7: Apply the finish


Next, you'll want to sand all of the wood pieces, starting at about 100 grit to remove machining marks, then to 220, and finally to 320 before the first coat of finish. Brush off dust and wipe clean to prepare the surface. Hang all your finishing pieces and apply the finish with a roller or brush. Be sure to remove the finish of your choice.
Once dry, sand with 320 grit or finer, remove dust, and then apply a second coat. Apply as many coats as necessary, we put down four coats because the polyurethane thinned a little.
Step 8: Attach the legs and metal panels


I don't have any photos, but you'll have to trust me that the legs screw into the embedded nuts. Lay them flat and place them on the sides of the desk.
Place the steel panels in the desired pattern and then stick them with double adhesive tape. You could glue them on, but the tape allows you to delete or rearrange them if you want.
Step 9: Drill holes for the aluminum angle


Next you will need to design your aluminum edges and choose where to place the screws. We chose to place all the screws on top to demonstrate the most structural support. We placed three in the front, then one on each side of the lateral joint.
First, drill a pilot hole to prevent the acrylic from cracking, then finish with a larger hole so the screw doesn't have to chew through the aluminum and acrylic. It should be deep enough to allow the screw to anchor into the plywood. Install all screws to test fit, then polish with a metal polish. Finish the polish with car wax to prevent the aluminum from rusting.
Step 10: Clean the surface and apply the acrylic


First, remove the polished aluminum trim and acrylic. Clean the surface and remove dirt from the steel panels. Peel the film down on the acrylic and then place it on the table. Peeling off the film from the top – this moment is glorious! Suddenly, the desk glows.
Screw the edges and you're done!
Step 11: Finished product


I guess it won't be over until you admire yourself at your shiny new desk. Add it, then install it in your workspace!
Suggestions, questions and comments welcome and appreciated. Have fun building your own custom desktop! Thank you for visiting us!
Get more information at perfectionidea.com and on our Facebook for more Simple Tutorial to Build a Birch and Aluminum Desk.
Popular Content
How to make a rocket stove for outdoors
Cardboard Drawers Lined with Jeans
Change the facade of your home with simple steps!
Latest Articles
How to make a refrigerator out of insulating material: Practical step-by-step guide
How to make a Kilim for the Home: Complete Step by Step Guide
How to protect ourselves from accidents in our workplace: Complete prevention and safety guide
Related Content
How to Build a Ninja Warrior Warped Wall!
Bathrooms Completely Covered with Tiles
Bed Ideas with Rustic and Natural Style
How to Make a Wooden Wine Rack and Mysterious Design
Creative Home Decor Ideas to Transform Every Space
Refreshing your home starts with smart design choices that combine comfort, personality, and functionality. Whether you want to modernize a small apartment, upgrade outdoor areas, or create cozy rustic interiors, these trending ideas can completely change the atmosphere of your space.
Outdoor Spaces That Increase Style and Functionality
Outdoor living continues to dominate modern home trends. Homeowners are increasingly investing in practical entertainment zones inspired by these BBQ shed ideas, which create the perfect setup for gatherings and weekend cooking sessions.
First impressions also matter when designing exteriors. Elegant farm entrance gates design ideas help properties stand out while improving privacy and curb appeal.
Compact living solutions are also gaining popularity. These inspiring 16x40 shed house interior design ideas show how smaller spaces can still feel luxurious and functional.
To enhance patios and entryways, homeowners are adding stylish protection with these creative porch awning exterior DIY ideas that blend aesthetics with practicality.

Rustic and Cozy Interior Design Trends
Warm and natural interiors remain timeless. These charming rustic decor ideas combine wood textures, vintage accents, and earthy tones to create welcoming spaces.
Bedrooms are becoming more personalized with curated wall arrangements. Many homeowners use these stylish picture wall ideas for bedroom spaces to display memories and artwork creatively.
Textured wall treatments are another major trend. Installing a board and batten wall adds architectural character while keeping interiors elegant and modern.
Similarly, bold accent wall ideas can instantly transform plain rooms into eye-catching focal points without requiring a full renovation.
Smart Kitchen and Organization Inspiration
Functional kitchens are essential for modern homes. These practical kitchen wall cabinet ideas maximize storage while maintaining a clean and stylish appearance.
Organization also starts at the entrance. Well-designed mud room ideas help families keep shoes, coats, and daily essentials neatly arranged.
Colorful and Personalized Home Styling
Vibrant interiors are becoming increasingly popular thanks to playful dopamine decor ideas that use bright colors and joyful accessories to improve mood and energy.
Gallery walls also continue to evolve as a major decorative feature. These trendy gallery wall inspiration ideas offer creative ways to combine prints, photos, and statement art.
Young renters and new homeowners are especially embracing these stylish first apartment aesthetic ideas to create sophisticated interiors on a budget.
Finally, selecting the right shades can dramatically influence any room’s atmosphere. These modern trendy color ideas help homeowners choose palettes that feel fresh, elegant, and timeless.
Final Thoughts
From rustic charm and colorful interiors to outdoor entertaining areas and functional storage solutions, today’s home decor trends focus on creating spaces that feel both beautiful and livable. By combining smart layouts, modern textures, and personalized decorative elements, any home can become more stylish, comfortable, and inspiring.


