
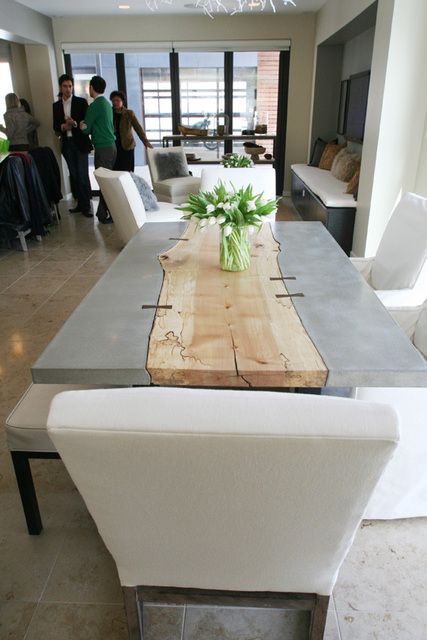
Concrete and Wood Slab Table, this build is probably not for the person who wants to try their first project.
This is a fun project that incorporates different materials (wood, concrete, metal) and, relatively speaking, can be a fairly quick build.

The materials needed will vary depending on how you would like it, but this is what I used:
- Wood (I used cedar, but any dry wood will work)
- Varnish
- Concrete mix (type may vary, I will explain later)
- Steel bar
- Stainless steel screws
- Concrete stain and acrylic strengthener
- Grout (filler grout or mixture of cementitious material).
- Wood or steel for the legs.
Step 1: Shape of the wooden plank


The first step is to obtain your piece of wood that will be placed inside the table.
Obviously, you don't have to include this piece of wood and the rest of the instructions can be used to make just a concrete table.
There are also many other excellent tutorials on concrete tables and counters.
I used a cedar log that had been lying in the trees in my backyard for years.
You can really use any type of wood as long as it is dry, I prefer natural curves.
I started by simply using a chainsaw to cut the log into a couple of blocks. If you have access to a sawmill or decide to purchase a piece of wood, you can obviously skip this step.
I got two good sized planks using my chainsaw which has a rough cut of about 3″ thick.
I want the final thickness to be 2″, so the surfaces were flat and parallel on the planer.
The nice thing about using cedar is that it smelled amazing when I was planning.
Step 2: Finishing the wooden board


This step might require a little experimentation, and perhaps your own experience will lead you down a different path.
But I found that it was easier to finish the wood plank before pouring the concrete around it so that you don't screw the surface of the wood as much when you polish the surface of the concrete.
The combination of wood and concrete in this table is what makes it a challenging build because the materials are worked very differently, but this is also what makes it such a unique table.
Once you have your wood board planed to the thickness you want (I used 2″) and cut to the length you need to prepare and finish the surfaces.
Don't worry about the bottom or even the edges being boxed into the Concrete, you only need to finish the surface and the two end grains. Of course, the first step is to sand until you get a nice smooth surface.
I went to 120 sandpaper on my orbital before filling the knots and holes with epoxy. a two part epoxy to fill in knot holes and other spots I wanted to see the character of the wood.
If you are not familiar with this epoxy, I would suggest experimenting with a little first, people either love it or hate it...
I used aluminum tape to cover the holes that extended all the way to the end and to create a dam along some of the rounded edges so I could pour the epoxy in there to avoid the concrete. to fill this space.
Use a propane torch to remove air bubbles when pouring the epoxy. just keep the torch moving, you don't want to burn the epoxy.
After letting the epoxy dry for a day or two, I sanded everything to the floor, with 220 grit sandpaper, and then finished with several coats of polyurethane.
Step 3: Preparation of the concrete form


The next step is to build a form and prepare to pour the concrete.
I used 3/4″ melamine to construct the forms because the melamine plastic coating releases very easily from the concrete without the use of any release agent, and has a very smooth surface. I made the sides of my shape 2″ tall.
I wouldn't suggest going thicker than this because holy crap, this thing is heavy.
As you will see in the photos, I put a dozen 8″ stainless steel bolts into the side of the slab, this is to create a good connection between the wood and the concrete and prevent the two from separating.
I guess this is a good time to point out that I'm pouring this upside down, the finished part of my wood is face down against the form.
This allows me to use the smooth surface of the melamine to give me an almost finished concrete when I take it out of the form.
Then I ran some 2x4s across and clamped them to keep the wood board flat and tight against the form to prevent concrete from seeping under the wood.
The 2x4s also give me a good point to tie my rebar so it's hanging in the middle of the concrete. I used two #4 bars on each side along the length of the table.
I would also like to point out that I made a sturdy cart with a lot of support to place this form on so you could move it around, make sure you have a sturdy base as this literally weighs hundreds of pounds and you don't want your form to sink or break.
Step 4: Pour the concrete


The next step is to pour the concrete into the form.
Sorry I don't have good photos of the actual pouring process, I was doing this as a one man operation and this stage is very time sensitive so I couldn't stop and take photos.
I used a black liquid concrete stain to give it a nice dark color, there are other color options and this is totally a personal preference.
The concrete mix is the part that can vary the most in this project. You can find countless sources online for what mix to use and different additives.
Mix the concrete and color before pouring into the mold.
I tried to use as little water as possible to give myself a stronger mixture, but this was a mistake.
Add enough water to make your pour very functional, it will still be quite strong, I would say you are going for a runny texture, not the peanut butter I tried to work into my shapes.
Work fast, premix concretes are prepared quickly.
When you see it all, you'll want to vibrate to remove as many air bubbles as you can, and to get the concrete flowing into all the nooks and crannies.
I used a vibrating sander without sandpaper on it, going around the entire outside of the form. Level it as best you can, but it doesn't need to be perfect because you can grind it later.
Cover it with plastic to prevent moisture from evaporating too quickly and let it sit for a few days.
If it is very hot and dry, I would suggest dampening the surface with a sponge a couple of times a day.
Step 5: Finishing the concrete


Once you have let the concrete dry for at least a few days in the form, you can remove the form and begin the concrete finishing process.
Concrete finishing is another of those things that can be done in different ways, for examplewhich I would suggest doing some research online to find the process that works best for you and the tools you have available.
I started grinding the bottom to make it smooth. I used an angle grinder with a masonry wheel, if you have never used this setup it is quite slippery, cuts through concrete.
After grinding the entire bottom surface smooth you will see a lot of small air pockets and voids where some aggregate was grinded, I mixed some black grout with an acrylic fortifier to help with adhesion.
Work this grout mixture into all the gaps with a rubber float or a good pair of rubber gloves on hand to give it a soft touch surface.
You only need to do this on the outside a few centimeters, where people would run their fingers under the table, no one will touch the center of the bottom, and if they do, they can experiment xD.. Let the grout dry for a day and then use some masonry polishing pads to moisten the surface.
You will want to get a wet buffer to do this. I just received some polishing pads that fit my orbital sander and I held my hose next to it.
That's right, I used a power tool that was not designed to get wet along with a hose, don't do this, I'm an idiot. I was pretty careful and wasn't surprised, but you may not get the same results.
Work your way through the polishing grains until you're done, then flip the bad boy over and take a look at the top.
Finishing the upper part is almost repeating the last steps you just did in the lower part. You will find some small air holes that you will fill with the grout mixture, then polish with your pads.
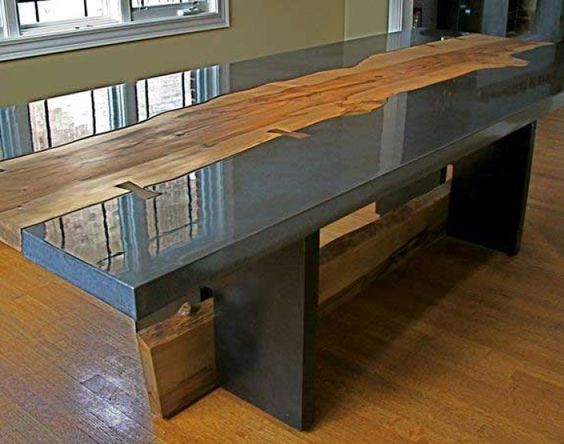
Here is another "problem." On my dining room table I had a couple of areas where the wood board was not completely tight against the form, so the concrete was a little higher than the surface of the wood.
To smooth the surface between the wood and the concrete I had to grind the concrete, but this exposed a lot of aggregates in the mix.
You will most likely see some aggressiveness after polishing, but this was a lot more.
During the process of polishing the concrete, you may have scratched the finish on the wood, but I hope you haven't ended up breaking the finish.
Either way, just fix this with some light sanding and then apply more polyurethane.
Step 6: Table legs and benches


I'm not going to go into too much detail about the legs because you can really make this any way you want with any number of materials.
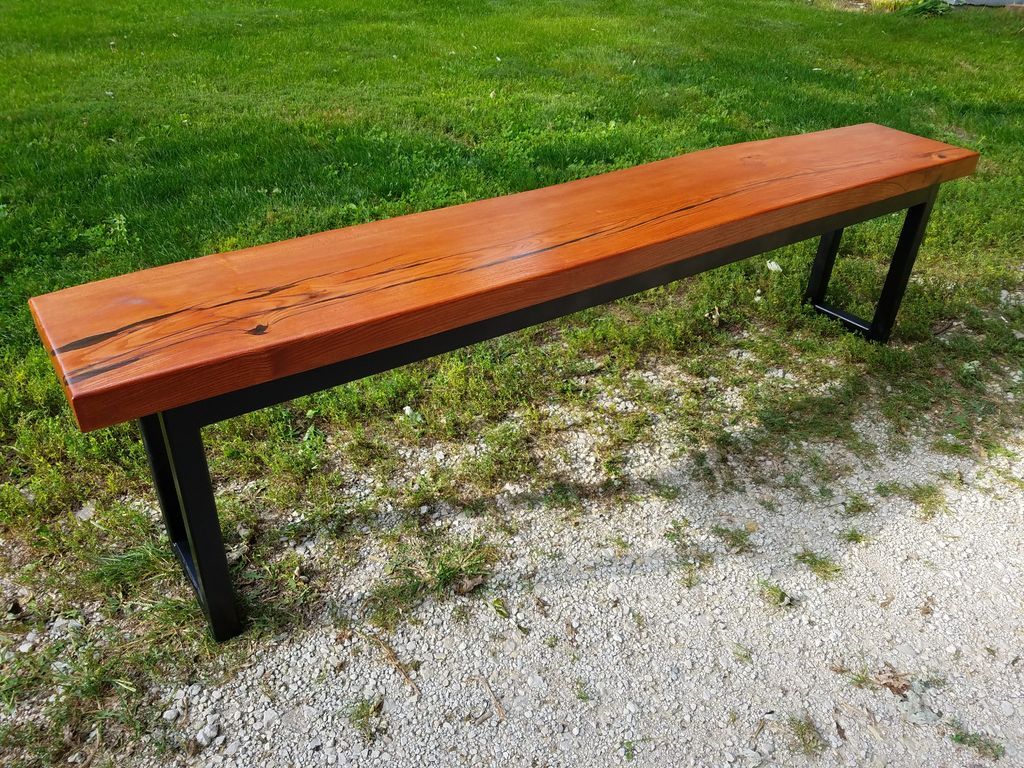
My parents' coffee table. I used 2″ square steel, welded it and then applied a blued finish.
This was my first attempt at blueing and I think I still have some experimentation to do with this.
For my dining table I used some wood that I found. I cut the metal braces from a long piece of scrap iron. The wood on the benches is the same wood and I welded some square steel for those legs.
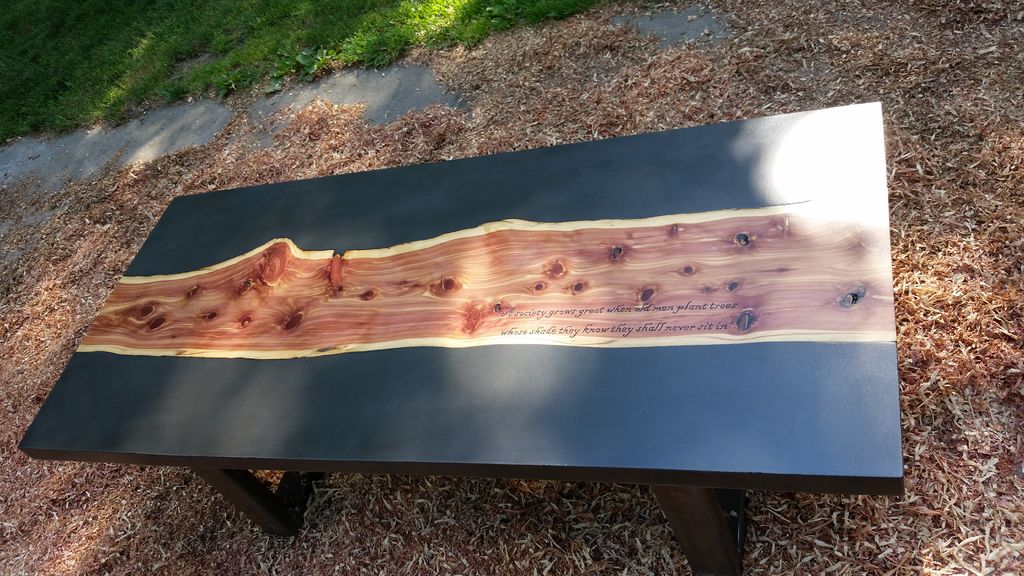
I also forgot to mention that I used a wood stove to include a small inscription on the table for my parents.
This was done before applying polyurethane with the process as follows: print your inscription on a plain paper in the size and font you want
Tape it to your wood, burn directly through the paper onto the wood tracing onto the letters, sand afterwards.
They are made to give clean edges to the letters, then apply your polyurethane finish.
Similar Ideas:


Thank you for following us. Let me know if you have any questions/comments/suggestions. And if you decide to make something using this as a guide, please send me pictures, I'd love to see it. Greetings!
Get more information at perfectionidea.com and on our Facebook for more Concrete Table and Wood Slab.
- Tags
- Concrete
Popular Content
How to make a rocket stove for outdoors
Cardboard Drawers Lined with Jeans
Bedroom furniture with secret compartments!
Latest Articles
How to make a refrigerator out of insulating material: Practical step-by-step guide
How to make a Kilim for the Home: Complete Step by Step Guide
How to protect ourselves from accidents in our workplace: Complete prevention and safety guide
Related Content
Bicycles are for Walking and Also for Your Home!
Impossible Screw in a Block of Wood!
Modern Infinity Mirror Table Lamp and LED Lights!
Crafts that Will Make Your Backpack Look Incredible
Creative Home Decor Ideas to Transform Every Space
Refreshing your home starts with smart design choices that combine comfort, personality, and functionality. Whether you want to modernize a small apartment, upgrade outdoor areas, or create cozy rustic interiors, these trending ideas can completely change the atmosphere of your space.
Outdoor Spaces That Increase Style and Functionality
Outdoor living continues to dominate modern home trends. Homeowners are increasingly investing in practical entertainment zones inspired by these BBQ shed ideas, which create the perfect setup for gatherings and weekend cooking sessions.
First impressions also matter when designing exteriors. Elegant farm entrance gates design ideas help properties stand out while improving privacy and curb appeal.
Compact living solutions are also gaining popularity. These inspiring 16x40 shed house interior design ideas show how smaller spaces can still feel luxurious and functional.
To enhance patios and entryways, homeowners are adding stylish protection with these creative porch awning exterior DIY ideas that blend aesthetics with practicality.

Rustic and Cozy Interior Design Trends
Warm and natural interiors remain timeless. These charming rustic decor ideas combine wood textures, vintage accents, and earthy tones to create welcoming spaces.
Bedrooms are becoming more personalized with curated wall arrangements. Many homeowners use these stylish picture wall ideas for bedroom spaces to display memories and artwork creatively.
Textured wall treatments are another major trend. Installing a board and batten wall adds architectural character while keeping interiors elegant and modern.
Similarly, bold accent wall ideas can instantly transform plain rooms into eye-catching focal points without requiring a full renovation.
Smart Kitchen and Organization Inspiration
Functional kitchens are essential for modern homes. These practical kitchen wall cabinet ideas maximize storage while maintaining a clean and stylish appearance.
Organization also starts at the entrance. Well-designed mud room ideas help families keep shoes, coats, and daily essentials neatly arranged.
Colorful and Personalized Home Styling
Vibrant interiors are becoming increasingly popular thanks to playful dopamine decor ideas that use bright colors and joyful accessories to improve mood and energy.
Gallery walls also continue to evolve as a major decorative feature. These trendy gallery wall inspiration ideas offer creative ways to combine prints, photos, and statement art.
Young renters and new homeowners are especially embracing these stylish first apartment aesthetic ideas to create sophisticated interiors on a budget.
Finally, selecting the right shades can dramatically influence any room’s atmosphere. These modern trendy color ideas help homeowners choose palettes that feel fresh, elegant, and timeless.
Final Thoughts
From rustic charm and colorful interiors to outdoor entertaining areas and functional storage solutions, today’s home decor trends focus on creating spaces that feel both beautiful and livable. By combining smart layouts, modern textures, and personalized decorative elements, any home can become more stylish, comfortable, and inspiring.


