
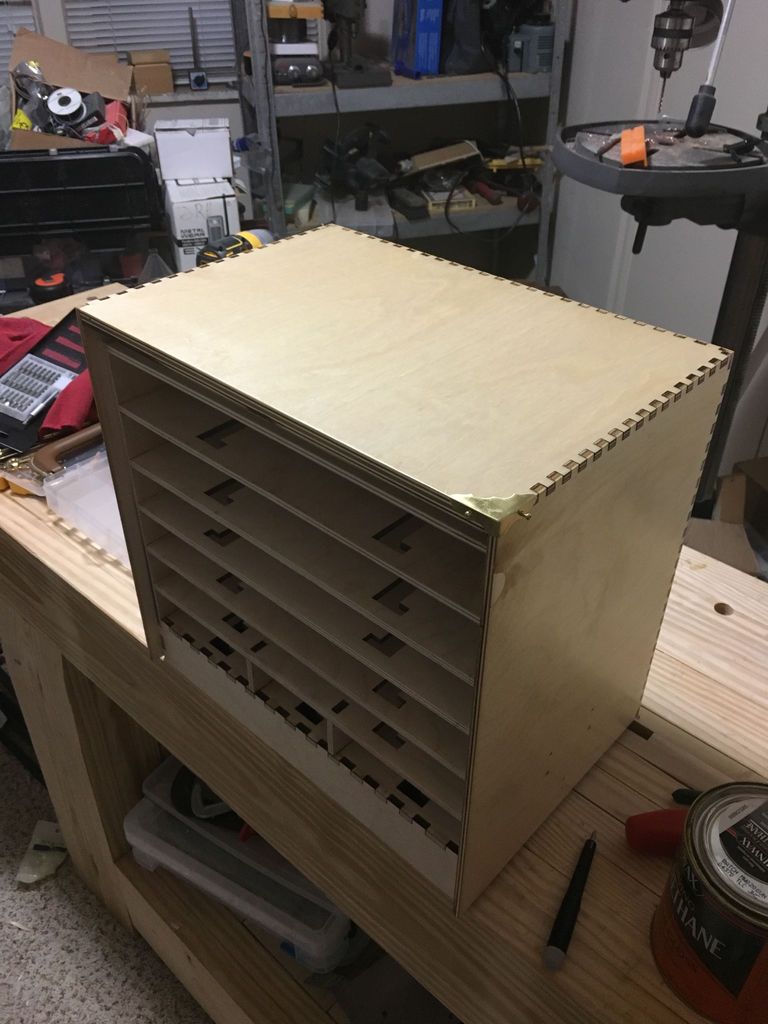
Creating a Cool Laser Cutting Tool Box, a tool box to store everything safely. Due to time constraints, I decided to go ahead and laser cut the pieces.
These instructions are for a very sturdy 9 compartment tool box. The drawers are designed to latch into the toolbox so they cannot be accidentally pulled out, thus losing potentially expensive tools.

A drawer lock can be added to lock both the top compartment and seal the drawers in place. This toolbox has so far withstood up to a year of abuse as it is transported between my apartment and the local maker space.


Step 1: Materials
- 2 5' x 5' Sheets, 1/4 Inch Thick Baltic Birch
- 1 sheet of 12 x 15 inches, 1/16 inch wide Baltic Birch
- Satin polyurethane varnish
- #4 x 1/2 inch wood screws
- 1 Piano Hinge 1-1/16′ X 30′ Brass
- 4 Latches
- 2 Chest Handles
- 1 Straight Friction Cap Holder
- 8 Copper Box Corners
- 13 Jewelry Box Knobs – 5/16 inch
- 1 Lid Handle
- 1 Desk Drawer Lock
- Foam inserts
- Drawer liner – foam sheet 12×18 inches
Step 2: Some Design Notes
The tool box is designed to have double-layer walls for better protection. While everything is made from 1/4 inch Baltic Birch, all exterior walls are 2 ply thick.
This allows me to easily add a dust lip to the top compartment and include the front wall to hold all the drawers during transport. I will refer to the inner layer that holds all the drawers together as the inner shell and the outer layer that will eventually be finished with urethane as the outer shell.
Step 3: Cut everything


The linked files contain all the wooden parts for the toolbox, files such as illustrator in .ai and files in .dxf. All wood parts are cut from 1/4 inch Baltic Birch. Everything here was cut using a GWEKE LC6090 150W laser cutter. I used 80% power at 10mm/s.
I lightly sanded everything using 220 grit sandpaper on a random orbit sander. I only sanded the front and back surfaces of each panel. A little attention to sanding here goes a long way to making sure the drawers slide smoothly. Be sure to sand all internal parts of the box and all parts of the drawer.
Link: https://goo.gl/Hedw8P
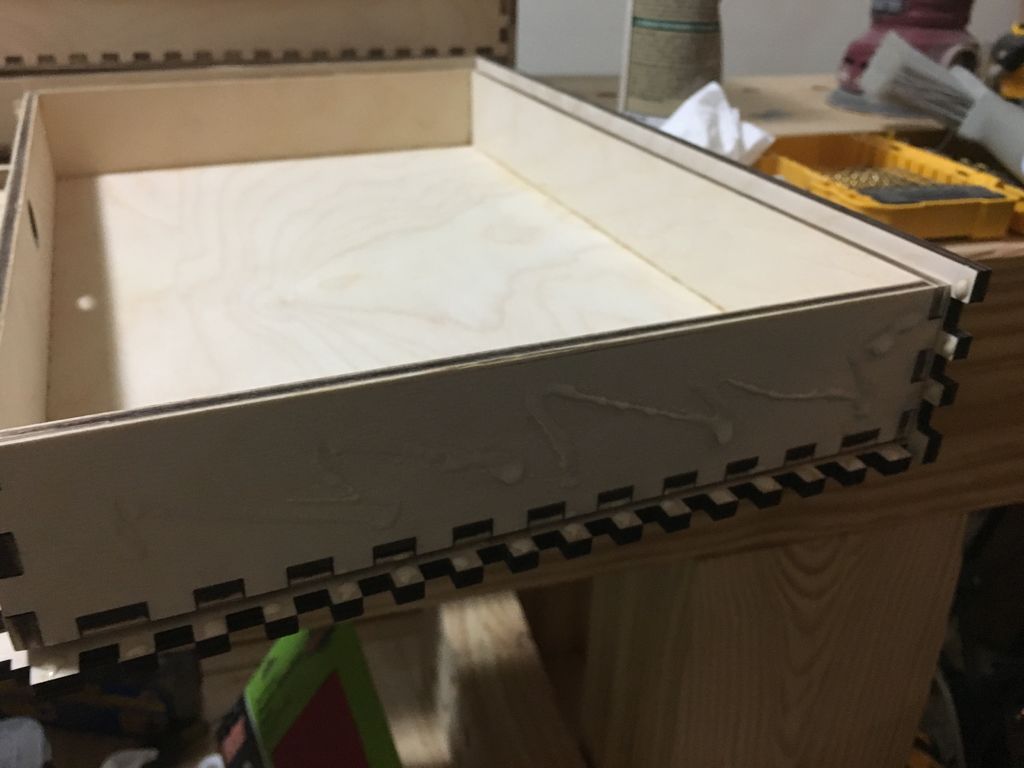
Step 4: Internal assembly


First we can assemble the inner case. Start by testing everything to make sure you know all the parts and are familiar with assembly. Depending on the type of glue you use, this part should be done fairly quickly. You don't need much glue to hold the pieces together.
You only need a small dot of glue on each tooth. Too much glue will make it harder for you to clean things up later..
First assemble the top two shelves that house the three smaller drawers. Glue the dividers to the shelves and then glue the assembly to the back panel of the inner box.
Then, attach the remaining 3 shelf sections to the back panel. You can then attach the side panels to the inner shell. It's easier to do this if the glue for all the shelves is still wet or at least flexible. Finally, you can add the bottom panel of the inner case and the front panel that extends along the top of the inner case (this forms the front of the upper compartment). Be sure to have plenty of clamps on hand to hold all the pieces together while they dry. I have built up quite extensively in port freight before this project.
Be sure to remove any excess glue on the inside of the joints before continuing. Any dried glue patches will make it difficult, if not impossible, to insert the drawers later. It's easiest to do this while the glue is still soft. I usually scraped off the glue with a spare chisel or filed it with a square file.
Reapply the outside to remove any excess glue on the outside of the box and make sure all the teeth are flush with the outside surface of the box. This is so that nothing interferes when we assemble the outer shell around the inner shell.
Step 5: Assemble the drawers


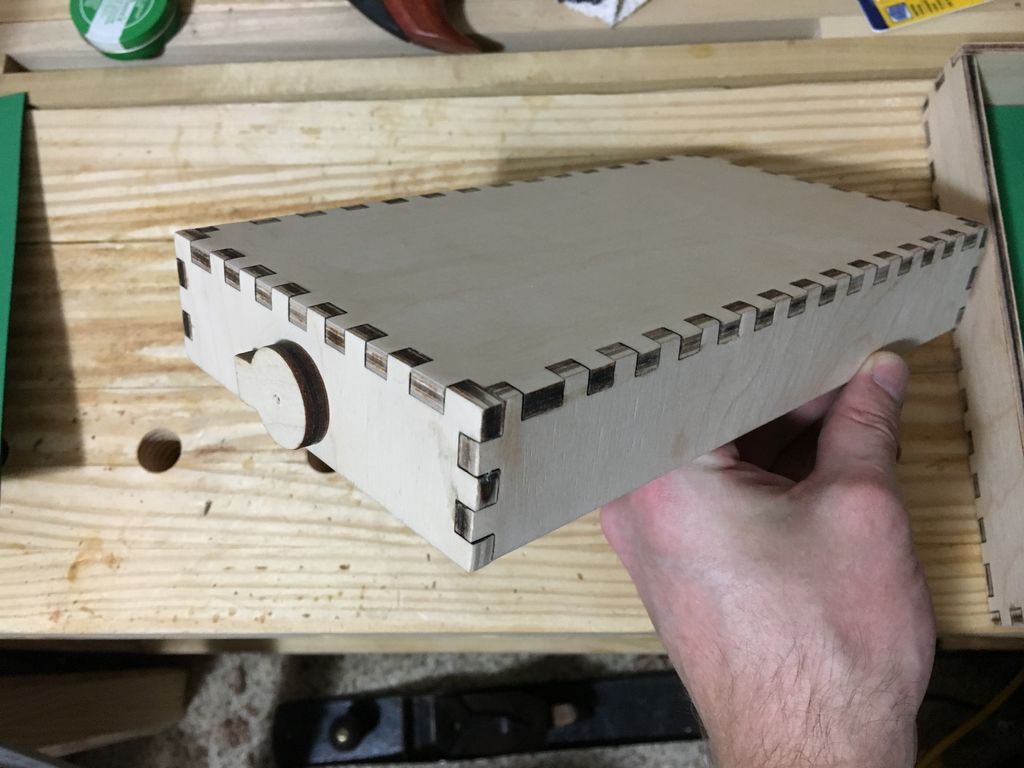


The drawers are pretty self explanatory. Sand all exterior surfaces of the box so they can be inserted smoothly into the interior casing. Please note that one of the back panels of each drawer has very small 1mm wide holes.
The small drawers have 1 hole, while the large drawers have 2 holes. The holes mark where to place the locking mechanisms. The circular mechanisms are cut out from the back panel of the internal casing to save materials.
Locking mechanisms hold the drawers in the tool box so you don't accidentally pull the drawer and spill your tools. Drive a small screw (#4 x 1/2 in.) through the back of the drawer into the locking mechanism.
Turn the screw to loosen it, so that you can easily rotate the locking mechanism from the horizontal unlocking position to the vertical locking position. This allows you to easily lock a drawer in the toolbox without having to disassemble anything.
Step 6: Assemble the cover


Assemble the inner casing cover and let it dry. You can then build the outer lid around the inner lid. Test everything and have the parts laid out for easy gluing and quick assembly. Assemble the outer cover around the inner cover.
Apply glue to the inside faces of the lid so that both layers are solidly joined. If you're not very quick with glue and assembly, use a slower-setting glue so you don't get rushed.
The dust edge of the lid should slide easily over the inner casing. I slid the cover over the inner casing after attaching the two cassettes.I took steps to make sure the lid fit without requiring additional shaping for a good fit.
Step 7: Assemble the outer casing


The outer shell glued around the inner shell. Glue the back and sides of the outer shell and apply adhesive to the inner shell. Please note that the outer shell is higher than the inner shell.
The extra space at the bottom is storage space for the front panel. To set the height of the inner case, place the lid on and make sure the inner and outer covers are seated on the lid.
There are two panels at the base. The interior panel has a long hole that locks the front panel in place. Glue the inner panel to the outer panel and quickly glue the assembly to the inner/outer case assembly.
Once everything is dry, put the drawers in place. Sand the sides as needed so they slide smoothly. Finish by sanding the front so that all drawers and shelves are smooth and even.
Step 8: Assemble the front panel


First, place the inner front panel in place and use the holes as a marking guide to adjust your drawer knobs. I used jeweler's knobs. However, this was much more expensive than it should have been. Next, glue the two front panel pieces together. You can place them in the box so everything is aligned. Carefully remove the front panel and clamp as necessary.
Once the glue is dry, adjust the fit of the panel by sanding the sides. It also helps to sand or use a plane to round the bottom lip of the panel. Rounding the bottom lip makes it much easier to insert the front panel when locking the toolbox.
After assembly, I discovered that the knobs were too long and prevented the front panel from laying flat against the drawers. I had to force the holes in the knob to get everything to fit. Now that all the pieces are assembled, give the exterior a nice sanding.
Step 9: Fix the equipment and finish the exterior


I used the piano hinge for the lid. The hinge is too long as purchased, but was cut to size with a Dremel. A lid support was also added. 4 Clasps were added to the lid. This may be a bit overkill and you may only need 2 in the front.
Note:
It was noted that just two latches on the front could cause failure if the box is weighed with heavy tools. The front panel may be dislodged by the lid when you lift it with the lid handle.
I have tested this with approx. 10 pounds and had no problems, but if you are going to weigh the box down with heavy tools, go ahead and use 4 snaps on the lid. The side handles are attached with short screws so they do not interfere with the drawers.
If the screw extends into the drawer space, move the extra screw with a Dremel tool. Brass corners were added to the box to protect the bottom and corners. The lock is a desk drawer lock.
I bent the locking arm so that it catches the locking clip screwed to the inside of the top compartment. Finally, since you never know when you need it, I added a bottle opener and embedded a small magnet to catch the bottle caps. After adding all of these pieces, go ahead and remove them so you can finish the box.
I applied 4 coats of satin polyurethane varnish. Allow the varnish to dry completely between coats and give a light sanding with 220 grit sandpaper. The varnish was only applied to the outside of the toolbox.
All interior surfaces were left completely unfinished. I laser cut a 1/16 inch thick sheet of Baltic birch to place in the top compartment. This will cover the holes in the drawer mechanisms.
You can use any thickness you want, but I wouldn't go over 1/8 inch. I didn't glue this piece in place in case I ever needed to access the drawer mechanisms. Get everything together and figure out what you're going to put in it.
Step 10: Optional: Cut the foam


NOTE: The foam used in machinist's tool boxes is quite a controversial topic. The main concern is that the foam will release unknown compounds that will cause your tools to rust. I have been very attentive to my tools and have not noticed any rust or problems since building the toolbox approx. 1 year ago. Please note that this is only a sample size of 1 and use your own judgment.
Update: I checked more on the foam and it is neoprene. This can generate chlorine gas when cut, so I do not recommend using it. Instead, use foam rubber or foam especially safe for laser cutters.
At this point, you've hopefully figured out what tools you want to add and where. Each drawer was lined with green art foam cut on the laser cutter. Please note that cutting foam on a laser cutter is a greater fire hazard and use caution. Greetings!
Learn more at perfectionidea.com and on our Facebook for more Creating a Cool Laser Cutting Toolbox.
Popular Content
How to make a rocket stove for outdoors
Cardboard Drawers Lined with Jeans
Bedroom furniture with secret compartments!
Latest Articles
How to make a refrigerator out of insulating material: Practical step-by-step guide
How to make a Kilim for the Home: Complete Step by Step Guide
How to protect ourselvese accidents in our work shop: Complete prevention and safety guide
Related Content
Personalized Tool Holder Wall!
How to Make a Floating Pool Lounger
Incredible Stacked Wooden Lamp!
Learn How to Build a Cool Folding Cedar Chair!
Creative Home Decor Ideas to Transform Every Space
Refreshing your home starts with smart design choices that combine comfort, personality, and functionality. Whether you want to modernize a small apartment, upgrade outdoor areas, or create cozy rustic interiors, these trending ideas can completely change the atmosphere of your space.
Outdoor Spaces That Increase Style and Functionality
Outdoor living continues to dominate modern home trends. Homeowners are increasingly investing in practical entertainment zones inspired by these BBQ shed ideas, which create the perfect setup for gatherings and weekend cooking sessions.
First impressions also matter when designing exteriors. Elegant farm entrance gates design ideas help properties stand out while improving privacy and curb appeal.
Compact living solutions are also gaining popularity. These inspiring 16x40 shed house interior design ideas show how smaller spaces can still feel luxurious and functional.
To enhance patios and entryways, homeowners are adding stylish protection with these creative porch awning exterior DIY ideas that blend aesthetics with practicality.

Rustic and Cozy Interior Design Trends
Warm and natural interiors remain timeless. These charming rustic decor ideas combine wood textures, vintage accents, and earthy tones to create welcoming spaces.
Bedrooms are becoming more personalized with curated wall arrangements. Many homeowners use these stylish picture wall ideas for bedroom spaces to display memories and artwork creatively.
Textured wall treatments are another major trend. Installing a board and batten wall adds architectural character while keeping interiors elegant and modern.
Similarly, bold accent wall ideas can instantly transform plain rooms into eye-catching focal points without requiring a full renovation.
Smart Kitchen and Organization Inspiration
Functional kitchens are essential for modern homes. These practical kitchen wall cabinet ideas maximize storage while maintaining a clean and stylish appearance.
Organization also starts at the entrance. Well-designed mud room ideas help families keep shoes, coats, and daily essentials neatly arranged.
Colorful and Personalized Home Styling
Vibrant interiors are becoming increasingly popular thanks to playful dopamine decor ideas that use bright colors and joyful accessories to improve mood and energy.
Gallery walls also continue to evolve as a major decorative feature. These trendy gallery wall inspiration ideas offer creative ways to combine prints, photos, and statement art.
Young renters and new homeowners are especially embracing these stylish first apartment aesthetic ideas to create sophisticated interiors on a budget.
Finally, selecting the right shades can dramatically influence any room’s atmosphere. These modern trendy color ideas help homeowners choose palettes that feel fresh, elegant, and timeless.
Final Thoughts
From rustic charm and colorful interiors to outdoor entertaining areas and functional storage solutions, today’s home decor trends focus on creating spaces that feel both beautiful and livable. By combining smart layouts, modern textures, and personalized decorative elements, any home can become more stylish, comfortable, and inspiring.


