
How to Make an Epoxy Resin Living Room Table, it is a children's table perfect for a nightstand or a side table.
I went with epoxy because it is durable and easy to maintain. The more layers you have, the more you can sand to remove scratches.

Project details:
- Epoxy:
- Colors used: white (first coat), aged brown, turquoise, light brown, silver, black.
- Legs
- Glued Round Panel with Pine Edge (1 in.) X (24 in.)
- PVC pipe
Project Cost:
- Project cost: $105
- Estimated time: 3 days (approx. 5 hours)
Step 1: Getting Started


This was a two-part process. The first was the base (I went with white). After pouring the resin on the workpiece, I used to brush it to spread it evenly.
It also helps if you are on a level surface. Now you will have to remove the bubbles.
I tried a heat gun and I wasn't a fan, I like the torch better. This part is pretty simple; Start from one end and then move towards the other.
Keep the torch moving, once you're done it should look like glass.
Now, begin your second pour, adding all the colors you want to see in the mix.
Once you have mixed the second container of epoxy, you will transfer it to a new container (I used plastic cups).
That's when you're going to add your individual colors.
Step 2: Mixing the Epoxy


The epoxy used in the projects is a 1 to 1 mix. One part hardener; one part resin.
If you check the epoxy countertop website you will find a chart to help you with square foot coverage. Twenty-four ounces of resin was just the right amount for this 24-inch table.
Here is the mixing process I used:
- 12 ounces. Hardener Part B + 12 oz. Resin Part A
- Pour the hardener into a mixing cup and then follow the resin.
- Mix this for 5 minutes.
- Pour into a new container and add your base color and mix for 4 more minutes.
- You are ready
You will repeat the same process for each pour. For the final coat, I just used the colorless resin.
Step 3: The first pour


This was a two-part process.
The first pour was the base (I went with white).
After pouring the resin onto the workpiece, I used a brush to spread it evenly.
It also helps if you are on a level surface. Now you will have to remove the bubbles. I tried a heat gun and was not a fan;
I like the torch better. This part is pretty simple, start from one end and then work your way to the other.
Keep the torch moving - once you're done, it should look like glass.
Now, begin your second pour, adding all the colors you want to see in the mix.
Once you have mixed the second container of epoxy, you will transfer it to a new container (I used plastic cups).
This is when you are going to add your individual colors.
Step 4: The second pour


For the second pour, I used a dirty pour technique. I used a total of five colors, but you can choose as many colors as you want to see in the final result.
Then I took a 4 inch piece of pipe and placed it on the white base.
Make sure you have everything prepared and ready to go, it is best if you do all this within 30 to45 minutes after pouring the base.
Now, pour all the colors into the PVC pipe. Don't mix it!
Then turn slightly, lift the PCV tube and push it into the desired path. It would help if you drew a pattern layout first, rather than trying and figuring it out while you're in the move.
I kept it simple;
I pushed the resin in one direction and then back. You can try whatever you want, spinning the pipe, zigzagging or whatever comes to your mind. You can even tilt the workpiece to create movement in the design.
Once you get the pattern you like, take the torch and remove the bubbles.
Then, let it rest for 24 hours.
Step 5: Day Two


Inspect your workpiece. If that looks good, then you're ready.
I ran into a few hiccups, so I had to address that before moving forward. If my process had worked in my favor, I would have finished.
Adding a layer of clear coat would only help, and I would still recommend it, especially if you love the design.
An additional clear coat adds protection. I would recommend sanding it lightly with the following: 120 grit, 220 grit, and 400 grit, before pouring the clear coat.
Remove sand dust with a damp cloth.
Make sure the surface is dry. Mix enough resin to cover the top and then pour it onto your work surface.
Take a brush and extend it, followed by the torch. Let sit for 24 hours.
Step 6: Day Three

Wipe off the hardened drops on the back.
Step 7: Add legs


For this project, I used hairpin legs to keep things simple. Feel free to go on whichever one you want.
Step 8: Result

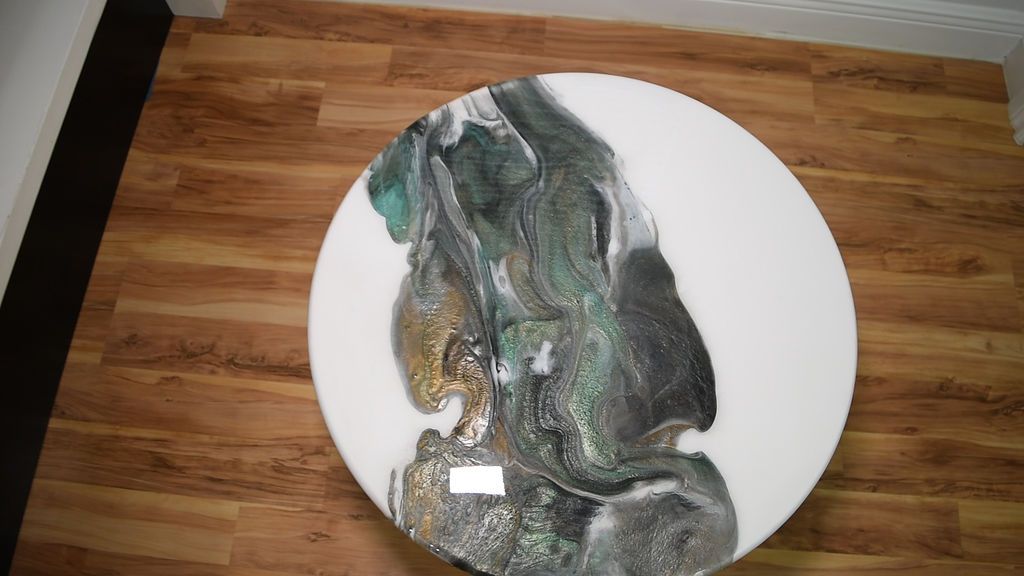


Here is the finished product.
Video:
Link to Facebook.
I hope you enjoyed this article. If you did, I'd love to hear what you think about it.
Source: https://diycreators.com/
Get more information at perfectionidea.com and on our Facebook for more How to Make an Epoxy Resin Living Room Table.
Popular Content
How to make a rocket p stoveoutdoor areas
Cardboard Drawers Lined with Jeans
Change the facade of your home with simple steps!
Latest Articles
How to make a refrigerator out of insulating material: Practical step-by-step guide
How to make a Kilim for the Home: Complete Step by Step Guide
How to protect ourselves from accidents in our workplace: Complete prevention and safety guide
Related Content
PVC Aquaponics: Vertical Garden
Original Shelving Ideas
Ideas for Reusing Car Tires
Learn How to Build a Cool Folding Cedar Chair!
Creative Home Decor Ideas to Transform Every Space
Refreshing your home starts with smart design choices that combine comfort, personality, and functionality. Whether you want to modernize a small apartment, upgrade outdoor areas, or create cozy rustic interiors, these trending ideas can completely change the atmosphere of your space.
Outdoor Spaces That Increase Style and Functionality
Outdoor living continues to dominate modern home trends. Homeowners are increasingly investing in practical entertainment zones inspired by these BBQ shed ideas, which create the perfect setup for gatherings and weekend cooking sessions.
First impressions also matter when designing exteriors. Elegant farm entrance gates design ideas help properties stand out while improving privacy and curb appeal.
Compact living solutions are also gaining popularity. These inspiring 16x40 shed house interior design ideas show how smaller spaces can still feel luxurious and functional.
To enhance patios and entryways, homeowners are adding stylish protection with these creative porch awning exterior DIY ideas that blend aesthetics with practicality.

Rustic and Cozy Interior Design Trends
Warm and natural interiors remain timeless. These charming rustic decor ideas combine wood textures, vintage accents, and earthy tones to create welcoming spaces.
Bedrooms are becoming more personalized with curated wall arrangements. Many homeowners use these stylish picture wall ideas for bedroom spaces to display memories and artwork creatively.
Textured wall treatments are another major trend. Installing a board and batten wall adds architectural character while keeping interiors elegant and modern.
Similarly, bold accent wall ideas can instantly transform plain rooms into eye-catching focal points without requiring a full renovation.
Smart Kitchen and Organization Inspiration
Functional kitchens are essential for modern homes. These practical kitchen wall cabinet ideas maximize storage while maintaining a clean and stylish appearance.
Organization also starts at the entrance. Well-designed mud room ideas help families keep shoes, coats, and daily essentials neatly arranged.
Colorful and Personalized Home Styling
Vibrant interiors are becoming increasingly popular thanks to playful dopamine decor ideas that use bright colors and joyful accessories to improve mood and energy.
Gallery walls also continue to evolve as a major decorative feature. These trendy gallery wall inspiration ideas offer creative ways to combine prints, photos, and statement art.
Young renters and new homeowners are especially embracing these stylish first apartment aesthetic ideas to create sophisticated interiors on a budget.
Finally, selecting the right shades can dramatically influence any room’s atmosphere. These modern trendy color ideas help homeowners choose palettes that feel fresh, elegant, and timeless.
Final Thoughts
From rustic charm and colorful interiors to outdoor entertaining areas and functional storage solutions, today’s home decor trends focus on creating spaces that feel both beautiful and livable. By combining smart layouts, modern textures, and personalized decorative elements, any home can become more stylish, comfortable, and inspiring.


