
Learn how to place tiles on the ground. Although if you have the necessary tools, the material and follow the explained procedure, we can obtain excellent results.
Preferably, you are required to start with the help of a professional specialized in these jobs. The technique is achieved by placing, placing and placing the platelets.


Materials
- cement glue or mortar for floors
- water
- platelets
- crossheads (optional)
Tools
- pencil or marker
- meter
- spatula
- pliers (optional)
- radial or grinder (optional)
- ceramic cutter
- toothed trowel
- spoon
- rubber hammer
- drill
- mixing rod
- aluminum or wooden rules
- rubber bucket
Procedure
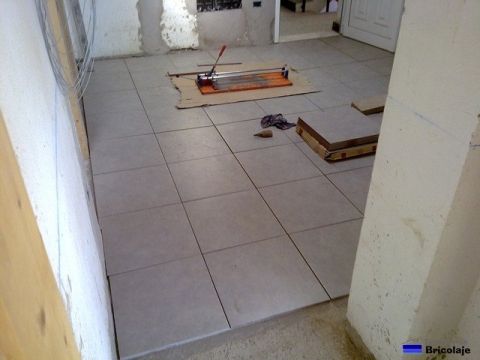
#1.
Before starting the task, we must make a presentation of some platelets on the floor to get an idea of how they will look.
We measure the place where to place the tiles and calculate the distribution of the tiles so that if we have to cut a tile to adjust sizes, the cut is in the corners where it will be less visible.
We must keep in mind that when cutting tiles we are necessarily going to waste a few, and it is very possible that some will break in the process, so it is not a bad policy to buy extra tiles.

#2.
We start by making the dough, for this we use the rubber bucket, the cement glue or mortar and the drill with the rod. We mix the product following the manufacturer's instructions.
#3.
Once we are clear about where to start, we start the work by pouring the cement glue on the ground, we will spread it with the trowel, leaving a layer of about half a centimeter thick.
Then with the serrated part of the trowel, we make a few passes to create some grooves.
The mortar or adhesive allows you to work with it for a period that ranges between half an hour and one hour after its preparation depending on the ambient humidity and temperature, that is, it is advisable that we do not prepare large quantities.


#4.
It is time to place the first row of platelets. We will place the first platelet leaning on the horizontal strip or ruler. We will continue placing the tiles until the first horizontal row is completed.
To separate the platelets, there are small cross-shaped plastic pieces (crossheads) that we will place between each one.
The thickness of these pieces is variable depending on our needs.
These pieces should be carefully removed as the mortar begins to set and harden, around half an hour or three quarters after placing the tiles.
If we wait longer we may have difficulty removing them. When a professional carries out the work, these plastic parts are not required.

#5.
As we place platelets and with the help of a hammer or rubber mallet we give them a few small blows to fix them to the glue cement.
In addition, we must ensure that they are perfectly flat and all at the same level. To do this we will use a wooden strip or an aluminum ruler.
If one stands out above the others, we will level it by gently tapping.
Finally, and with a spatula we remove excess cement glue.


#6.
Through this process we will place all the platelets that do not need to be cut. When we finish with them we will cut the platelets that will have to complete the corners and other recesses.
If the resulting piece is very stressedIt is more comfortable to place the mortar, or the adhesive, on the tile itself and not on the ground.


#7.
As you remove the plastic crosses, it is also a good idea to clean the plates with a damp sponge or cloth to remove any trace of mortar before it dries. After placing the platelets we must let them set for a few hours, about a day. And that's it, job done.
Source: tutallerdebricolaje
If you liked the content, don't forget to share it with your friends 🙂
Get more information at perfectionidea.com and on our Facebook for more. Learn how to place tiles on the ground.
Popular Content
How to make a rocket stove for outdoors
Cardboard Drawers Lined with Jeans
Change the facade of your home with simple steps!
Latest Articles
How to make a refrigerator out of insulating material: Practical step-by-step guide
How to make a Kilim for the Home: Complete Step by Step Guide
How to protect ourselves from accidents in our workplace: Complete prevention and safety guide
Related Content
10 ideas on how to recycle pallets in your home
Look at the incredible creation of this cabin with everything necessary implemented
20 furniture made with pallets that you can make yourself
Incredible ideas to keep your home cleaner
Creative Home Decor Ideas to Transform Every Space
Refreshing your home starts with smart design choices that combine comfort, personality, and functionality. Whether you want to modernize a small apartment, upgrade outdoor areas, or create cozy rustic interiors, these trending ideas can completely change the atmosphere of your space.
Outdoor Spaces That Increase Style and Functionality
Outdoor living continues to dominate modern home trends. Homeowners are increasingly investing in practical entertainment zones inspired by these BBQ shed ideas, which create the perfect setup for gatherings and weekend cooking sessions.
First impressions also matter when designing exteriors. Elegant farm entrance gates design ideas help properties stand out while improving privacy and curb appeal.
Compact living solutions are also gaining popularity. These inspiring 16x40 shed house interior design ideas show how smaller spaces can still feel luxurious and functional.
To enhance patios and entryways, homeowners are adding stylish protection with these creative porch awning exterior DIY ideas that blend aesthetics with practicality.

Rustic and Cozy Interior Design Trends
Warm and natural interiors remain timeless. These charming rustic decor ideas combine wood textures, vintage accents, and earthy tones to create welcoming spaces.
Bedrooms are becoming more personalized with curated wall arrangements. Many homeowners use these stylish picture wall ideas for bedroom spaces to display memories and artwork creatively.
Textured wall treatments are another major trend. Installing a board and batten wall adds architectural character while keeping interiors elegant and modern.
Similarly, bold accent wall ideas can instantly transform plain rooms into eye-catching focal points without requiring a full renovation.
Smart Kitchen and Organization Inspiration
Functional kitchens are essential for modern homes. These practical kitchen wall cabinet ideas maximize storage while maintaining a clean and stylish appearance.
Organization also starts at the entrance. Well-designed mud room ideas help families keep shoes, coats, and daily essentials neatly arranged.
Colorful and Personalized Home Styling
Vibrant interiors are becoming increasingly popular thanks to playful dopamine decor ideas that use bright colors and joyful accessories to improve mood and energy.
Gallery walls also continue to evolve as a major decorative feature. These trendy gallery wall inspiration ideas offer creative ways to combine prints, photos, and statement art.
Young renters and new homeowners are especially embracing these stylish first apartment aesthetic ideas to create sophisticated interiors on a budget.
Finally, selecting the right shades can dramatically influence any room’s atmosphere. These modern trendy color ideas help homeowners choose palettes that feel fresh, elegant, and timeless.
Final Thoughts
From rustic charm and colorful interiors to outdoor entertaining areas and functional storage solutions, today’s home decor trends focus on creating spaces that feel both beautiful and livable. By combining smart layouts, modern textures, and personalized decorative elements, any home can become more stylish, comfortable, and inspiring.


