

Reclaiming space in a small bathroom is a common challenge, but with a bit of DIY ingenuity, you can transform the area around your sink into a stylish and functional storage hub. This project replaces standard panels with a custom-built structure of shelves and panels around the washbasin. The result is not just a place for your essentials, but a design feature that maximizes every inch.
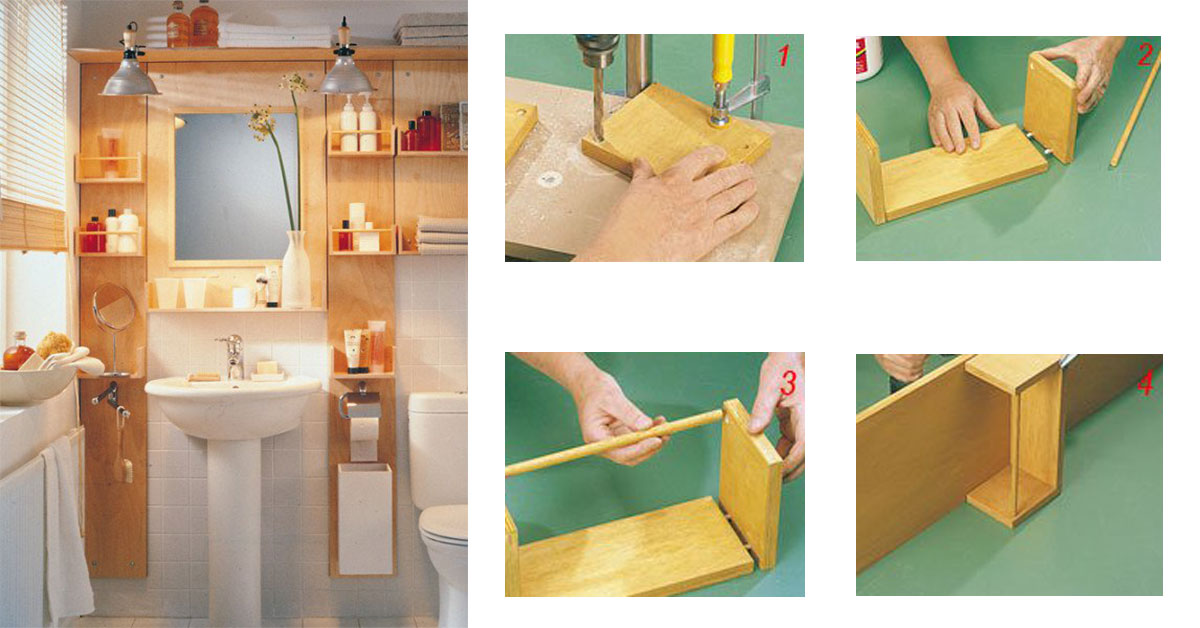
The framework consists of separate panels that serve both as an aesthetic covering and as a support system for the mirror, a traditional shelf between the mirror and the sink, plus a series of smaller shelves. While closed cabinets keep bottles and tubes from falling, open shelves present a risk. To solve this and create a more sophisticated look, we’ll build protected shelves instead of bare ones.
Get Lifetime Access to Top AI Tools
Find Bleeding Edge Business Software at Scandalous Prices on Appsumo.

On the back, the structure is automatically formed for attachment. On the sides, two narrow side panels work perfectly, and at the front, a simple railing—a piece of metal rod fixed horizontally between the sides—prevents items from tumbling off. For shelves holding a variety of bottle sizes, including very small containers, doubling the railing with a second lower rod is a smart move. A full front panel is not recommended, as it makes cleaning harder and, without a higher rod, doesn’t guarantee safety.
Both the panels and the shelves look great in plywood or multi-layer wood, as long as you apply a moisture-resistant finish. Use a modest thickness of about 6 mm for the panels, but at least 10 mm for the shelves. For longevity, choose marine-grade wood that better withstands humidity, though exterior glue isn’t critical. The height and width of each panel depend on your tile line, sink level, any fixtures below, and your personal taste. Generally, shelves should be as wide as the panel strips, though they can be narrower on very wide panels. For depth and height, 70 mm is both sufficient and aesthetically pleasing.
Ready to start your project? You can find all the wood and hardware you need at your local home improvement center, or browse our Home Improvement collection for inspiration and tools.
Preparing the Shelves
Begin by cutting your wood panels to size. For the main structure, measure the area around your sink carefully. The back panel should be as wide as your sink area and tall enough to reach from the countertop to your desired mirror height. The side panels should match the depth of your sink (typically 70 mm) and the height of the back panel.
For the shelves, cut pieces that are 70 mm deep and as wide as your panel strips. Sand all edges smooth to avoid splinters. If you’re using a moisture-resistant finish, apply two coats, allowing each to dry completely. For the protective railings, cut metal rod pieces to match the width of each shelf, then drill small holes in the side panels to insert the rods. Secure them with wood glue or small screws.
To enhance your workspace, consider adding a task light above the mirror for better visibility. For a cohesive look, match your new shelving with other bathroom elements like a modern vanity.
Assembling the Structure
Start by attaching the back panel to the wall using heavy-duty wall anchors. Ensure it is level before securing. Next, attach the side panels to the back panel using wood screws and glue. Then, install the shelves by sliding them between the side panels, resting them on small support brackets or cleats. Finally, insert the metal rod railings into the pre-drilled holes.

This open shelving system is perfect for storing daily essentials like toothbrushes, soap, and small plants. For a touch of luxury, add a frameless mirror above the sink to make the space feel larger.
Styling and Maintenance
Keep your shelves organized by grouping items by size. Use small trays or baskets for loose items like cotton balls. To prevent water damage, wipe down the shelves weekly with a damp cloth. If you notice any warping, apply an additional coat of moisture-resistant sealant.
For a complete bathroom refresh, pair your new shelving with a soft bath rug and moisture-resistant curtains.
Frequently Asked Questions
What type of wood is best for a bathroom shelf?
Marine-grade plywood is ideal because it resists moisture better than standard wood. You can find suitable options in our Home Improvement section.
How do I prevent items from falling off open shelves?
Install a metal rod railing at the front of each shelf. For very small items, add a second lower rod. This simple addition is a game-changer for bathroom organization.
Can I install this shelving over tiles?
Yes, but you’ll need a tile drill bit and wall anchors designed for tile. If you’re unsure, consult a professional or check our Home Improvement guides.
What finish should I use?
A marine-grade varnish or polyurethane is best. Apply at least two coats for maximum protection. For a quick-dry option, look for water-based sealants.
How deep should the shelves be?
70 mm (about 2.75 inches) is the recommended depth. It’s enough for most bottles and tubes without protruding too far into the room.
Additional Ideas for Maximizing Bathroom Space
- Over-the-toilet storage: Install a slim shelving unit above the toilet for extra towels and toiletries.
- Corner shelves: Use corner étagères to turn unused corners into storage.
- Floating vanity: Replace a bulky vanity with a floating model to create the illusion of more floor space.
- Mirrored cabinet: Swap your mirror for a mirrored medicine cabinet with built-in shelves.
- Wall hooks: Add decorative hooks for robes and towels.
With these tips, you can transform your bathroom into a clutter-free oasis. For more inspiration, explore our Bathroom Vanities and Wall Decor collections.
Browse Grand Goldman Home Decor
Discover unique craftsmanship home decor and furniture at the Grand Goldman Shop.
Home Decor Shop
 Acacia frida deluxe solid wood bed frame |
Bedroom bench |
Bed chest drawers |
Lingerie dresser |
Frame base |
Mirror with jewelry storage |
30 Bathroom Vanity |
Memory foam queen mattress |
Mattresses for back pain |
Nightstand set of 2 |
Grand Goldman Shop |
Civil Lawyer
Deutschland Trikot WM 2026
Acacia frida deluxe solid wood bed frame |
Bedroom bench |
Bed chest drawers |
Lingerie dresser |
Frame base |
Mirror with jewelry storage |
30 Bathroom Vanity |
Memory foam queen mattress |
Mattresses for back pain |
Nightstand set of 2 |
Grand Goldman Shop |
Civil Lawyer
Deutschland Trikot WM 2026







