
Guide to Building a Storage Garage and Work Center, includes almost 40 feet of shelving in a package just 8' wide by 6' high. Additionally, it is equipped with a folding workbench and pegboard area for hanging tools. Best of all, it's built from four sheets of plywood and a couple of 1x2 boards.
Materials needed:
Wood products:
- (4) Full sheets, 3/4″ thick plywood.
- (2) 1×2 boards, 96″,
- (1) 1/4″ thick sheet, nail board
Supplies:
- (1) 1 1/2″ x 48″ Cabinet Hinge
- (175) 1 1/4″ Coarse Pocket Screws
- (30) 3″ Flat Head Wood Screws or Decking Screws
- (8) 3/4″ Wood Screws
- (1) 5 1/2″ Tool Extraction
- (36) Shelf Pins
- (1) Wood glue
Tools used:
- (1) Kig Pocket-Hole Jig
- (1) Kreg Shelf Pin Jig
- (1) Circular Saw
- (1) Drill (cordless)
- (1) Jigsaw
- (1) Saw
- (1) Square
- (1) Tape measure
Cut List:
- (4) Tower sides, 3/4″ wood x 15 3/4″ x 72″
- (4) Top/bottom tower, 3/4″ wood x 15 3/4″ x 22 1/2″
- (2) Tower Divider, 3/4″ wood x 15 3/4″ x 22 1/2″
- (6) Tower Shelf, 3/4″ Wood x 15 3/4″ x 22 3/8″
- (1) Tower Rail, 3/4″ wood x 3 1/2″ x 22 1/2″
- (4) Large box side, 3/4″ wood x 15 3/4″ x 24″
- (4) Large Top/Bottom Box, 3/4″ wood x 15 3/4″ x 22 1/2″
- (2) Large Box Shelf, 3/4″ Wood x 15 3/4″ x 22 3/8″
- (2) Large Box Rail, 3/4″ Wood x 3 1/2″ x 22 1/2″
- (4) Small Box Side, 3/4″ Wood x 3 1/2″ x 22 1/2″
- (4) Small Top/Bottom Box, 3/4″ wood x 15 3/4″ x 22 1/2″
- (2) Small Box Rail, 3/4″ Wood x 3 1/2″ x 22 1/2″
- (1) Workbench top, 3/4″ wood x 18″ x 47 3/4″
- (1) Workbench Hinge Plate, 3/4″ Wood x 5 1/2″ x 47 3/4″
- (1) Workbench Clamp, 3/4″ Wood x 5 1/2″ x 47 3/4″
- (1) Bottom Slat, 3/4″ x 1 1/2″ x 96″
- (1) Top Slat, 3/4″ x 1 1/2″ x 48″
- (1) Pegboard, 1/4″ Pegboard x 16 3/4″ x 48″


Step 1: Start with the tower parts

Cut the parts for a pair of towers: four Tower Sides, two Tops, two Bottoms, two Dividers, two Rails, and six Tower Shelves for 3/4" plywood size, as shown in the cutting diagram. With the jig set for 3/4” material, drill pocket holes in the top, bottom, divider, and rails as shown.
Step 2: Add Shelf Bolt Holes
Drill holes for adjustable shelf pins in the sides of the tower, as shown. The easiest way to do this is by using a shelf template. This way you can be sure to get even spacing with all holes.
Step 3: Assemble the towers

You can now assemble the towers with 1 1/4″ coarse thread pocket screws, as shown. Make sure you have both sides of the tower oriented correctly, and that you place the tower rail on the top end.
Step 4: Make the pieces of the big box

Cut the pieces for a pair of large boxes: four Large Box Sides, two Large Box Tops, two Large Box Bottoms, two Large Box Dividers, two Large Box Rails, and two Large Box Shelves for the 3/4″ plywood size, as shown in the cutting diagram.
Then, with the template set for 3/4″ material, perMake pocket holes in the tops, bottoms and rails, as shown. Then drill holes for adjustable shelf pins in the sides of the large box, as shown
Step 5: Assemble the large boxes

You can now assemble the large boxes with 1 1/4″ coarse thread pocket screws, as shown. Make sure you have both sides of the large box oriented correctly, and that you place the rail on the top end.
Step 6: Make the small box pieces

Cut the parts for a pair of small boxes: four Small Box Sides, two Small Box Tops, two Small Box Bottoms, and two Small Box Rails from 3/4″ plywood, as shown in the cutting diagram. For 3/4″, drill pocket holes in the tops, bottoms and rails, as shown. Then drill holes for adjustable shelf pins in the sides of the large box, as shown in the picture.
Step 7: Assemble the small boxes

You can now assemble the small boxes with 1 1/4″ coarse thread pocket screws, as shown.
Step 8: Create the slats

Then you can create a Bottom Slat and a Top Slat from 1x2 boards, as shown in the cutting diagram.
Then, use the hole template and create a Front Panel Border from a 1x3 board, as shown in the cutting diagram.
With your template prepared for 3/4″ material, drill pocket holes, as shown.
Step 9: Add the Work Shelf Parts
Cut a workbench top, workbench clamp, and work shelf hinge plate to size from 3/4″ plywood, as shown in the cutting diagram.
Once you have these cuts, you can protect them, as well as the towers and boxes, with clear finish and paint.
Step 10: Start installing the crossbars

To mount the shelf to your wall, start by locating the towers. If you won't be able to connect the cleat to at least five bolts, also use heavy-duty wall anchors where bolts are not available.
Next, place the Bottom Slat 24″ off the floor, making sure the Slat is level and the pocket holes are facing up.
Attach the Cleat by driving 3″ screws through it and into the studs (or wall anchors).
Step 11: Assemble the towers and small boxes
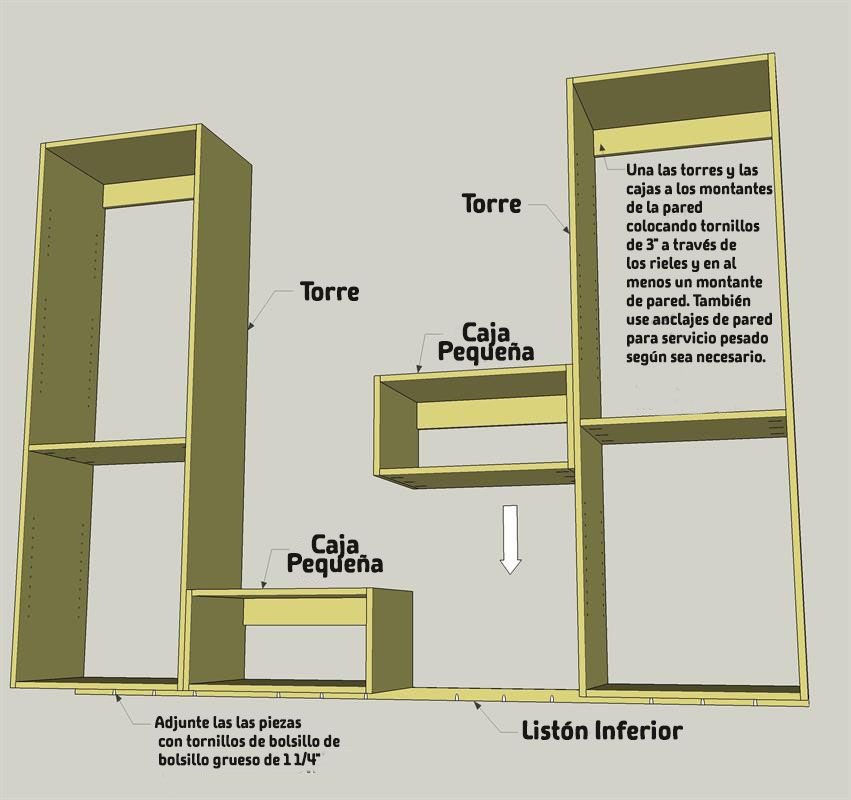
Start at one end to install the first tower. You will want a helper for this. Support the tower, make sure it is upright.
Attach it by driving 1 1/4″ coarse thread pocket hole screws from the bottom of the tower, and driving 3″ screws through the tower rail and into the wall studs (or wall anchors).
Then you can attach the small boxes in the middle, and the other tower. Make sure the top ends of the towers have 48″ of space between them.
Step 12: Add the large boxes

Next, measure 24″ down from the top of the towers, and install the Top Cleat by driving 3″ screws through it and into the studs (or wall anchors).
Then assemble the Large Boxes in the same way as the towers and lower boxes.
With everything in place, connect all the boxes and towers together.
To do that, drive several screws through one side and into the adjacent side. You can use 1 1/4″ coarse thread pocket hole screws for this. Simply push them straight in.
No pilot holes needed. Use 1 1/4″ wood screws, if preferred.
Step 13: Put the seat in place

The shelfe work comes next. Start by trimming 1/4″ off one end of a 48″ cabinet hinge.
Then attach it to the hinge plate of the workbench and the top of the workbench.
Slide this assembly into position and attach the hinge plate by driving 1 1/4″ coarse thread pocket screws into the small box lids.
Finally, screw the top workbench clamp to the bottom of the bench and add a handle.
Step 14: Assemble a panel
If you would like to add a dash panel, cut it to size, as shown in the cutting diagram.
Also cut a board clamp from a 1x2 board. Measure down 16 3/4″ from the bottom of the large boxes, and secure the cleat to the wall studs with a pair of 3″ screws. Next, attach the nail board to the cleat and the Top Cleat with 3/4″ screws
Step 14: Completion


Get more information at perfectionidea.com and on our Facebook for more Guide to Building a Storage Garage and Work Center.
Popular Content
How to make a rocket stove for outdoors
Cardboard Drawers Lined with Jeans
Change the facade of your home with simple steps!
Latest Articles
How to make a refrigerator out of insulating material: Practical step-by-step guide
How to make a Kilim for the Home: Complete Step by Step Guide
How to protect ourselves from accidents in our workplace: Complete prevention and safety guide
Related Content
Learn How to Make a Chair from PVC Pipes!
Unique Furniture Made from Tree Trunks – Part 2!
Modern Office Designs for Teleworking
How to Make a Modern Camera Slider
Creative Home Decor Ideas to Transform Every Space
Refreshing your home starts with smart design choices that combine comfort, personality, and functionality. Whether you want to modernize a small apartment, upgrade outdoor areas, or create cozy rustic interiors, these trending ideas can completely change the atmosphere of your space.
Outdoor Spaces That Increase Style and Functionality
Outdoor living continues to dominate modern home trends. Homeowners are increasingly investing in practical entertainment zones inspired by these BBQ shed ideas, which create the perfect setup for gatherings and weekend cooking sessions.
First impressions also matter when designing exteriors. Elegant farm entrance gates design ideas help properties stand out while improving privacy and curb appeal.
Compact living solutions are also gaining popularity. These inspiring 16x40 shed house interior design ideas show how smaller spaces can still feel luxurious and functional.
To enhance patios and entryways, homeowners are adding stylish protection with these creative porch awning exterior DIY ideas that blend aesthetics with practicality.

Rustic and Cozy Interior Design Trends
Warm and natural interiors remain timeless. These charming rustic decor ideas combine wood textures, vintage accents, and earthy tones to create welcoming spaces.
Bedrooms are becoming more personalized with curated wall arrangements. Many homeowners use these stylish picture wall ideas for bedroom spaces to display memories and artwork creatively.
Textured wall treatments are another major trend. Installing a board and batten wall adds architectural character while keeping interiors elegant and modern.
Similarly, bold accent wall ideas can instantly transform plain rooms into eye-catching focal points without requiring a full renovation.
Smart Kitchen and Organization Inspiration
Functional kitchens are essential for modern homes. These practical kitchen wall cabinet ideas maximize storage while maintaining a clean and stylish appearance.
Organization also starts at the entrance. Well-designed mud room ideas help families keep shoes, coats, and daily essentials neatly arranged.
Colorful and Personalized Home Styling
Vibrant interiors are becoming increasingly popular thanks to playful dopamine decor ideas that use bright colors and joyful accessories to improve mood and energy.
Gallery walls also continue to evolve as a major decorative feature. These trendy gallery wall inspiration ideas offer creative ways to combine prints, photos, and statement art.
Young renters and new homeowners are especially embracing these stylish first apartment aesthetic ideas to create sophisticated interiors on a budget.
Finally, selecting the right shades can dramatically influence any room’s atmosphere. These modern trendy color ideas help homeowners choose palettes that feel fresh, elegant, and timeless.
Final Thoughts
From rustic charm and colorful interiors to outdoor entertaining areas and functional storage solutions, today’s home decor trends focus on creating spaces that feel both beautiful and livable. By combining smart layouts, modern textures, and personalized decorative elements, any home can become more stylish, comfortable, and inspiring.


