
Making a modern crash wood lamp can be an incredible DIY job, as it has a unique design and will stand out in your home.
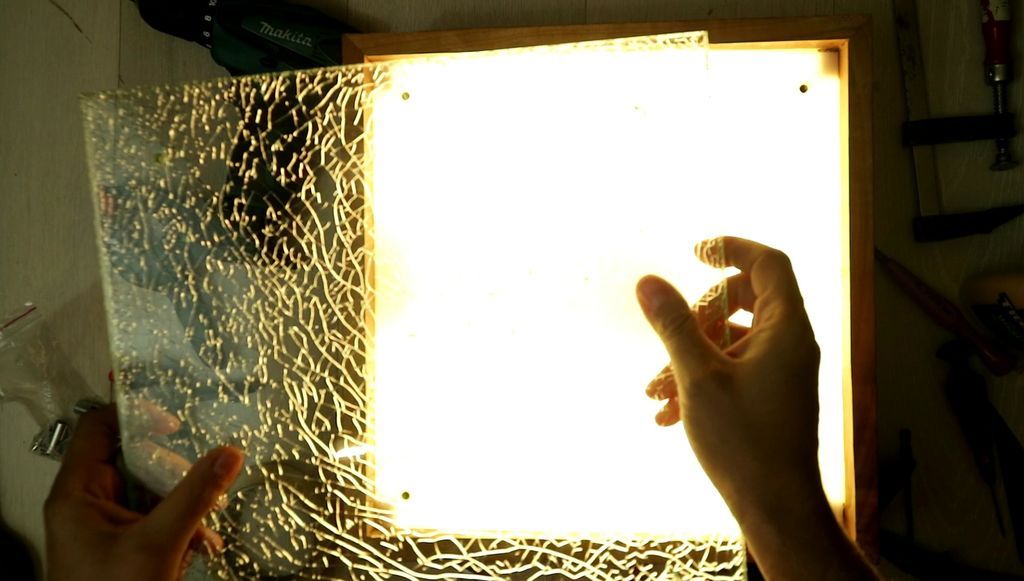
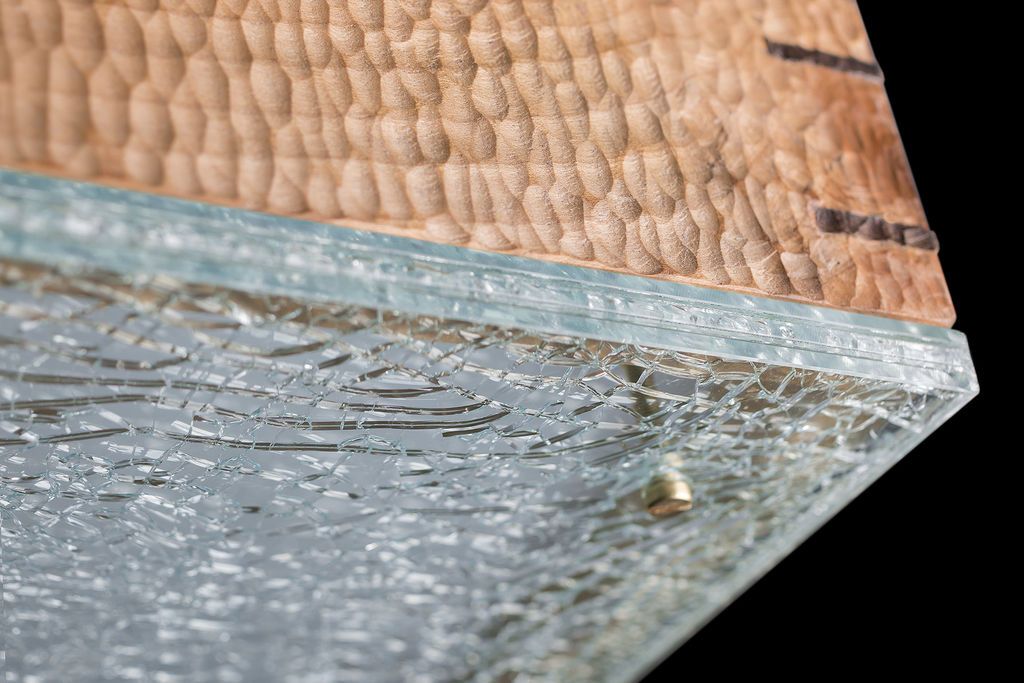
This is a lamp I designed to use a particular type of glass that a supplier gave me.

It is a three-layer glass with the middle layer completely collapsed to form a sort of spider web texture.
This is a wonderful glass, especially when you light it up.
So I decided to use it on a lamp and, why not, a wooden lamp! I hope you enjoy the build.
Steps to make a modern lamp:
Step 1: The Design
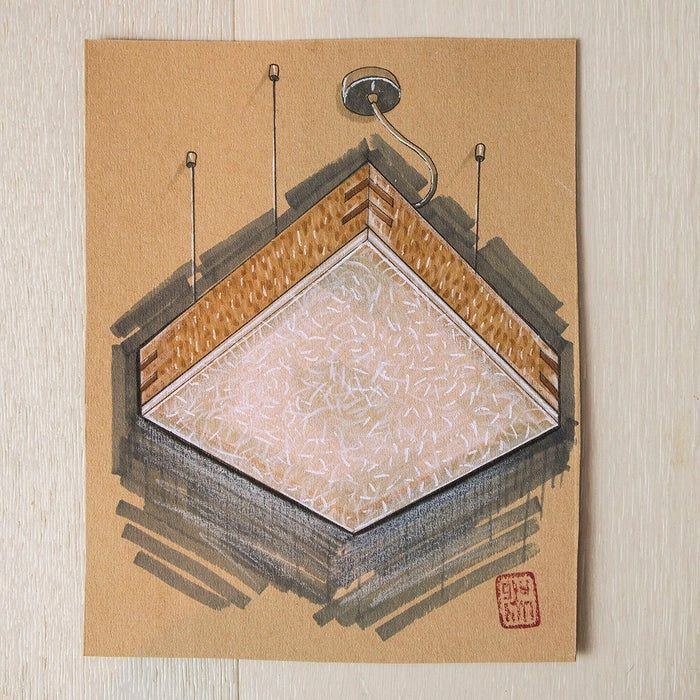
As always in my design process, everything starts from a sketch.
In this case, I sketched on tan sketch paper with Copic markers, ink pens, and a white pencil.
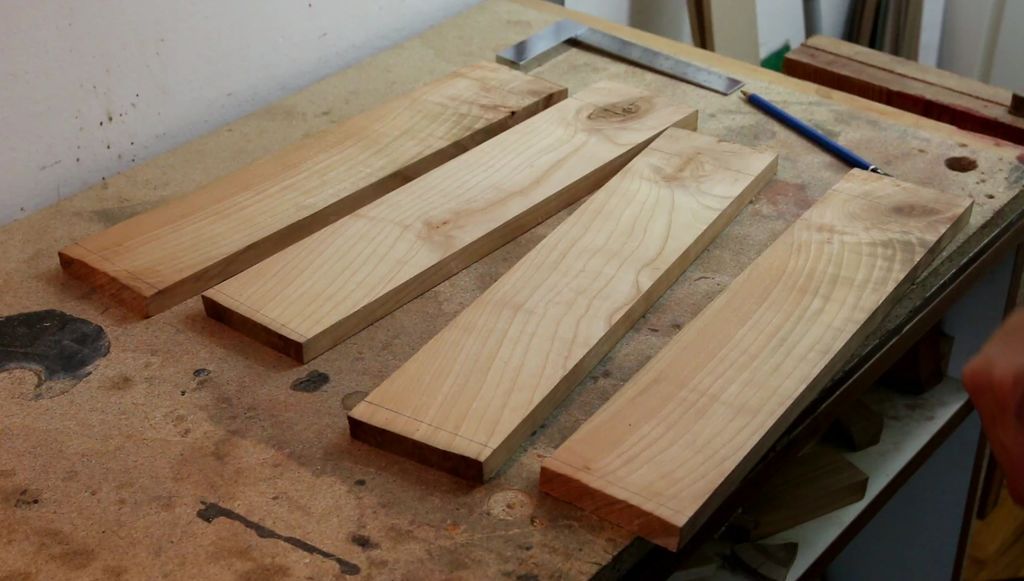
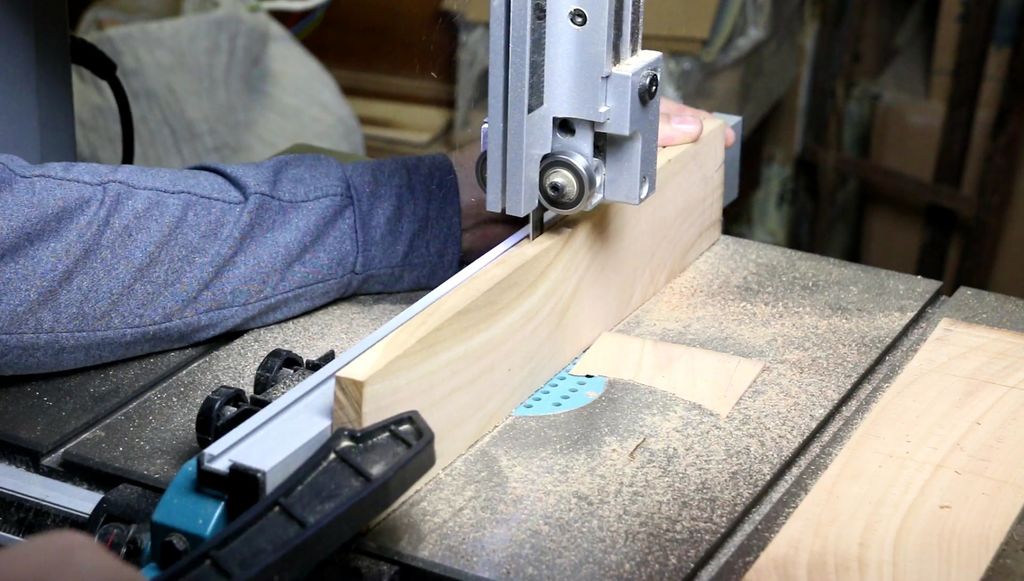
Step 2: Cut Wood to Size
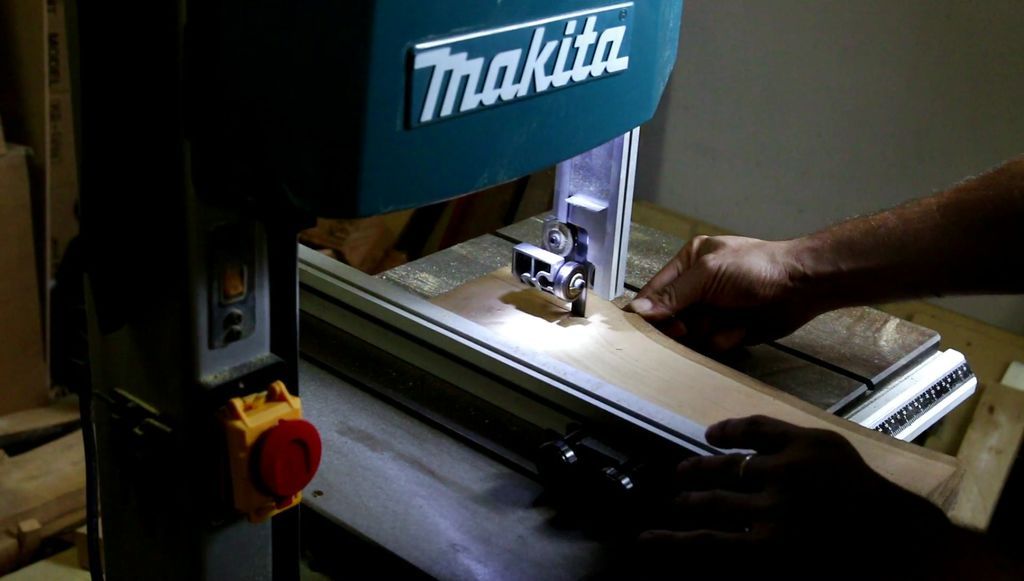
After the sketch, I decided on the dimensions, based on the size of the glass, and cut the pieces of cherry wood to the appropriate size and thickness with my band saw. This can be done with a table saw, circular saw, jig saw, or even a hand saw if you wish.
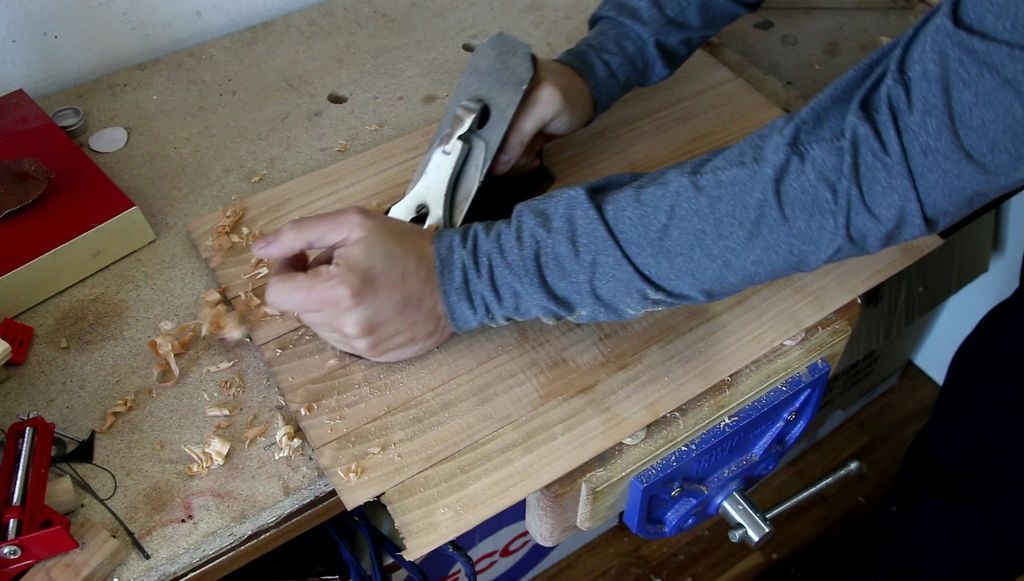
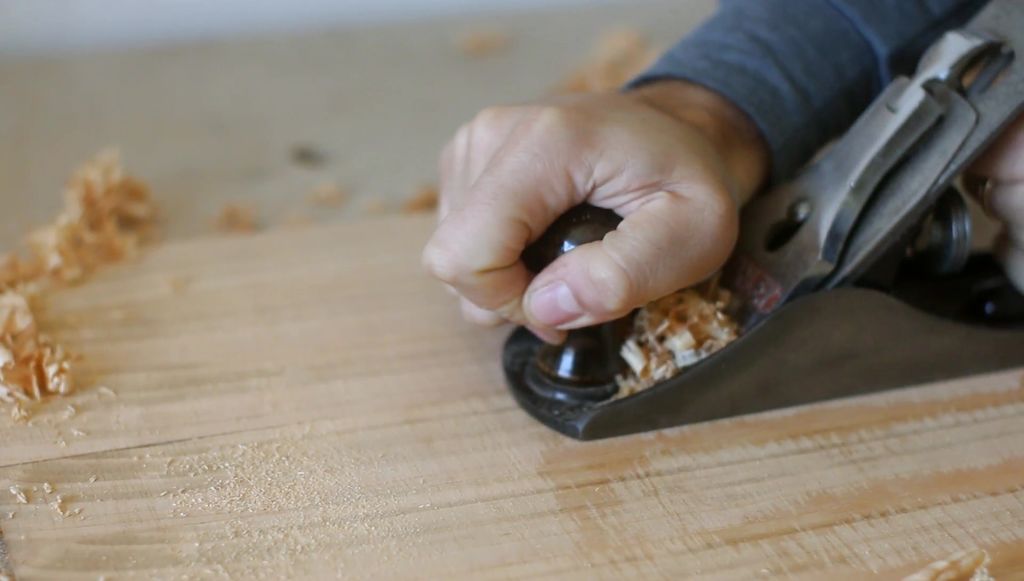
Step 3: Manual brushing
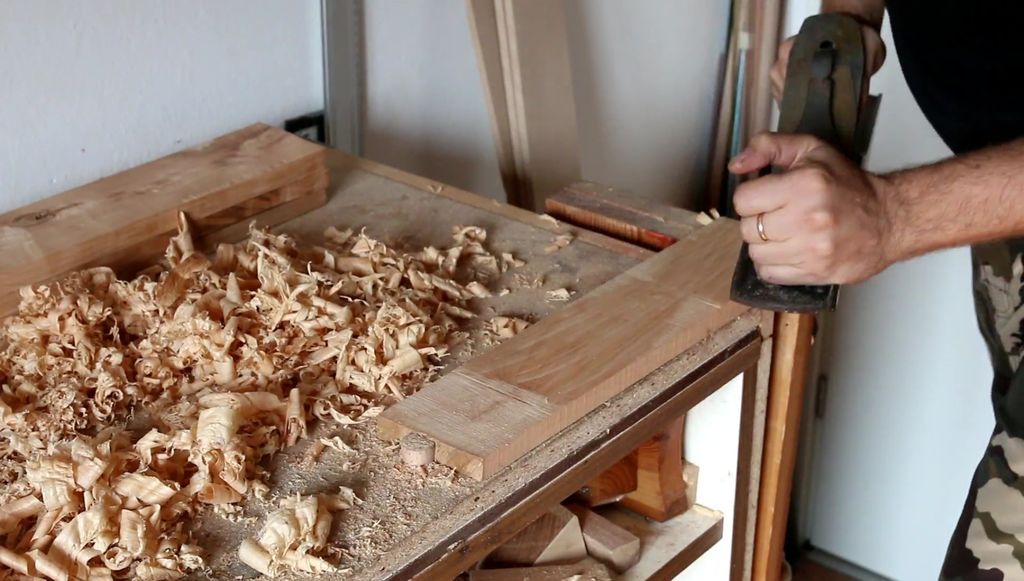

After roughly cutting all the sides of the lamp, I fitted them to size and squared them on all sides. I used a number 6 and a number 4 from vintage airplanes to do the job. If your blades are sharp and you know how to square a piece to the plane, it will take less time than you think.
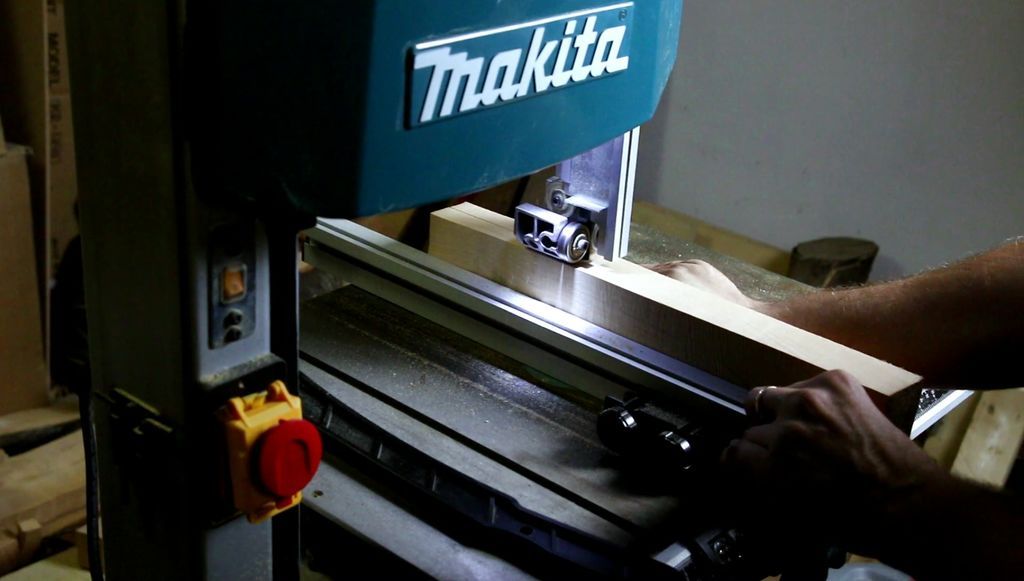
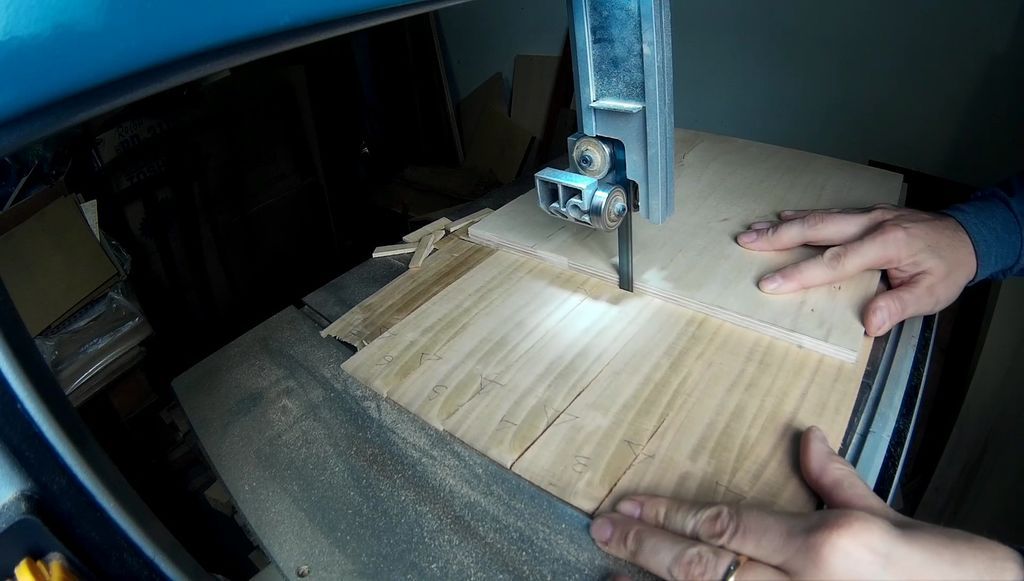
Step 4: Make the 45 degree cuts
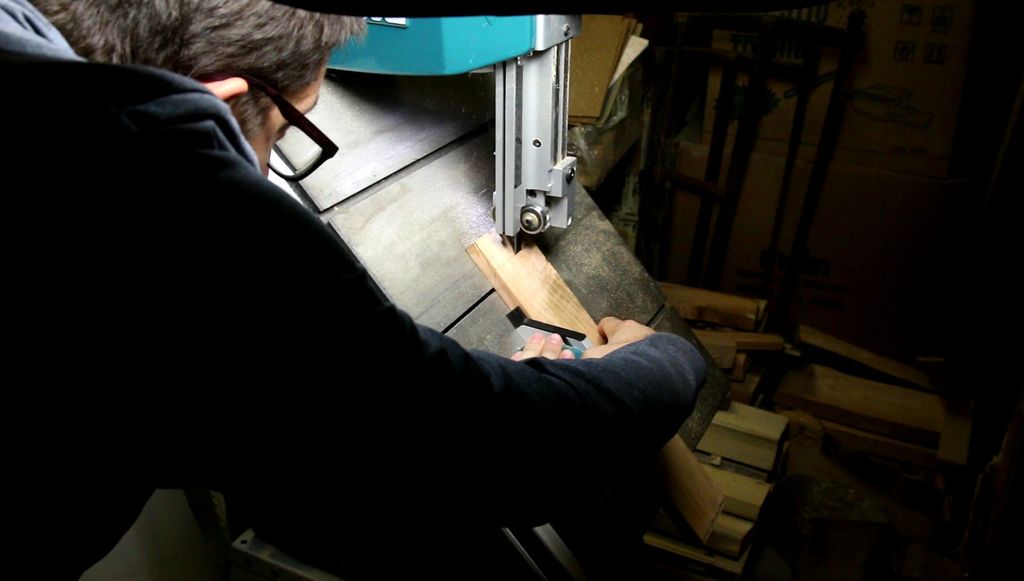
After planning the sides of the lamp, I cut them at 45 degrees to build the lamp frame. There are several ways to make these cuts. I used my band saw because that was the easiest machine to use at the time. I first marked them at the correct length, then after cutting I put them together to check the squareness of the frame.
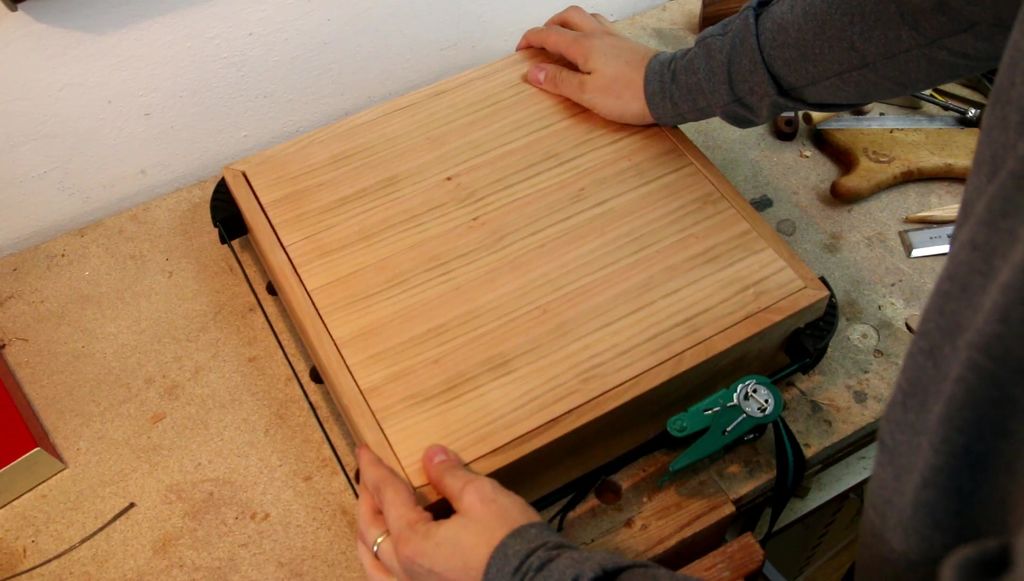
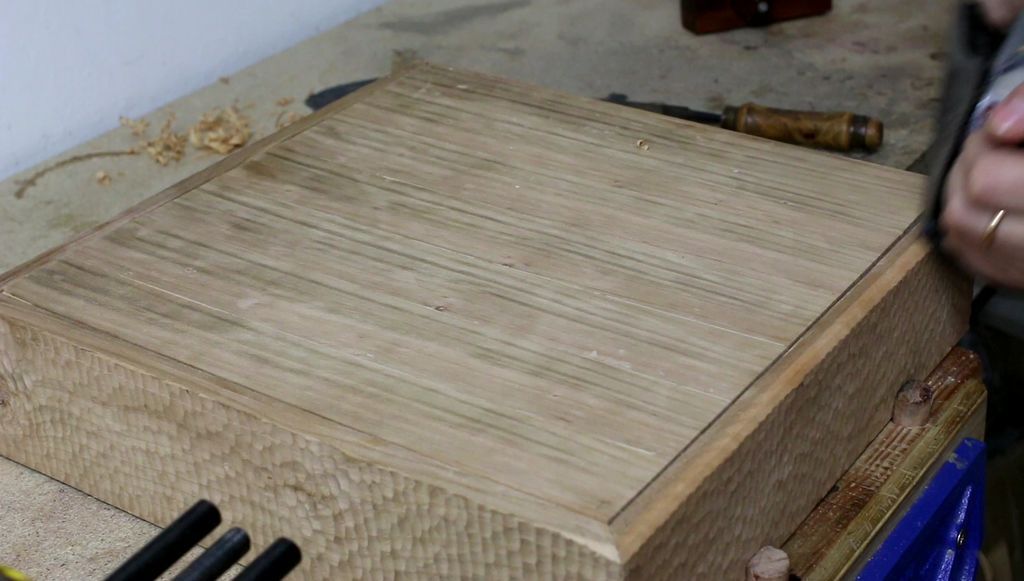
Step 5: The top of the lamp
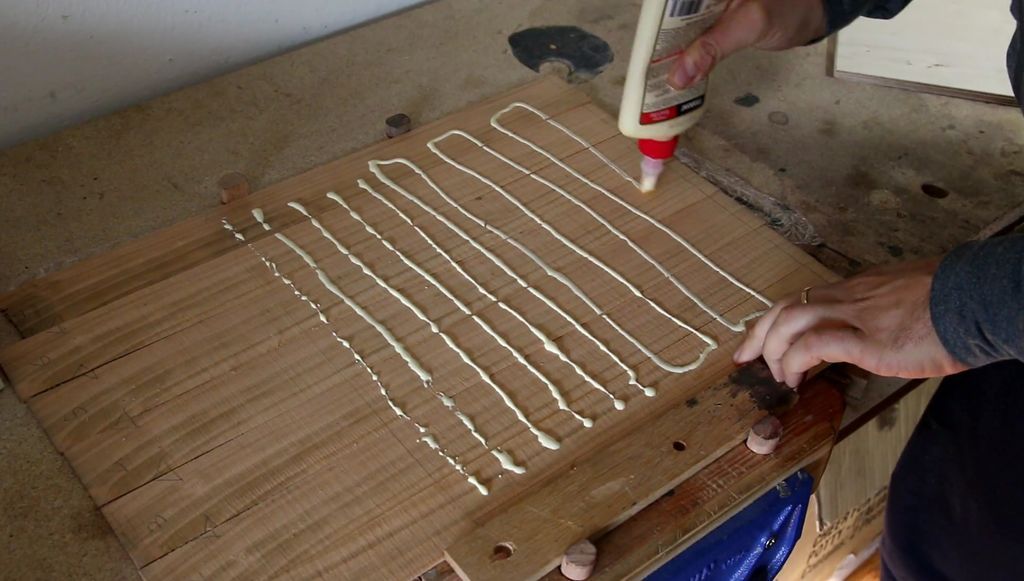
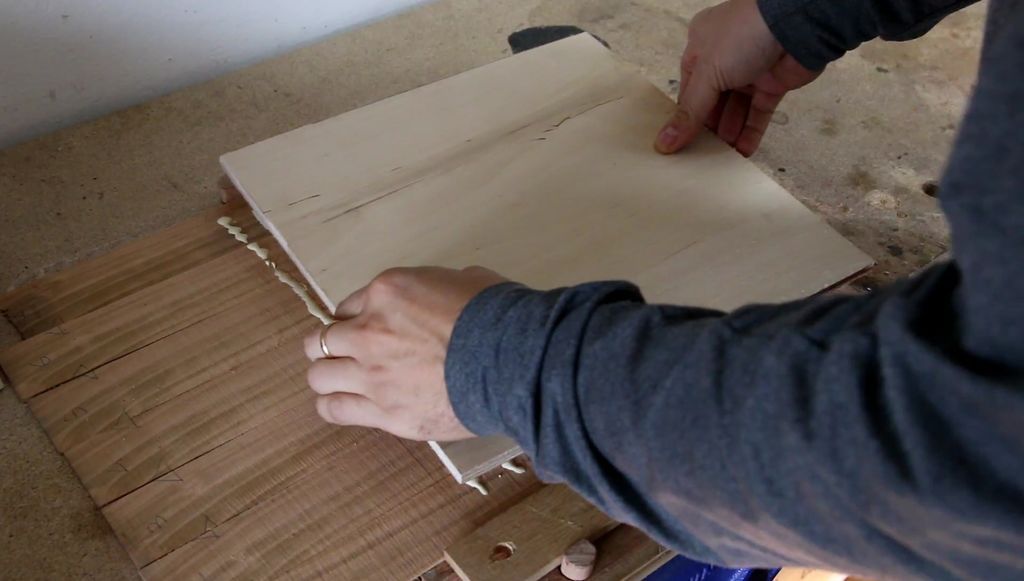
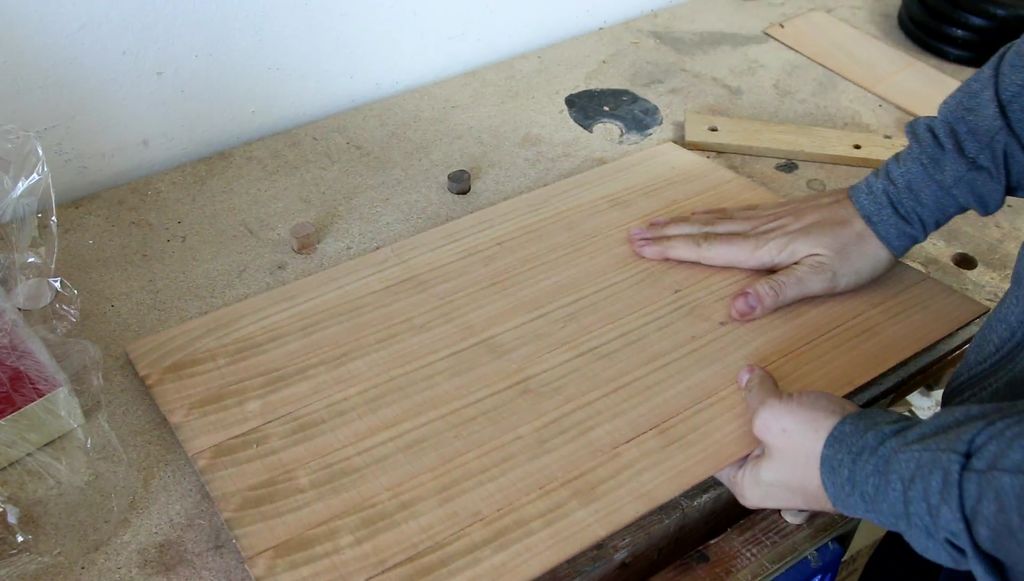
For the top part of the lamp, I used the same wood as the frame, making a thick sheet. I made some strips of wood and glued them to a piece of 9mm thick plywood of the correct size. After that, I hand-cut the surface of the wood and finally cut it with my band saw, following the sides of the plywood.
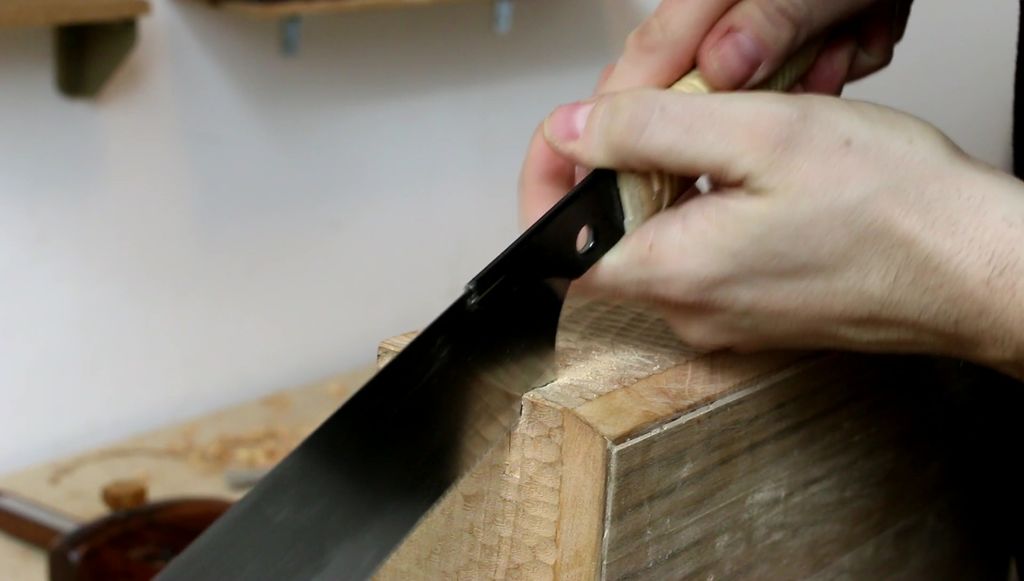
Step 6: Slots for the top panel
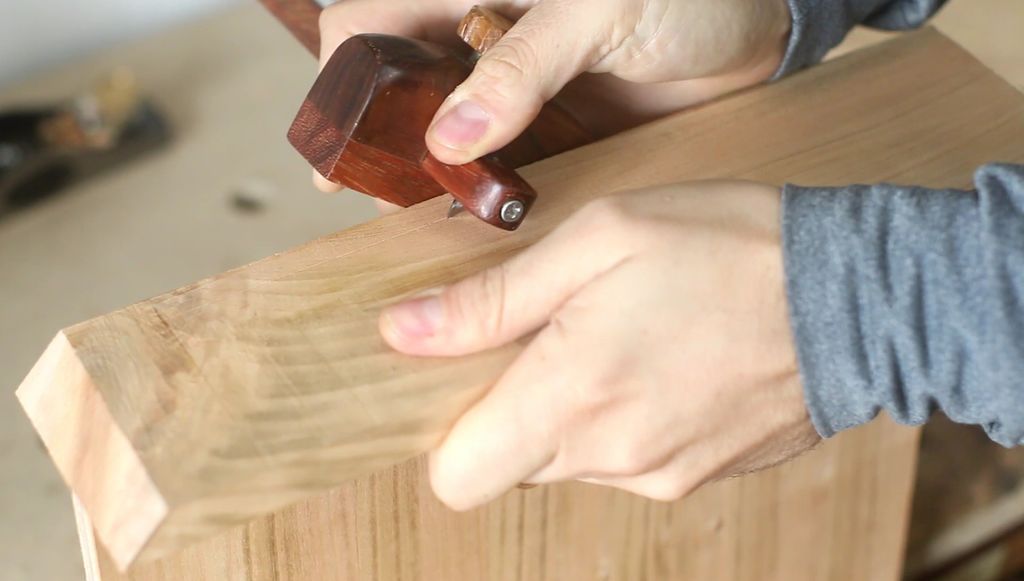
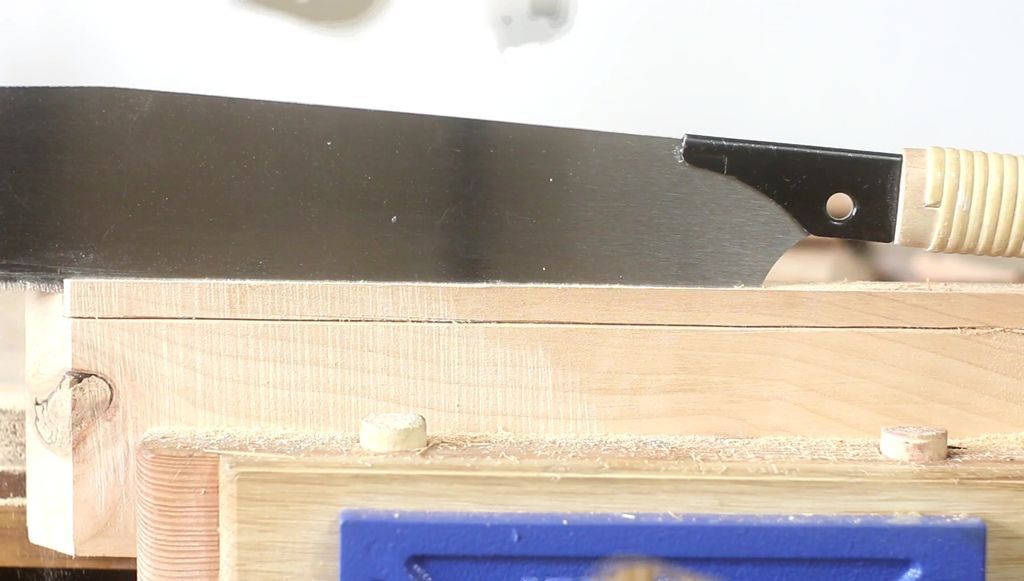
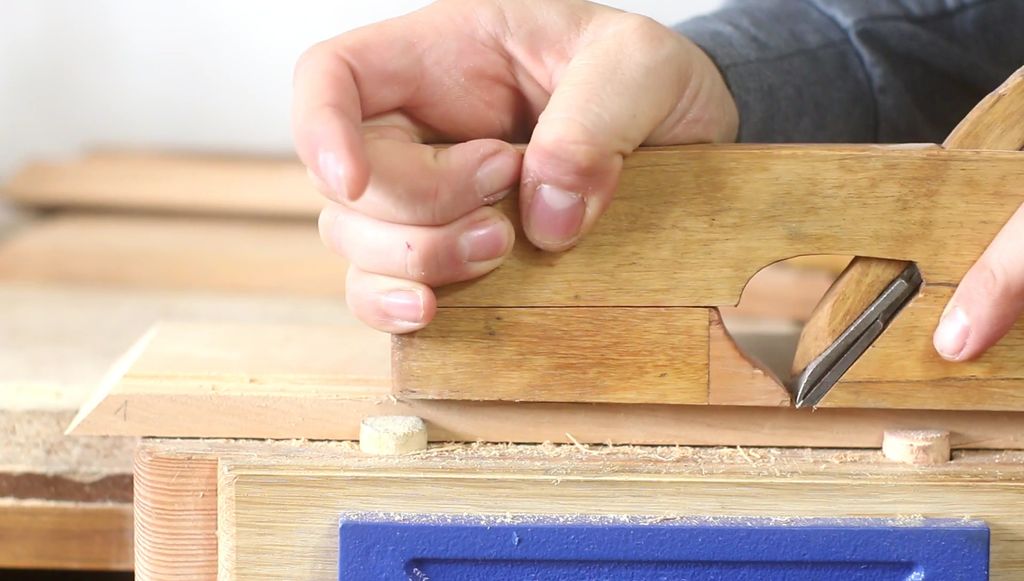
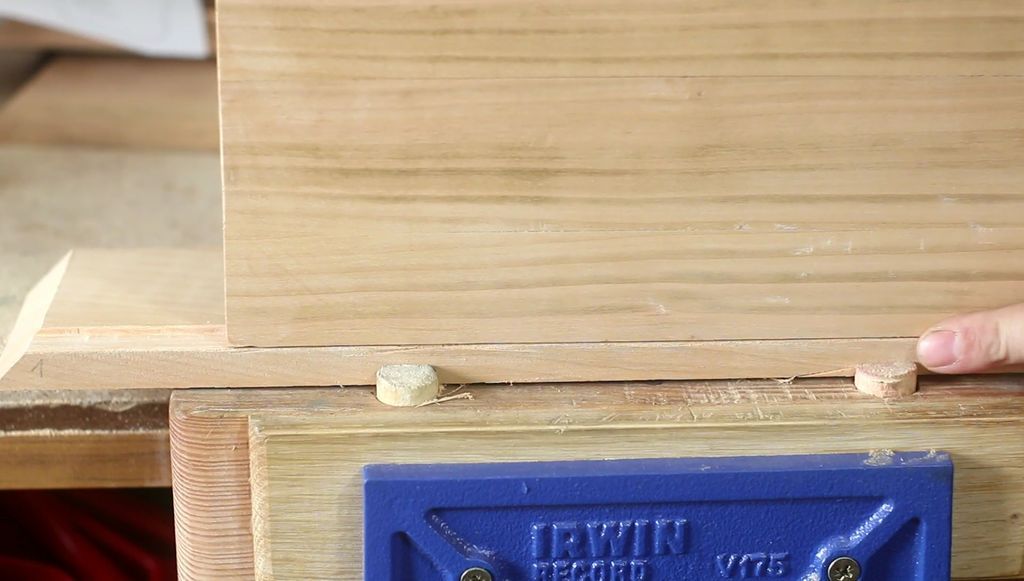
To secure the top of the lamp to the frame, so that it is not visible from the sides, I made a grille in the frame to accommodate the top panel. So this slot had to be as deep as the panel. To make it, I marked it first with a marking gouge and then cut it with a Japanese saw and then refined it with a rabbit plane. Couldhaving done it with a Router on my Router table, but since I love hand tools, for this project I decided to use mainly hand tools.
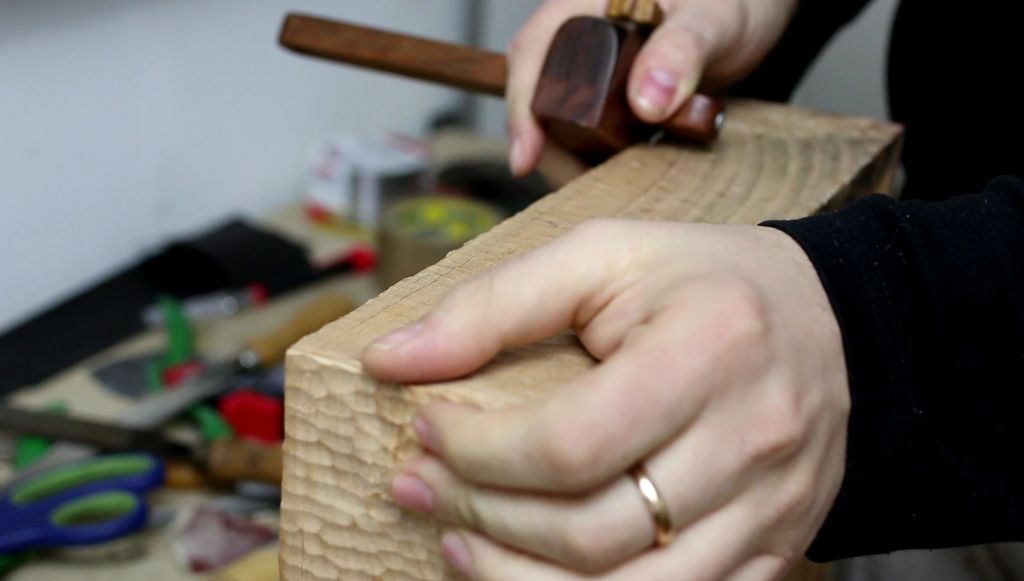
Step 7: Texture the frame
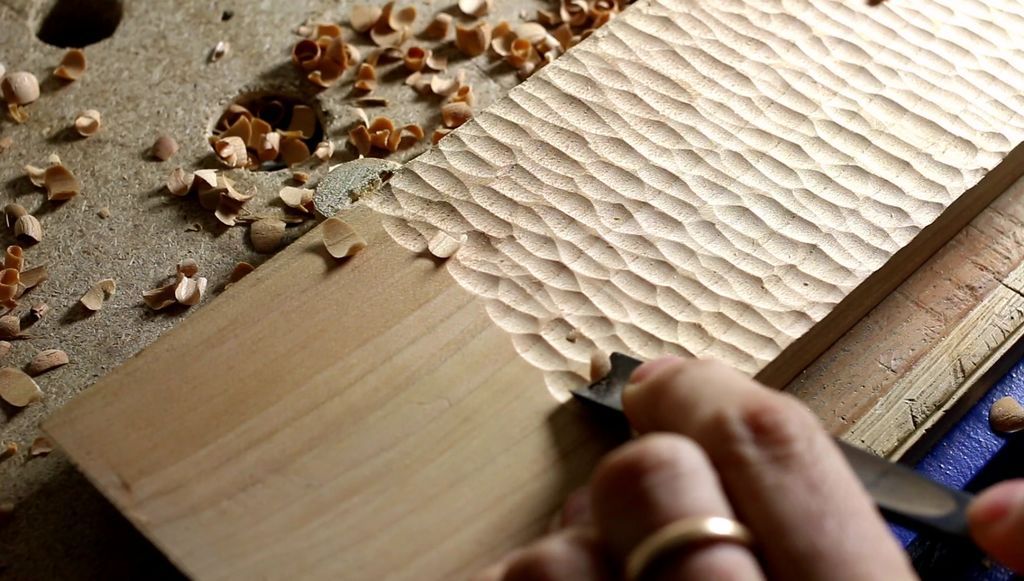
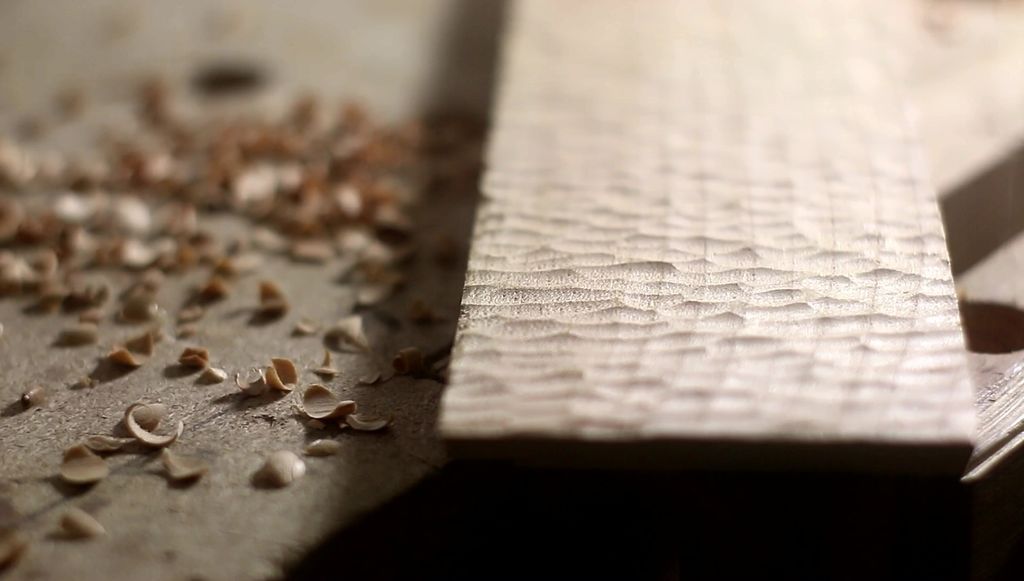
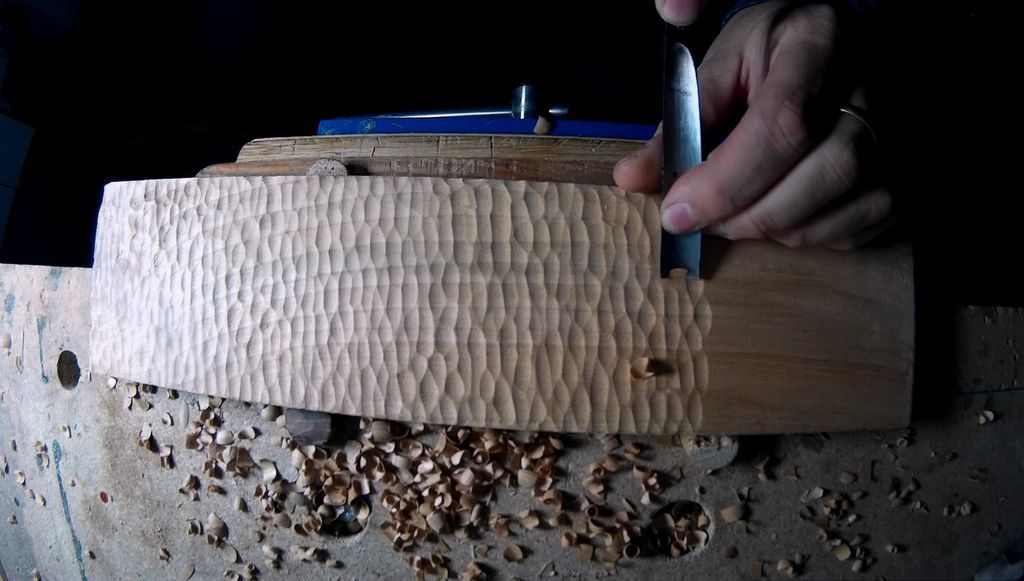
To add textures and decorations to the lamp frame, I made a drawing with a gouge. I find this operation to be a very relaxing activity and it does not take long to complete the job.
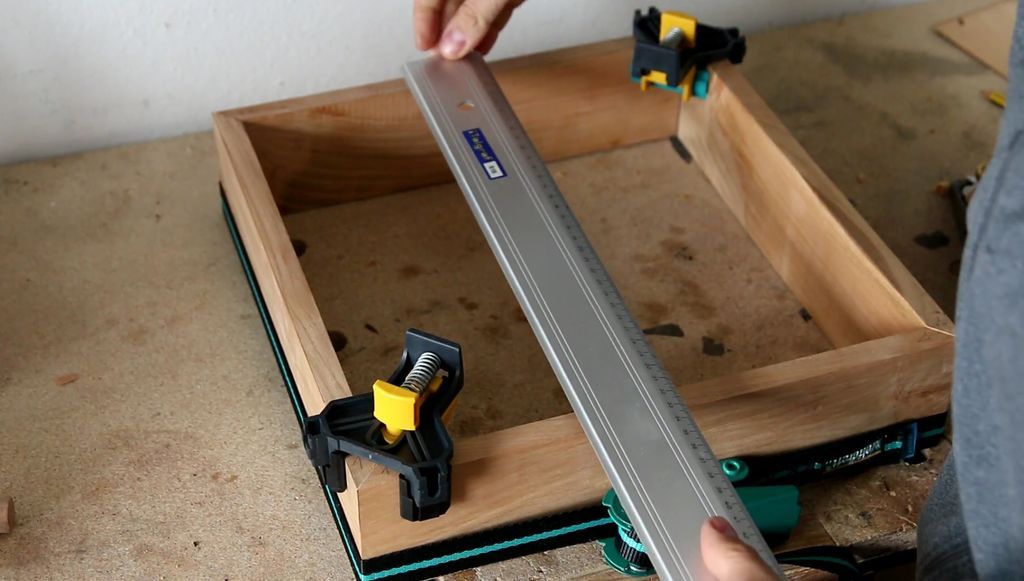
Step 8: Glue the lamp
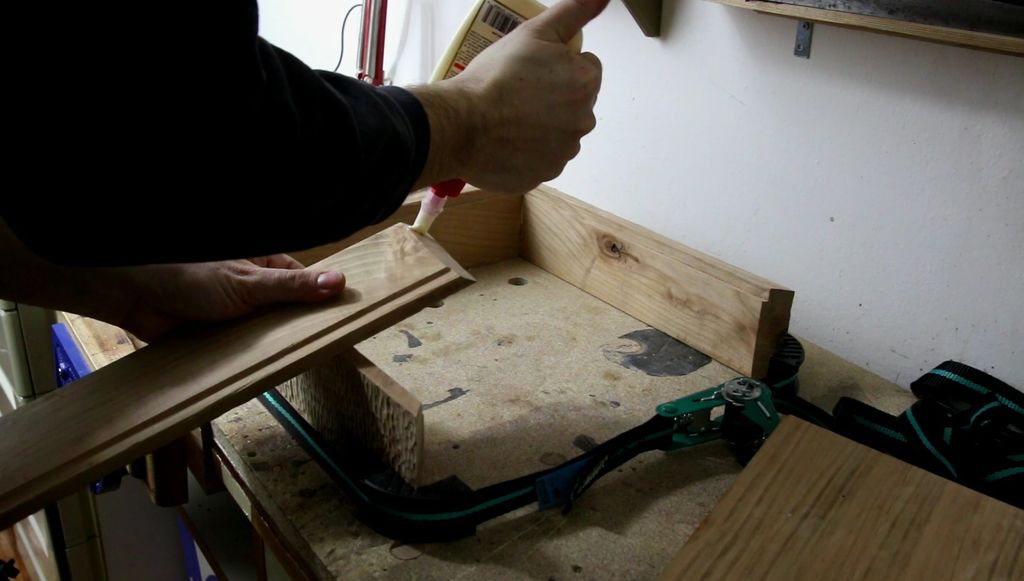
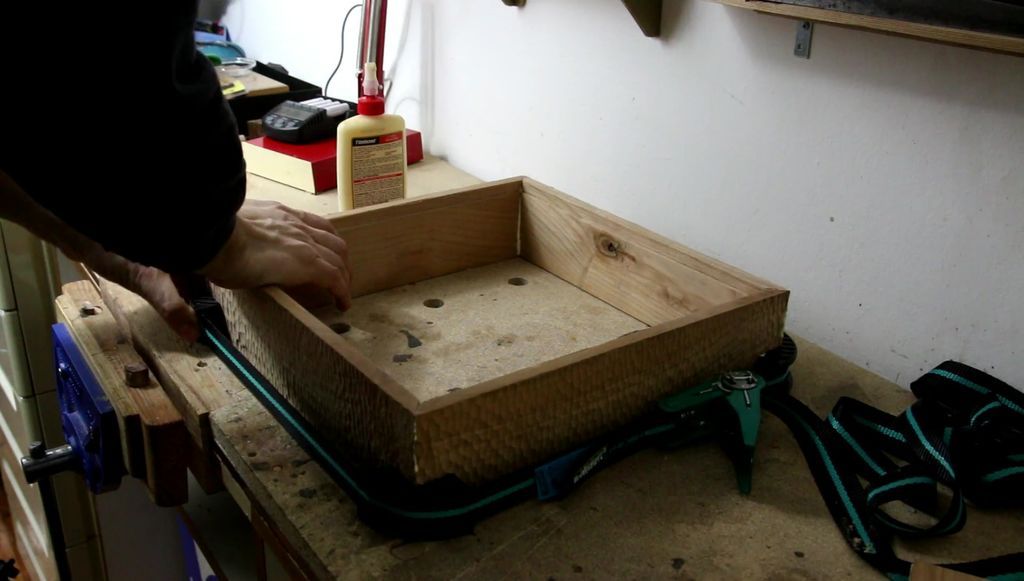

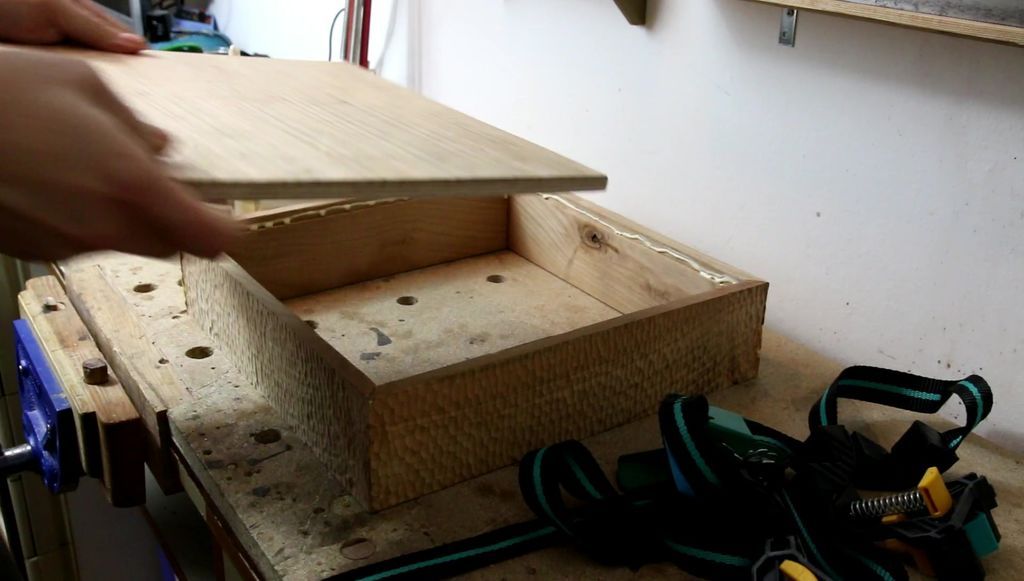
After completing the carving, it was time to glue all the pieces together. The operation was quite simple, using a band clamp and due to the squareness of the pieces for the top cover.
Step 9: Chamfer the top edges
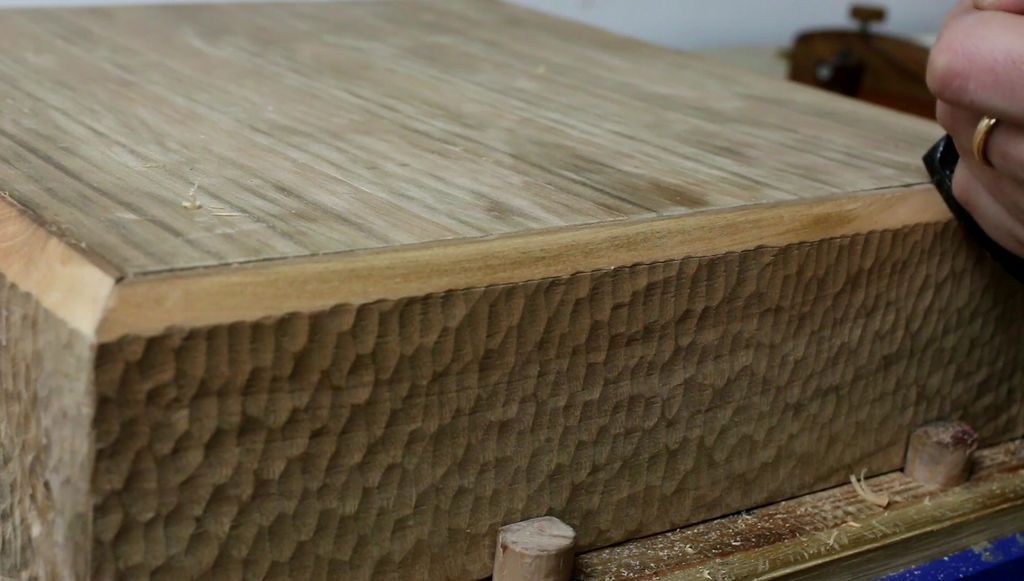
When the glue was dry, I first marked and then beveled the top edges of the lamp at 45 degrees with the flat of my hand.
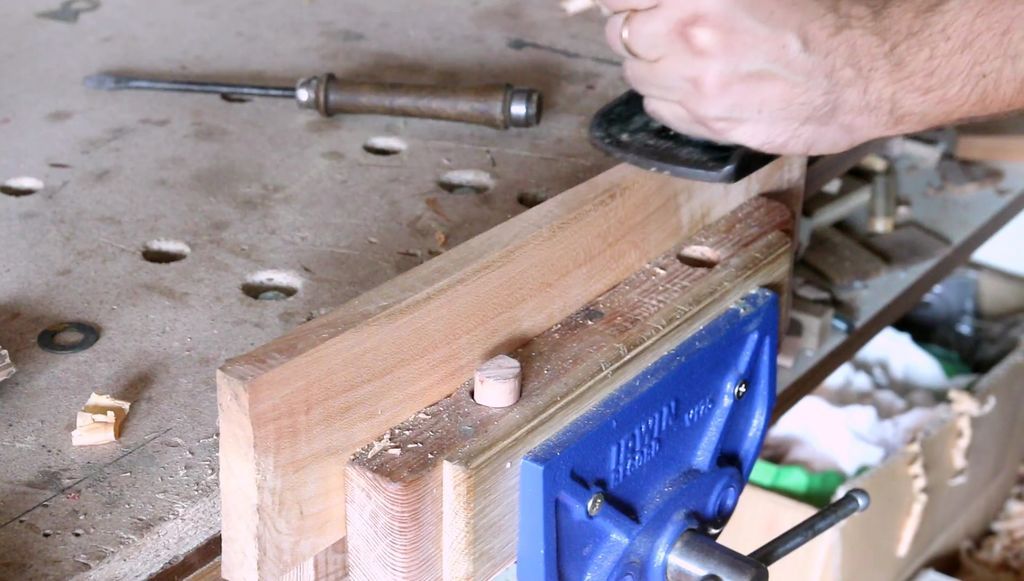
Step 10: Making the keys for the joints
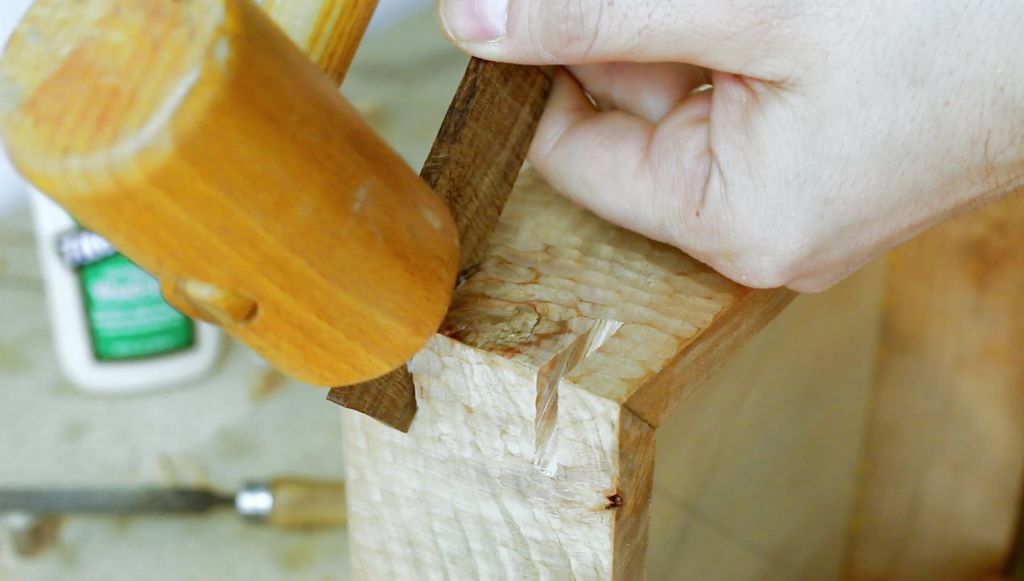


These keys have an aesthetic function, so I made them with a dark wood to create a nice contrast with the cherry wood of the lamp. I first cut the housings for the keys and then glued some pieces of walnut into the slots. When the glue dried, I cut off the excess and cut the keys from the surface of the lamp, adding the same texture with the gouge.
Step 11: Adding holes
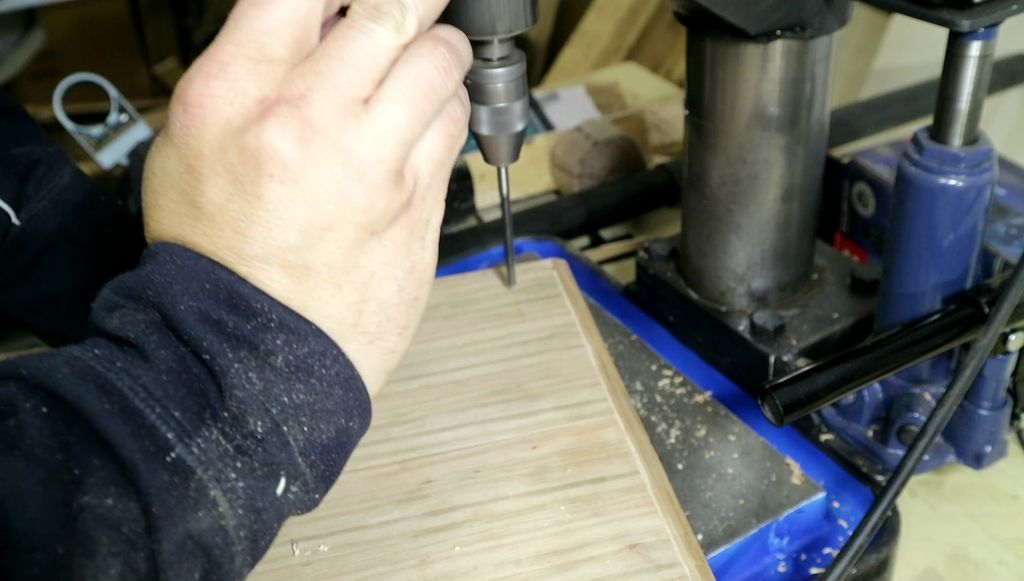
The next step was to drill all the holes for the wiring and the steel cord.
Step 12: Finishing
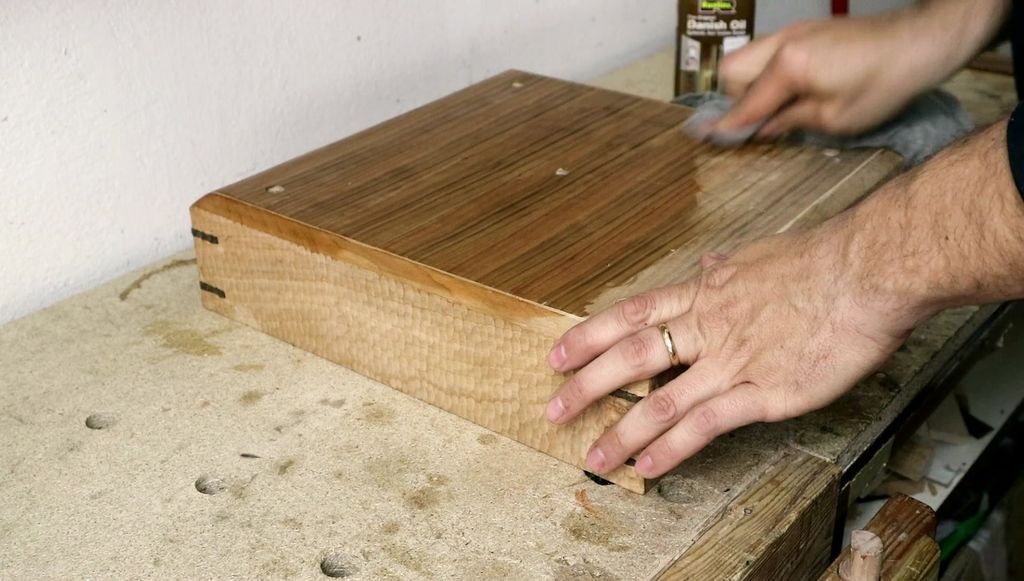

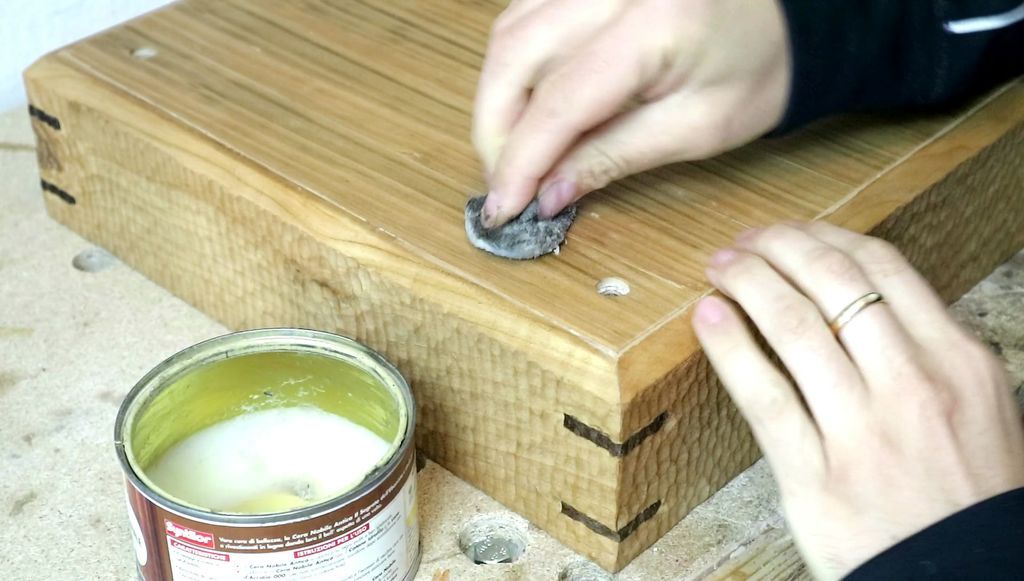
For the finish I used a couple of coats of Danish oil and a coat of beeswax. Cherry wood with this finish retains a light color that will tend to turn reddish over time.
Step 13: The Internal Reflector
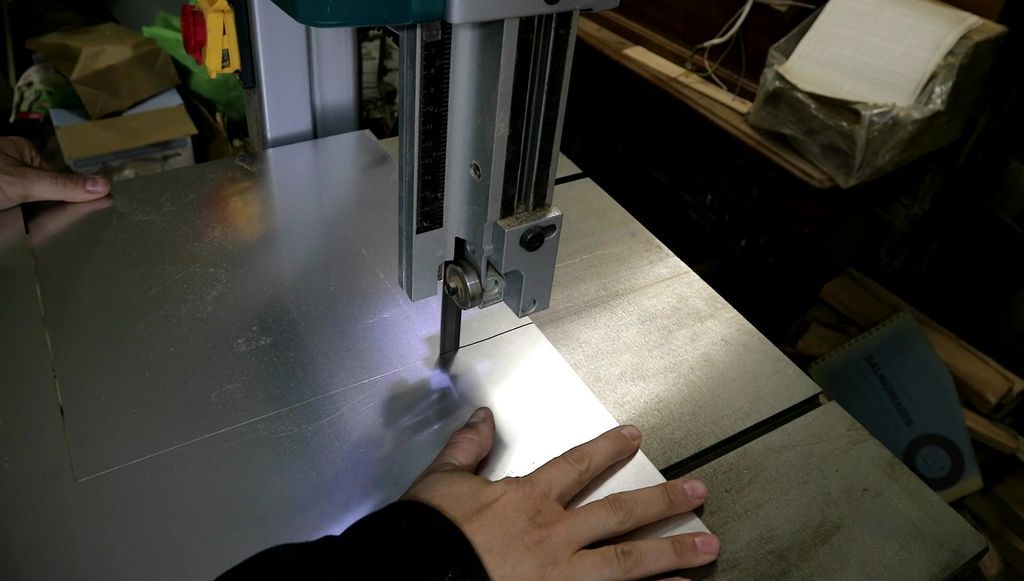
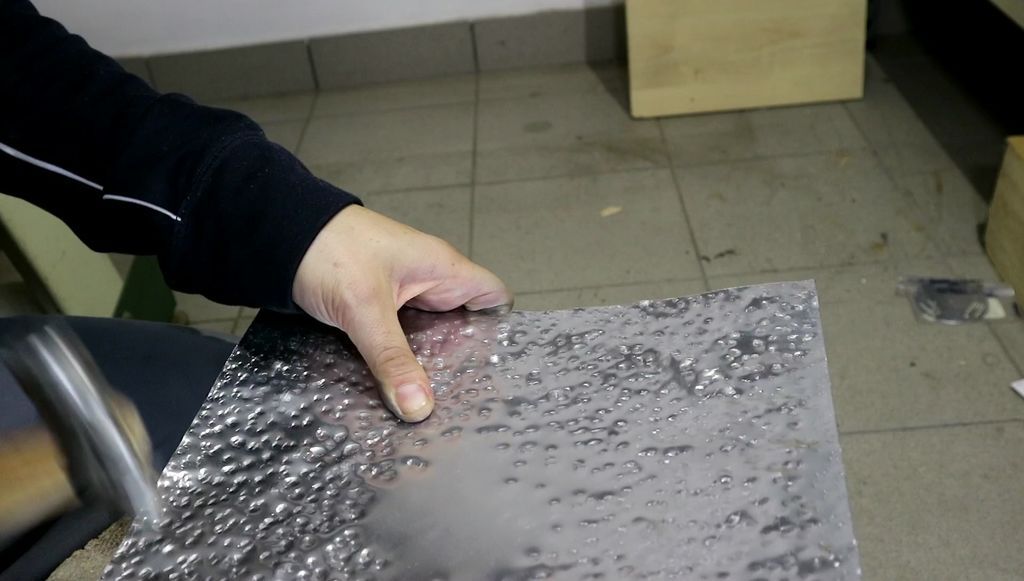
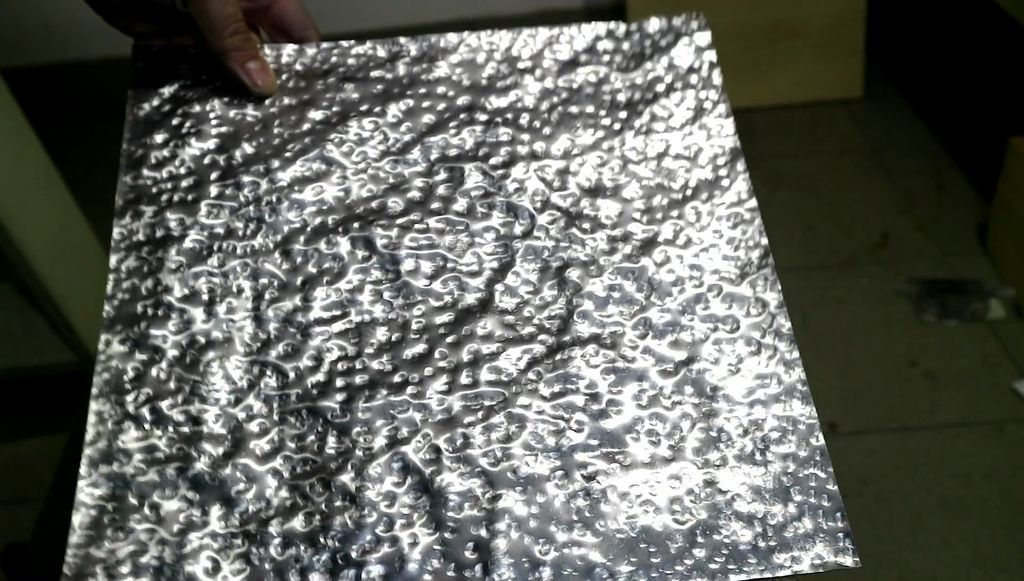
To ensure that the light is evenly distributed, I make an internal reflector from a 1mm thick aluminum sheet. After cutting the aluminum, I hammered it to have a rough surface to spread the light in all directions.
Step 14: Final Assembly

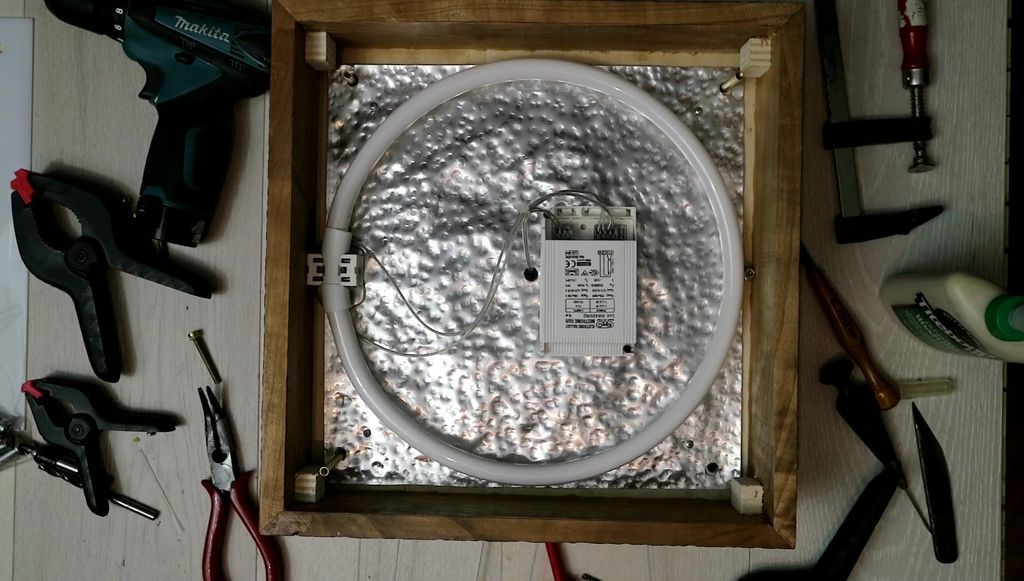

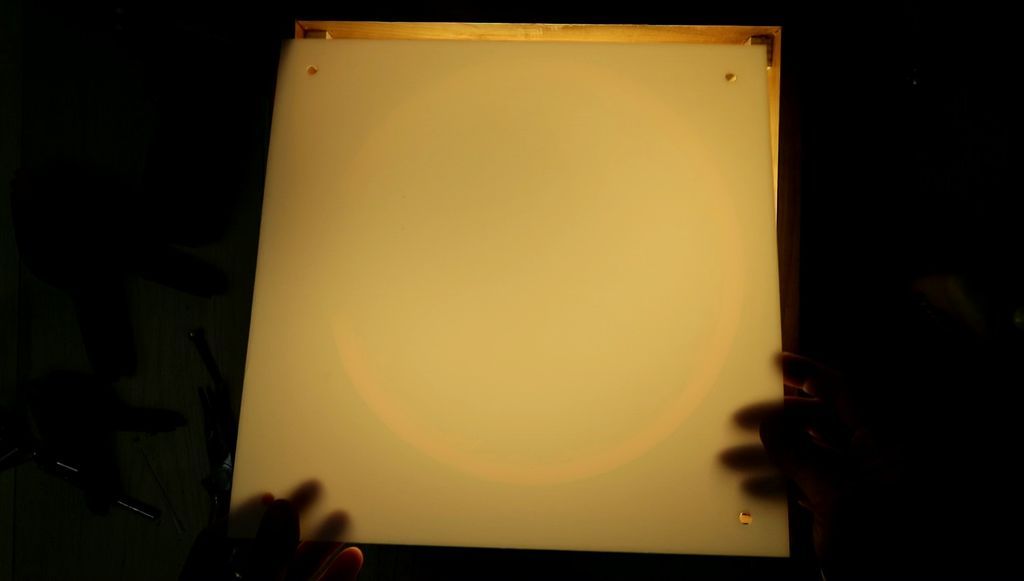

Now it is time to assemble all the electrical components and the other accessories, and the internal sheet of white plexiglass, to hide the interior of the lamp and the glass.
The glass and plexiglass have been secured with four brass screws and spacers. After assembling the wiring, I turn it on to make sure it works. As a light source I used a 40W 2GX13 circline lamp.
I didn't use LEDs for this project because I already had the lamp and all the other components, so I decided to use them for this project.
Step 15: The lamp pendant!


Here are the final shots of the hanging lamp!
Thank you very much for reviewing this article. Some of the steps are quite difficult to describe with just the image, but nothing stops you from making a modern lamp in your home.
Don't forget to follow us on our social networks for more news!
Popular Content
How to make a rocket stove for outdoors
Cardboard Drawers Lined with Jeans
How to Create a Fairy Garden: Magic, Creativity and Nature in One Place
Latest Articles
How to make a refrigerator out of insulating material: Practical step-by-step guide
How to make a Kilim for the Home: Complete Step by Step Guide
How to protect ourselves from accidents in our workplace: Complete prevention and safety guide
Related Content
Cutting a Glass Bottle with Water
Waterfalls: Make Your Pool Even More Pleasant and Elegant
Decorative Crafts Using Stones
Low Cost Apartments that Will Inspire You to Change Yours!
Creative Home Decor Ideas to Transform Every Space
Refreshing your home starts with smart design choices that combine comfort, personality, and functionality. Whether you want to modernize a small apartment, upgrade outdoor areas, or create cozy rustic interiors, these trending ideas can completely change the atmosphere of your space.
Outdoor Spaces That Increase Style and Functionality
Outdoor living continues to dominate modern home trends. Homeowners are increasingly investing in practical entertainment zones inspired by these BBQ shed ideas, which create the perfect setup for gatherings and weekend cooking sessions.
First impressions also matter when designing exteriors. Elegant farm entrance gates design ideas help properties stand out while improving privacy and curb appeal.
Compact living solutions are also gaining popularity. These inspiring 16x40 shed house interior design ideas show how smaller spaces can still feel luxurious and functional.
To enhance patios and entryways, homeowners are adding stylish protection with these creative porch awning exterior DIY ideas that blend aesthetics with practicality.

Rustic and Cozy Interior Design Trends
Warm and natural interiors remain timeless. These charming rustic decor ideas combine wood textures, vintage accents, and earthy tones to create welcoming spaces.
Bedrooms are becoming more personalized with curated wall arrangements. Many homeowners use these stylish picture wall ideas for bedroom spaces to display memories and artwork creatively.
Textured wall treatments are another major trend. Installing a board and batten wall adds architectural character while keeping interiors elegant and modern.
Similarly, bold accent wall ideas can instantly transform plain rooms into eye-catching focal points without requiring a full renovation.
Smart Kitchen and Organization Inspiration
Functional kitchens are essential for modern homes. These practical kitchen wall cabinet ideas maximize storage while maintaining a clean and stylish appearance.
Organization also starts at the entrance. Well-designed mud room ideas help families keep shoes, coats, and daily essentials neatly arranged.
Colorful and Personalized Home Styling
Vibrant interiors are becoming increasingly popular thanks to playful dopamine decor ideas that use bright colors and joyful accessories to improve mood and energy.
Gallery walls also continue to evolve as a major decorative feature. These trendy gallery wall inspiration ideas offer creative ways to combine prints, photos, and statement art.
Young renters and new homeowners are especially embracing these stylish first apartment aesthetic ideas to create sophisticated interiors on a budget.
Finally, selecting the right shades can dramatically influence any room’s atmosphere. These modern trendy color ideas help homeowners choose palettes that feel fresh, elegant, and timeless.
Final Thoughts
From rustic charm and colorful interiors to outdoor entertaining areas and functional storage solutions, today’s home decor trends focus on creating spaces that feel both beautiful and livable. By combining smart layouts, modern textures, and personalized decorative elements, any home can become more stylish, comfortable, and inspiring.


