
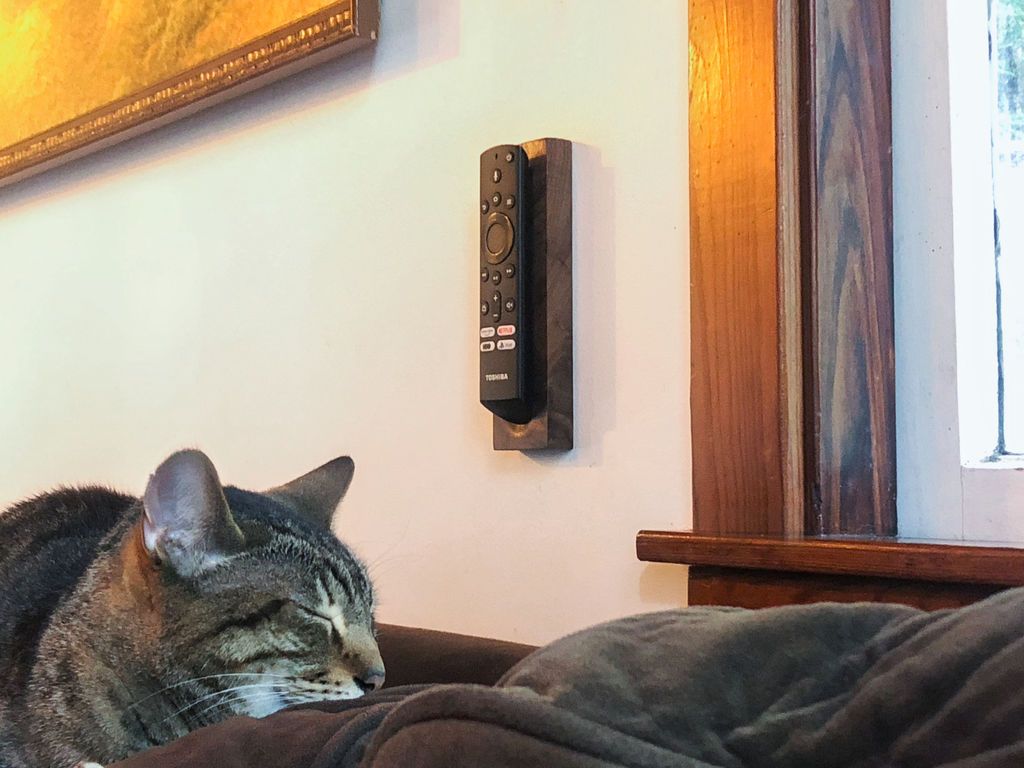
A magnetic holder for the remote control will help you always know where you left off when watching TV, we usually forget where we left this control sometimes.
That is why in this article we will show you how you can build a magnetic holder for that remote control.

We discovered that the remote control is made of a friendly magnetic substance.
So, using some scrap wood from our polychrome LED filament lamp project, we decided to make a quick and easy solution to hold our remote control, easily accessible over our comfortable, remote-hungry couch.
Note: This magnetic remote control holder can easily fit any controller that doesn't involve magnets.
Step 1: Tools + Materials
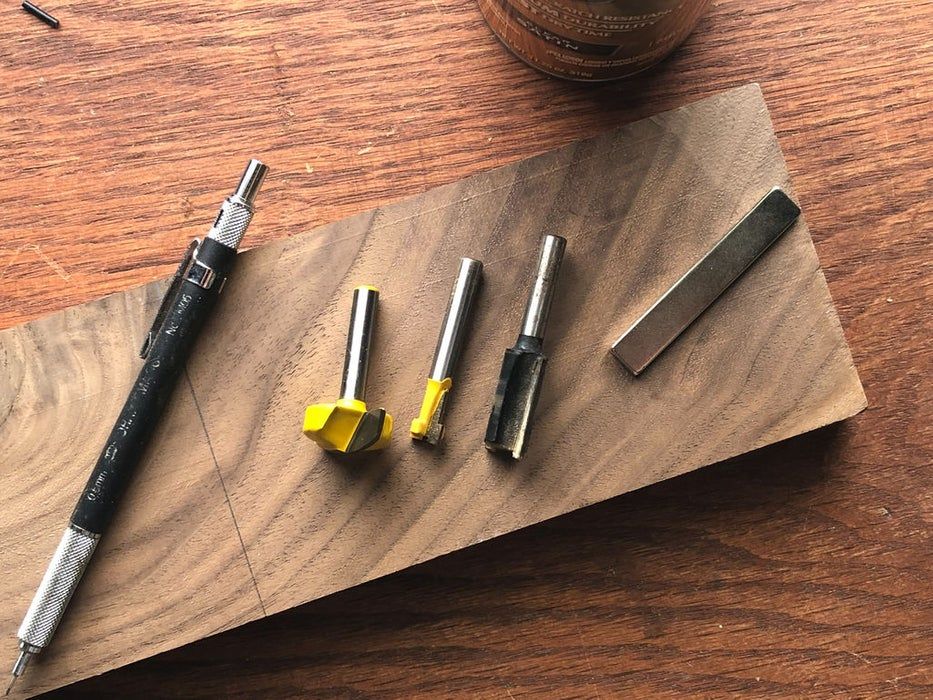
Tools:
- Table saw
- Miter saw
- Router
- Orbital sander
- Cordless drill
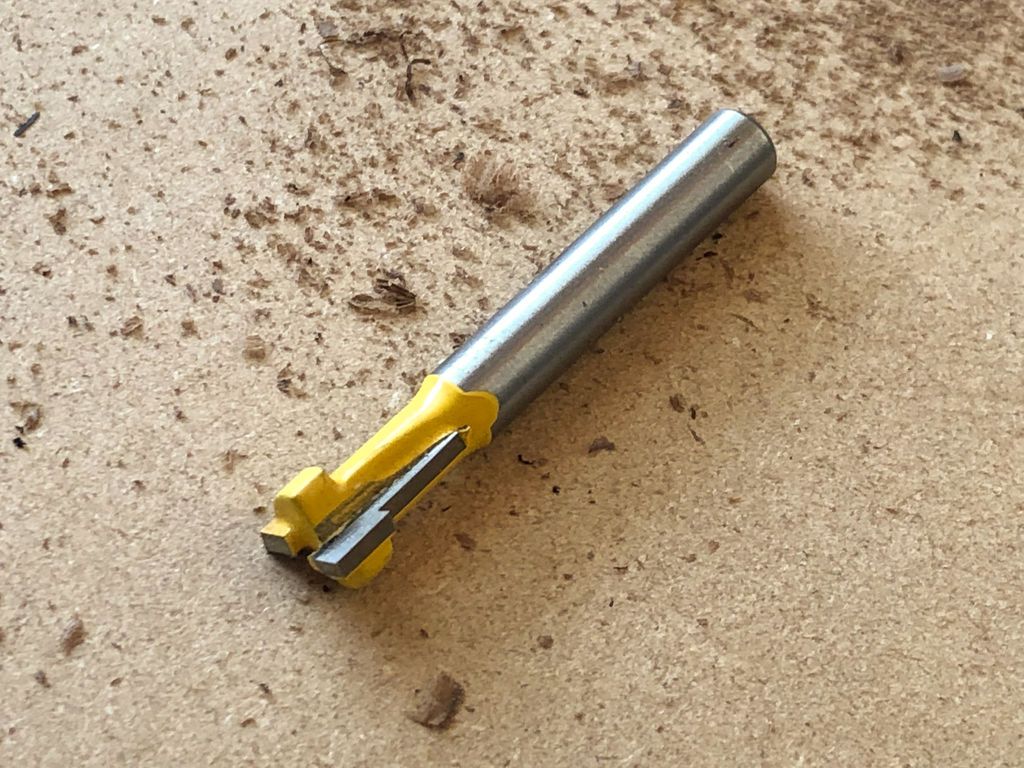
- 1″ Round Nose Router Bit
- 1/2 Straight Mill
- 3/8 Keyhole Router Bit
- Pencil
- Rule
- Carpenter's Square
- Small level
Supplies:
- Hardwood S4S 1’x 3/4 x 3″
- 4 Bar Magnets
- Cyanoacrylate glue (Super Glue)
- Zip Kicker (Optional)
- Carpet tape
- Interior polyurethane oil-based spray, satin finish
- Sandpaper 120 – 200
- 6 1-3/4″ Wood Screws
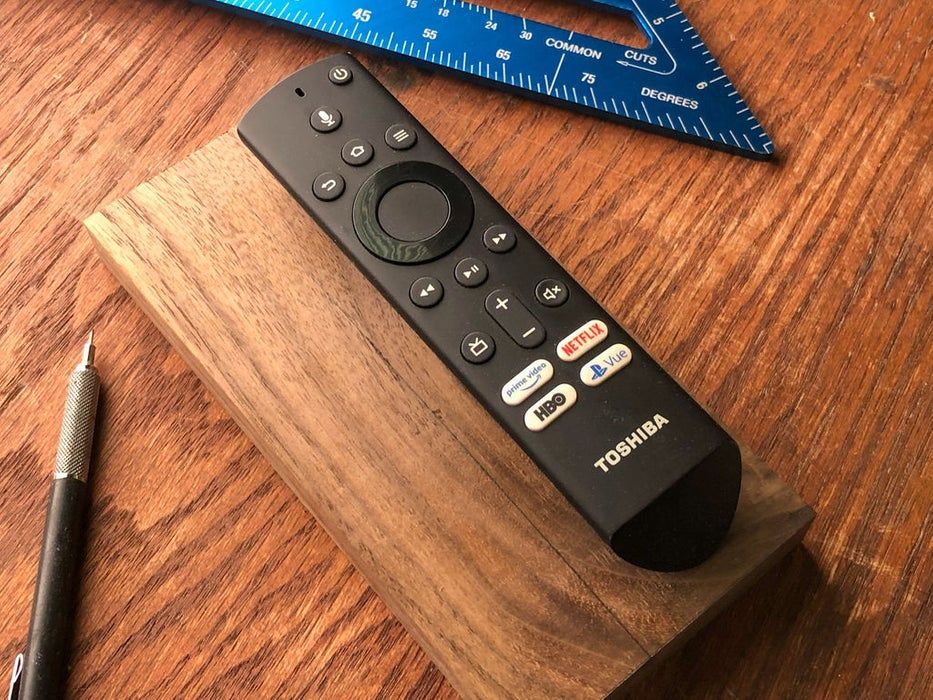
Step 2: Measurements + Design Summary
- We found that the remote control would stick exceptionally well to the magnets we used to use to post pictures (or messages, drawings, etc.) on the refrigerator door.
- We opted to make a wall-mounted holder with small rare earth magnets sunk beneath the surface so that it effortlessly, yet holds the remote in place in our designed cradle.
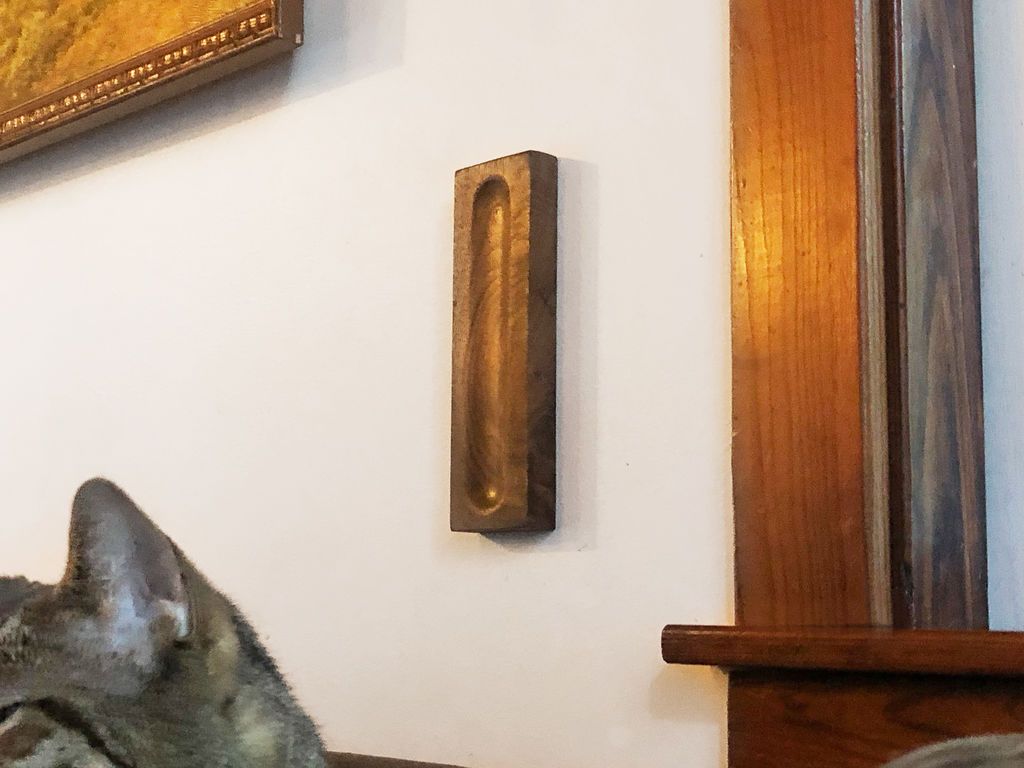
- First, we measured the remote and established the overall size of the frame, 1-3/4″x 7″x3/4". This will make it just a little larger than our FireTV remote and deep enough to hide the strong magnets inside the wooden base.
- Because the remote has a rounded back, we are going to place a similar notch in the wood so that the remote is properly wedged and has a place to register when it slides efficiently into its new home.
- We will also add two fixing points to the back of the frame that we will use to mount the unit to the wall.
- Once the frame is made, we will insert the rare earth bar magnets into the back channel of the unit and install the equipment on the wall for mounting.
If your remote is not a FireTV remote, specifically a different size remote, you will need to modify the measurement of both:
- The total size of the unit
- The size and shape of the channel leading to the front of the drive, possibly the thickness of the drive as well.
Step 3: Cut the unit frame
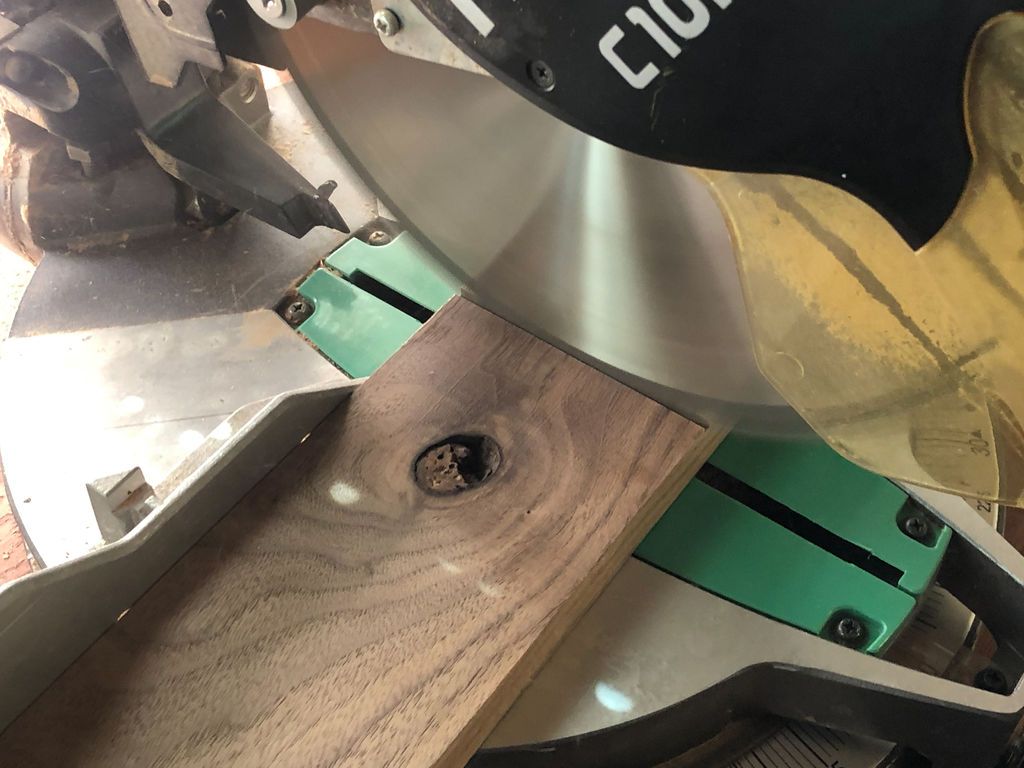
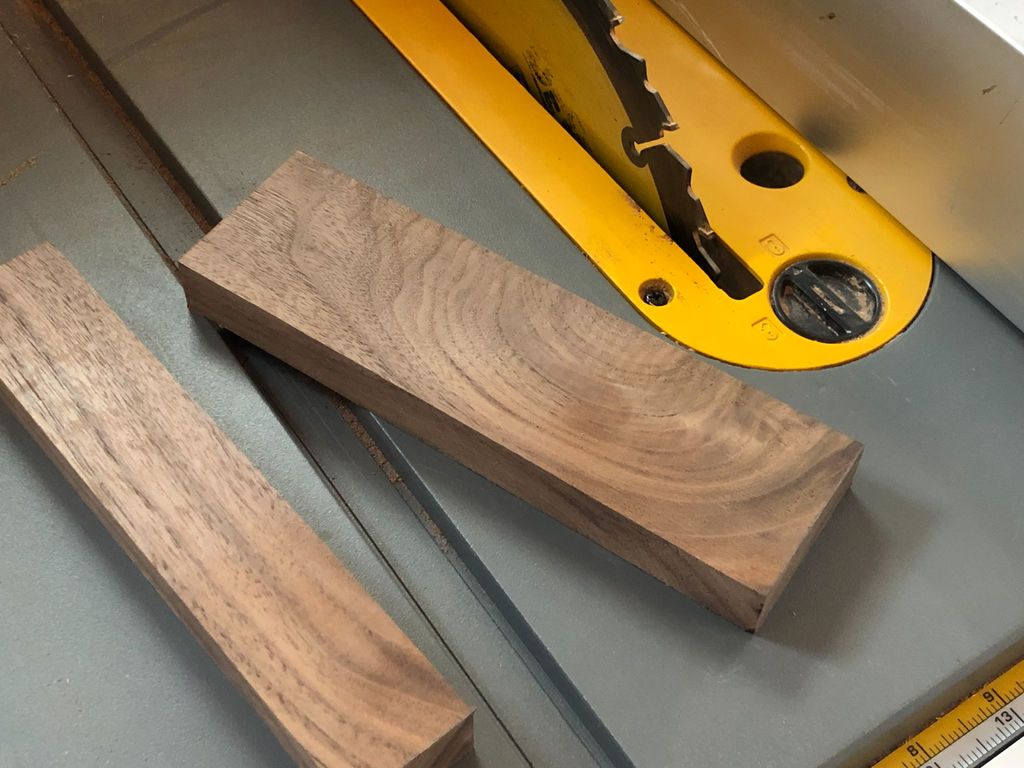
This step is simple and direct.
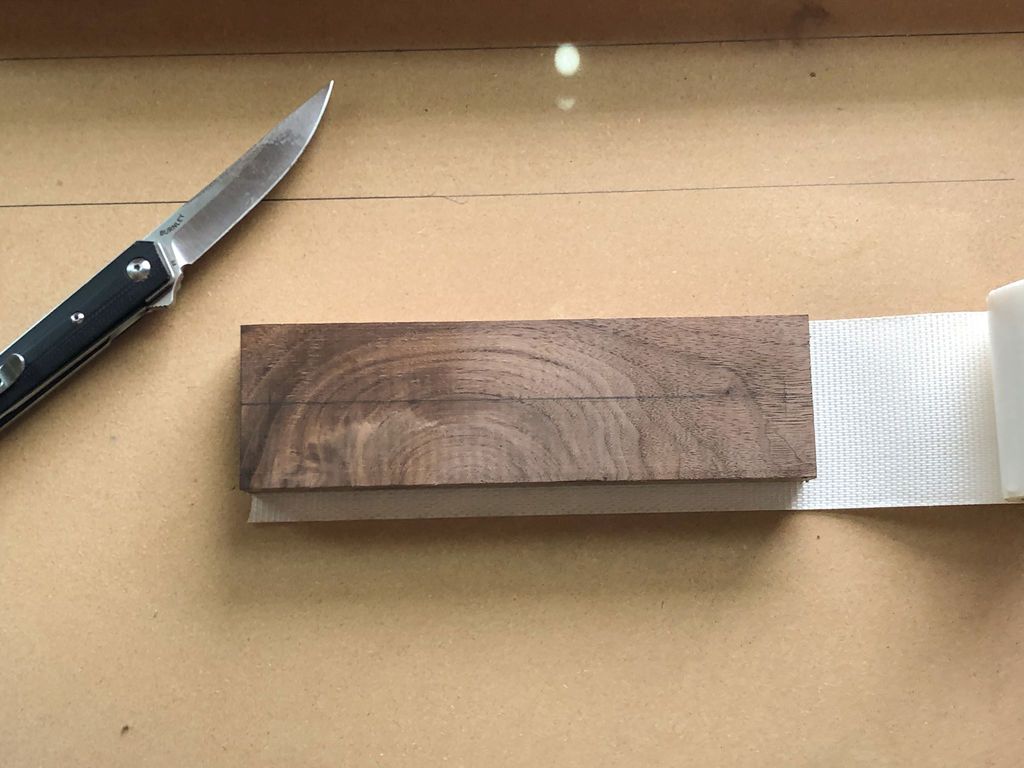
- We are using a beautiful small cut of walnut for our frame that we had left over from our last project...
- But you could really use any hardwood you're interested in.
- We settled on a section of the wood that had an intriguing and striking grain and drew the design into the wood with pencil.
- Then we cut it to length on our miter saw and to width on our table saw.
- You are now ready to route the front indent for the new remote bed.
Step 4: Routing the front
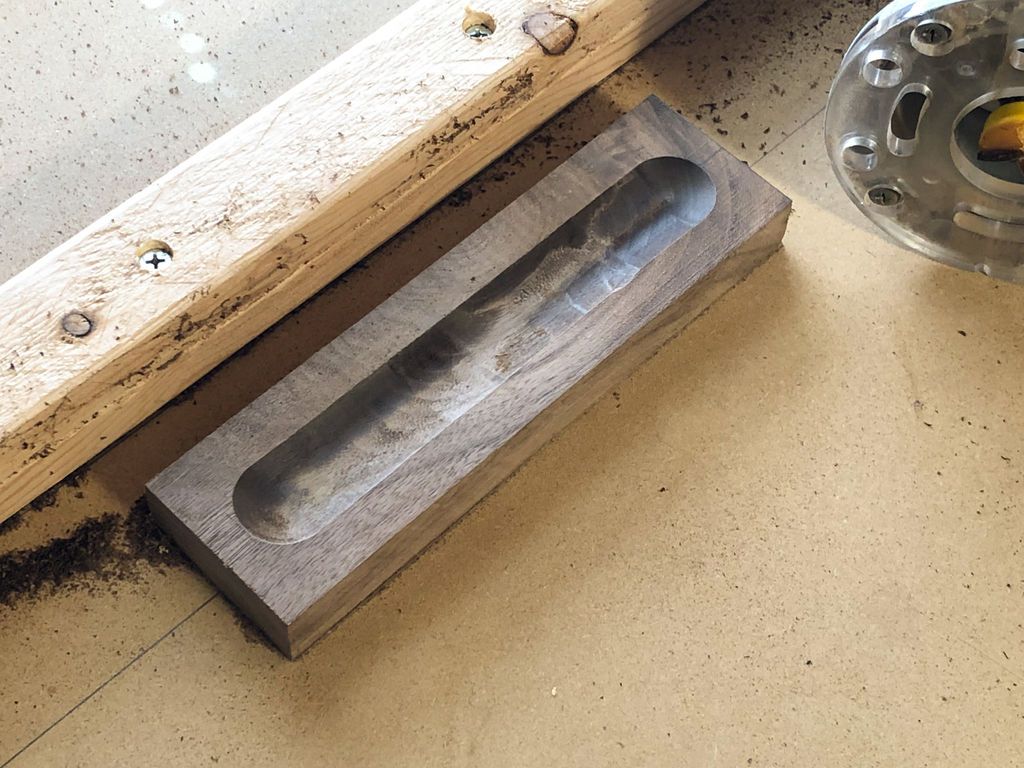
- Routing the front indentation of the drive is the difficult part. Be sure to read the entire section and make sure you are clear on what to do before you start.
- First, we measured the center line of the block of wood and, using a ruler and pencil, marked a line along the face of the unit, stopping the line 1/4″ from each end of the wood.
- This is where both lengths of the routed channel end.
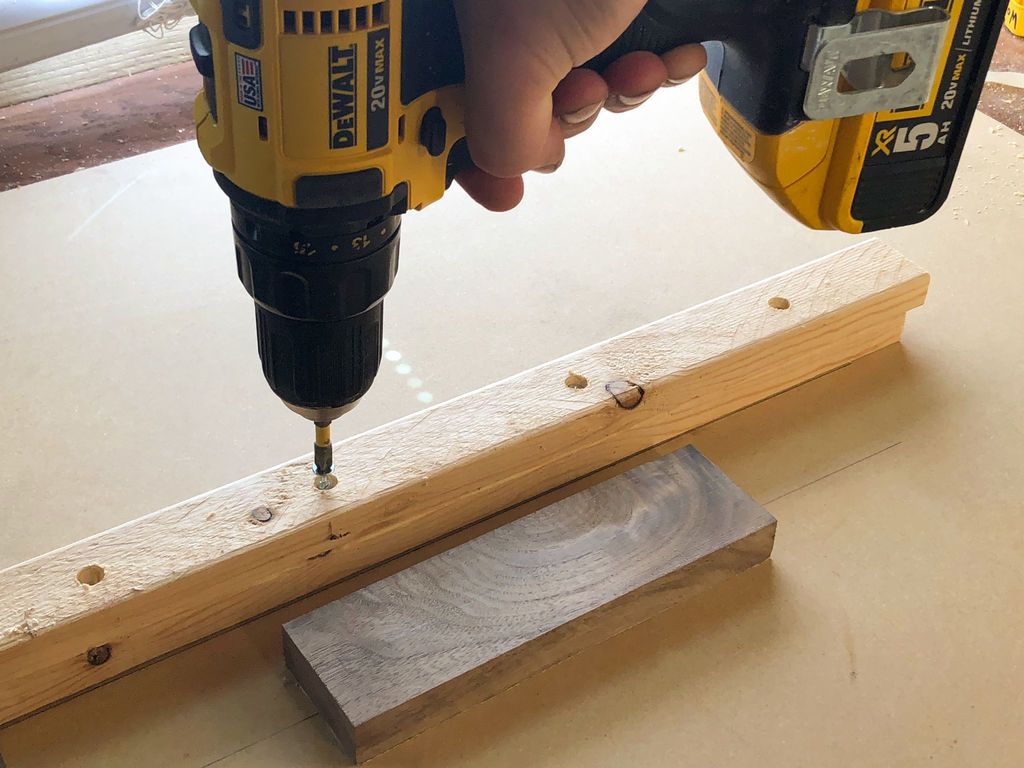
- To secure the workpiece during routing, we use carpet tape to hold it on a work surface. Next we made a simple template to facilitate routing. Then for the template we used two pieces of 3/4″ wood, stacked and screwed parallel to the workpiece as a guide for the Router to work.
- To decide the space between the edge of the guide and the center of the work. The piece we measured from the center of the Router collet (the part that contains the Router bit) to the outside edge of the Router base, this was 2″.
- We draw two parallel lines on the work surface, two inches apart, and align the center lines on the nut with either one. We press it firmly to adhere it.
- Next, we line up the edge of the scrap with the other line and screw it on.
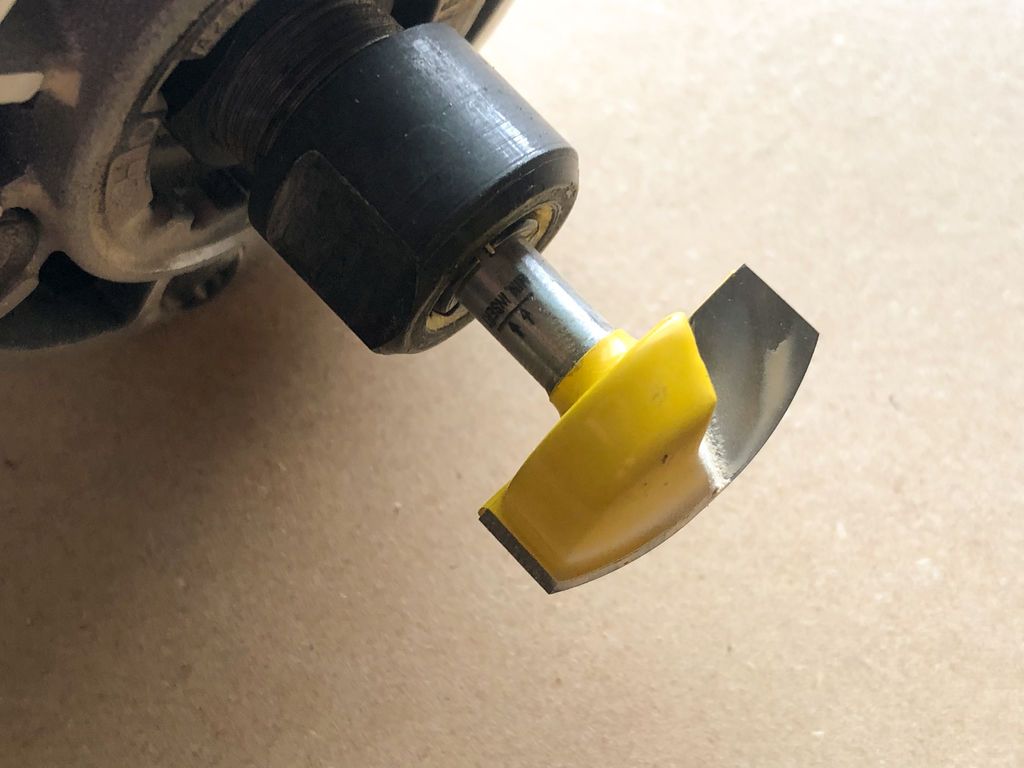
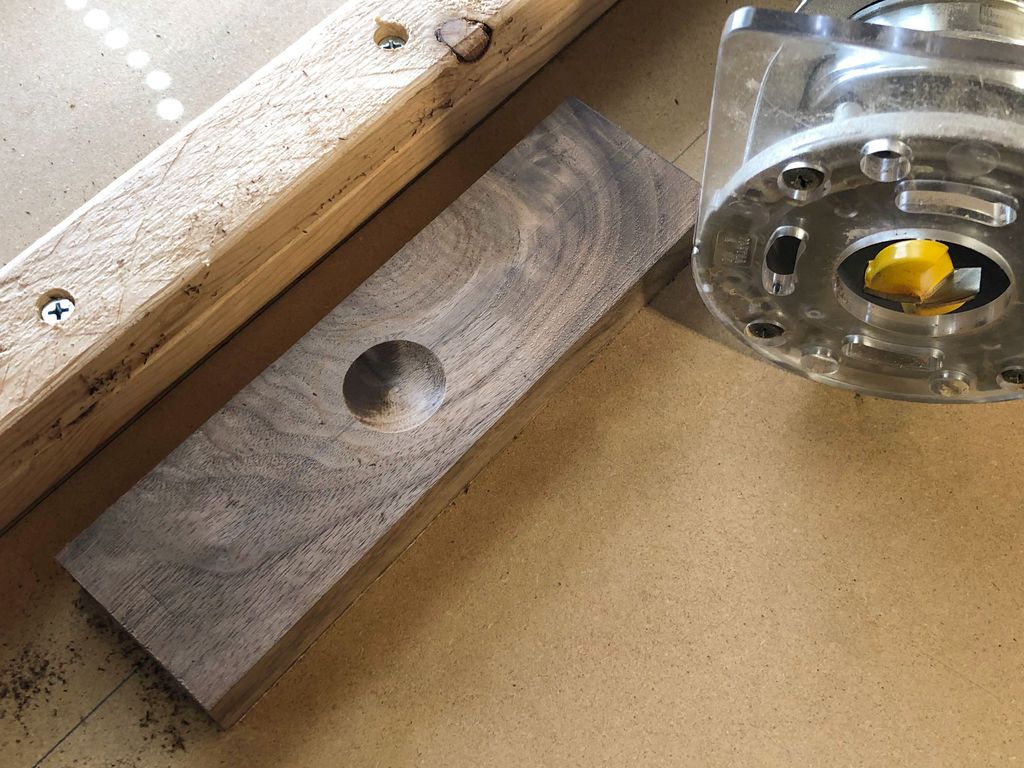
- We loaded the bullnose bit into my router, set the depth to about 3/16″, and routed the channel slowly in one pass.
- Being very careful to stop at the final marks made earlier.
- In preparation for lining up the work on the back, we made a mark around the workpiece on the surface.
- You may want to use a chisel to gently free the unit. Remove the remaining tape.
NOTE:
If you have a Router table, use it instead of the guide we described for the steps above, it will make your life easier!
- I found that my Router bit caused a lot of surface burns towards the end, to combat this I would make shallower passes and let the bit cool between each pass.
- When you have finished routing, turn off the Router and hold it in place until the bit stops.
- This will help prevent any errors in the route.
- If your indentation has any wobbles, don't worry, you can blend this out when you sand later!
Step 5: Routing the back


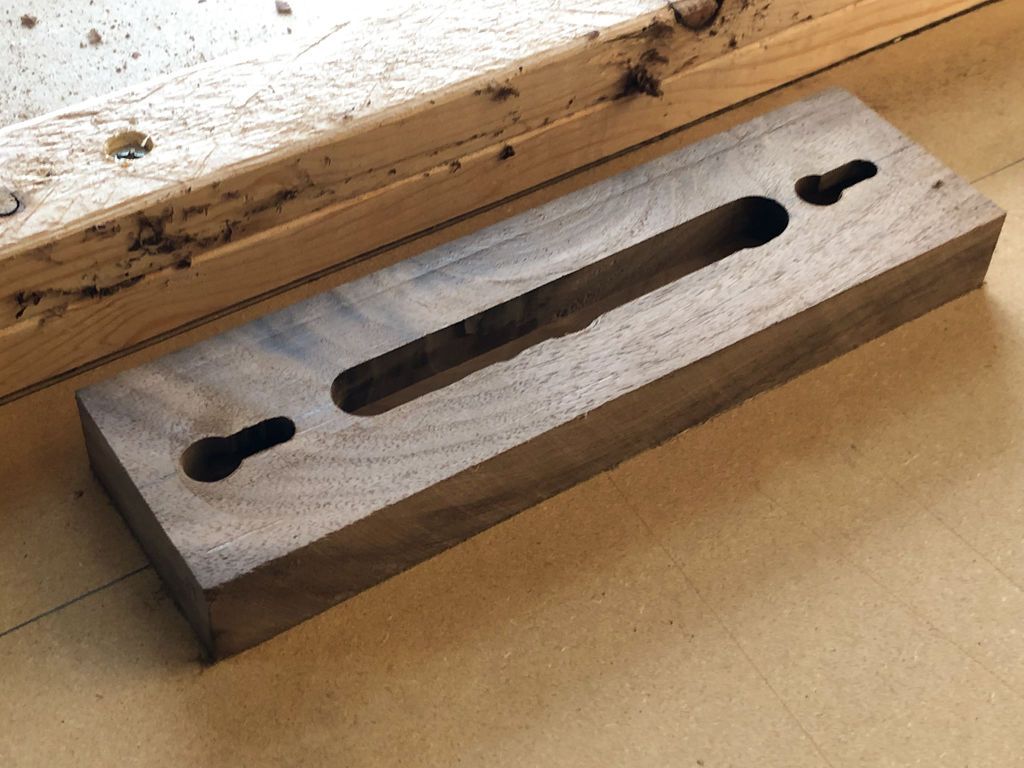
Now for the rear channel, where the magnets will live.
- Once this is done, we flip the piece over, apply double-sided tape to the side we just routed, and stick it down using the markings on the surface to put it back in the same place.
- Change the router bit for a 1/2″ straight bit and set the depth to 1/4″. Route a long 3-1/2″ channel centered in the center of the piece.
- Adjust the Router to the maximum depth you can without breaking the notch on the other side, somewhere around 1/2″.
- Now change the Router bit for a 3/8 Keyhole bit and set the depth according to the instructions for your bit, but not so deep that it breaks to the opposite side.
- Cut a keyhole at the top and another at the bottom of the piece. These slotted holes will be for attaching your bracket to the wall.
Step 6: Glue + Apply Finish
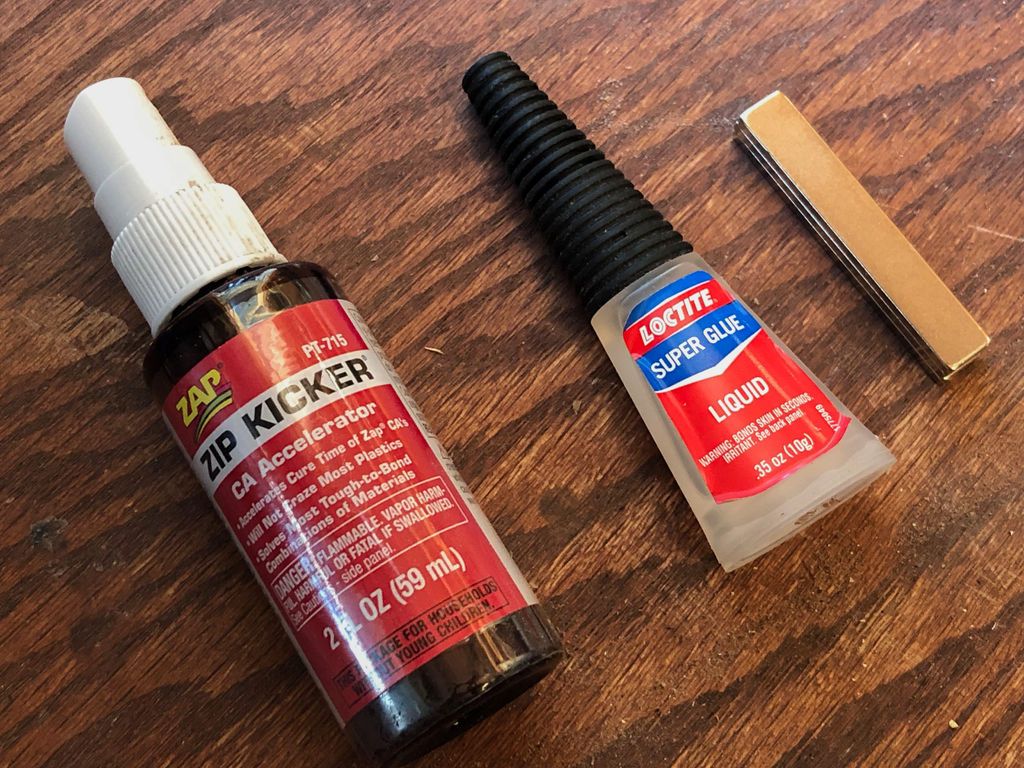
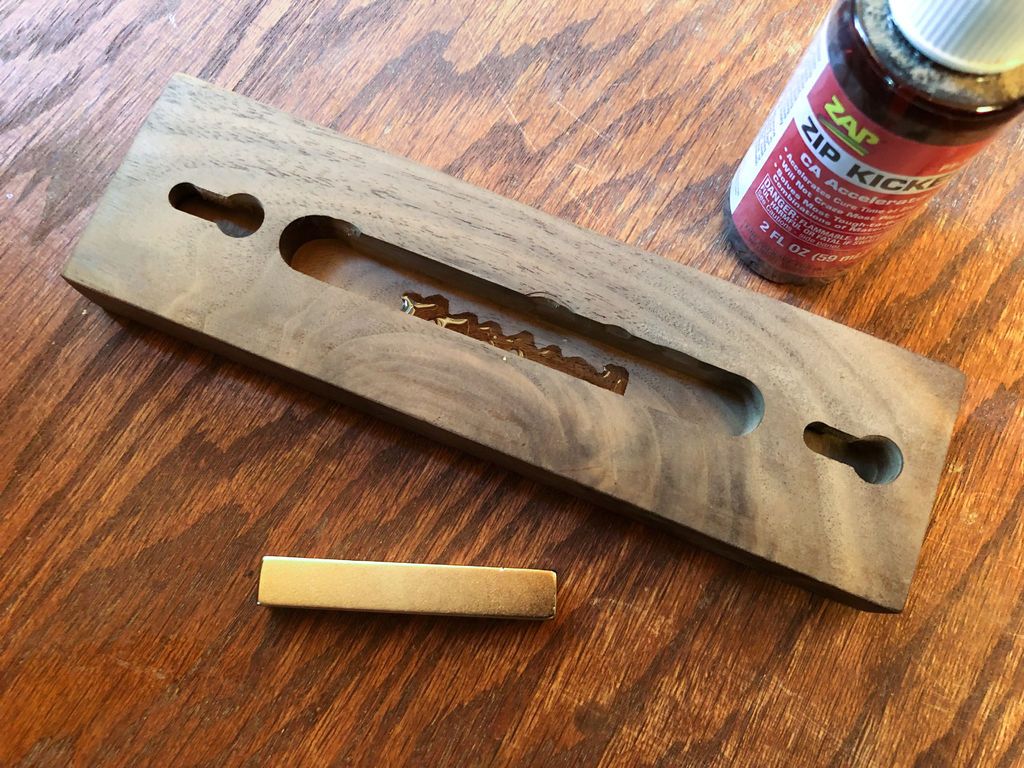
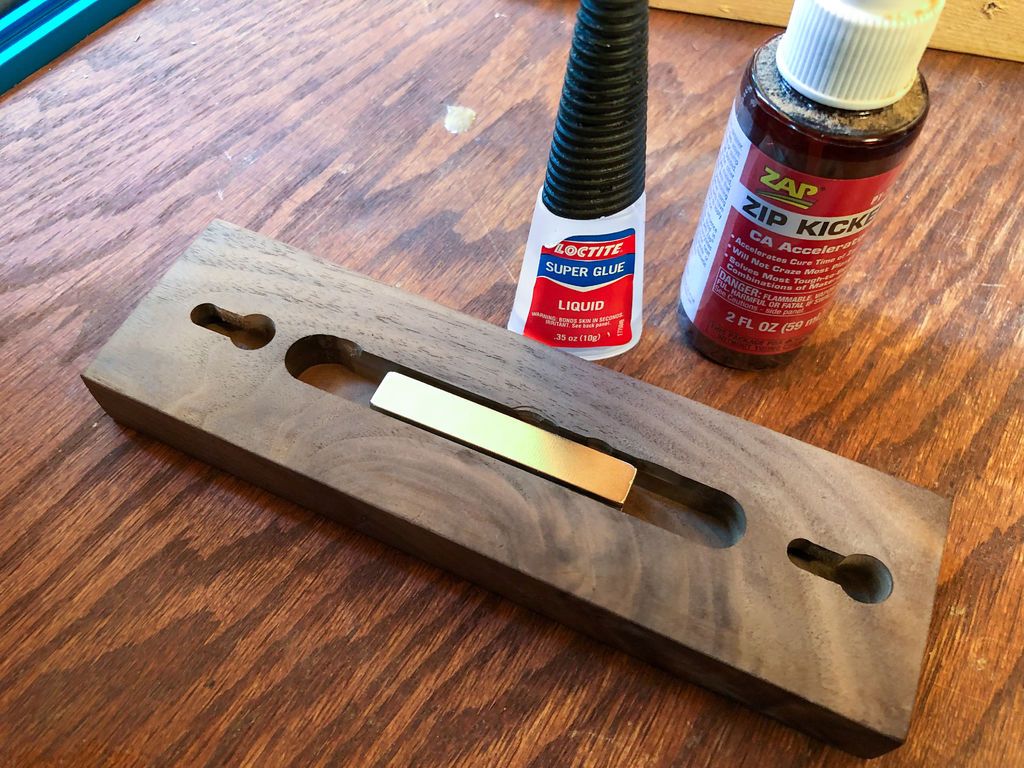
- Now we carefully remove the unit from the susurface and remove the tape from the carpet. Next, we temporarily placed the Rare Earth magnet in the canal and the remote control on the face where we wanted it.
- Testing that its location will hold the remote securely through the wood, we marked where the magnets were and removed them. Now we apply some super glue to the walnut bottom of the channel where we just marked.
- Now we apply a spray of Zip Kicker to the magnets.
- This will instantly set the glue on contact. (If you've never used zip kicker before, it's an awesome and useful thing!)
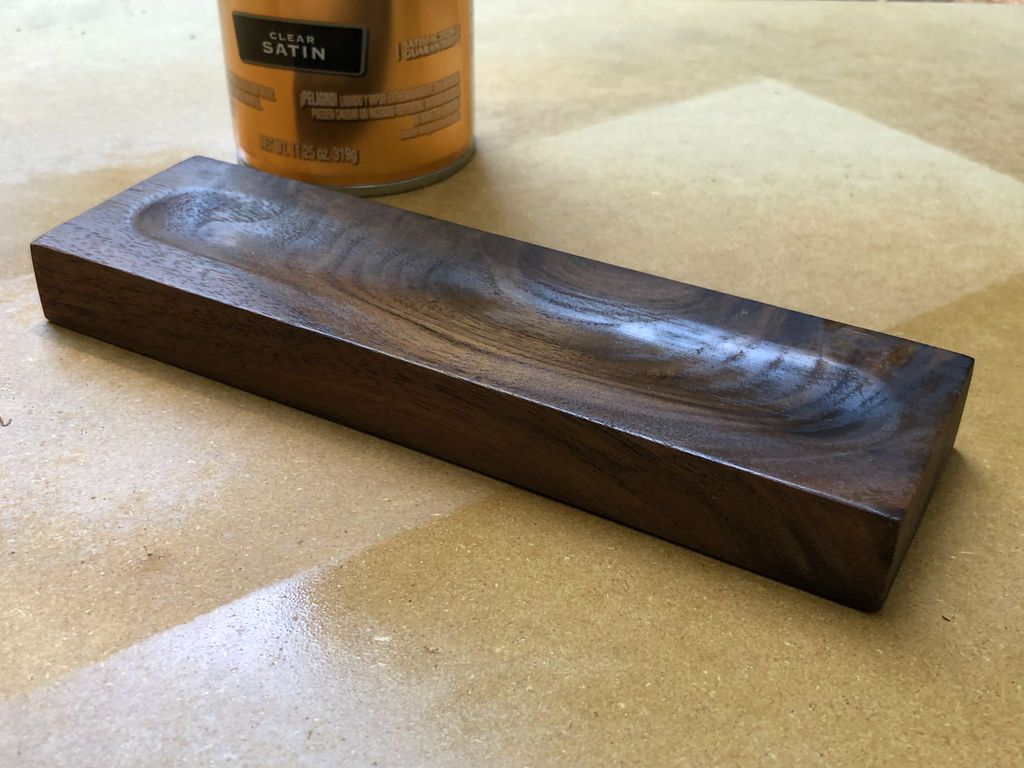
- To finish the surface of the unit, we sand all visible surfaces, first with 120 and then with 220 grit sandpaper.
- Be sure to wipe off dust with a clean, dry cloth. Finally we give it a coat of polyurethane and let it dry.
Lessons learned the hard way:
- If you are left with any sticky bits when you remove the tape from the carpet, get a small piece of new tape from the roll and rub it on the surface to remove it.
Step 7: Assemble the unit and enjoy
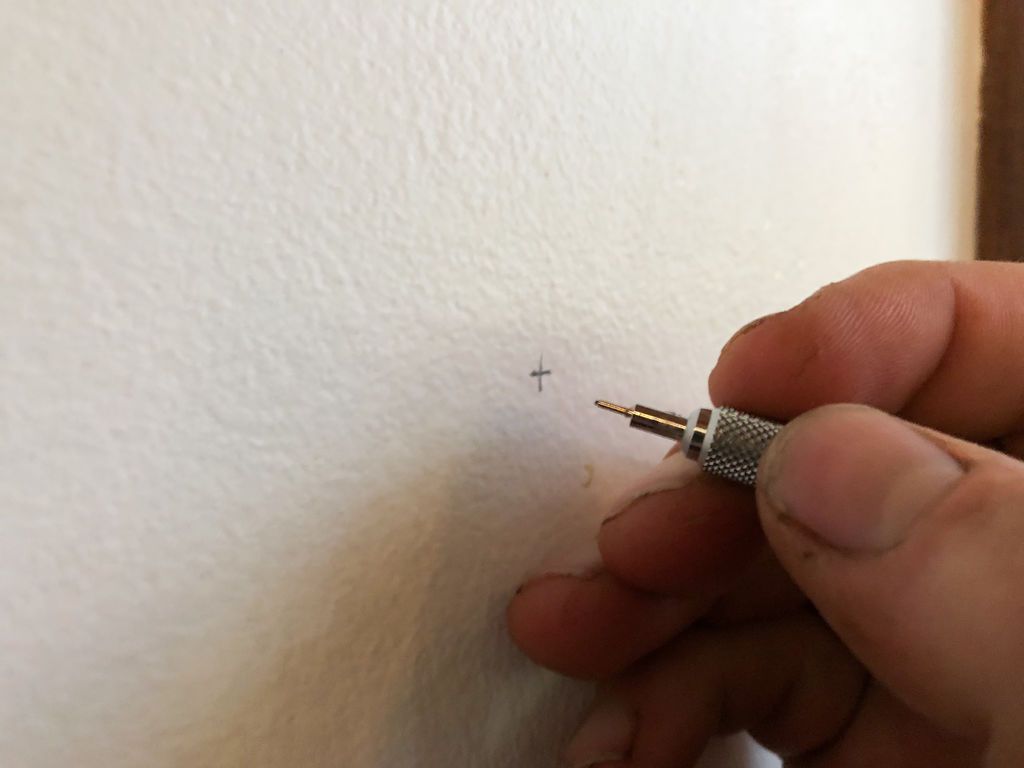
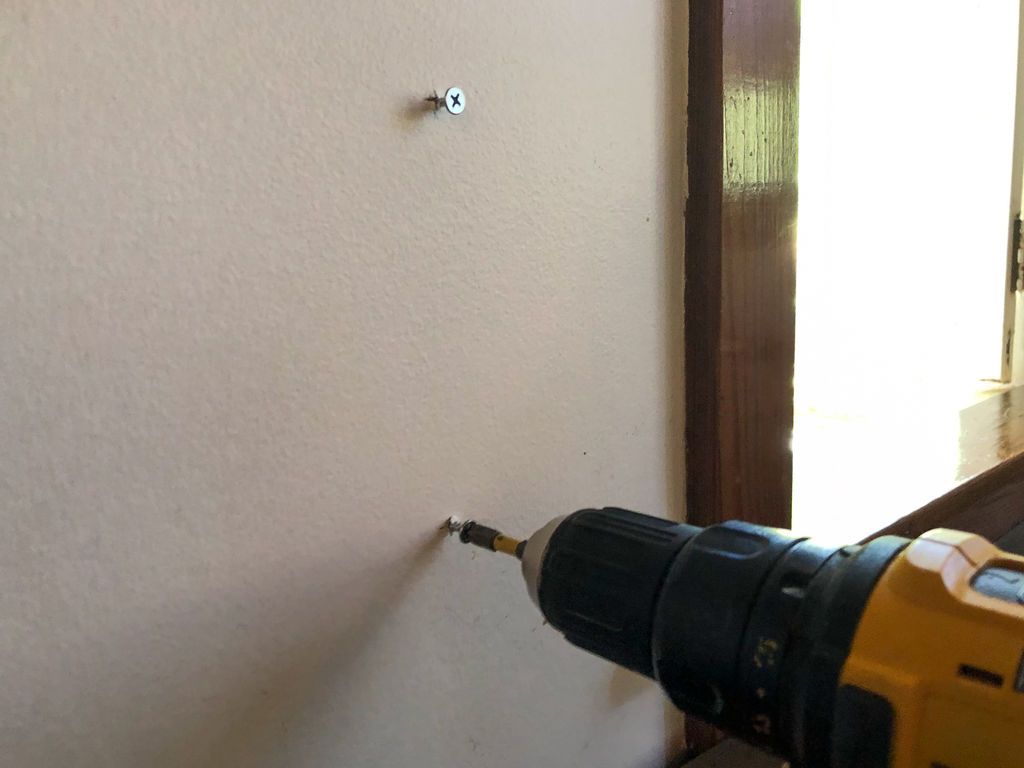
- Measure the distance between the top of your two holes. Select the optimal location on the wall where you will mark this same distance, preferably on a stud.
- Make sure your two marks are level and then screw two wood screws into the wall, leaving about 1/4″ of the screw heads sticking out.
- Place the magnetic remote control holder on these screw heads and then slide down to secure the unit to the wall surface.
Greetings!
Popular Content
How to make a rocket stove for outdoors
Cardboard Drawers Lined with Jeans
How to Create a Fairy Garden: Magic, Creativity and Nature in One Place
Latest Articles
How to make a refrigerator out of insulating material: Practical step-by-step guide
How to make a Kilim for the Home: Complete Step by Step Guide
How to protect ourselves from accidents in our workplace: Complete prevention and safety guide
Related Content
Simple Bottle Glass Cutter Composed of Common Parts!
11 Unique Hardwood Flooring Designs and Ideas for Your Home!
How to distill water
Ideas and Designs to Have Your Own Kitchen Bar
Creative Home Decor Ideas to Transform Every Space
Refreshing your home starts with smart design choices that combine comfort, personality, and functionality. Whether you want to modernize a small apartment, upgrade outdoor areas, or create cozy rustic interiors, these trending ideas can completely change the atmosphere of your space.
Outdoor Spaces That Increase Style and Functionality
Outdoor living continues to dominate modern home trends. Homeowners are increasingly investing in practical entertainment zones inspired by these BBQ shed ideas, which create the perfect setup for gatherings and weekend cooking sessions.
First impressions also matter when designing exteriors. Elegant farm entrance gates design ideas help properties stand out while improving privacy and curb appeal.
Compact living solutions are also gaining popularity. These inspiring 16x40 shed house interior design ideas show how smaller spaces can still feel luxurious and functional.
To enhance patios and entryways, homeowners are adding stylish protection with these creative porch awning exterior DIY ideas that blend aesthetics with practicality.

Rustic and Cozy Interior Design Trends
Warm and natural interiors remain timeless. These charming rustic decor ideas combine wood textures, vintage accents, and earthy tones to create welcoming spaces.
Bedrooms are becoming more personalized with curated wall arrangements. Many homeowners use these stylish picture wall ideas for bedroom spaces to display memories and artwork creatively.
Textured wall treatments are another major trend. Installing a board and batten wall adds architectural character while keeping interiors elegant and modern.
Similarly, bold accent wall ideas can instantly transform plain rooms into eye-catching focal points without requiring a full renovation.
Smart Kitchen and Organization Inspiration
Functional kitchens are essential for modern homes. These practical kitchen wall cabinet ideas maximize storage while maintaining a clean and stylish appearance.
Organization also starts at the entrance. Well-designed mud room ideas help families keep shoes, coats, and daily essentials neatly arranged.
Colorful and Personalized Home Styling
Vibrant interiors are becoming increasingly popular thanks to playful dopamine decor ideas that use bright colors and joyful accessories to improve mood and energy.
Gallery walls also continue to evolve as a major decorative feature. These trendy gallery wall inspiration ideas offer creative ways to combine prints, photos, and statement art.
Young renters and new homeowners are especially embracing these stylish first apartment aesthetic ideas to create sophisticated interiors on a budget.
Finally, selecting the right shades can dramatically influence any room’s atmosphere. These modern trendy color ideas help homeowners choose palettes that feel fresh, elegant, and timeless.
Final Thoughts
From rustic charm and colorful interiors to outdoor entertaining areas and functional storage solutions, today’s home decor trends focus on creating spaces that feel both beautiful and livable. By combining smart layouts, modern textures, and personalized decorative elements, any home can become more stylish, comfortable, and inspiring.


