


Super Economical Router Table (Safety and Precision in Your Work), create this very safe and precise Router table for a fraction of the cost of a brand name version.
Materials needed:
- Router Mold (Kreg brand)
- 3/4 inch thick MDF sheet 2′ x 4′ (final dimensions 20″ x 36″)
- 1/4 inch thick MDF sheet with laminated surface 2′ x 4′ (final dimensions 20″ x 36″)
- 3/8 inch thick plywood or other material approximately 2′ x 2′ (to make a pattern for the Router)
- 2x3 lumber (approximately 16 feet total)
- 4 small wood screws (to level the Router mold)
- 26 Large Cover Screws
- Wood glue
- Contact adhesive
- Small paint brush or paint roller (for applying contact adhesive)
- Surge Suppressor (to easily turn the Router on and off)
- CA glue (cyanoacrylate adhesive)
Tools needed:
- Table saw
- Router
- Router Bit 1: Clean the trim bit (to clean the table surface)
- Router Bit 2: Pattern Bit (to make the plate tray or router mold)
- Drill with two bits: 1) 3/8″ bit and 2) 1/8″ countersink bit
- Sierras.
Warnings:
- Woodworking tools are dangerous.
- Routers are probably the most dangerous tool... They have hair triggers and are extremely powerful. Please note that when the Router is on, nothing, and I mean nothing, will prevent the bit from rotating.
- Always unplug the Router when installing it on the table, when changing the bit, and/or when performing any operation other than edge work on a table or board. Seriously, unplug it when you're not working on it.
- Always wear eye protection. Ideally, a full face shield.
- Always use a commercial Router plate or mold. Never use a thin piece of plywood or a thin board in place of a commercial router board. This must be durable and the table surface must be thick. This ensures that the Router never separates from the table in the unlikely event that something gets stuck as well as preventing the material from sagging.
Step 1: Table Surface


Cut both pieces from the MDF sheets.
- Cut the 3/4″ thick MDF to its final dimensions: 20″ x 36″ (or whatever size you choose).
- Cut the 1/4″ thick MDF sheet, one inch larger in all directions. In my case, that's 22″ x 38″
- Link both sheets of MDF together.
- Apply contact cement to both pieces of MDF. Let the cement dry. When it is sticky to the touch, it is ready. That should take approximately 30 minutes.
- Apply a second coat of contact cement around the edges. Again, let it dry.
- Place small pieces of wood on the thick base. Align the thinner top piece.
- Remove the scrap wood and apply downward pressure to join both joints.
IMPORTANT:
You only have one chance to join the boards... The bond will be instant and permanent. Having the top board 1 inch larger gives you some "margin for error," so to speak.
- Trim excess material
- Use a Router with a flush cut bit to remove the extra 1/4″ MDF material.
Tip:
Always clamp the workpiece to your workbench. You don't want it to slide around while using the Router.
Step 2: Cut the hole for the Router board


Pattern
This will be used to guide a hand router with a pattern bit while removing material that is the exact size of the router plate.
It is best to make the pattern opening a little larger than the router plate... Maybe 1/16 of an inch larger. This way, the Router board will easily fall into place.
Use the table saw to cut 3/8-inch-thick plywood into strips. I cut mine to about 3 inches wide. Use glue. CA to close the pieces. Hold the template to the table.
IMPORTANT:
The position of the plate on the table surface must not be in the exact center! That's a common mistake! Although you can have the same amount of space on the left and right of the Router board, the space on the front and back of the board should NOT be equal. Position the plate so that it has more space in the front…
That's your "work surface" and the extra space will come in handy. The back of the table (the area behind the router bit and where the fence is located) requires less space.
Shelf
The Router board should be located on a shelf within the table surface.
- Use a router with a pattern tip to remove the material. The drill bit should have a bearing between the blade and the handle, that way the bearing will ride along the plywood template.
- Set the bit depth deeper than the thickness of the Router board. All Router boards should measure 3/8 inch... Measure yours to be sure.
- Drill four holes with a 3/8-inch drill bit to allow a saw blade to pass through.
- Remove the core by cutting along the inside edge with a jigsaw.
- Add four small screws (position as shown) to adjust the height of the Router plate.
- The Router plate should be flush with the surface. Make sure your workpiece does not "catch" on the plate or table. It is best to have the plate depth lowest, about the thickness of a sheet of office paper, on the input side (right) and highest (again, the thickness of a sheet of office paper) on the output side (left).
Step 3: Finish the Router Board Area


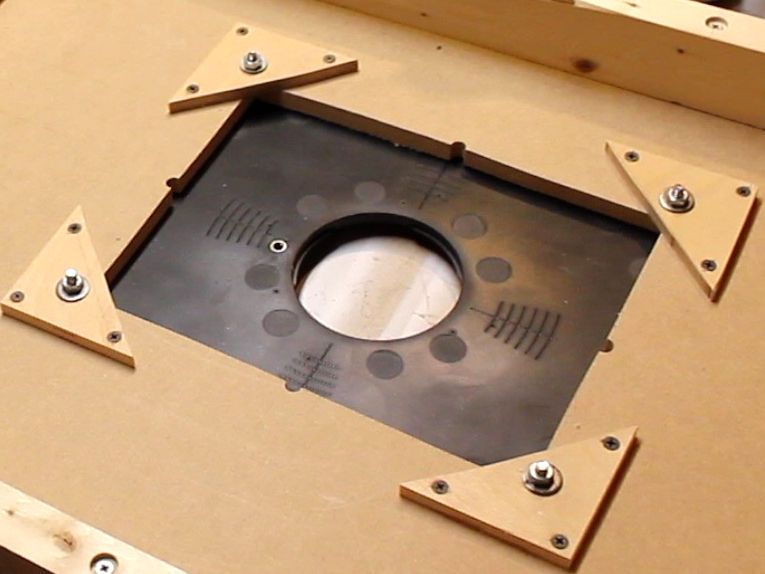
The Router board has pre-drilled holes in the corners.
With the router plate in position, use its pre-drilled holes as a guide to drill the ledge you just created. (this step is not shown).
Notice that the holes are VERY close to the edge. That's a little too unsafe in my opinion. I prefer to have the mounting screws "grab" into more material. So... do the following:
- Reinforce the router plate area
- Cut a section of the 3/8-inch-thick plywood into triangles. The exact size is not critical.
- At the bottom of the table, cover the corners with this triangle and secure with small wood screws. I also used CA glue, but CA glue probably wasn't necessary. However, it doesn't hurt to use CA glue in addition to screws.
- With the table placed top side up, use the holes you drilled earlier to drill the plywood reinforcement triangles you just installed.
- Use the screws/washers/nuts that came with the Router board to secure it.
You're almost done!
Step 4: Table frame and legs


Reinforce the table surface
- Cut two sections of 2x3 wood to the length of the table.
- Optional: Grind the 2x3 lumber so that all surfaces are 90 degrees and parallel. (This step is not shown. Additional tools are required if you do this… Again, this is totally optional)
- Stick the wood to the bottom of the table and attach with the deck screws.
Create the legs of the table
- Cut four pieces of 2x3 wood for the legs. The length you choose for you. Choose a length that produces a comfortable height for you. Obviously, make sure the Router has enough space when you finally mount it under the table surface.
- Set the table saw's miter gauge at 5 degrees and cut the legs to size.
- Make sure each leg is the same size. I used two powerful magnets to mark the cut locations. Magnets can be a safe and precise way to ensure that your workpiece does not bounce back towards you.
- Install the table legs
- Apply wood glue to the legs and hold them in place with clamps.
- Use the platform screws to secure the table legs to the reinforcing frame.
Table leg crossbars
- Use a 2x3 piece of wood to use as crossbars. In my case, I used two pieces of 3/4″ plywood glued together…
- The legs are already at a 5 degree angle… But the longer cross beams allow you to avoid making a more complicated compound miter cut. Basically doing it this way will result in a table that is just safe and much easier to build. Easy = good!
Final reinforcement
- Cut 2x3 pieces of wood to cover the short area of the table. Measure the area on your table and cut these pieces at that distance.
- Apply glue and secure with clamps to ensure good contact with the underside of the table
- Screw these bracket pieces into place as shown.
Step 5: Final touches and final reflections


Installing your router
Follow the instructions on the Router board to assemble your tool. Each manufacturer has slightly different steps. Don't worry, it's easy!
Power
Use a power strip to easily turn your computer on and off. This prevents you from reaching under the table to locate the on/off trigger that is connected to the Router.
Nearby
Use a thick piece of wood as a fence. Make sure the wood is flat! Use clamps to secure the fence to the table. Although this will not look as elegant as professional router fences, you can rest assured, it will be absolutely as precise... If not more precise!
Secure your table so it never moves
Secure your Router to your work table before using it! Better yet, use screws to secure it.
Enjoy your new Router table! Be safe and follow all tool manufacturer's instructions and precautions. Your table will give you a life of precision.
Get more information at perfectionidea.com and on our Facebook for more Super Economical Table for the Router.
Popular Content
How to make a rocket stove for outdoors
Cardboard Drawers Lined with Jeans
Ideas and Advantages of Window Grilles for the Home!
Latest Articles
How to make a refrigerator out of insulating material: Practical step-by-step guide
How to make a Kilim for the Home: Complete Step by Step Guide
How to protect ourselves from accidents in our workplace: Complete prevention and safety guide
Related Content
Neon Light Nightstand and Wireless Cell Phone Charger!
How to Make a Water/Air Pump/Vacuum Pump!
Wooden Pendrive: Personalize your USB Memory with This Simple Tutorial!
Incredible Homes in the World to Go on Vacation!
Creative Home Decor Ideas to Transform Every Space
Refreshing your home starts with smart design choices that combine comfort, personality, and functionality. Whether you want to modernize a small apartment, upgrade outdoor areas, or create cozy rustic interiors, these trending ideas can completely change the atmosphere of your space.
Outdoor Spaces That Increase Style and Functionality
Outdoor living continues to dominate modern home trends. Homeowners are increasingly investing in practical entertainment zones inspired by these BBQ shed ideas, which create the perfect setup for gatherings and weekend cooking sessions.
First impressions also matter when designing exteriors. Elegant farm entrance gates design ideas help properties stand out while improving privacy and curb appeal.
Compact living solutions are also gaining popularity. These inspiring 16x40 shed house interior design ideas show how smaller spaces can still feel luxurious and functional.
To enhance patios and entryways, homeowners are adding stylish protection with these creative porch awning exterior DIY ideas that blend aesthetics with practicality.

Rustic and Cozy Interior Design Trends
Warm and natural interiors remain timeless. These charming rustic decor ideas combine wood textures, vintage accents, and earthy tones to create welcoming spaces.
Bedrooms are becoming more personalized with curated wall arrangements. Many homeowners use these stylish picture wall ideas for bedroom spaces to display memories and artwork creatively.
Textured wall treatments are another major trend. Installing a board and batten wall adds architectural character while keeping interiors elegant and modern.
Similarly, bold accent wall ideas can instantly transform plain rooms into eye-catching focal points without requiring a full renovation.
Smart Kitchen and Organization Inspiration
Functional kitchens are essential for modern homes. These practical kitchen wall cabinet ideas maximize storage while maintaining a clean and stylish appearance.
Organization also starts at the entrance. Well-designed mud room ideas help families keep shoes, coats, and daily essentials neatly arranged.
Colorful and Personalized Home Styling
Vibrant interiors are becoming increasingly popular thanks to playful dopamine decor ideas that use bright colors and joyful accessories to improve mood and energy.
Gallery walls also continue to evolve as a major decorative feature. These trendy gallery wall inspiration ideas offer creative ways to combine prints, photos, and statement art.
Young renters and new homeowners are especially embracing these stylish first apartment aesthetic ideas to create sophisticated interiors on a budget.
Finally, selecting the right shades can dramatically influence any room’s atmosphere. These modern trendy color ideas help homeowners choose palettes that feel fresh, elegant, and timeless.
Final Thoughts
From rustic charm and colorful interiors to outdoor entertaining areas and functional storage solutions, today’s home decor trends focus on creating spaces that feel both beautiful and livable. By combining smart layouts, modern textures, and personalized decorative elements, any home can become more stylish, comfortable, and inspiring.


