
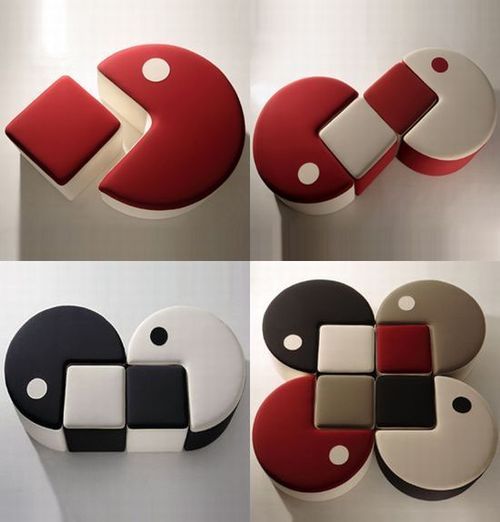
Beanbag with Pacman Design, browsing the Internet, I found a link to an Italian design site that creates hockeha amrs (beanbag) in the shape of the Pacman creature that I always adore.
When I saw the photo on the Internet, I thought, well... It shouldn't be that difficult to do it myself and immerse myself in the adventure of designing, creating and (for the first time) making upholstery. I hope you like it and comments/suggestions are welcome...

Step 1: Design


The first thing I always do when starting a build or project, I create some scaled Autocad drawings, so at a later stage during construction, I can easily measure the angles and sizes of the wood I need.
The next process was to determine the size of the Pacman:
- For the height I took my current sofa as the best height (40 cm). Please note that the foam/padding determines the height of the wood!
- The radius of the Pacman was defined in proportion to the height. It looks quite big (d = 80 cm) but proportionally, the pacman will look strange if the height (40 cm) was set to a diameter of 50 cm.
List of materials:
- 15mm MDF, depending on the size, you will need at least the C shape to be created from a single piece.
- Multiplex 9 mm (plywood)
- 32mm * 40mm wood (count number needed * height for total length needed)
- Larger ones (e.g. 40mm*40mm) for the corners and block.
- Upholstery. I used sky to get that leather look, but it's not as flexible. Mine already had some slippery things on the inside, so it can slide on the foam. If you get other things, please let them know if you need additional things.
- Cardboard strips. I had special ones, but you can cut some yourself.
- Staples.
Necessary equipment:
- Coworker/bank
- Sierra
- Drill
- Drill bits
- Countersink
- Screws (about 30mm in length, 3.2*30mm would be fine)
- Wood glue
- Needle (a special curve for this type of work) and thread (a strange special one!)
- Sewing machine [if available] (I don't know if a regular sewing machine can cut through upholstery)
- Foam and other filling
- A stapler! (I had a pneumatic one, but an electric one or whatever is a necessity... I don't think manuals can get into the MDF deep enough.)
- Knife
- Bookmarks
Tips/Observations:
In the design, the top (9mm multiplex/plywood) of the pacman was created separately because I wasn't sure if the upholstery required a top that wasn't connected. Only when I did the upholstery did I discover that it was better that the top was fixed, but also for weight reduction it is a good solution!
Step 2: Create the Base Structure


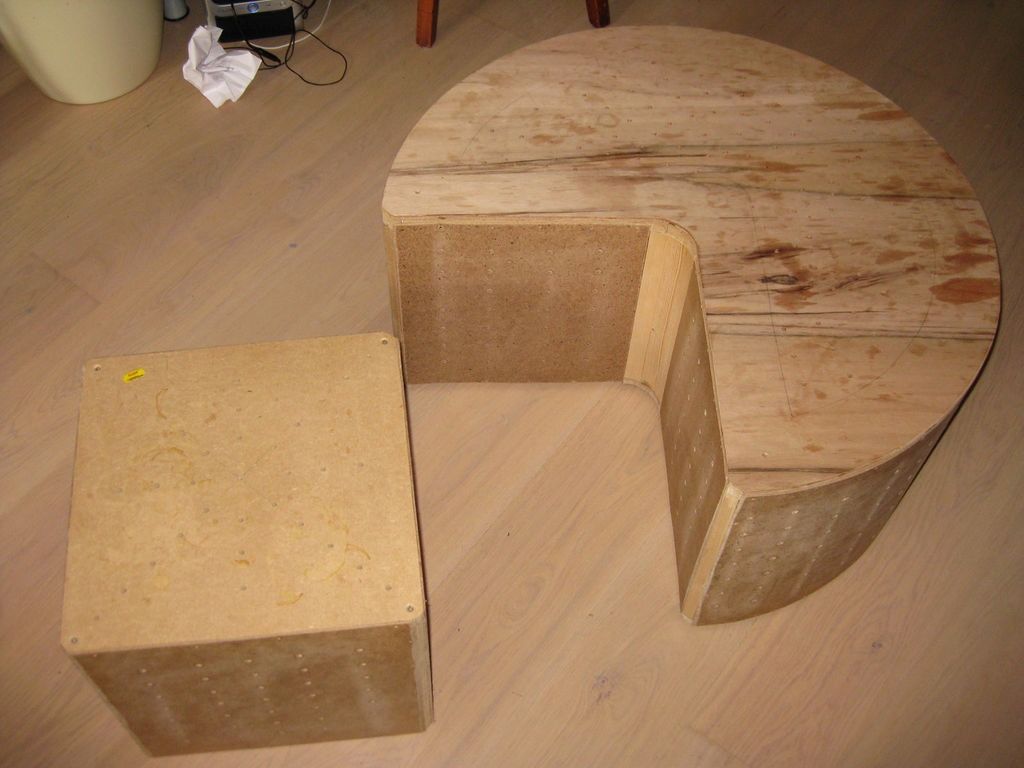
Creating the C shape
- First I drew the C shape on the MDF, I used a nail in the middle and a piece of wood and a pencil to create the perfect round shape.
- Measure the inside edge 7.1 cm.
- Mark the points where the vertical wood for the frame will be glued and screwed between the top and bottom in a C shape
–
Creating theblock
- Draw the top/bottom square
- Saw to cut the pieces.
- Mark the edges where the wood will be mounted (glue and screw).
- Attach the sides
- Drill holes everywhere
Tips/Observations:
Holes drilled in the wooden structure prevent air from being trapped under the upholstery. When you sit on the bean bag, air can escape through the holes.
The work is precise and removes all imperfections by using files and sandpaper, because a lot will show when the upholstery is attached.
Step 3: Eye of Pacman


Ok, now the hard part.
A pacman looks cool, but he only comes complete with one eye to look for blocks to eat. I measured where I wanted the eye to be and how big it would be, all in relation to the size of the entire set of courses.
As I have tried a few examples first to create the perfect round eye and sew it onto the red cloth, you may find that it is a good step to try a few examples of the material you have after cutting the basic cloth.
I used a professional sewing machine for this, but as you can see in a detailed image, it has a fairly high starting resistance, so it could "shoot" in a straight line. Practice is a necessity!
It may be better to do it manually, but then you will have to work precisely on the distance between the stitches.
Tips/Observations:
Sew right on the edge of the white "eye" so that when the pouf is used, the edge does not bend and wear loosens it from the red cloth.
Step 4: Upholstery


After all the preparation, it's time to start the upholstery. I took the small block for the test first, because it is cheaper to buy a small piece of fabric when it goes wrong instead of the C-shaped piece.
The foam:
- Use appropriate glue for the foam (I used Bison Tix). Let it dry for the required time (15/20 minutes) before assembling it together.
- Start pushing the edges together, lifting up the center piece. Work your way from the edges on.
The edges will look chamfered, something like this: \ _ /
When the upholstery is attached, it will return to shape, creating straight edges.
Top assembly:
- Measure the rough shape and keep about 10cm extra for shape.
- Use the staple gun (at an angle, see Tips) to get the first stretch in place. Start at the corners and make sure the curve is right. Continue with the sides.
- Check if everything is straight and if the tension is high enough. You can check this by placing your hands on your side and moving towards the center. If the upholstery curls, there is not enough tension.
If the edges are not uniform, there is probably too much tension. - Due to the lack of stretch of the fabric I used, it was not possible to stretch evenly without wrinkles, so I decided to use the folded corners (see photos)
- Finish the top by stapling it. Use one length of staple between staples to obtain even tension.
- Cut the remaining part, marking it evenly. (I again used a piece of wood with a mark and a pen to trace the entire line.
Continue with the sides:
- Usesew a piece of fabric for the sides, obtaining a sewing edge in one corner
- Mount the white fabric inside out and use a strip of cardboard which will create the sharp edges.
- Put the interior filling, a little more on the edges.
- Fold the cloth down and staple it to the bottom. Use the same technique as described above (using angled staples). Finish the bottom first for the three edges that can be attached. Leave the seam edge open.
- Fold the last corner into shape and use pins to keep it in shape. Staple the bottom with temporary staples. Check if the corners are not too bulky, if not, fold them again and remove the cloth that is not needed/not visible (be careful when cutting)
- Start sewing at the top by creating a knot at the end, pull both ends of the corners with the special curved needle and go through the knot again.
From there, go from the back from one side to the other and push the needle through, bending it back so that it comes out 4 to 5 mm on the other side. - Finish the bottom with fixed staples and cut the remaining fabric about 5 mm from the staple line
Tips/Observations:
- Use the angled staple gun for ‘tagging’. It is easy to remove nails when mistakes are made, as there is only one "leg" of the staple in the wood.
- Stretch all corners and sides evenly. Use many views to see if the lines (curves) are smooth and straight. Look at it from eye level, turn it over, put it on the ground and do the same.
Step 5: C-shaped upholstery


Now that the first part is finished, start with the C shape.
With the 'block' experience you use the same technique for the C shape.
Difficulties:
- The center of the top is quite difficult. Use a spare cloth to test the cuts you will need to make. Be very careful when cutting, as you will cut very deep quite easily. Don't underestimate, cut, test, cut some more, test again.
- Use the same drop edge corners as the 'block'. If you leave marks from the wood, fill it with additional foam where necessary.
- I used as with the block, a piece of fabric for the outside of the C shape and stapled it to the C cut (see image 13 below)
- I used a small piece for the trim with overlap. Assemble it like all the other side walls and fold in the edges to sew. Use the same sewing technique as shown above.
- I finished it by placing 2 nails so that the corner sides can't be torn off.
Tips/Observations:
Be careful with your cuts. Use cuts and small V shape at the end to better divide the tension.
Step 6: Enjoy the finished project
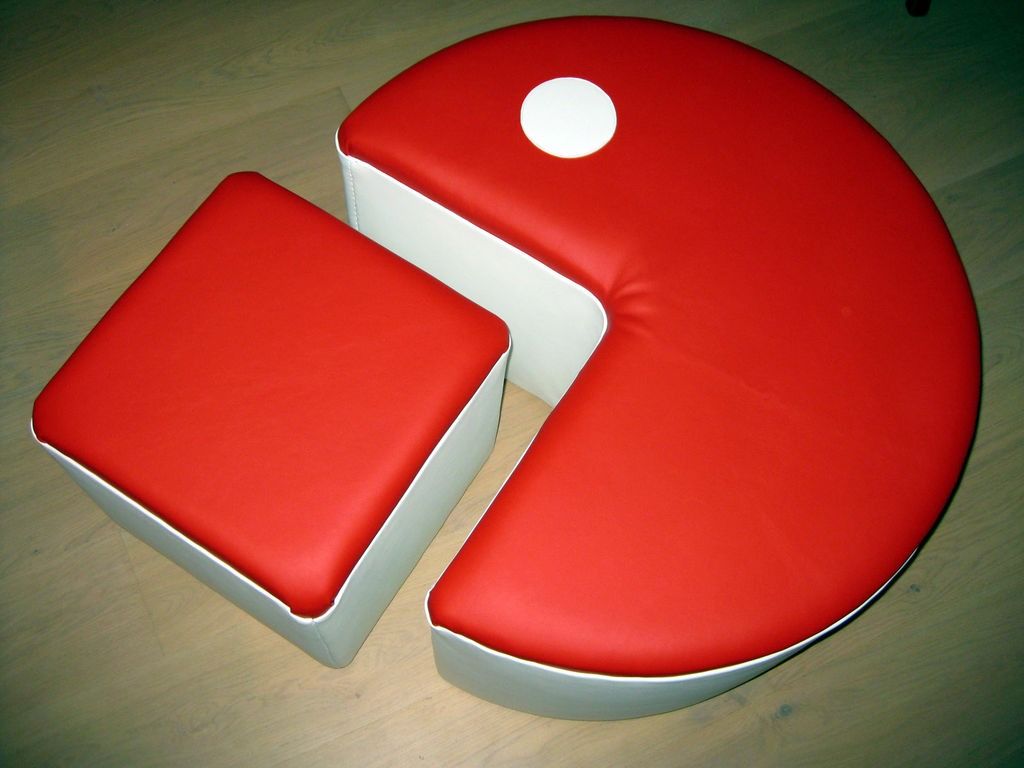

Now the fun part…
Put it in your living room and enjoy!
More Ideas:


Greetings!
Get more information at perfectionidea.com and on our Facebook for more Beanbags with Pacman Design.
Popular Content
How to make a rocket stove for outdoors
Cardboard Drawers Lined with Jeans
Bedroom furniture with secret compartments!
Latest Articles
How to make a refrigerator out of insulating material: Practical step-by-step guide
How to make a Kilim for the Home: Complete Step by Step Guide
How to protect ourselves from accidents in our workplace: Complete prevention and safety guide
Related Content
Adapting a Wall into a Giant Screen to Have a Home Theater!
Steampunk Bedroom Ideas
Ideas for Reusing Wine Cork
Learn How to Build a Cool Cabin Bed for Kids!
Creative Home Decor Ideas to Transform Every Space
Refreshing your home starts with smart design choices that combine comfort, personality, and functionality. Whether you want to modernize a small apartment, upgrade outdoor areas, or create cozy rustic interiors, these trending ideas can completely change the atmosphere of your space.
Outdoor Spaces That Increase Style and Functionality
Outdoor living continues to dominate modern home trends. Homeowners are increasingly investing in practical entertainment zones inspired by these BBQ shed ideas, which create the perfect setup for gatherings and weekend cooking sessions.
First impressions also matter when designing exteriors. Elegant farm entrance gates design ideas help properties stand out while improving privacy and curb appeal.
Compact living solutions are also gaining popularity. These inspiring 16x40 shed house interior design ideas show how smaller spaces can still feel luxurious and functional.
To enhance patios and entryways, homeowners are adding stylish protection with these creative porch awning exterior DIY ideas that blend aesthetics with practicality.

Rustic and Cozy Interior Design Trends
Warm and natural interiors remain timeless. These charming rustic decor ideas combine wood textures, vintage accents, and earthy tones to create welcoming spaces.
Bedrooms are becoming more personalized with curated wall arrangements. Many homeowners use these stylish picture wall ideas for bedroom spaces to display memories and artwork creatively.
Textured wall treatments are another major trend. Installing a board and batten wall adds architectural character while keeping interiors elegant and modern.
Similarly, bold accent wall ideas can instantly transform plain rooms into eye-catching focal points without requiring a full renovation.
Smart Kitchen and Organization Inspiration
Functional kitchens are essential for modern homes. These practical kitchen wall cabinet ideas maximize storage while maintaining a clean and stylish appearance.
Organization also starts at the entrance. Well-designed mud room ideas help families keep shoes, coats, and daily essentials neatly arranged.
Colorful and Personalized Home Styling
Vibrant interiors are becoming increasingly popular thanks to playful dopamine decor ideas that use bright colors and joyful accessories to improve mood and energy.
Gallery walls also continue to evolve as a major decorative feature. These trendy gallery wall inspiration ideas offer creative ways to combine prints, photos, and statement art.
Young renters and new homeowners are especially embracing these stylish first apartment aesthetic ideas to create sophisticated interiors on a budget.
Finally, selecting the right shades can dramatically influence any room’s atmosphere. These modern trendy color ideas help homeowners choose palettes that feel fresh, elegant, and timeless.
Final Thoughts
From rustic charm and colorful interiors to outdoor entertaining areas and functional storage solutions, today’s home decor trends focus on creating spaces that feel both beautiful and livable. By combining smart layouts, modern textures, and personalized decorative elements, any home can become more stylish, comfortable, and inspiring.


