


Building a Beautiful Concrete Garden Bench, as an architectural engineering student, I learn a lot about concrete construction. The funny thing is, I've never used concrete in my life. So I was going to change that and do something with concrete. The first thing that came to mind was a concrete garden bench.
So, here we go!

If you like this project, please comment.
Step 1: Materials and tools

Materials:
- Melamine board or formwork plywood: To make your mold, you need a waterproof plywood with a smooth surface. Plywood is a material designed for making molds. It has a very smooth surface and is water resistant. It is also very expensive. Otherwise, melamine board is a cheap alternative.
- The melamine board has a smooth surface but is not waterproof on the sides. I found an old closet in the dumpster and used these boards to build my mold.
- Concrete: I used 10 bags of ready-mixed concrete (25 kg each). Pre-mixed bags are easy to use. When you want to make your own concrete, you need to put cement, sand, and gravel together. 1 part cement, 2 parts sand and 3 parts gravel. When you change the size of the bench, you must calculate the amount of concrete you need. A 25 kg bag of concrete is good for 12 liters.
- Screws
- Silicon sealant
- Release agent: Silicone spray, Vaseline, WD40, etc.
- Adhesive tape
- Reinforcing bar
- Some pieces of wood
- Rope
- Concrete coloring (optional)
Tools:
- Electric drill
- Silicone gun
- Orbital sander
- Mixer or Bucket
- Shovel
- Circular saw
- Hammer
Step 2: Make the mold


When everything fits correctly, it is very easy to screw together.
The cutout was made with a circular saw. Place the two side pieces on top of each other and pin them down before cutting. By doing this you will obtain two identical pieces.
Now you can screw everything together. Be sure to use a large number of screws, as they have to withstand the pressure of the concrete.
Step 3: Adding the rebar


I used a piece of an old fence to act as rebar. I cut it to the correct size with an angle grinder. You can also purchase rebar at your local hardware store.
When making and placing rebar, you need to keep two things in mind:
- You must place reinforcing bars with an offset of at least 4 cm from the concrete surface. When you don't do this, the rebar can rust and you can get chipped concrete. When you want to place your rebar closer to the surface, you can use coated rebar or stainless steel.
- You should place the reinforcement bar as low as possible on the seat. When you sit on the bench it creates traction forces at the bottom of the seat. This is where you want your rebar to be.
I doubt if rebar is really necessary for this particular bench. The seat is 15cm thick, so it should hold up a lot on its own. But it is better to be safe than to waste materials and time.
Step 4: Application of silicone sealant


When using melamine panels, you must apply silicone sealant to the joints because melamine board is not waterproof at the joints. The silicone seals also create a nice round edge. I used masking tape to create an airtight seal.
NOTE: Before sealing the inside of the legs, you must attach your rebar!
Step 5: Placement of rods

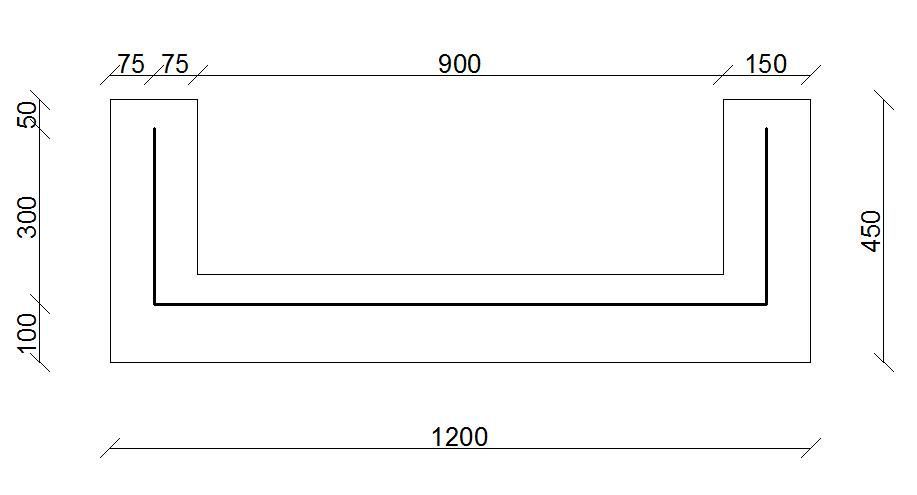
I attached the rebar with pieces of wood and some ropes. The rebar is placed as shown in the drawing.
Step 6: Mix the concrete
Follow the manufacturer's instructions for mixing your concrete. I used a large plastic tub, mixed the concrete and water with a shovel. A good tip is to first calculate the water you need and then add 2/3 of it to the tub. Add your concrete a little at a time as you mix it. At the end add the other 1/3 of the water.
I used black pigment powder to give the concrete a darker color. This is why concrete has an uneven appearance.
NOTE:Always wear gloves!
Step 7: Filling the mold


Before filling the mold, you need to make sure the mold is level. To make the mold easy to release, you should use a release agent. There is a special release agent on the market but it is not worth the money. I used Silicone Spray as a release agent. You can also use olive oil, WD40, Vaseline, almost anything greasy. To get a smooth surface, you must remove air bubbles from the concrete. To do this you have to vibrate the mold, I used two different techniques for this:
- Tap the mold quickly with a hammer. This is used to make the bottom of the mold smooth (seat part)
- Use an orbital sander to press against the mold. This is a good method to remove air bubbles from the legs and sides.
Knowing this you can now fill the mold with concrete. Be sure to spread the concrete and press it into the base of the mold. Fill small batches of concrete and tap the mold frequently between batches. This is really important! Also use the orbital sander on the sides of the bench. When you have filled the bench seat, you must put the board in place before you can fill the legs. When you finish filling the legs, you should cover the legs with a plastic sheet. This is done to prevent the water in the concrete from evaporating.
NOTE: I made additional pieces to reinforce the sides of the mold. This was not necessary at all.
Step 8: Demoulding


When you have waited five days you can begin to remove the mold. Unscrew the boards and use a joint knife as a wedge between the wood and the concrete.
Step 9: Final Product
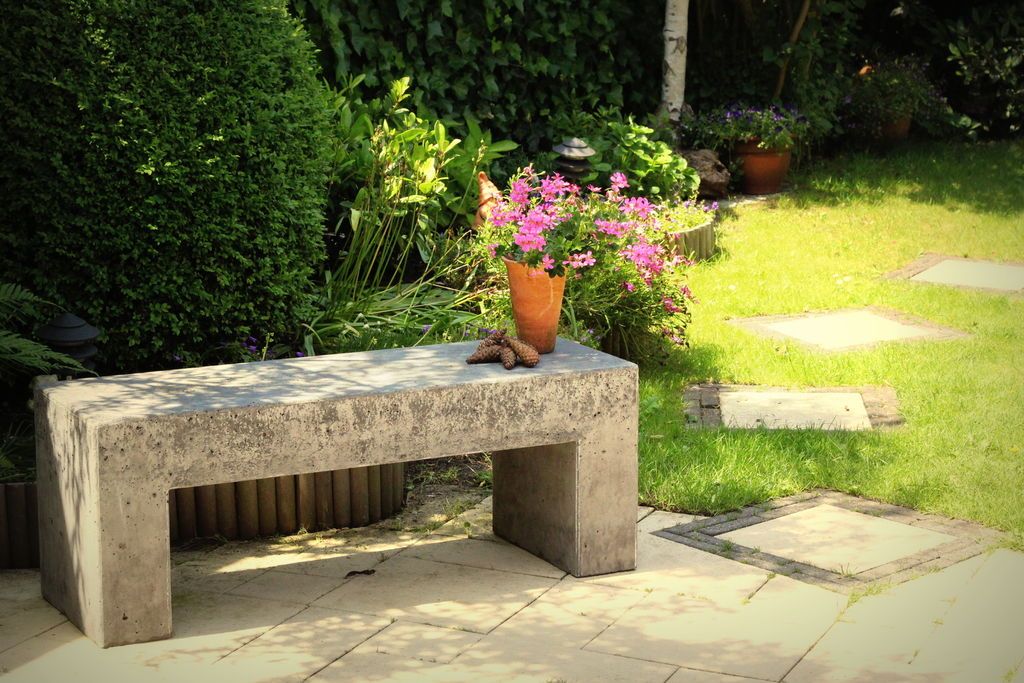

You have managed to make a nice looking concrete bench that will last forever... Good luck with this project!
Get more information at perfectionidea.com and on our Facebook for more Building a Beautiful Concrete Bench for the Garden.
- Tags
- Concrete
Popular Content
How to make a rocket stove for outdoors
Cardboard Drawers Lined with Jeans
Ideas and Advantages of Window Grilles for the Home!
Latest Articles
How to make a refrigerator out of insulating material: Practical step-by-step guide
How to make a Kilim for the Home: Complete Step by Step Guide
How to protect ourselves from accidents in our workplace: Complete prevention and safety guide
Related Content
Rustic Decoration Ideas
Unique Design for a Wooden Garden Seat!
Multifunctional Furniture Ideas that Help Save Space
Aquarium Ideas that Beautify the Patio or Garden
Creative Home Decor Ideas to Transform Every Space
Refreshing your home starts with smart design choices that combine comfort, personality, and functionality. Whether you want to modernize a small apartment, upgrade outdoor areas, or create cozy rustic interiors, these trending ideas can completely change the atmosphere of your space.
Outdoor Spaces That Increase Style and Functionality
Outdoor living continues to dominate modern home trends. Homeowners are increasingly investing in practical entertainment zones inspired by these BBQ shed ideas, which create the perfect setup for gatherings and weekend cooking sessions.
First impressions also matter when designing exteriors. Elegant farm entrance gates design ideas help properties stand out while improving privacy and curb appeal.
Compact living solutions are also gaining popularity. These inspiring 16x40 shed house interior design ideas show how smaller spaces can still feel luxurious and functional.
To enhance patios and entryways, homeowners are adding stylish protection with these creative porch awning exterior DIY ideas that blend aesthetics with practicality.

Rustic and Cozy Interior Design Trends
Warm and natural interiors remain timeless. These charming rustic decor ideas combine wood textures, vintage accents, and earthy tones to create welcoming spaces.
Bedrooms are becoming more personalized with curated wall arrangements. Many homeowners use these stylish picture wall ideas for bedroom spaces to display memories and artwork creatively.
Textured wall treatments are another major trend. Installing a board and batten wall adds architectural character while keeping interiors elegant and modern.
Similarly, bold accent wall ideas can instantly transform plain rooms into eye-catching focal points without requiring a full renovation.
Smart Kitchen and Organization Inspiration
Functional kitchens are essential for modern homes. These practical kitchen wall cabinet ideas maximize storage while maintaining a clean and stylish appearance.
Organization also starts at the entrance. Well-designed mud room ideas help families keep shoes, coats, and daily essentials neatly arranged.
Colorful and Personalized Home Styling
Vibrant interiors are becoming increasingly popular thanks to playful dopamine decor ideas that use bright colors and joyful accessories to improve mood and energy.
Gallery walls also continue to evolve as a major decorative feature. These trendy gallery wall inspiration ideas offer creative ways to combine prints, photos, and statement art.
Young renters and new homeowners are especially embracing these stylish first apartment aesthetic ideas to create sophisticated interiors on a budget.
Finally, selecting the right shades can dramatically influence any room’s atmosphere. These modern trendy color ideas help homeowners choose palettes that feel fresh, elegant, and timeless.
Final Thoughts
From rustic charm and colorful interiors to outdoor entertaining areas and functional storage solutions, today’s home decor trends focus on creating spaces that feel both beautiful and livable. By combining smart layouts, modern textures, and personalized decorative elements, any home can become more stylish, comfortable, and inspiring.


