


Today we will teach you how to make a floating shoe rack with PVC pipes, a cheap, easy and decorative solution to keep your shoes organized and unstuck.


Note on materials: I use PVC mainly because it is very easy to work with and white was the color I was going for. It would work just as well (maybe better) on copper, brass, stainless steel, or any other style you can get pipes and fittings. Choose the material that best suits your style.
And PVC is a great option if you want it to be cheap.
Steps to make a floating shoe rack with PVC
Step 1: Find the place
The only practical place I have to store my shoes by my front door is a weird little spot between my door and the kitchen cabinets. It can only hold about two pairs of shoes before it overflows and enters traffic.
Step 2: Parts and Tools
Materials:
- 1/2″ diameter PVC pipe
- 8 1/2″ PVC 90° Elbows.
- 4 Screws. (1 1/2″ drywall or wall screws for most circumstances.)
Tools:
- Saw (any kind really, PVC doesn't care much. A hacksaw is very good though).
- Screwdriver.
- Drill. and a 1/8″ all-purpose drill bit. For pilot holes
- Tape measure.
Optional things:
- Goggles or protective glasses. Because two eyes are better than one.
- 80 grit sandpaper. To sand marks from PVC and give it a nice matte finish.
- Glue. Although I didn't find the necessary joints. It doesn't have to be airtight, and since the screws are inside, I don't want to have to use a hacksaw if I want to (re)move it one day.
- Use knife. To take care of any strange burrs or anything else at the end of PVC cuts. It's also not a real project unless there's a decent chance of seriously cutting yourself.
- Level: To hang the thing straight.
Step 3: Prepare your PVC

Sanding:
- Your pipe likely has many printed specifications, and 90° elbow connectors may have barcodes. A little work with sandpaper will clean them up. Then, apply sandpaper over the entire surface to give it a smooth matte finish. This was probably the slowest step of all of this as I cut everything to size first and it was a huge pain for some of the smaller things. So sand first, then cut.
Cut to size:
- Cross Pieces: Measure your cross pieces to account for the added width of the connectors. To do this take the maximum width of the shelf and subtract two inches. Cut two pieces to this length.
- For my shelf, the total finished length is 20 1/2″. So I cut my cross pieces to 18 1/2″.
The inferior extensor:
- Cut two pieces into 3 1/2″ I call these pieces “R1” and “L1”
- The center connector and top extender: Cut 4 pieces to 1 1/2″. Or a little shorter. They will be completely inside the elbow connectors, so high tolerance is not really needed. I refer to these as; "R2", "L2", "R3", and "L3".
- I label all the cut end pieces with a sharpener so I don't get confused. (You will notice in the picture that my R1 and R3 are 3/4″ longer than the ones on the left. This is because the left side of mine connects to a 3/4″ door trim and I want the shelf to remain parallel to the wall.)
Step 4: Rough Assembly and Fit Test
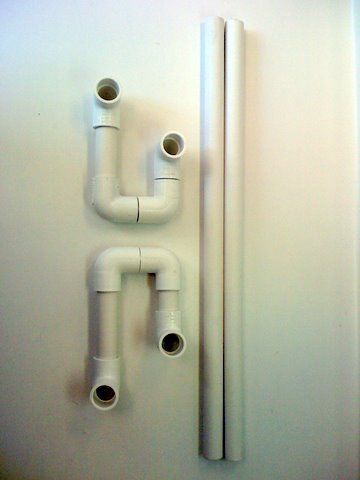
Test the fit of your parts by recreating the assembly below. I'll try to describe it, but the photo really does a much better job.
Assemble the side supports in the following order:
Right mounting:
- 90° elbow -> R1 -> 90° elbow -> R2 -> 90° elbow -> R3 -> 90° elbow
Left assembly:
- 90° elbow -> L: 1 -> 90° elbow -> L2 -> 90° elbow-> L3 -> 90° elbow
They should be flat and make a crooked "U" shape with the first and last 90° elbow facing up.
(Again, my pieces R1 and R3 are 3/4″ longer because I am gluing them to an uneven surface. Unless you are also dealing with 3/4″ molding, you should do what I tell you and not what I do.
Step 5: Rougher Fit


Connect the short sides of the "U"s with one of the cross bars. This is the top "shelf."
Connect the long side of the "U" with the final cross bar. This is the bottom bracket.
Look how it all fits together. It should fit well. Hopefully all the connections have a decent friction fit and won't come apart easily. Use a t-square and a level, or just stick it on the ground in a corner to see how it lines up.
The photo below shows things assembled and in orientation it will be attached to the wall.
Step 6: Drill some holes

If everything seems to fit well, take it apart a bit. Specifically, we need to get to the four 90° elbows that connect the back of the frame. (Those where the “R2” and “L2” part are hidden)
Use a 1/8" drill bit to drill holes in the "Backs" of the 90° connectors as close to the "inside" as possible. See the following illustration. If you put them through the center of the pipe, you will see the screws after you put them in the wall. Placing them on the "inside" we bring them as close as possible to the flat part, hiding the screw when we attach it to the wall.
Step 7: Place it on the wall

(There is an optional step here where you can glue the "R2" and "L2" assemblies together, but it doesn't seem to add much to the stability. I wouldn't recommend gluing the entire assembly because you will have to destroy it to get it off the wall.)
Measure 7" from the floor (or more if you wear a lot of boots) and mark a line as the bottom of the shelf. Reassemble the frame and use it as a guide to mark the screw holes, then remove the crossbars and attach the back pieces from the previous step to the wall.
Drive a drywall screw directly through the inside of the elbow connector, through the drilled hole and into the wall.
Make the screws one by one, and check that they fit and are level with each other.
Step 8: Use!

This floating shoe rack with PVC can be used to organize any type of shoes and the best thing is that it doesn't take up much space.


Slip on your shoes and enjoy!
The bottom shelf is short enough that the shoes slide back, but the toes of the shoes catch on the top bar.
Keeps them organized, off the floor and out of the way.
Advantages:
- It is easy to clean.
- Does not scratch shoes as much as metal or wood.
- There are no sharp corners.
- Very cheap.
Disadvantage:
- PVC isn't exactly environmentally friendly.
Don't forget to follow us on our social networks for more news!
Popular Content
How to make a rocket stove for outdoors
Cardboard Drawers Lined with Jeans
Ideas and Advantages of Window Grilles for the Home!
Latest Articles
How to make a refrigerator out of insulating material: Practical step-by-step guide
How to make a Kilim for the Home: Complete Step by Step Guide
How to protect ourselves from accidents in our workplace: Complete prevention and safety guide
Related Content
Creating a Hidden Door Shelf for a Secret Space at Home
Wheelchair Made of PVC Pipes!
How to Make an Eclipse Lamp
Ideas for Modifying a Wine Barrel in a Campfire!
Creative Home Decor Ideas to Transform Every Space
Refreshing your home starts with smart design choices that combine comfort, personality, and functionality. Whether you want to modernize a small apartment, upgrade outdoor areas, or create cozy rustic interiors, these trending ideas can completely change the atmosphere of your space.
Outdoor Spaces That Increase Style and Functionality
Outdoor living continues to dominate modern home trends. Homeowners are increasingly investing in practical entertainment zones inspired by these BBQ shed ideas, which create the perfect setup for gatherings and weekend cooking sessions.
First impressions also matter when designing exteriors. Elegant farm entrance gates design ideas help properties stand out while improving privacy and curb appeal.
Compact living solutions are also gaining popularity. These inspiring 16x40 shed house interior design ideas show how smaller spaces can still feel luxurious and functional.
To enhance patios and entryways, homeowners are adding stylish protection with these creative porch awning exterior DIY ideas that blend aesthetics with practicality.

Rustic and Cozy Interior Design Trends
Warm and natural interiors remain timeless. These charming rustic decor ideas combine wood textures, vintage accents, and earthy tones to create welcoming spaces.
Bedrooms are becoming more personalized with curated wall arrangements. Many homeowners use these stylish picture wall ideas for bedroom spaces to display memories and artwork creatively.
Textured wall treatments are another major trend. Installing a board and batten wall adds architectural character while keeping interiors elegant and modern.
Similarly, bold accent wall ideas can instantly transform plain rooms into eye-catching focal points without requiring a full renovation.
Smart Kitchen and Organization Inspiration
Functional kitchens are essential for modern homes. These practical kitchen wall cabinet ideas maximize storage while maintaining a clean and stylish appearance.
Organization also starts at the entrance. Well-designed mud room ideas help families keep shoes, coats, and daily essentials neatly arranged.
Colorful and Personalized Home Styling
Vibrant interiors are becoming increasingly popular thanks to playful dopamine decor ideas that use bright colors and joyful accessories to improve mood and energy.
Gallery walls also continue to evolve as a major decorative feature. These trendy gallery wall inspiration ideas offer creative ways to combine prints, photos, and statement art.
Young renters and new homeowners are especially embracing these stylish first apartment aesthetic ideas to create sophisticated interiors on a budget.
Finally, selecting the right shades can dramatically influence any room’s atmosphere. These modern trendy color ideas help homeowners choose palettes that feel fresh, elegant, and timeless.
Final Thoughts
From rustic charm and colorful interiors to outdoor entertaining areas and functional storage solutions, today’s home decor trends focus on creating spaces that feel both beautiful and livable. By combining smart layouts, modern textures, and personalized decorative elements, any home can become more stylish, comfortable, and inspiring.


