


Making a bathtub sofa can be an innovative idea to make at home easily, which you can reuse this material in different ways.
Overall, I would say the project takes "much longer than a weekend" to complete, and is best done with the help of another person, even if it's just to move the several-hundred-pound bathtub from one location to another.

However, once this is done, you will have a unique piece of furniture that really speaks for itself.
Having made it, rather than buying it, will really speak to your skills as a creator of things, and that's great too if you like that kind of thing.
Step 1: This idea is not new
Let me start by saying that this idea is not new. It first appeared in 1961 in Holly Golightly's apartment in the film "Breakfast at Tiffany's."
It was then recreated by Jared and Jill Morrison of Ruff House Art for everyone's Phillip Morris a few years ago.
This was followed by a New York Times article covering the concept of a claw-foot bathtub sofa (when I caught up with the idea) which then led to several custom retailers trying to recreate the work.
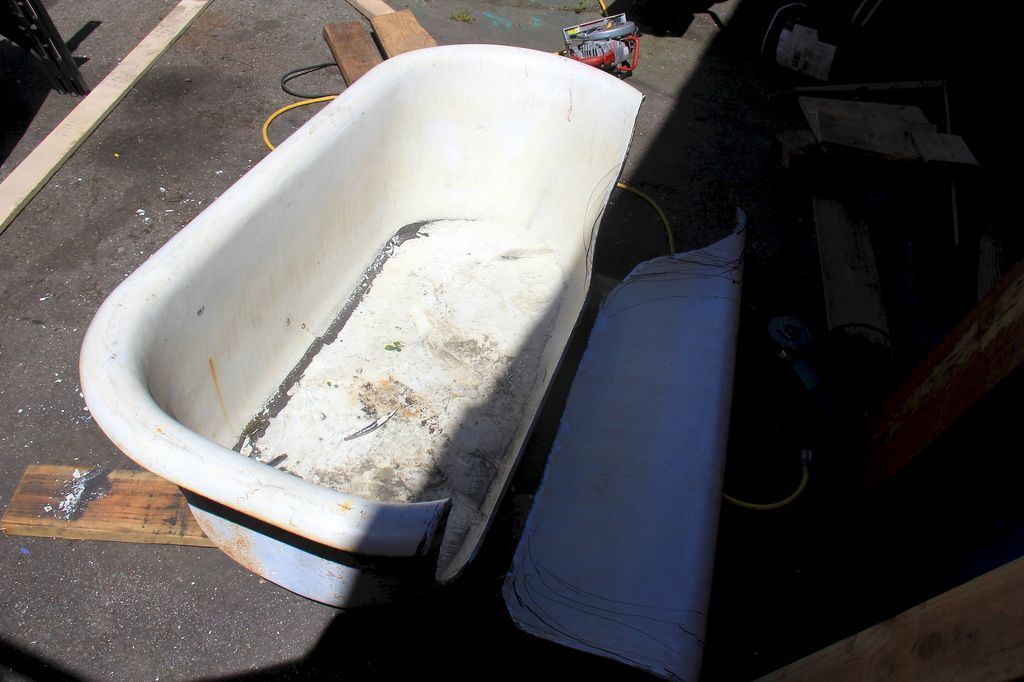
Step 2: Find the tub
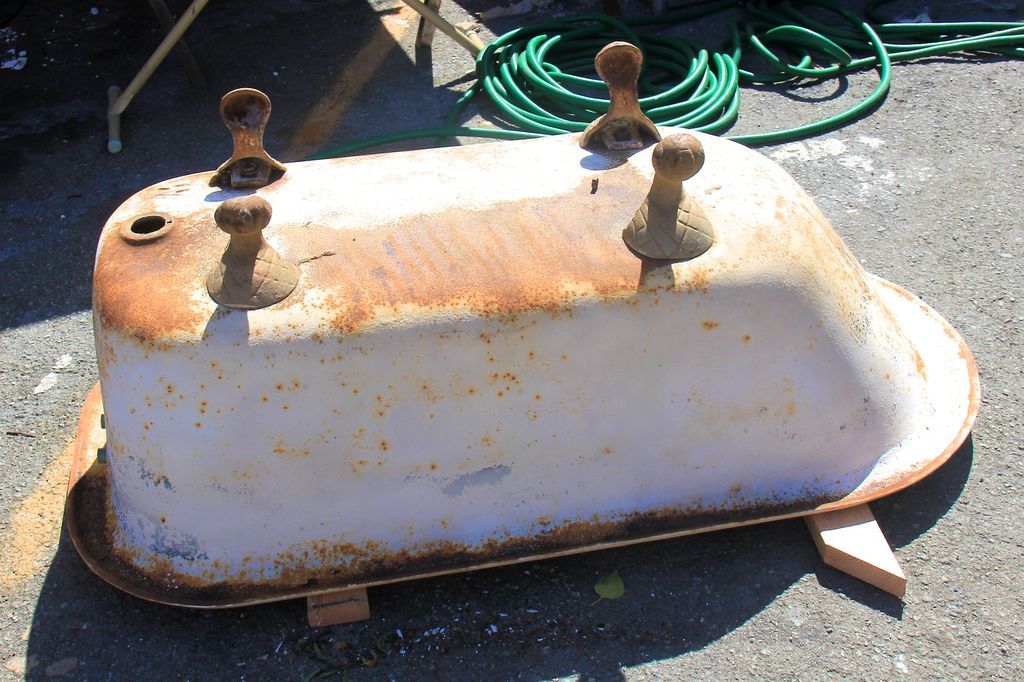
Continuing with the show, it's time to get a clawfoot tub!
- The condition of the bathtub doesn't really matter as long as it's not cracked.
- Accessories are optional.
- Some bathtubs are shorter than others. I was looking for a longer one so I could fit two people in it.
Step 3: Assess the status
- Evaluate your clawfoot tub. Keep in mind that there is always a risk of finding lead paint when going vintage, so wear gloves, don't lick the tub, and use common sense.
- Ideally, the inside of the bathtub should be finished with porcelain and free of paint.
- If there is paint on it, it will have to be removed, but we will look at that later.
- The exterior of the tub if purchased used will probably be painted.
- It is possible and likely that the paint will crack and rust.
- Don't worry too much about the surface condition, just rule out any significant damage or cracks.
- Be careful when handling the bathtub, it is extremely heavy!
Step 4: Remove the legs
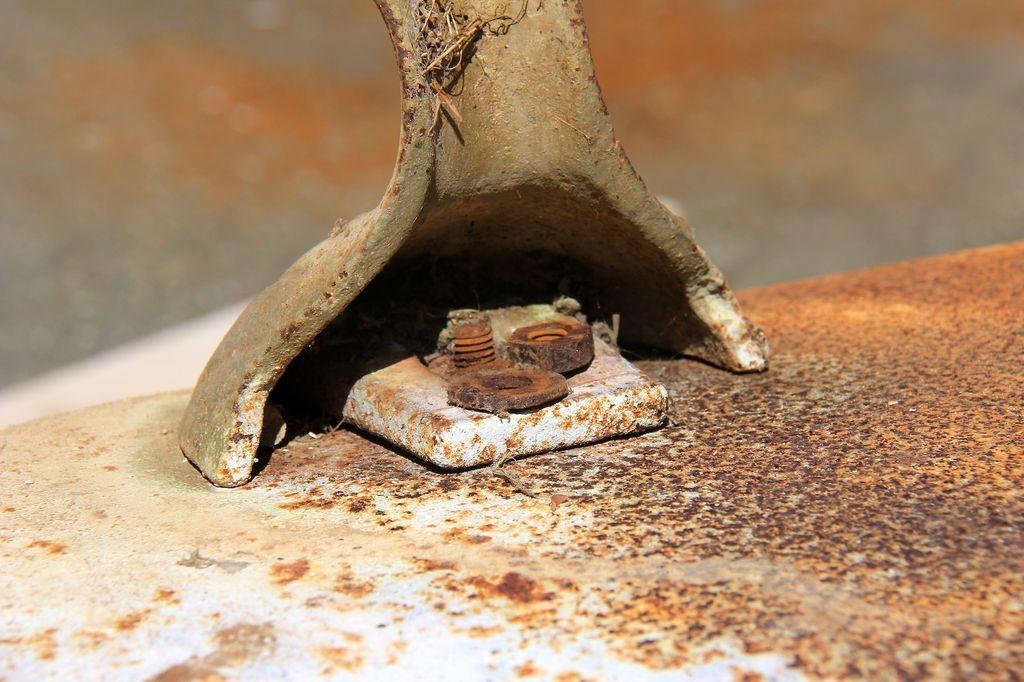
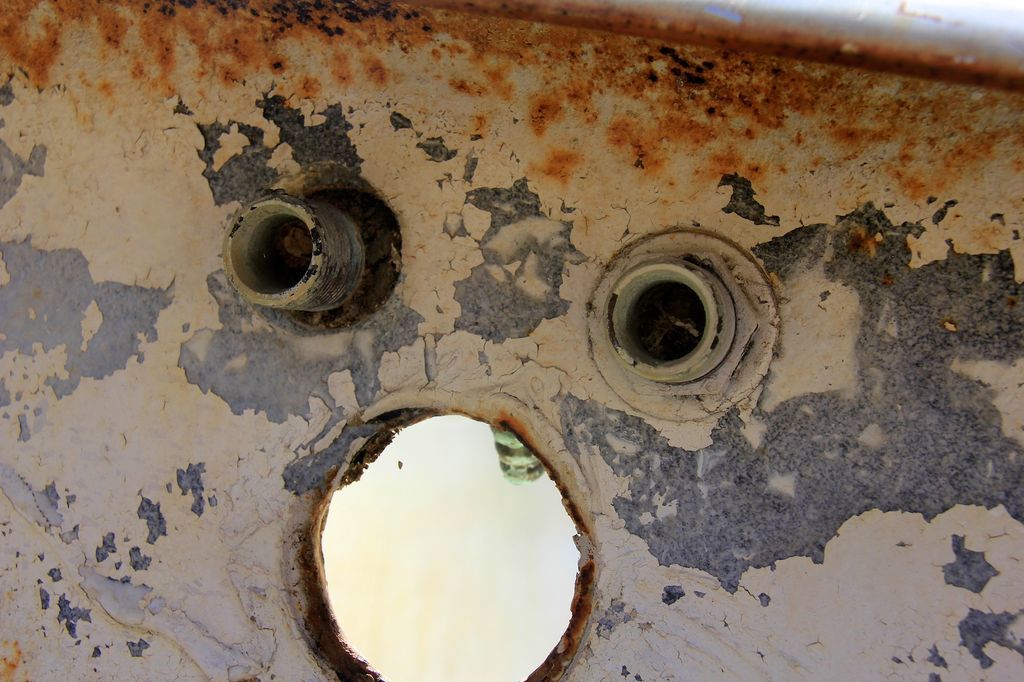
- Remove the rusted nuts and washers holding the claw feet to the tub.
- If any of the hardware or accessories are rusty, put them in a vice and hit them with a hammer.
- You don't really care about the condition of the nuts, they will be replaced later.
- Place the legs and accessories coming out of the tub to the side.
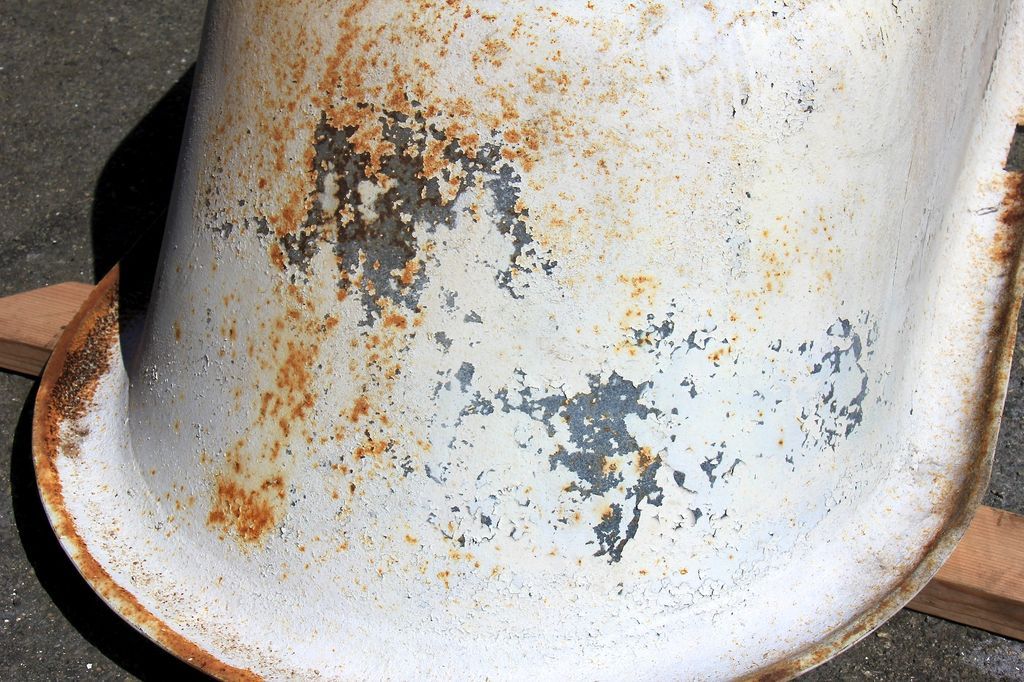
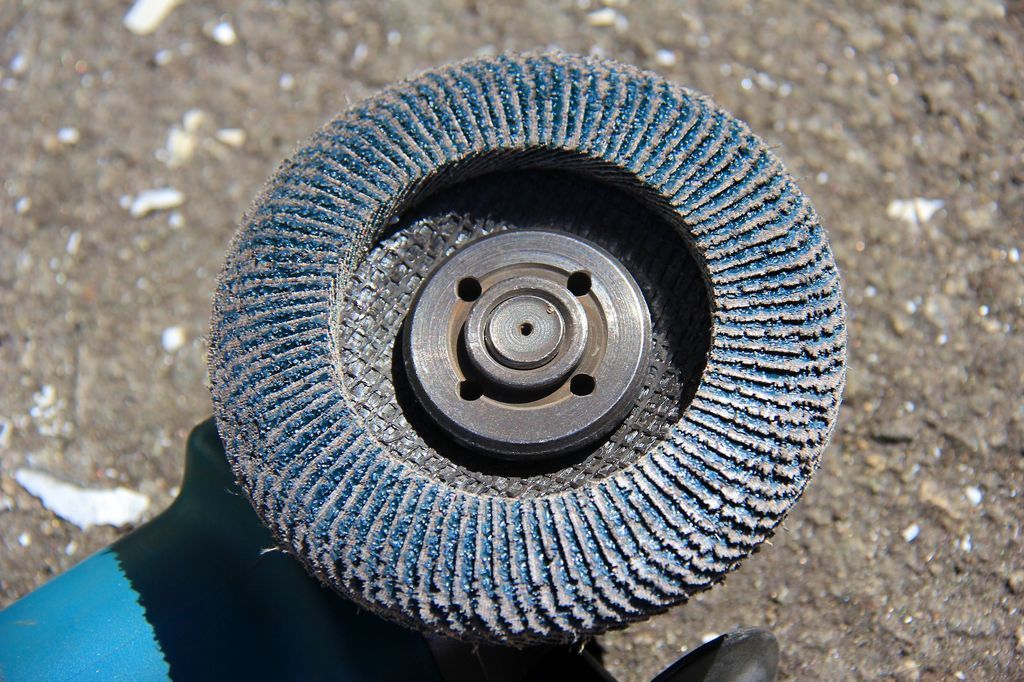
Step 5: Sandblast Out of Tub and Legs
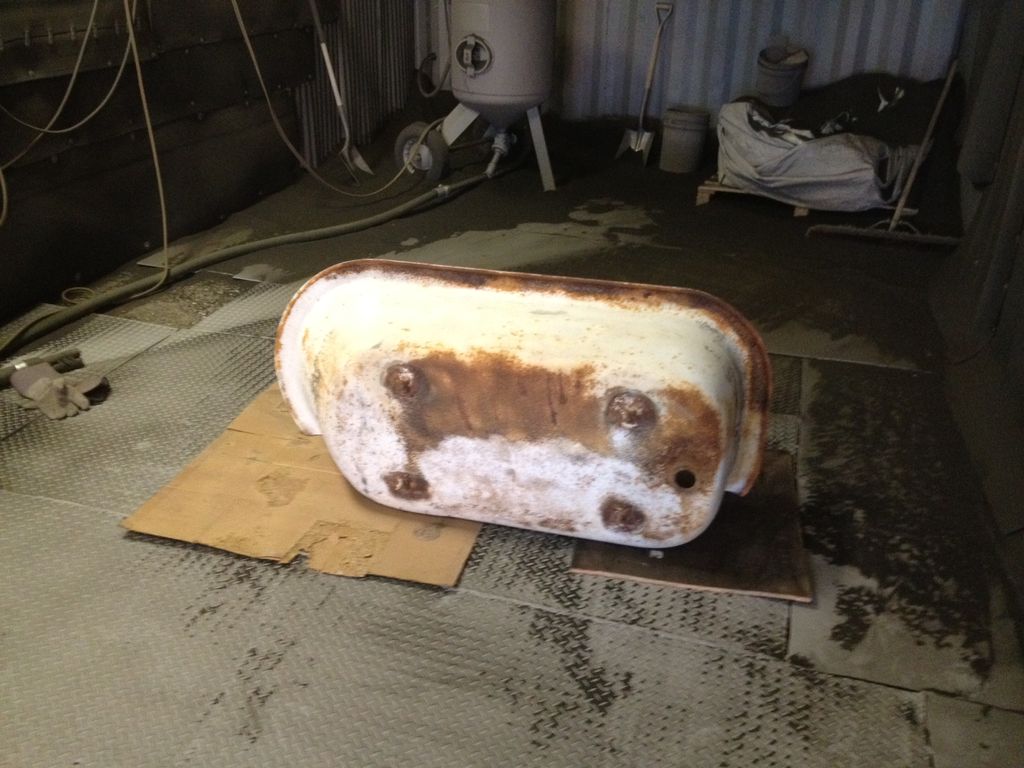
- Load the tub and claw feet into the car and take them to a sandblaster (or use your own if you have one).
- It was worth it, as removing all the paint and rust dust would take time and possibly expose me to lead paint dust.
- While lead paint can be adequately treated at home/store, I decided to avoid the hassle and leave it to the professionals.
- Sandblast only the outside of the tub and the legs. Not the inside!
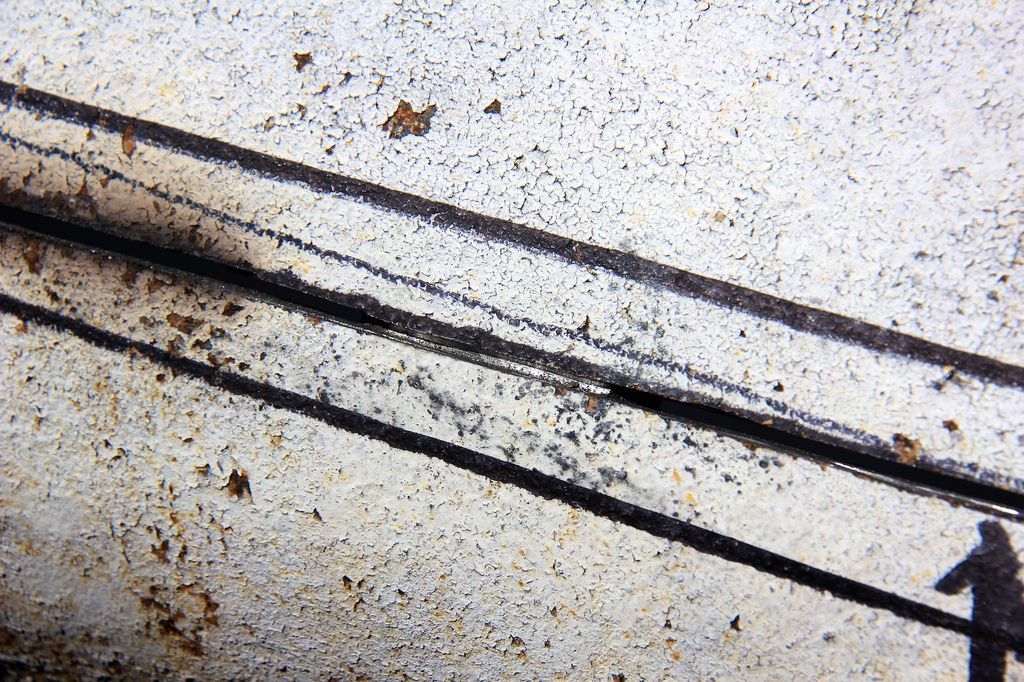
- Sandblasting the exterior removes all paint and corrosion on the outside of the tub. When you're ready, you should like the second photo below: a nice raw iron casting.
- Sandblasting the porcelain on the inside will remove the shiny glaze and expose the porous interior of the ceramic coating.
- This leaves a delicate bone-like finish, which although cool, is not appropriate for this application. I did this on a test piece to find out what would happen.
Note: Sandblast before cutting and sandblast only the exterior, not the interior porcelain lining.
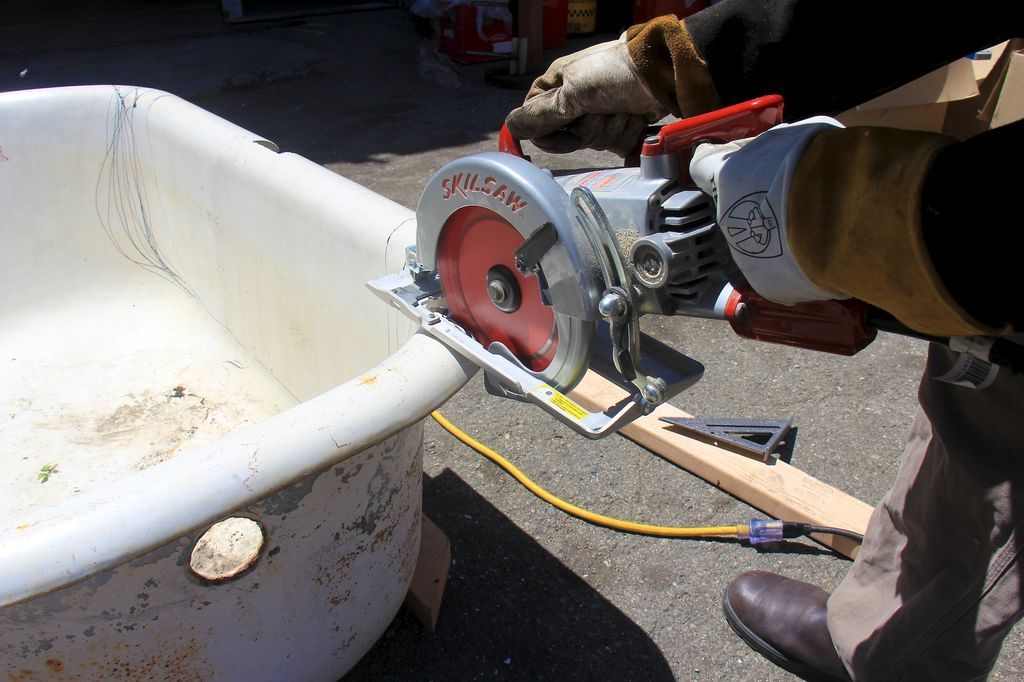
Step 6: Test Cut
- My first step in attacking this beast was to make a small test cut just to prove to myself that cast iron could, in fact, be cut.
- I have never cut cast iron before, let alone 3/8″ thick cast iron, much less curves composed of cast iron from a 100 year old bathtub!
- Cutting cast iron with a circular saw is intense, so wear heavy-duty pants, closed-toe shoes, a leather welding jacket, a face shield, a respirator, hearing protection, eye protection, and a hat or helmet to ensure the metal does not heat up
- Potatoes don't accidentally light your hair on fire.
- Fully protected, I slowly placed the saw blade in an area of the bathtub. I knew I was cutting to form the sofa, in case the worst and lowest happened, and now it's cut like butter!
- Inching across the cast iron, the saw blade cut a 1/8″ path spitting hot chunks of metal everywhere.
Note: Do not sweat when cutting cast iron.
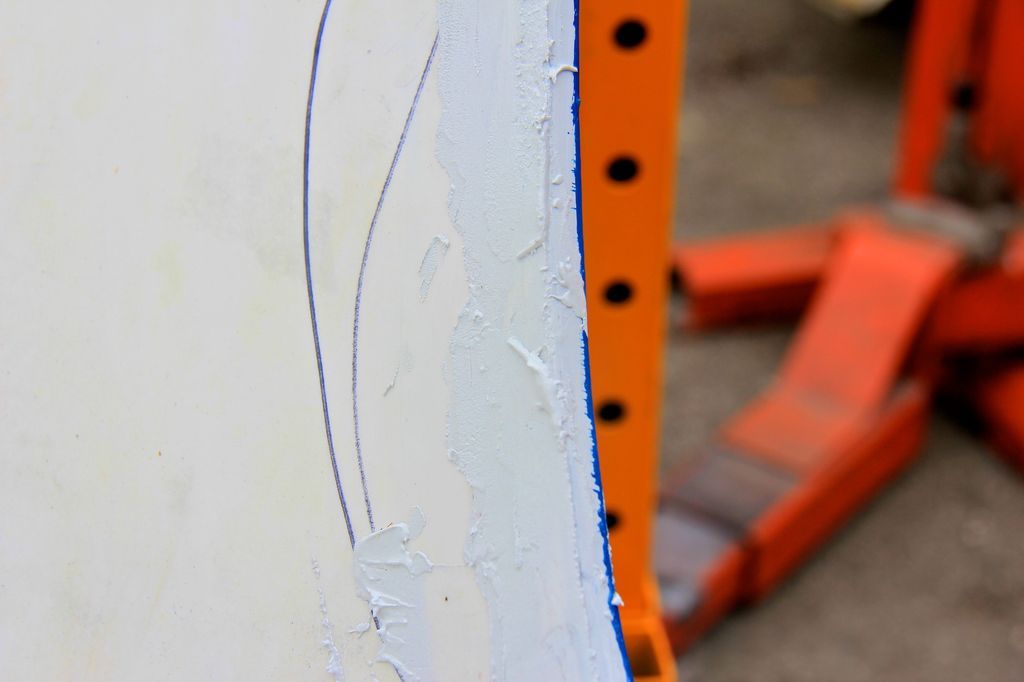
Step 7: Mark for cuts
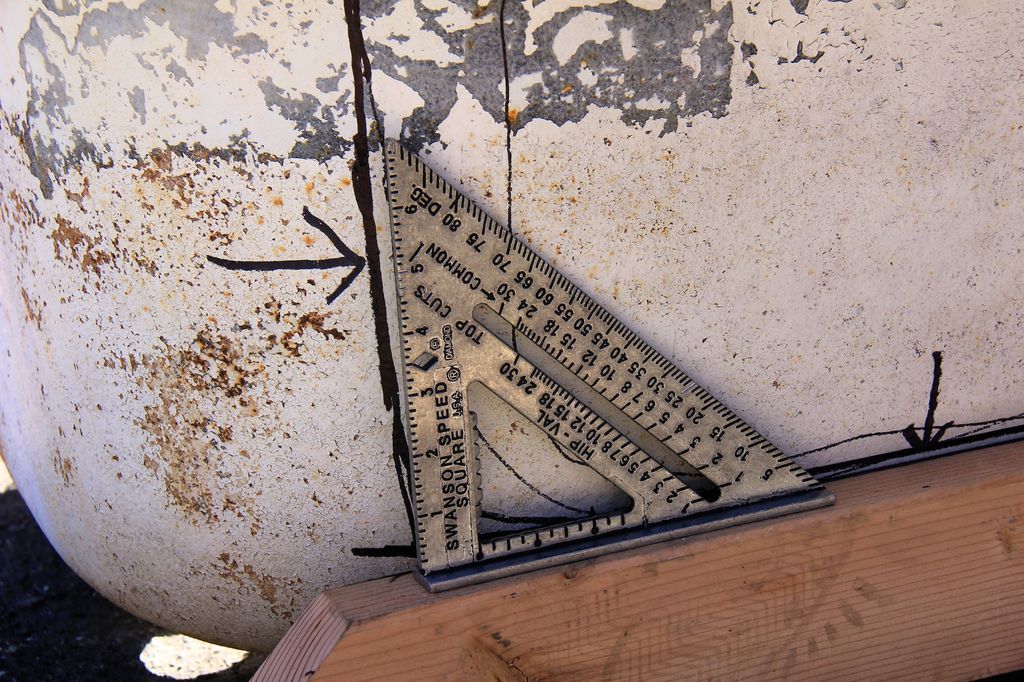
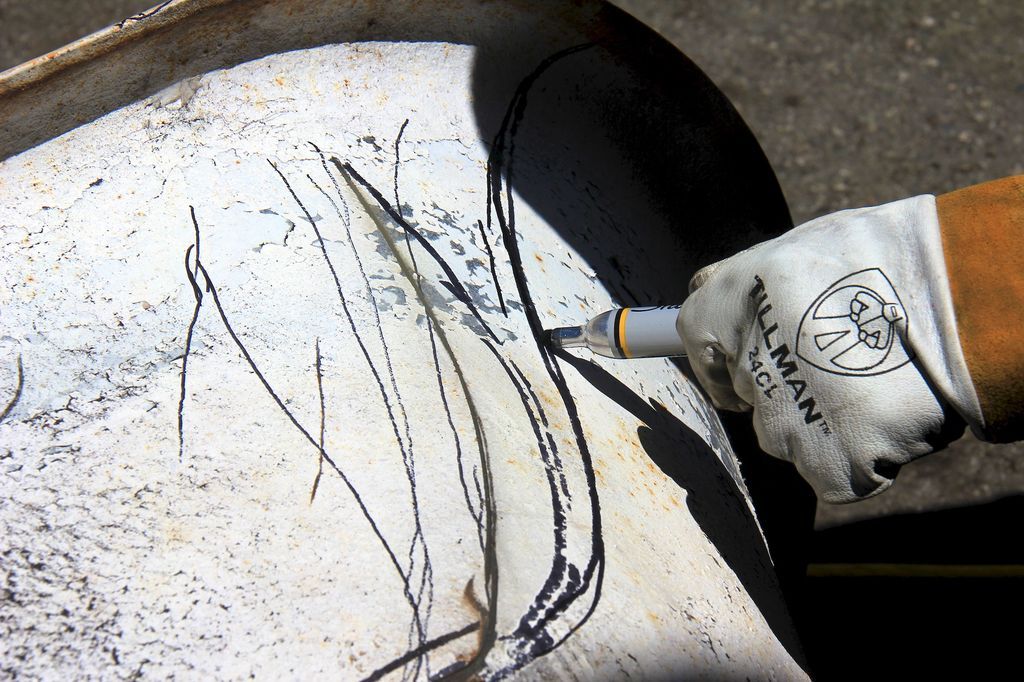
- I planned the cut like any good DIYer who can't draw to save his life would; I used a giant permanent marker and drew thick lines, line after line.
- Finally, I used a 2x4 as a straight edge and a square to make sure that at least part of my organic curves were aligned horizontally along the bottom straight and vertically along the sides.
- The overall cutout should allow two people to sit in the bathtub.
- You should be sure to cut one side of the tub low enough so that the remaining edge does not sink into the legs.
- Don't remove too much from the sides as you will lose the armrest and disrupt the nice sweeping curve that hooks around your back where it would normally rest on an uncut tub.
- Aside from these guidelines, the cut line is largely up to you.
- When I realized where I wanted to cut the line, I had so many lines drawn on the bathtub that I didn't know which were good and which were wrong.
Step 8: Protection
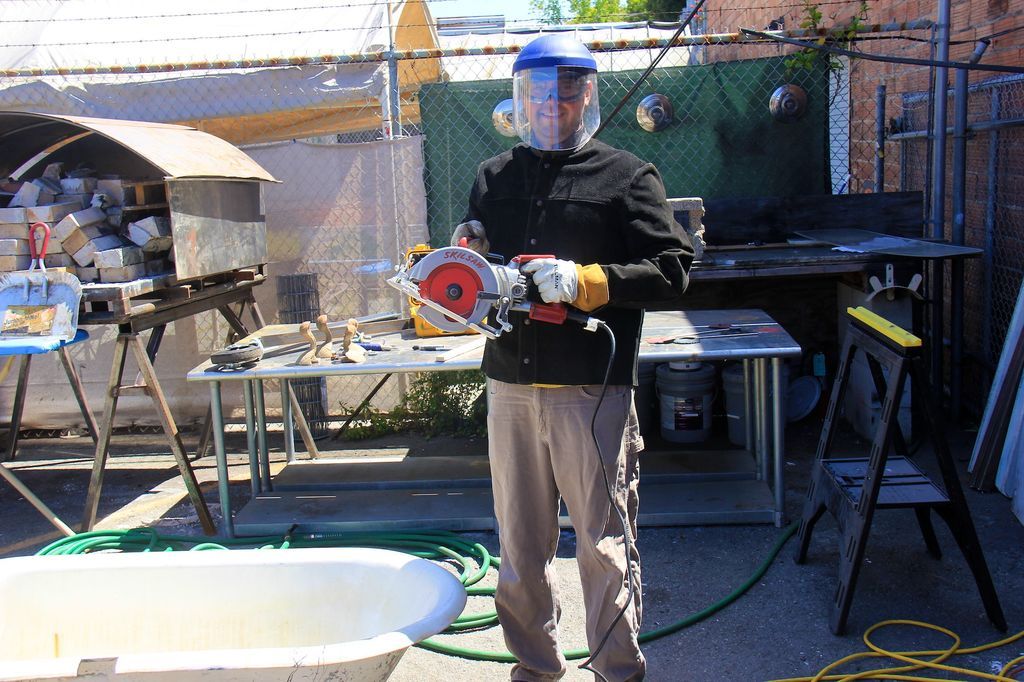
As I mentioned earlier in the test cutting step, be sure to wear full metal cutting safety equipment.
- Heavy work pants
- Boots
- Gloves
- Eye protection
- Face mask
- Hair protection
- Ear protection
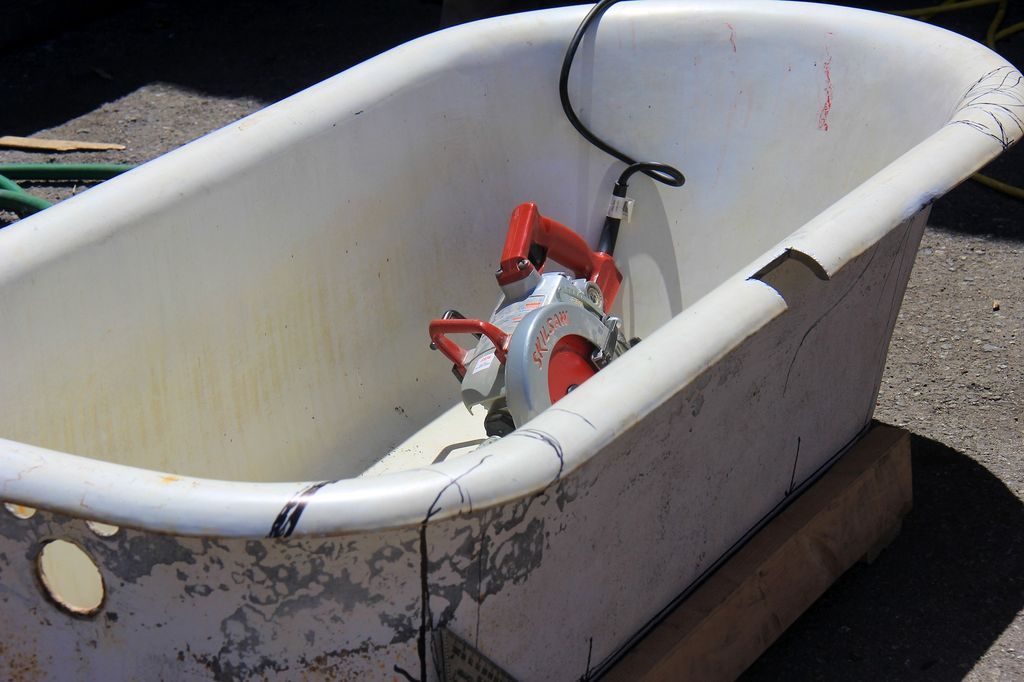
Step 9: Cutting Plan A
- Slowly run the saw along your cutting line and cut.
- For about 4 inches everything was fine.
- The saw cut like butter and I was making a big mess of metal dust everywhere.
- Then, I started having to push the circular harder and harder to make any progress on my cut.
- Then he barely moved and stopped really eating on the cast iron.
- The saw blade dulled very quickly when cutting through the tub, much faster than it normally would when cutting through steel.
- The problem (I suspect): the porcelain interior of the tub was too strong and abrasive for the sawtooth of the blade; It tarnished them unusually quickly making the circular saw cutting method ineffective.
- Much like a ceramic whetstone can put a razor edge on a steel knife at the proper angle, I suppose it can dull an edge pretty quickly when dragged across a head sharpened thousands and thousands of times.
- If I were to cut cast iron alone, without a porcelain coating, I think this method would work quite well and result in a nice smooth straight cut.
Note: Do not use ferrous cutting circular saw blades on porcelain coated metals.
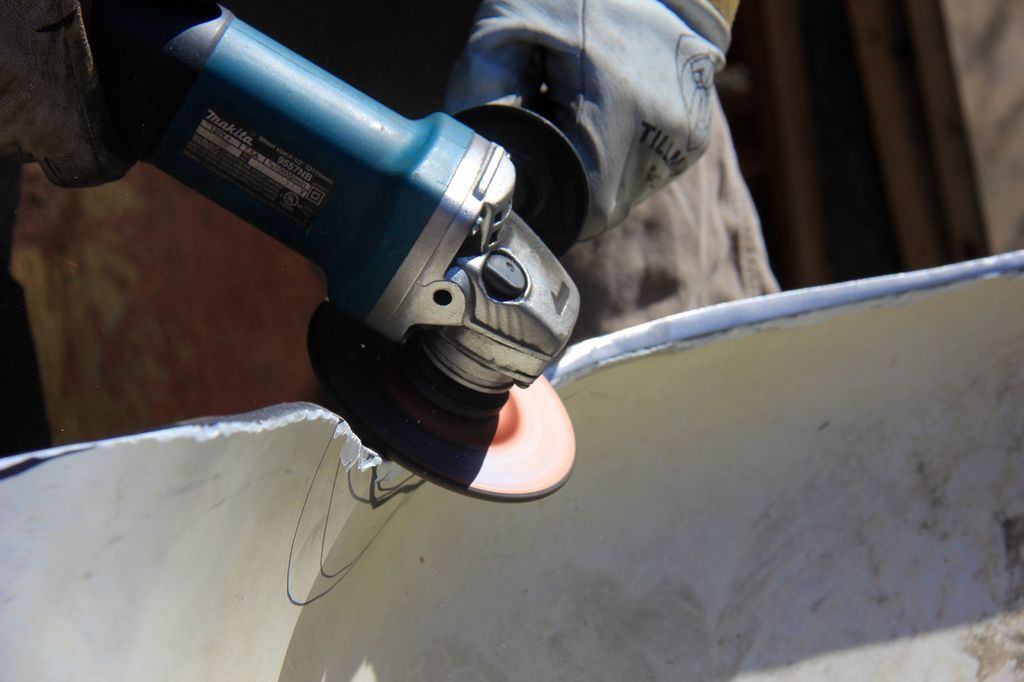
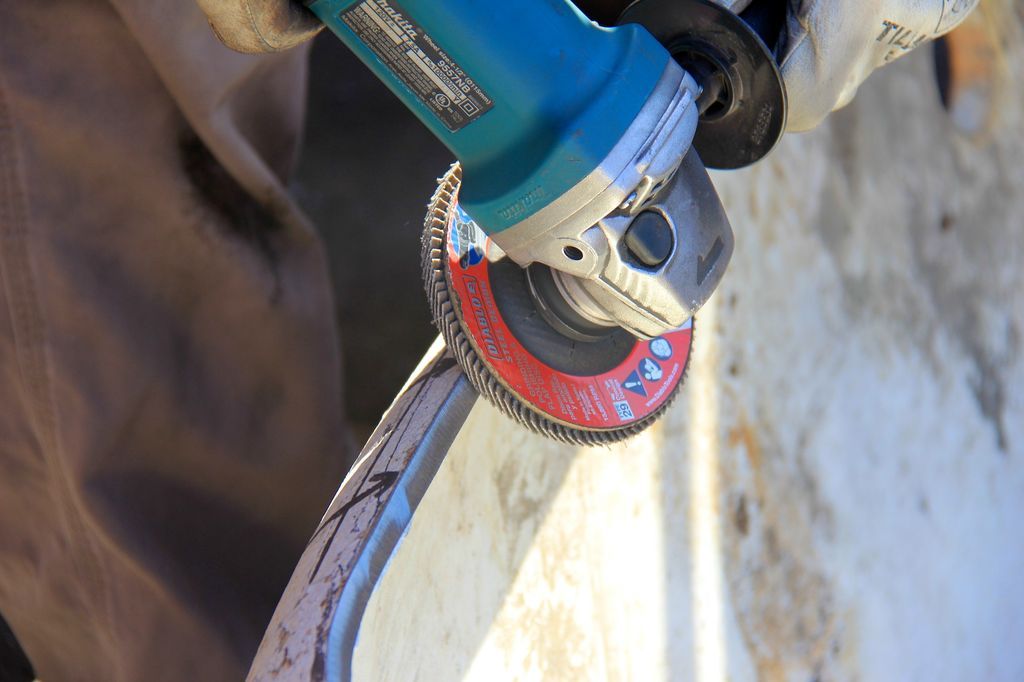
Step 10: Cutting Plan B
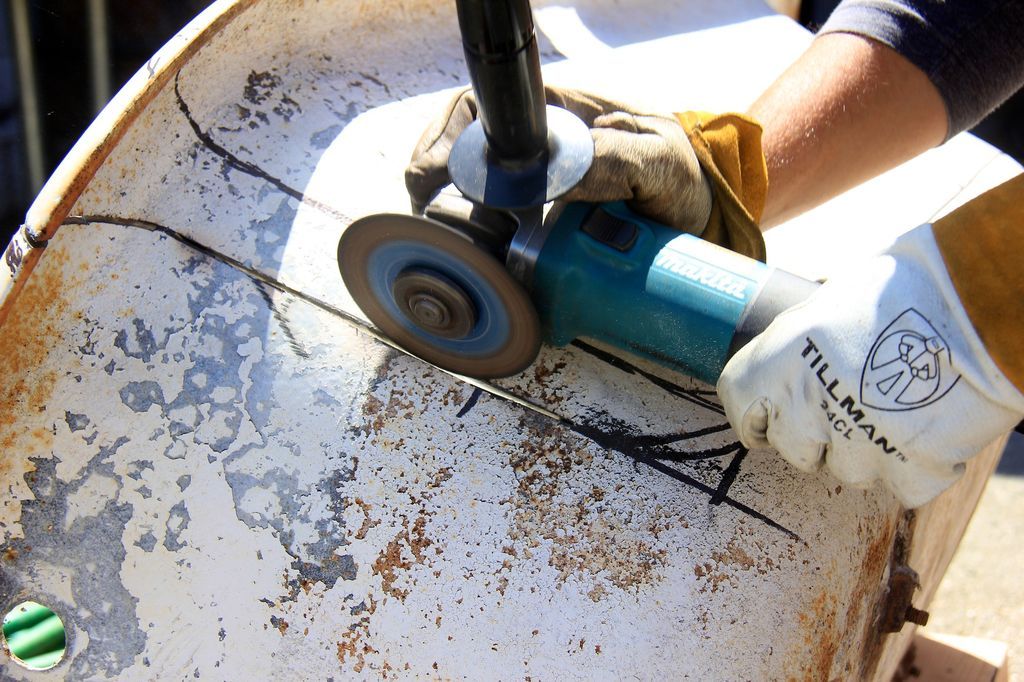
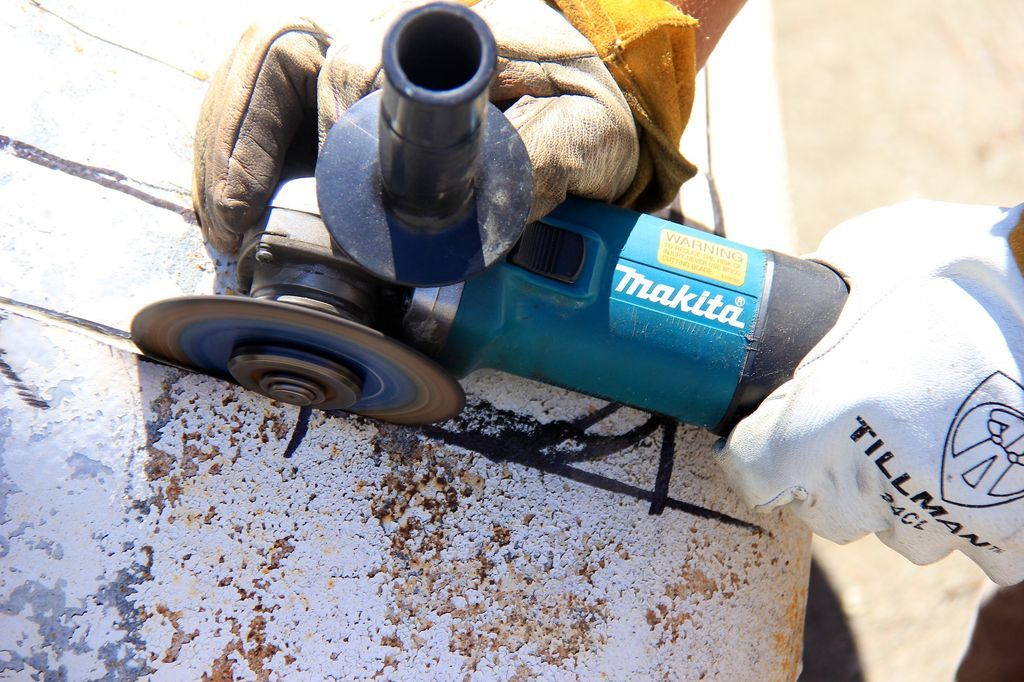
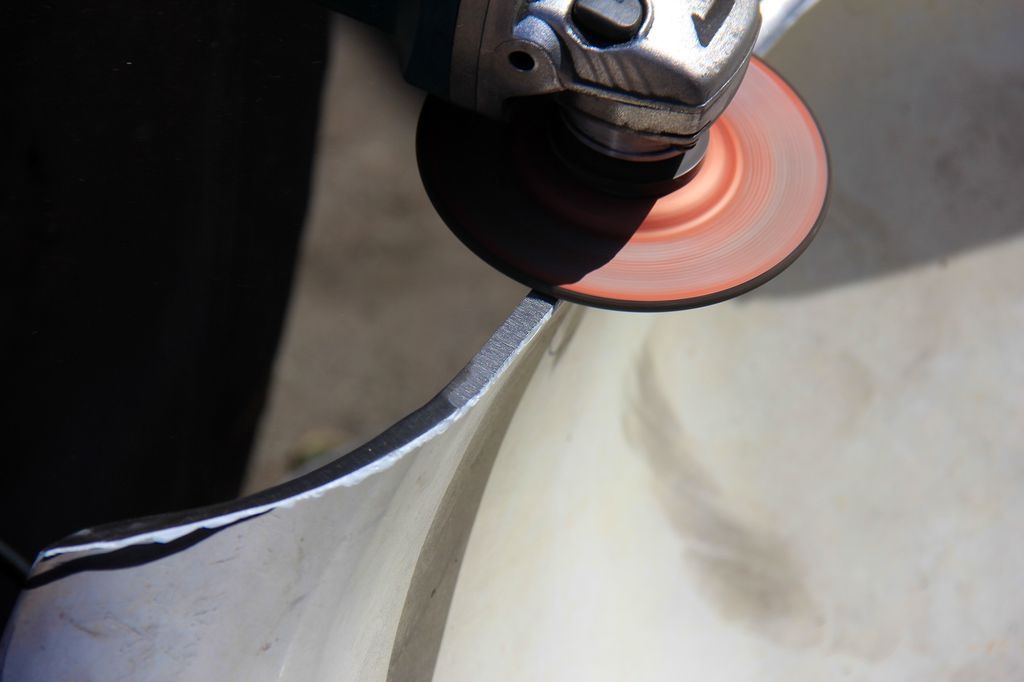
- The other method of cutting cast iron I wanted to try was the angle grinder loaded with a 5″ abrasive cutting wheel. This is a standard tool for cutting freehand curves in metal. I was worried about using it on something as thick as a cast iron tub.
- After ditching the leather jacket and hair guard (the angle grind is tame compared to the circular saw's ferrous blade setup) I slowly began to trace my cut lines with the edge of the angle grinder. Make a shallow pass at first to block the path.
- Then make deeper and deeper cuts with each pass until you have "removed" the cut. Once the cut is ridged, it will be easy to run the grinder deeper and deeper until you have cut to the other side.
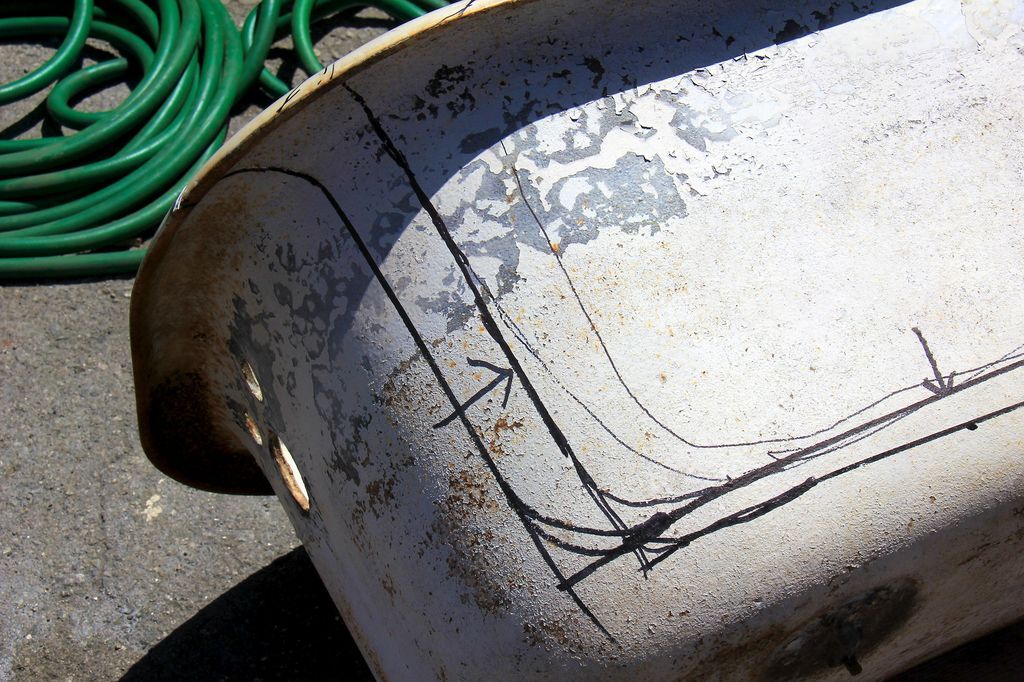
The angle grinder works very well for making this cut, except for the following two defects:
- Cut wheels don't last long. I used about 7 wheels to make the cut.
- The cut wheel can sometimes dislodge a large piece of porcelain adjacent to the cut line (see additional photo below), although I believe losing these pieces of porcelain is inevitable, it can be reduced by using the following technique: cut first with a masonry abrasive wheel through the porcelain until you have reached the cast iron. Then switch to the metal cutting disc and continue cutting. This will allow you to have more control when cutting the porcelain instead of what I did, which was more like pretending it wasn't there and treating it like steel.
Note:Use a masonry abrasive cutting wheel on the inside of the tub to first cut cleanly through the porcelain.
Then use a metal cutting wheel to cut the casting to avoid large chips.
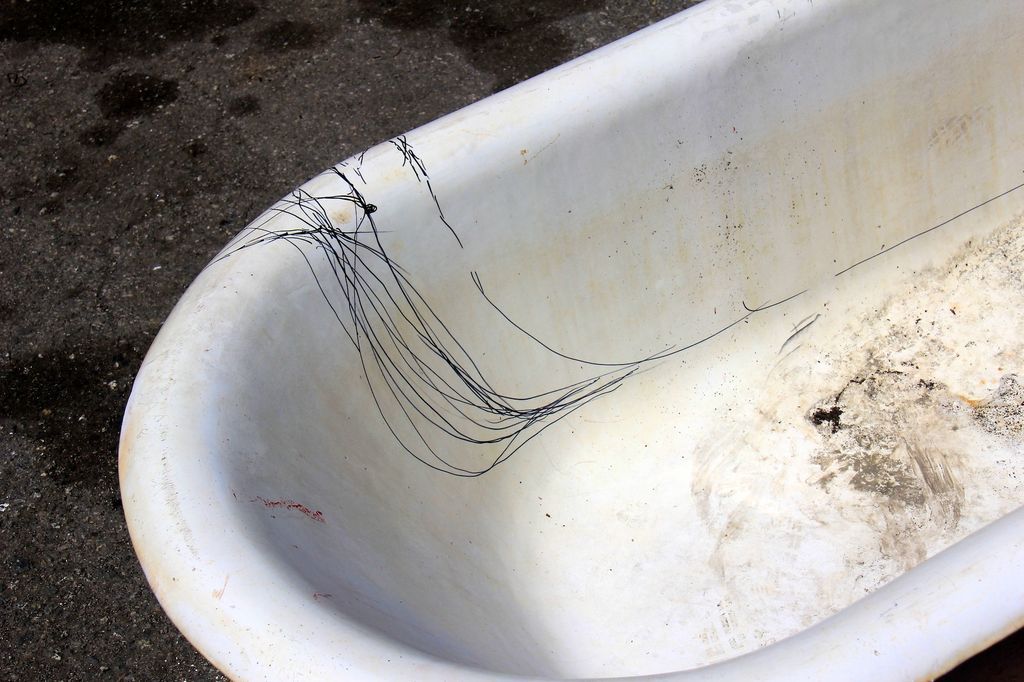
Step 11: Keep cutting

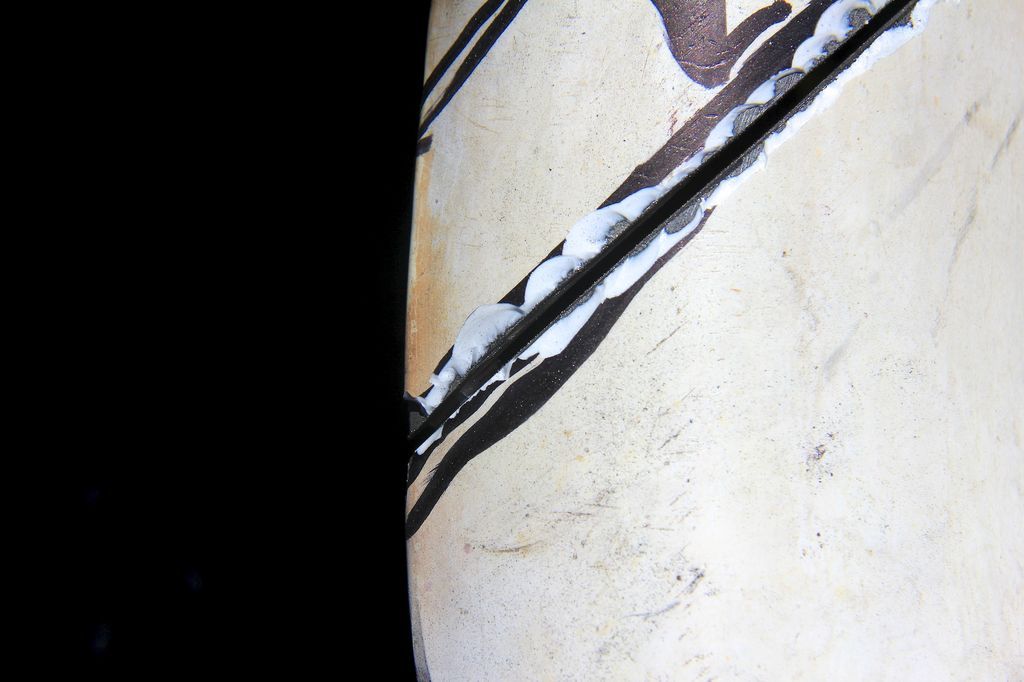
- Continue cutting the tub along your line. The minutes and hours will pass.
- The cutting discs will turn into dust. Replace worn discs, stay focused, keep cutting and drink water. Keep cutting!
- You have to treat it like a marathon, except don't have bare feet or pee in your pants!
- If you get porcelain chips flying like in the photos below, don't despair, we'll fix them later with a composite filler.
Step 12: Leave the eyelashes on
- As you go along the cut line on the tub, be sure to leave a few short cast iron tabs about 1″ long intact.
- I left three tabs in place along my cut line: two near the edges and one in the center of the cut to hold the panel in place until I was ready to remove it.
- You don't want the panel to "fall" when it's not ready to do so.
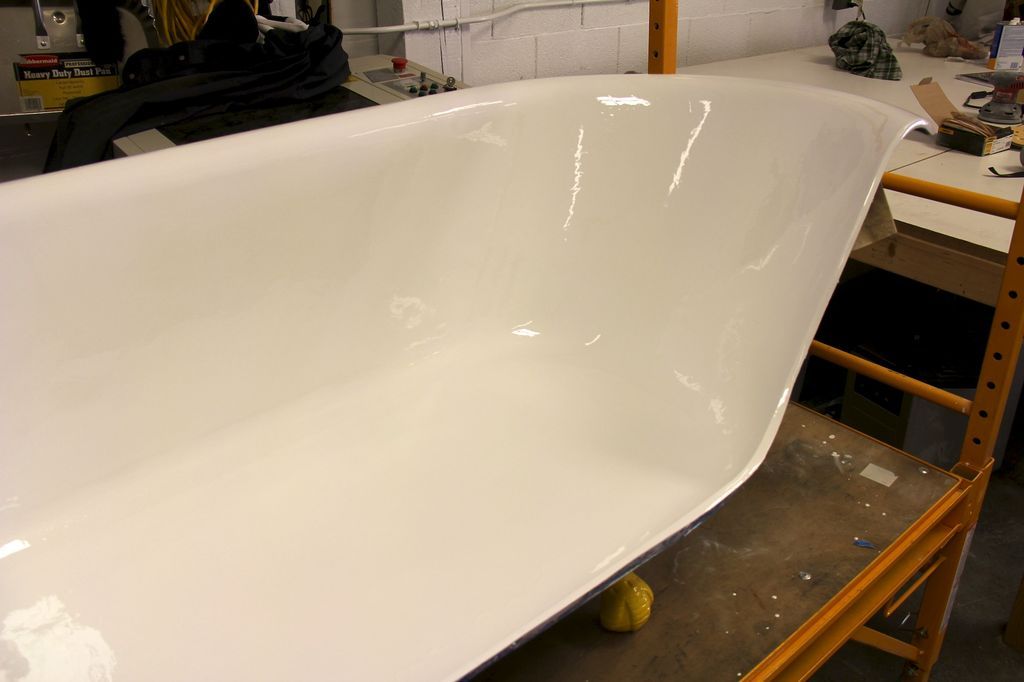
Step 13: Finish cutting and removing the panel
- Once you have cut everything except the tabs, have a friend or two hold the tub and cut them with the grinder while holding the panel in place so that the panel is removed in a controlled and slow manner.
- Even at just 1/8″ the overall size of the tub, the cut-out piece weighs about 60 pounds – cast iron!
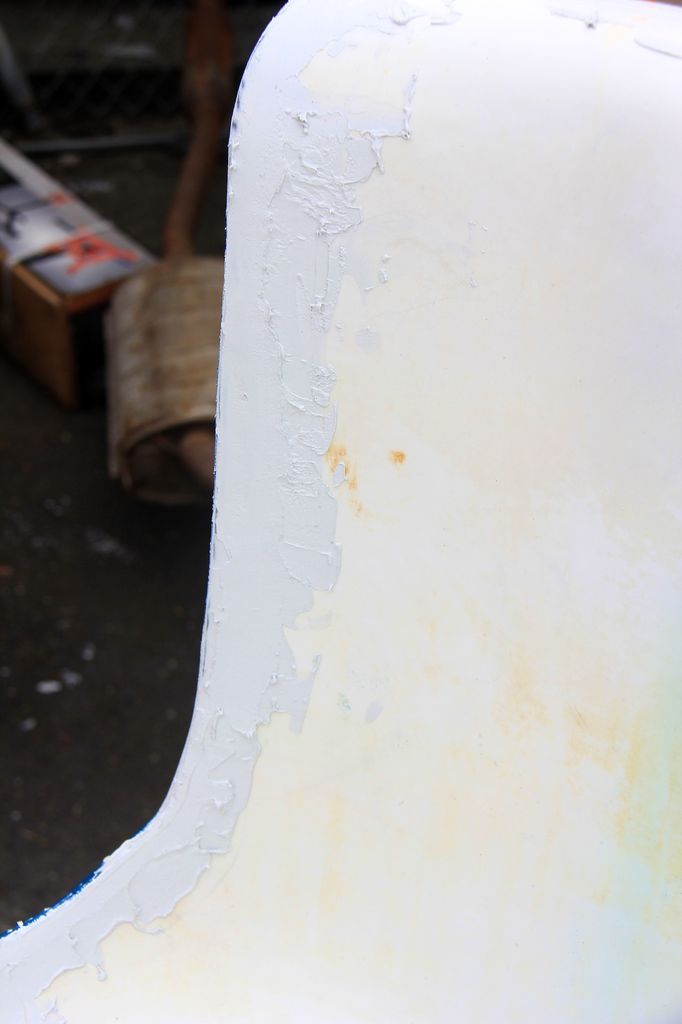
Step 14: Clean the edge with a grinding wheel
- Attach a standard grinding wheel to the angle grinder and clean up any inconsistencies along the cutting edge you just made.
- I did my best to join all the cuts together, but occasionally there is a slight lip between the sections, this step takes care of smoothing all that out.
- Be careful with the porcelain side of the cut and try not to make any additional chips or nicks.
Step 15: Clean the edge with a lint discjado
- A second pass over the cut edge with a sanding disc loaded on the angel grinder smoothes everything out even further.
Step 16: Prime outside of tub and legs
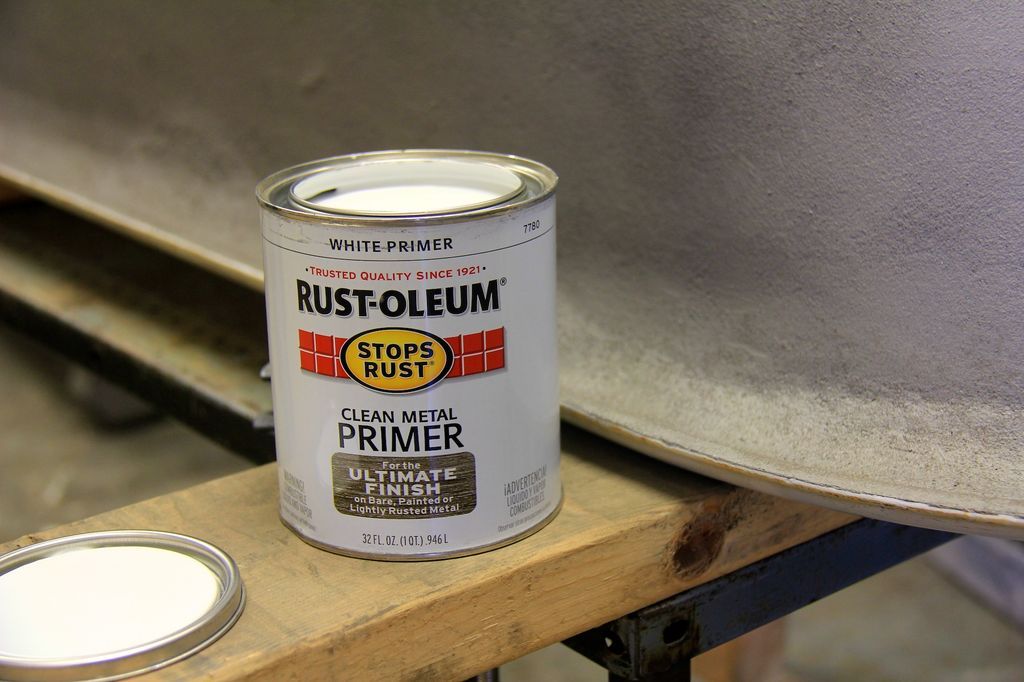
- If you haven't already sandblasted the outside of your tub (and hadn't already mentioned it in Step 5 "Sandblasting Outside of the Tub"), now is the time to sandblast the exterior and legs.
- Shortly after sandblasting, you'll want to put on a coat of primer to seal out moisture and corrosion from the cast iron.
- Being completely bare after blasting, it is particularly vulnerable to oxidation due to moisture.
- The primer protects against this and establishes a good base for colored top coats.
- I used Rustoleum Clean Metal Primer and a disposable chip brush to prime all sandblasted surfaces, including the outside of the tub (excluding the rim) and all 4 legs. The paint is thick and easily covers the porous tank.
- Paint over a smooth, even coat and allow to dry for the time recommended by the manufacturers.
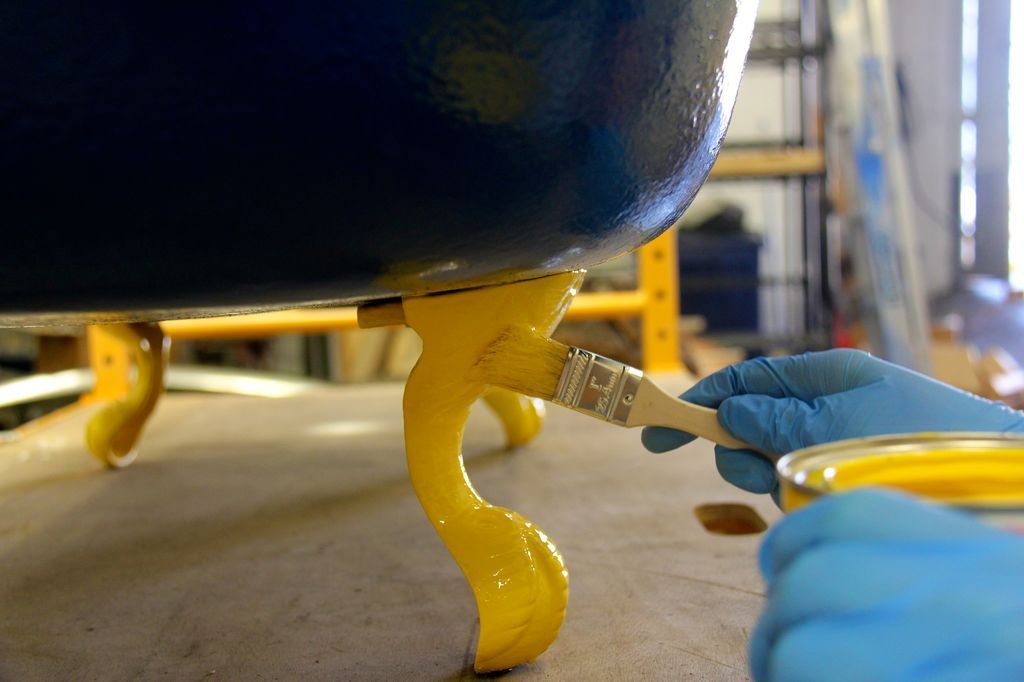
Step 17: Paint outside the tub and legs
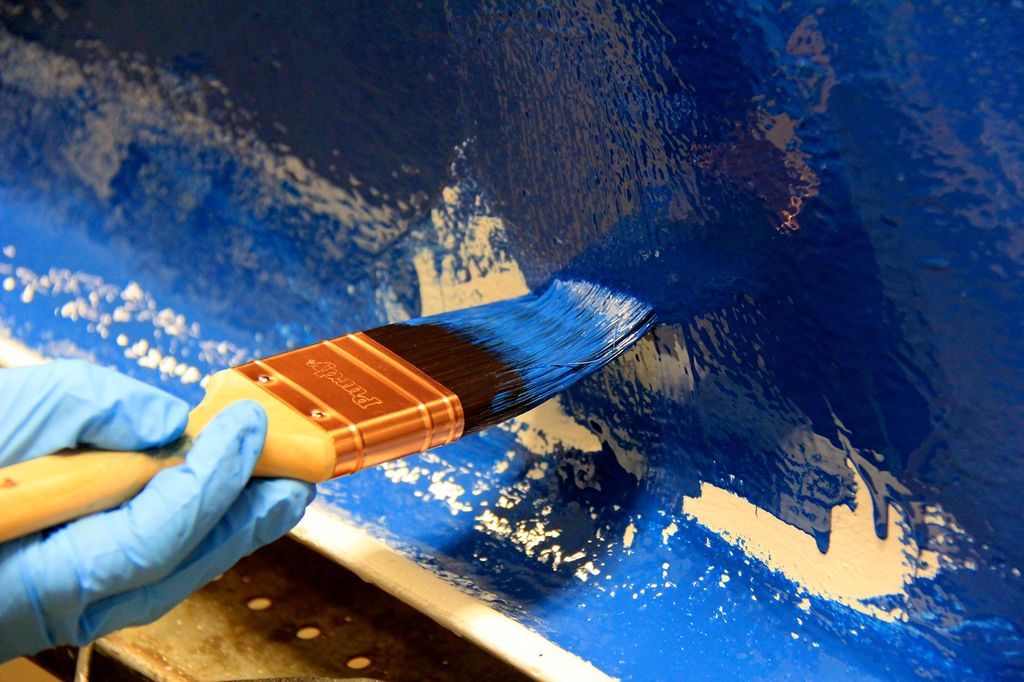
- Painting the outside of the bathtub is generally simple.
- I used Rustoleum enamel-based paints and high-quality brushes to get a nice, shiny, uniform coat.
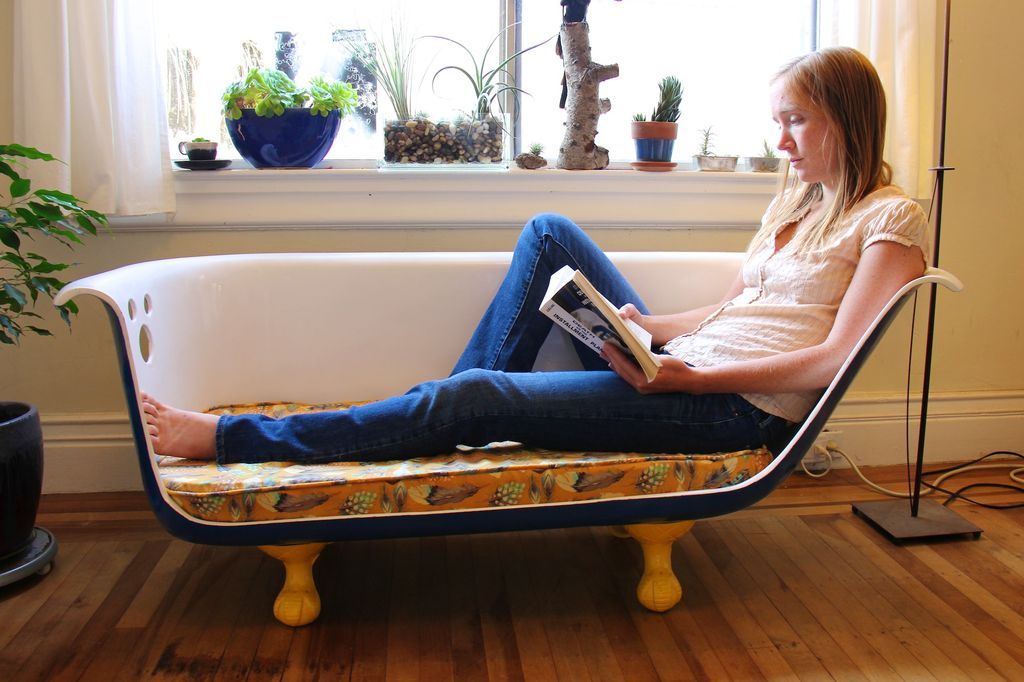
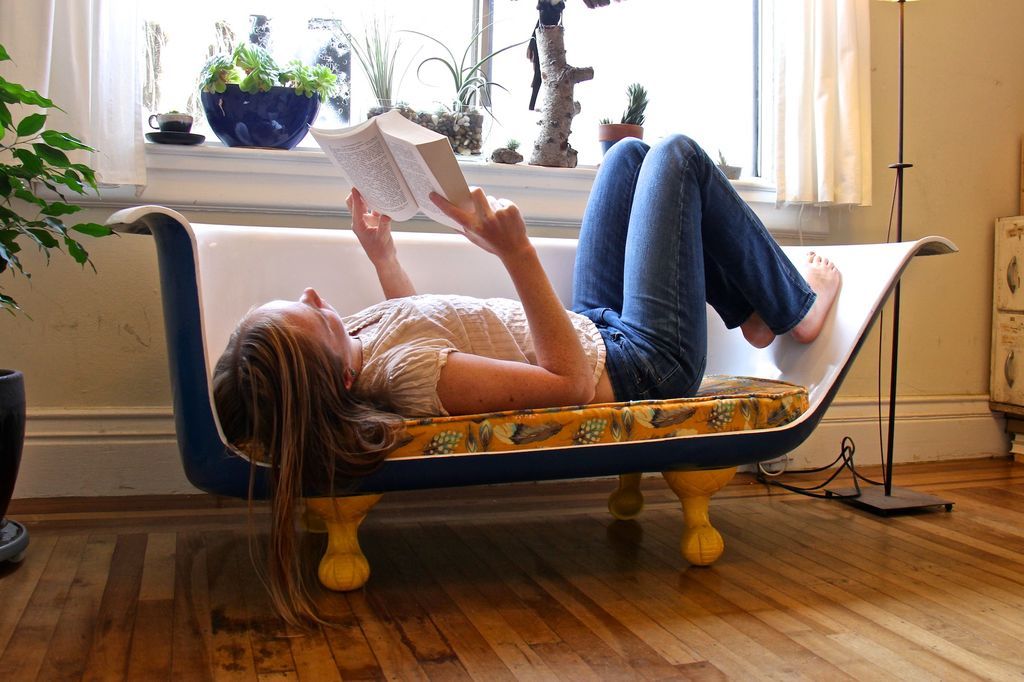
- I chose to paint the outside of the tub blue and the legs yellow.
- Contrasting colors make the bathtub really pop.
- People seem to really make a good color accent in this step from the other tubs I've seen, so create your own interesting combinations.
Step 18: Sand Outside of Tub and Legs


- Use a fine 220 or 400 grit sandpaper to sand between coats.
- If the paint is completely dry, you should not stick the sandpaper too much.
- If your paper is getting sticky, wait longer before sanding, or if you have wet/dry sandpaper on hand.
- Use a little water and try sanding the tub with water to help control paint dust.
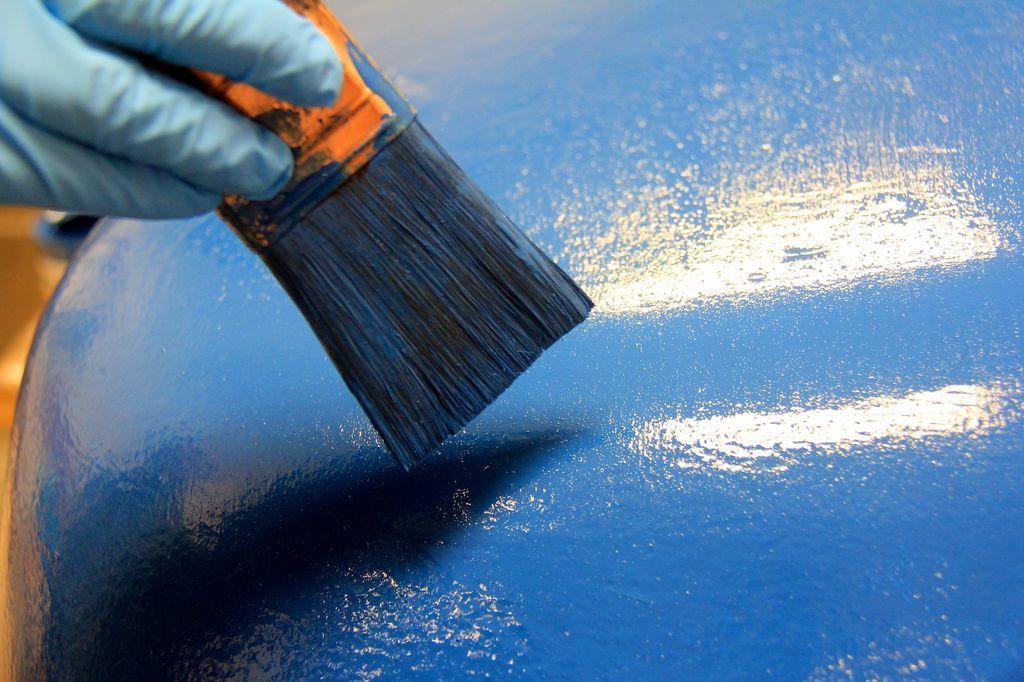
Step 19: Put the final coat of paint on the outside of the tub


- Brush on the final coat of paint and allow it to dry for the recommended time.
- When you're done, be sure to soak your brushes in a paint remover or brush cleaner:
- Dry polish can be a real pain to get off your brushes.
- The answer here is thin, even coats, if multiple coats are needed to get the depth of coverage you want, do multiple coats rather than painting one coat that is too thick.
Note: Do not rush the job and use several thin coats instead of one thick, loose coat.
Step 20: Reinstall the equipment

- Using new nuts and flange washers (the old ones I removed were badly rusted), reinstall the legs on the tub.
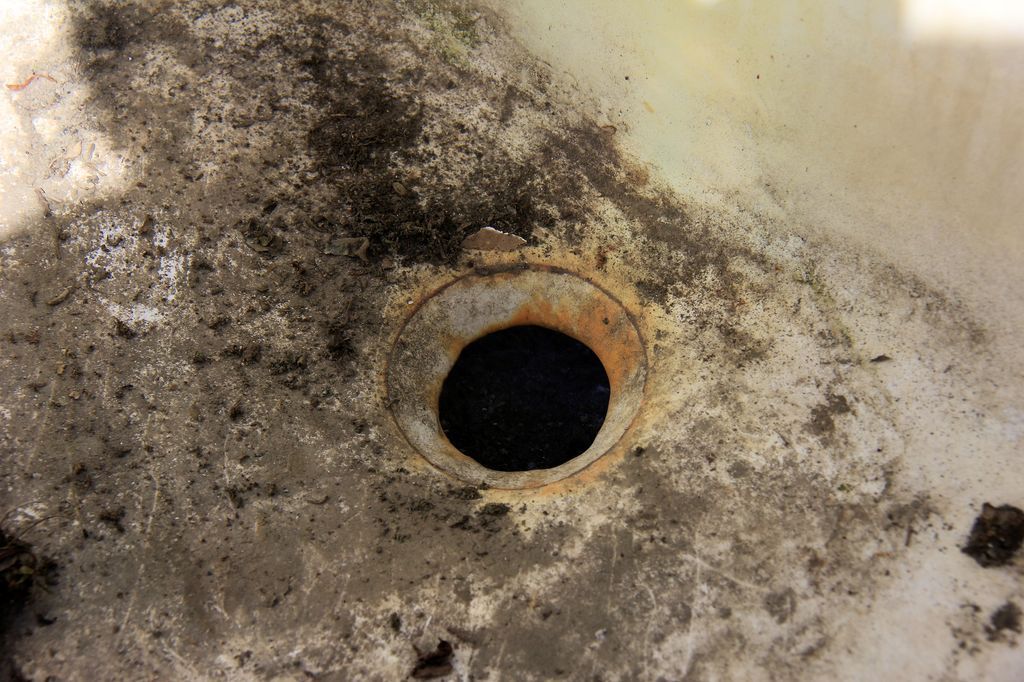
Step 21: Clean the inside of the bathtub
- The exterior of the clawfoot tub sofa should be complete. That's good. It's time to tackle the interior.
- Take the tub outside and use an abrasive cleaner andan abrasive pad to clean the inside of the bathtub.
- After a good dose of scrubbing, wash the inside of the tub with a hose - it conveniently drains through the drain hole!
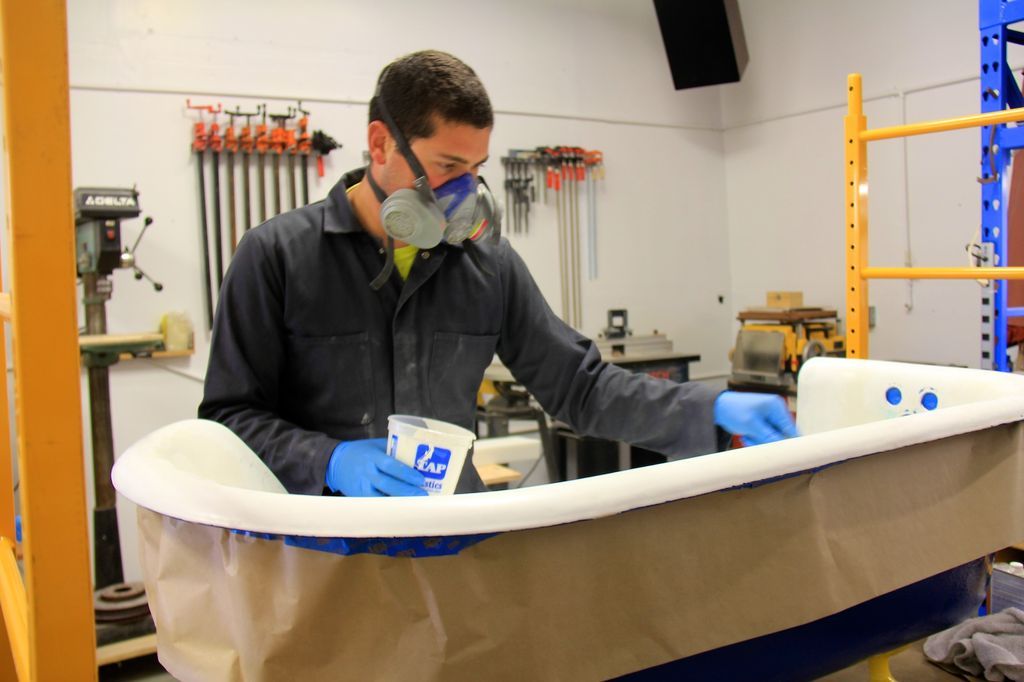
Step 22: Fill the edges of the cut inside the tub
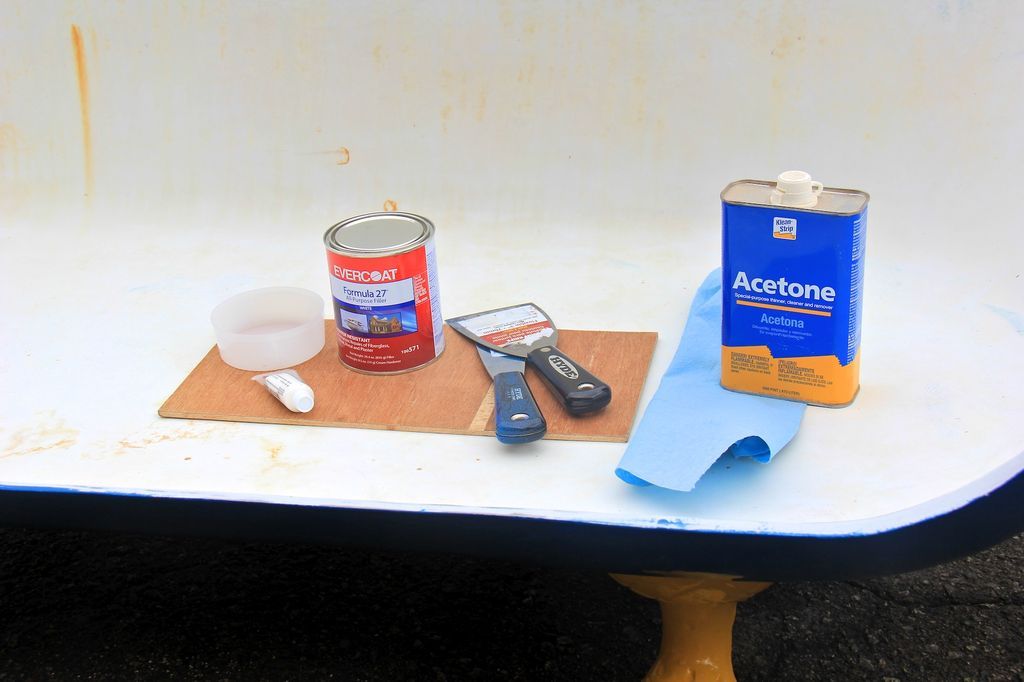
- It's time to deal with the porcelain traces that were created from the cut.
- Choose a two-part epoxy filler like Bondo (I'm using an epoxy called Evercoat in the picture below which is a little higher quality than bondo, but any epoxy filler will work) and follow the directions on the can to fill the holes.
- In essence, we are doing "body work" in the bathtub like you would do with a car after an accident.
- Mix the epoxy in small batches and apply it to the affected parts with a spatula.
- Working on the chipped edge of the bathtub is not the easiest thing to do.
- Place small amounts of filler only where chips occur rather than building up the entire edge.
- 99% of the filler will sand away once it's dry, so putting less in now means less work later.
- I didn't always follow this suggestion and ended up working more for myself.
- If the interior porcelain has any other marks or holes, now is the time to fill them.
Note: Only use filler where chips occur and resist the temptation to spread it in a thick layer and completely rebuild the edge of the tub.
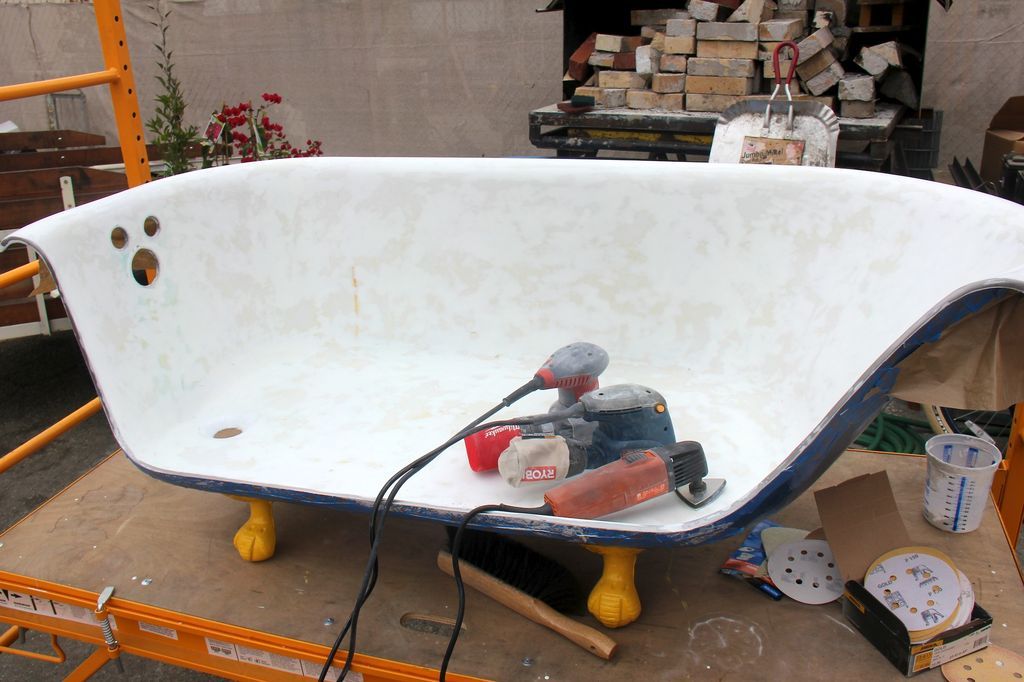
Step 23: Sanding and preparation inside the tub
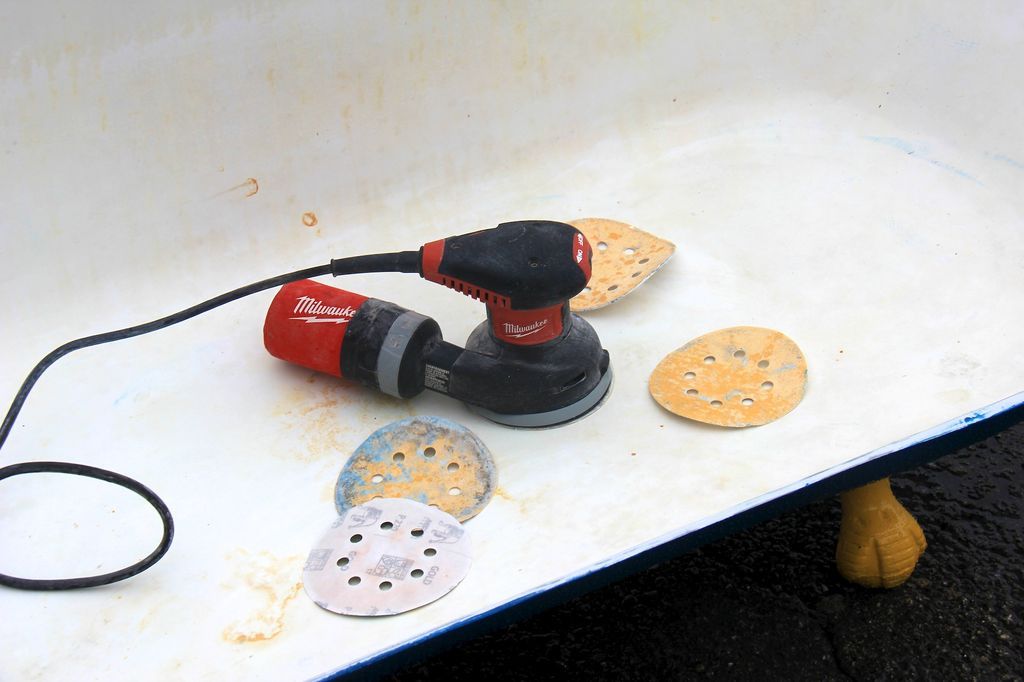
- There are a few more steps before painting the inside of the bathtub. With the porcelain chips and pit marks filled, it's time to sand the epoxy filler and smooth the inside of the tub.
- I did this with a random orbital sander and lots of 120 grit sanding discs.
- Remember to wear a dust mask and work outside if you can.
- Sanding the inside of the tub creates a smooth surface for the interior paint to adhere to.
Step 24: Tape Edges and Tub Holes

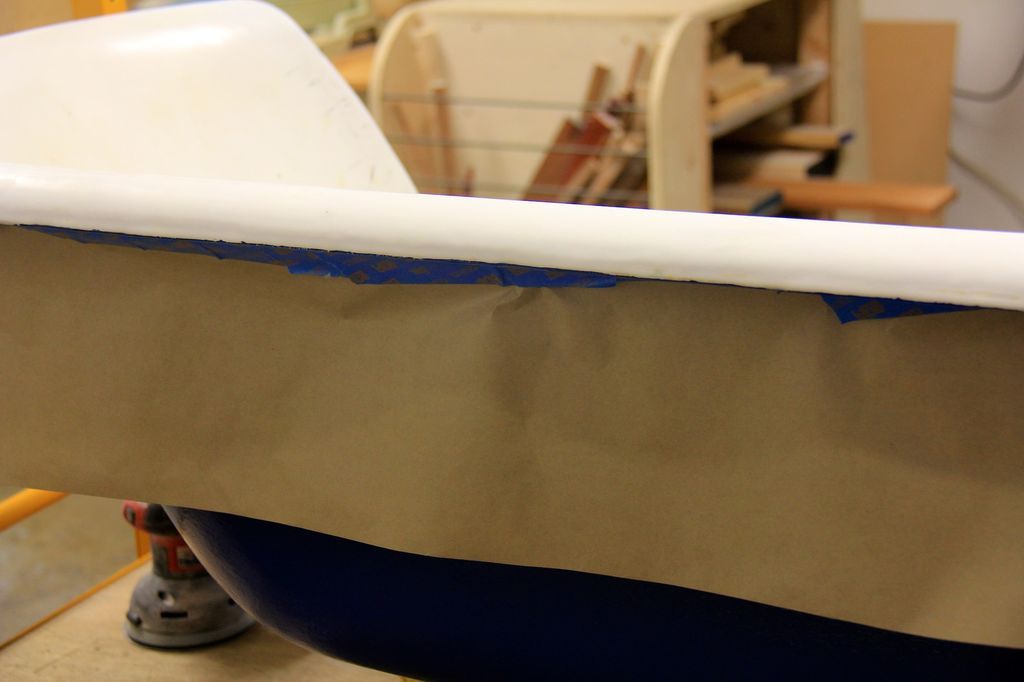

- Before painting the inside of the tub, use the highest quality paint tape you can find to cover the edge of the tub and empty any holes so the inner layer of paint doesn't accidentally splatter or drip onto the freshly painted outer layer.
- I used a roll of brown paper in certain areas that were prone to dripping to offer added protection.
- Mask the outside of the tub as best as possible. You may have to retouch the outside layer a bit once the inside is painted just because it's hard to paint perfectly.
- I certainly can't and it's not difficult to retouch the exterior paint job.
Step 25: Interior Finish Choices
Porcelain
- Ideally, when making a claw-shaped bathroom sofa, I would have liked to turn the tub to porcelain.
- This is, of course, the most expensive option and involves shipping the tub and using a hired professional to tear down the pre-existing porcelain and repaint the tub with new porcelain using a kiln.
- This process is not available everywhere, but professionals offer the service in some locations.
- This method would create the same glossy finish that is most likely on your actual bathroom fixtures.
- There is no substitute for porcelain as it is basically melted and cooled glass, so any painted finish will simply be an approximation.
- That said, we are making a sofa out of the bathtub, this is all an approximation!
Rpowder coating
- The next option is powder coating.
- Now, no one I talked to really knows how well a coat of sprayed powder paint will adhere to sandblasted porcelain.
- While I found powder coatings that were willing to attempt to repaint the tub, there was apprehension and I was warned that the finish could crack on the sandblasted ceramic sublayer beneath the tub's glossy porcelain top layer.
- Although I was excited to try this method because 1) it meant I could do less work and hand the finishing process over to a professional, and 2) it would result in a very good long-lasting finish for the tub, since powder coating is industrial grade.
- The finish used on steel in many wear applications, I did not go this route for fear of cracking of the finish and the added cost of having it done by a professional.
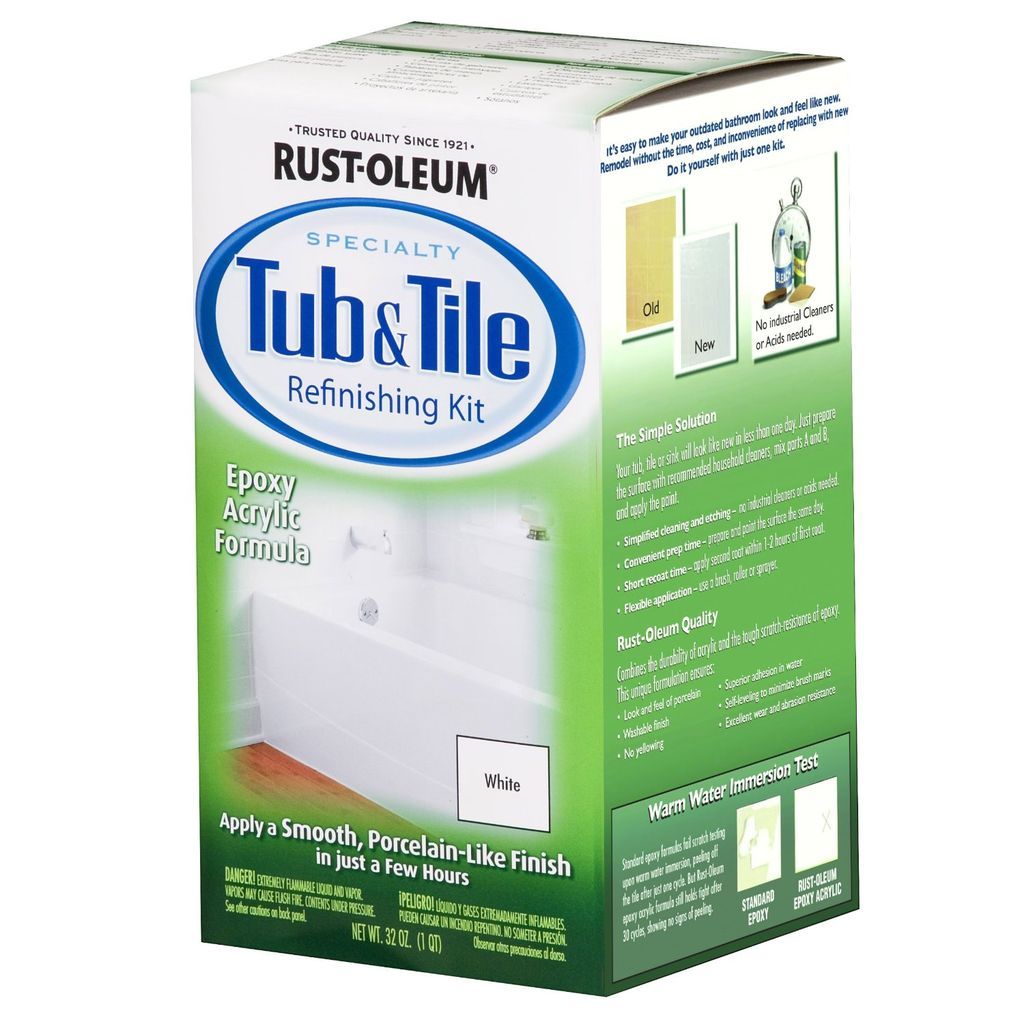
DIY Tub Finishing Kit
- There are actually some epoxy-based DIY kits for people who want to renovate their tubs.
- Some are inexpensive, like the Rustoleum Tub and Tile Finish Kit, and others are more expensive and include acid etchants that must be used before applying the top coat of paint.
- All of the kits seem to have a lot of controversy swirling around them, with results varying across the map.
- It seems that if you use the kit correctly, you can actually refinish your tub for a fraction of the cost of what a professional would charge to come in and do a similar process. Others seemed to have endless problems with cracking, dripping and clogging over time and warned against "doing it yourself" loud and clear.
- Two-part epoxy primer with a high-quality gloss polyurethane topcoat
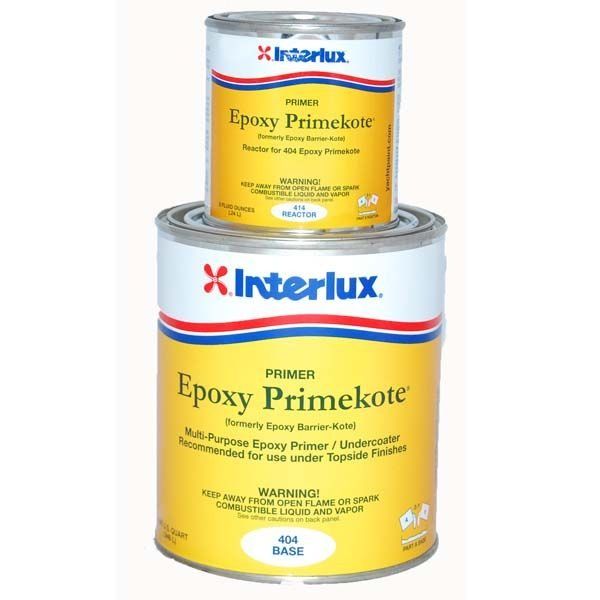
- Using the basic knowledge I have of enamel paints and talking to some experts in the field, I decided to take my own approach and use a two-part epoxy base and high-gloss polyurethane top coat from Interlux.
- I used Interlux Epoxy PrimeKote as a primer.
- It sands reasonably well, dries ultra hard and most importantly does not require acid etching before application.
- For the final interior bright white coat, I chose the marine paint.
- If you haven't used a high quality paint like this before you are in for a pleasant surprise.
- Even though they cost 3 to 4 times more than the standard enamel paints I used outside, when you need a quality finish, it makes a big difference.
- If I ever have to paint something that needs to last, I'm going to use marine grade paint like this.
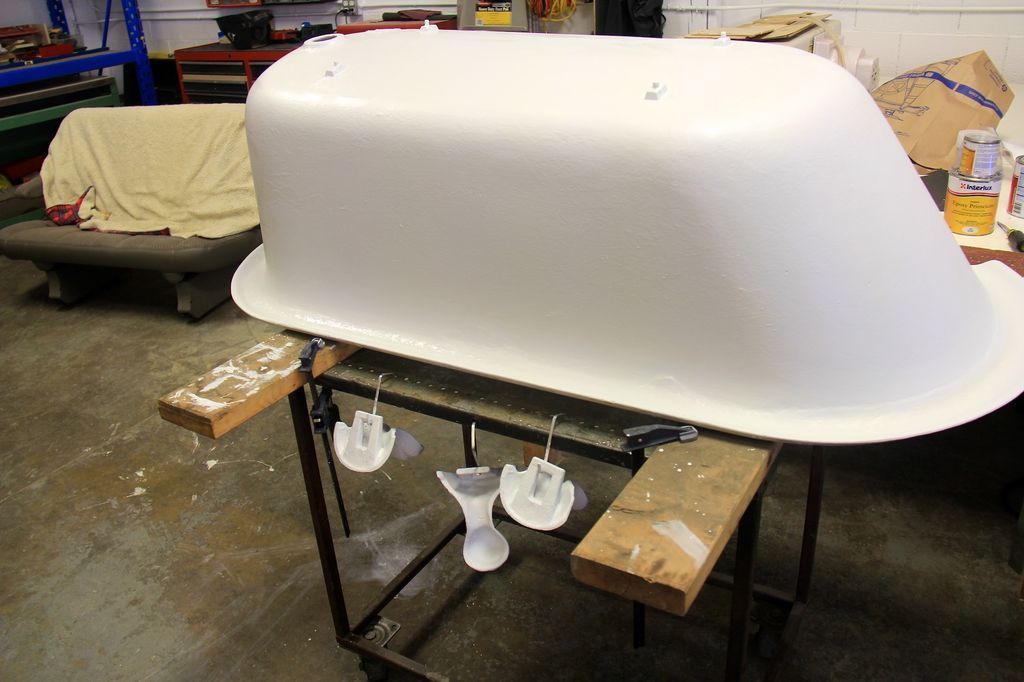
Step 26: Paint inside the tub
- These things will kill your brain cells in an instant, so make sure you wear a respirator and ideally paint in a well-ventilated area.
- I didn't want the dust from the patio in my workshop to get into the paint, so I didn't paint outside, but I had the roll-up door open and all the exhaust fans running.
- It would be great to have a spray booth for this step. The fumes are intense!
- Brush on an even coat of the primer making sure there are no large drips or drips. Better to put it a little thin and then too thick.
- That's a painting lesson I need to remember again and again.
- This was a "lesson learned" in a previous step, I don't think I learned it very well...
Step 27: Sand all surfaces
- Armed with a wide variety of sanders, I set out to sand all the surfaces on the inside of the tub. Sand with 120 grit pads first to remove any high spots, then 220 to smooth everything out.
- Wear a respirator for this step and definitely do it outside. It will be very dusty.
- This step takes some time, but it is worth it, as it is the only way to guarantee an absolutely uniform and smooth surface for applying the top coat.
- Don't worry if you sand through the epoxy top coat to the porcelain in some places, the polyurethane paint is good and will adhere well to either surface.
Step 28: Paint inside the tub
- The time has finally come! Open the can of Interlux Gloss White Brightside polyurethane paint and follow the instructions to thin it with your expensive brush-on thinner, and paint it on the inside of the tub or spray it with an HVLP gun and blow dry compressed air.
- Paint in two coats of the top coat, allowing the paint to dry for the time specified by the manufacturers, doing very light sanding with 400 grit sandpaper between coats.
- The finish that results from Interlux Brightside paint is considerably better than what I would have expected from a standard enamel paint.
- The paint was more expensive and certainly harder to work with, as it had to be thinned before you could brush it well, but in the end it gave a finish that you had to look hard at to notice it wasn't. 'Not porcelain, just look at that shine!
Step 29: Remove tape and retouch
- Remove all the painters tape and check all its edges.
- If any white paint has bled through the edge of the tape (which happened in a few spots along the edge despite my best taping efforts), repeat any drips with blue or yellow Rustoleum enamel paint and a detail brush as necessary.
- The touch ups on the tub were quick and any imperfections I had created through washing, sanding and interior painting were quickly addressed.
- It is easier to touch up the outside than the inside.
- That's why I think it's best to paint the outside first, then come back to it and only have to deal with the inside once.
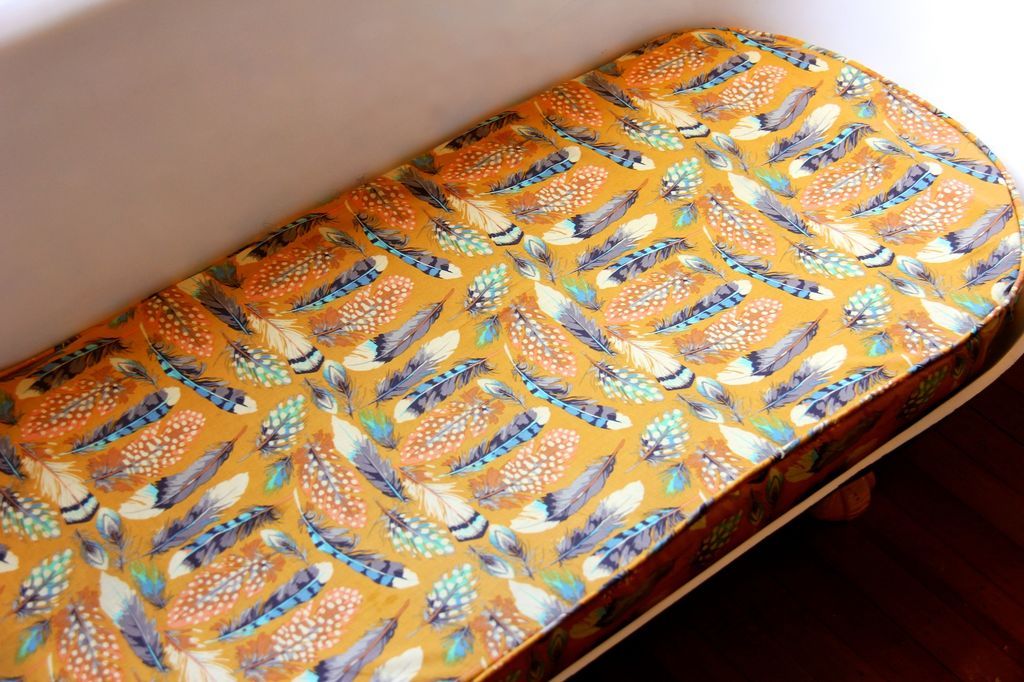
Step 30: Cut the foam cushion

- Going down the home stretch, all that's left to do now is cut out the custom foam insert and sew a cover for it.
- I collected 4″ thick furniture foam. A 4′ x 2′ x 4″.
- I tried all kinds of tools to cut the foam and finally caved in and bought an electric carving knife which is the tool of choice for foam shaping.
- You can cut it with a standard knife but you can't really shape it. For this you need a power tool.
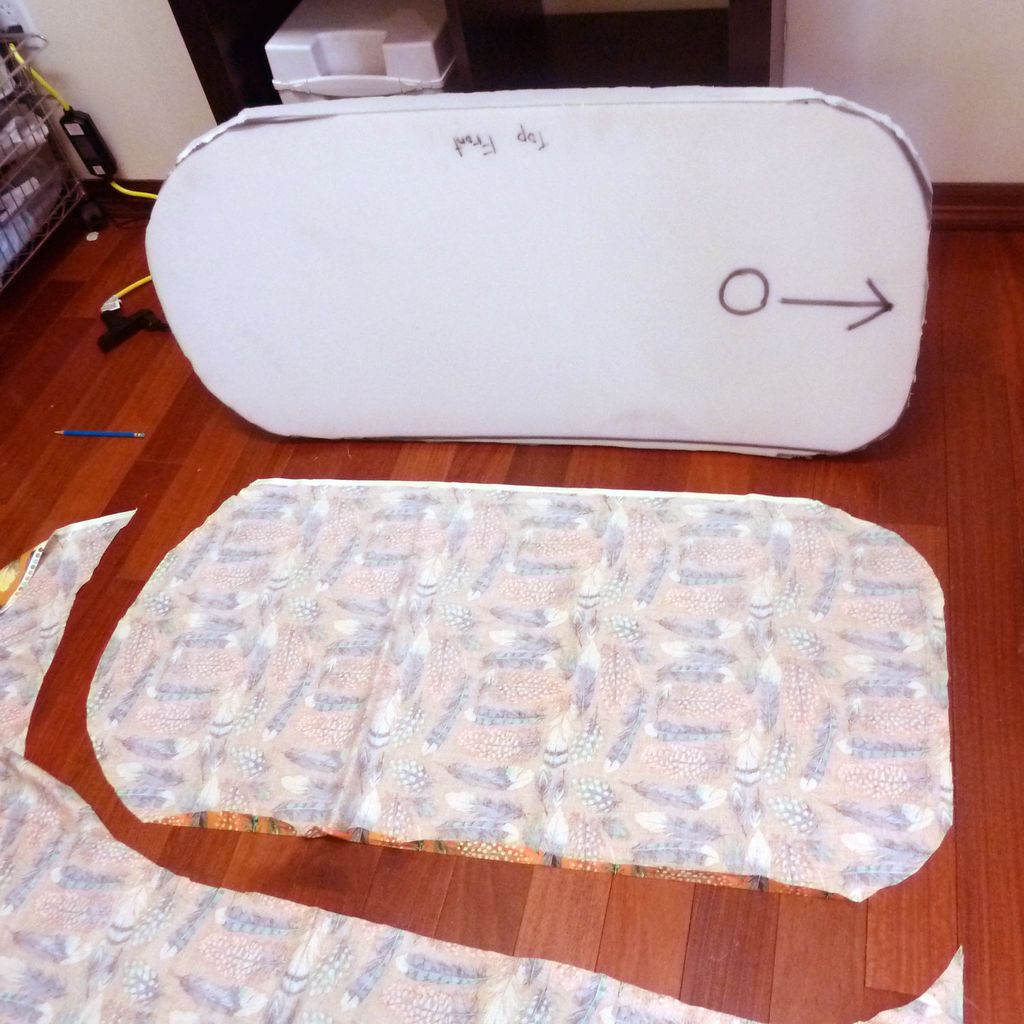
- Outline the bottom of the tub on a large piece of butcher paper and then transfer the pattern to the foam with a permanent marker.
- Use the electric knife to remove small sections of foam that get closer and closer to the contour needed to fit inside the tub comfortably.
- I labeled the orientation of the foam in the tub as it can be a little confusing.
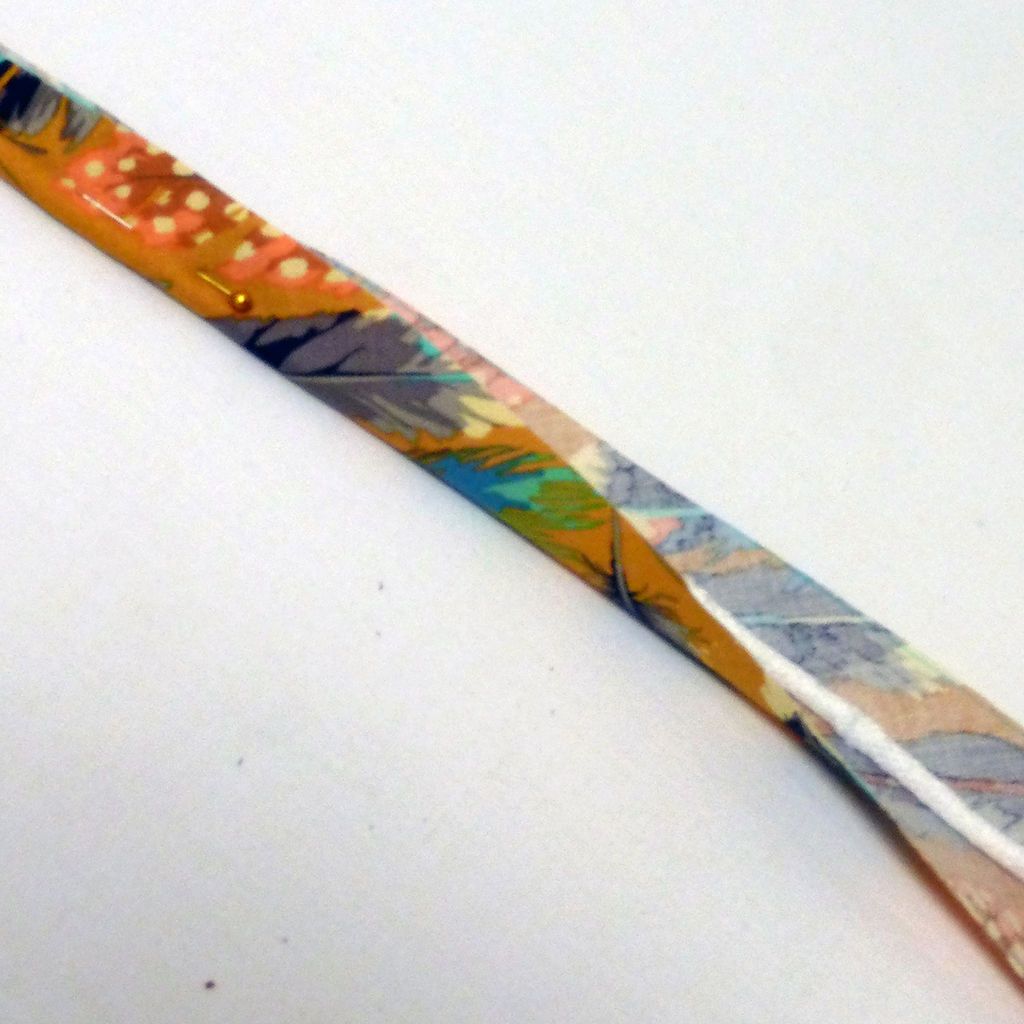
Step 31: Cut the fabric for the foam cushion

- You'll want enough fabric to cover the top, bottom, and sides of the cushion, plus extra if you add piping to the edge, as well as enough soft rope to go around the top edge of the cushion.
- Since the foam in this cushion was carved to be rounded at the bottom to fit inside the tub, it made sense to cover it in two pieces instead of three.
- So the top fabric was cut flat, and the bottom fabric was cut to form around the sides and fit around the curves.
- Place the top side of the foam on the wrong side of the fabric and trace around the edge.
- Cut the fabric with a 1″ seam allowance all the way around.
- Place the foam face up on the wrong side of the fabric and trace around it.
- Cut the fabric with enough seam allowance to go up the sides and still have 1″ left.
Step 32: Make the border for the bathtub sofa cushion

- Measure around the top of the cushion to determine how much you will need.
- Cut the 6″ rope lengthwiselength.
- Cut the fabric on the bias long and wide enough to cover the rope.
- I cut two 2″ wide strips and sewed them together to make a strip long enough to cover the length of the rope.
- The reason you need to cut the fabric on the bias is so that it curves smoothly along the edge of the cushion.
- The fabric bias has the greatest stretch, it will eliminate the folds and bumps that would occur if the fabric was cut on the straight grain line.
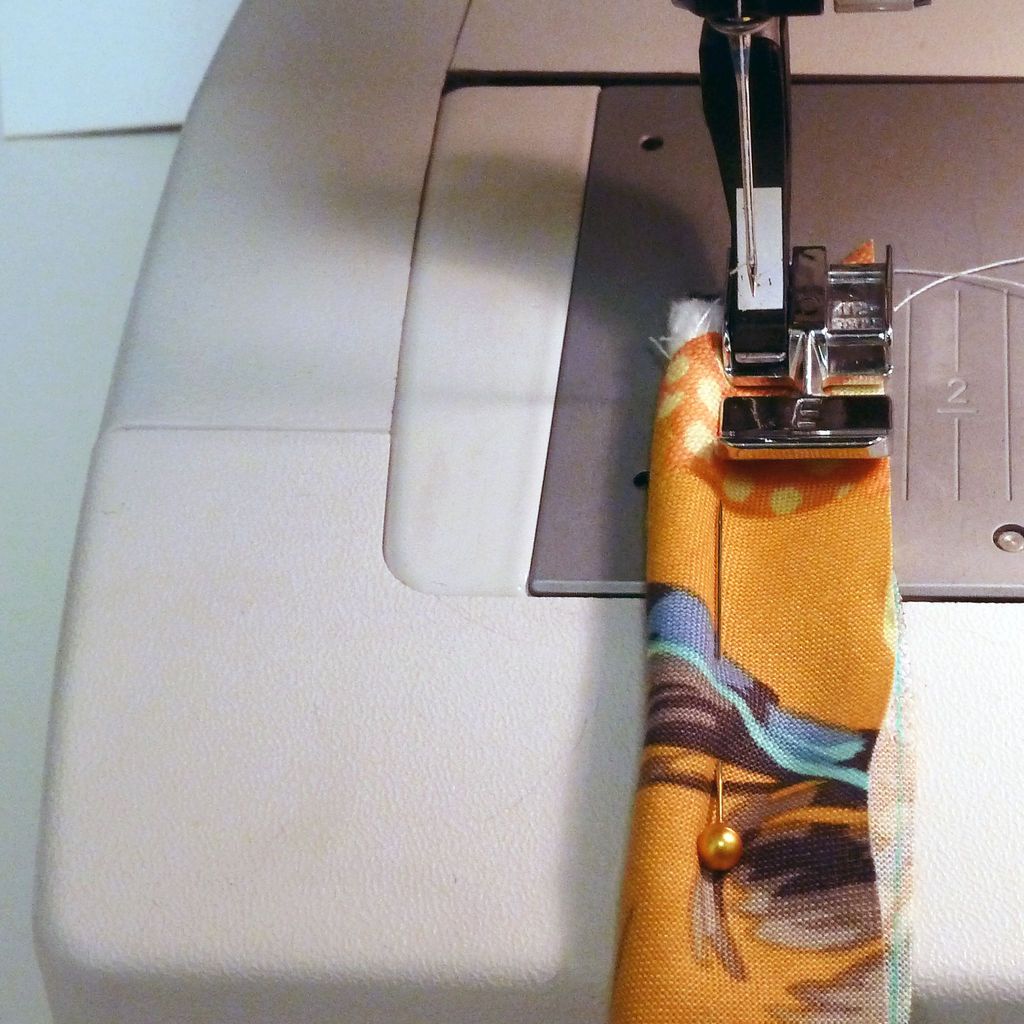
- Place the rope in the center of the strip of fabric, and fold the fabric to enclose the rope.
- Using a sewing machine, sew as close to the taping as possible.
- This is made easier by using a zipper foot and moving the needle as far to the left as possible.
Step 33: Upholstery Sofa Cushion


- Sew the edge to the top layer of fabric. Release along the marked seam line on the right side of the top fabric.
- Make sure the rope is facing the inside of the cushion and the seam allowance is facing the outside.
- Using a sewing machine, sew along the seam line, again using a zipper foot to get as close to the inside cord as possible.
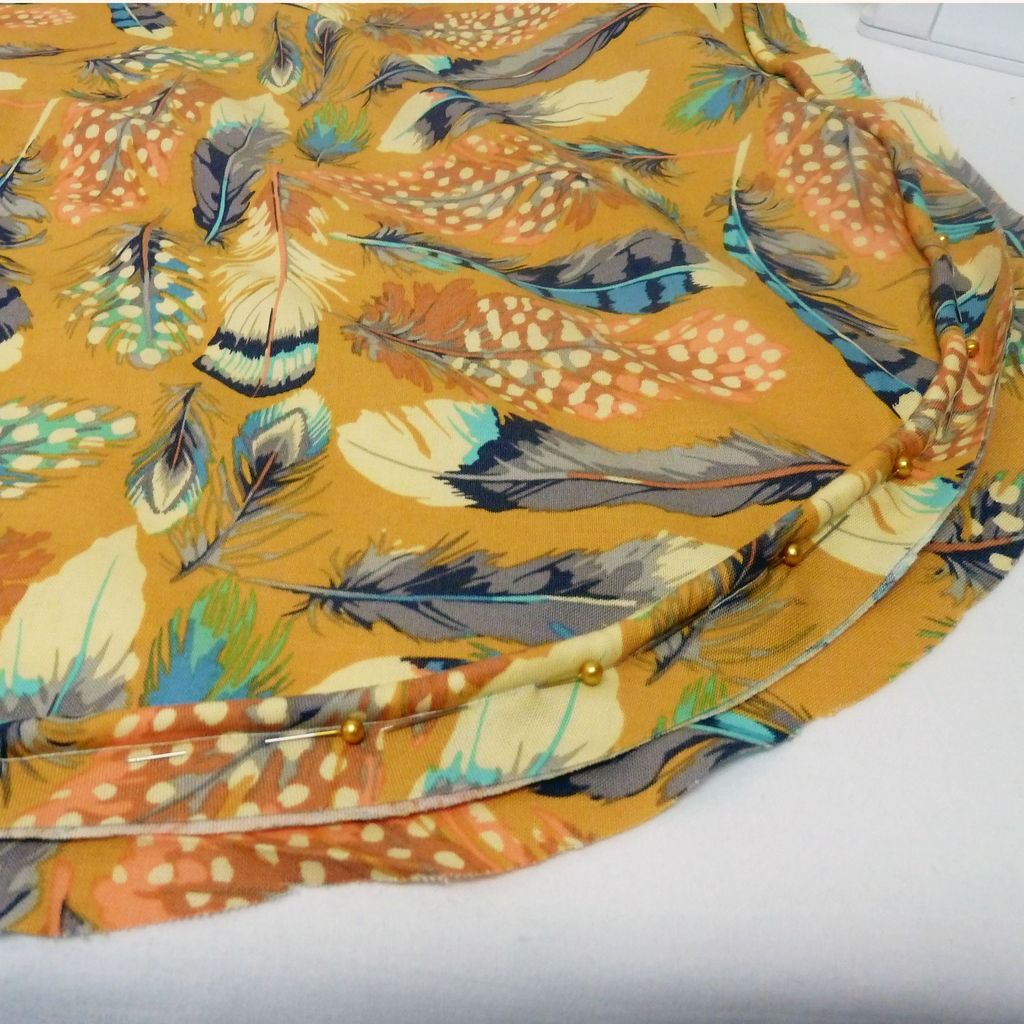
- Take the fabric you have cut for the bottom of the cushion and wrap it around the sides and pin it at the top, pinning it in folds around the curves.
- Mark the edge of the cushion top on the fabric with chalk or disappearing ink. Be sure to mark all the folds as well.
- Attach the top fabric to the bottom fabric with the right sides facing up and the piping sandwiched between them.
- Clamp the lines you marked and keep the folds where you want them.
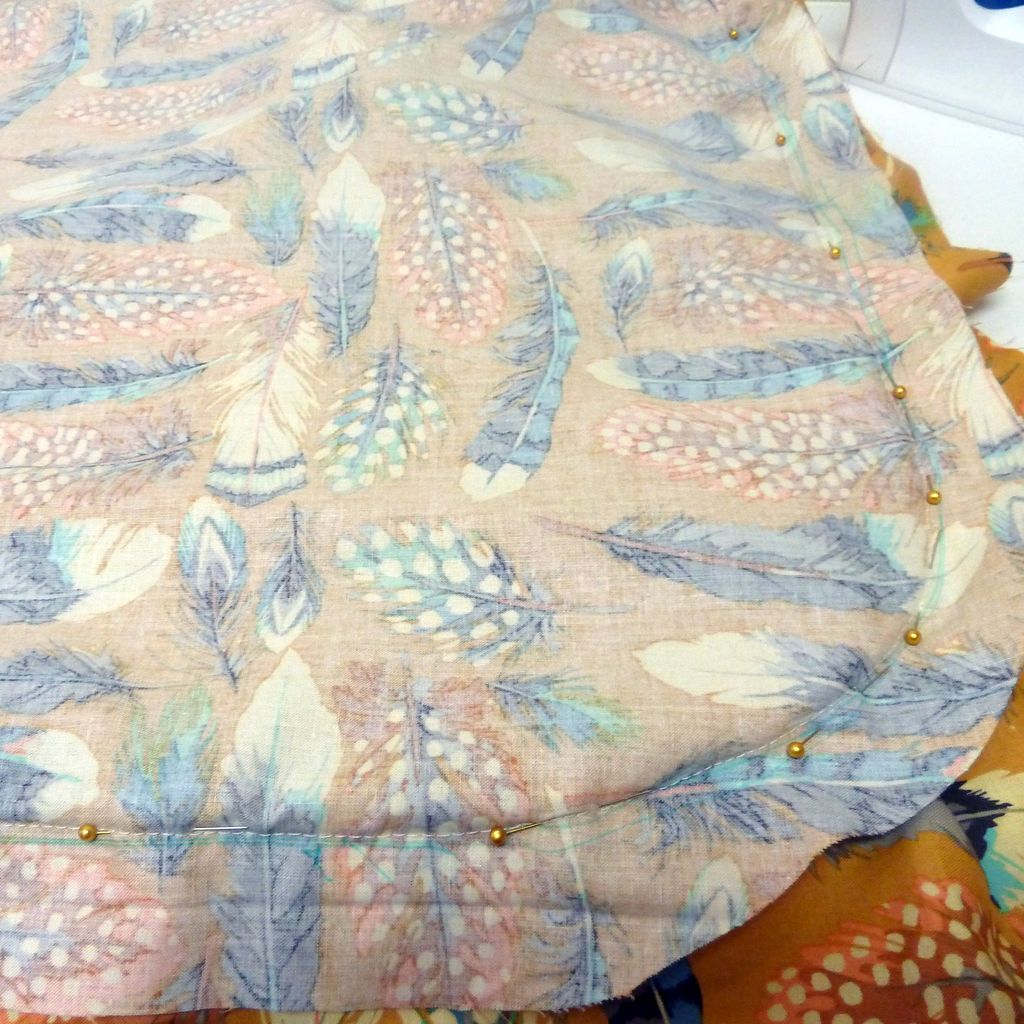
- Using a sewing machine, sew 2/3 of the way around this seam, leaving an opening large enough to insert the foam cushion. Trim all excess fabric, leaving about a 1/2″ seam allowance.
- Turn the lid clockwise and insert the foam cushion.
- Hand sew the remaining opening closed.
Step 34: Feel comfortable with your bathtub sofa


That's it! Please Comment…
Popular Content
How to make a rocket stove for outdoors
Cardboard Drawers Lined with Jeans
Ideas and Advantages of Window Grilles for the Home!
Latest Articles
How to make a refrigerator out of insulating material: Practical step-by-step guide
How to make a Kilim for the Home: Complete Step by Step Guide
How to protect ourselves from accidents in our work workshop: Complete guideprevention and safety
Related Content
How to Make a Simple Pallet Chair!
30 Closet Ideas You Can Make Yourself with Recycled Wood!
Charger support for your wristwatch
Unique Design for a Wooden Garden Seat!
Creative Home Decor Ideas to Transform Every Space
Refreshing your home starts with smart design choices that combine comfort, personality, and functionality. Whether you want to modernize a small apartment, upgrade outdoor areas, or create cozy rustic interiors, these trending ideas can completely change the atmosphere of your space.
Outdoor Spaces That Increase Style and Functionality
Outdoor living continues to dominate modern home trends. Homeowners are increasingly investing in practical entertainment zones inspired by these BBQ shed ideas, which create the perfect setup for gatherings and weekend cooking sessions.
First impressions also matter when designing exteriors. Elegant farm entrance gates design ideas help properties stand out while improving privacy and curb appeal.
Compact living solutions are also gaining popularity. These inspiring 16x40 shed house interior design ideas show how smaller spaces can still feel luxurious and functional.
To enhance patios and entryways, homeowners are adding stylish protection with these creative porch awning exterior DIY ideas that blend aesthetics with practicality.

Rustic and Cozy Interior Design Trends
Warm and natural interiors remain timeless. These charming rustic decor ideas combine wood textures, vintage accents, and earthy tones to create welcoming spaces.
Bedrooms are becoming more personalized with curated wall arrangements. Many homeowners use these stylish picture wall ideas for bedroom spaces to display memories and artwork creatively.
Textured wall treatments are another major trend. Installing a board and batten wall adds architectural character while keeping interiors elegant and modern.
Similarly, bold accent wall ideas can instantly transform plain rooms into eye-catching focal points without requiring a full renovation.
Smart Kitchen and Organization Inspiration
Functional kitchens are essential for modern homes. These practical kitchen wall cabinet ideas maximize storage while maintaining a clean and stylish appearance.
Organization also starts at the entrance. Well-designed mud room ideas help families keep shoes, coats, and daily essentials neatly arranged.
Colorful and Personalized Home Styling
Vibrant interiors are becoming increasingly popular thanks to playful dopamine decor ideas that use bright colors and joyful accessories to improve mood and energy.
Gallery walls also continue to evolve as a major decorative feature. These trendy gallery wall inspiration ideas offer creative ways to combine prints, photos, and statement art.
Young renters and new homeowners are especially embracing these stylish first apartment aesthetic ideas to create sophisticated interiors on a budget.
Finally, selecting the right shades can dramatically influence any room’s atmosphere. These modern trendy color ideas help homeowners choose palettes that feel fresh, elegant, and timeless.
Final Thoughts
From rustic charm and colorful interiors to outdoor entertaining areas and functional storage solutions, today’s home decor trends focus on creating spaces that feel both beautiful and livable. By combining smart layouts, modern textures, and personalized decorative elements, any home can become more stylish, comfortable, and inspiring.


