
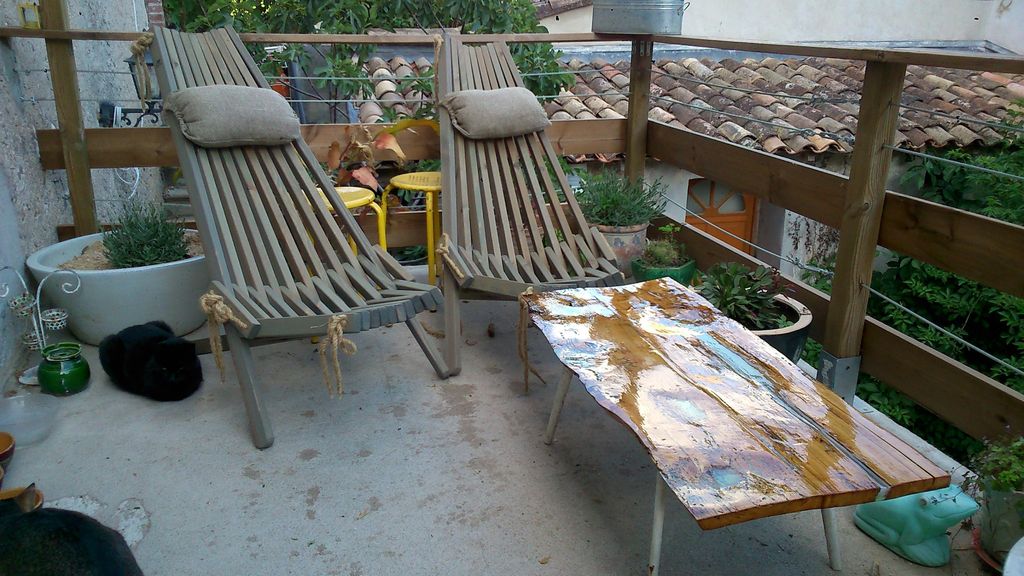
Beautiful Glowing Table, placing this table near a window will allow it to collect the rays of the setting sun and then emit a pleasant glow as the transition from twilight to night. Making your own is fun since you can customize it any way you want.
Instead of using hardwood, you can use the technique of adding glow glitter powder to resin to project glows in many fun ways.

Let's do it!
Step 1: Materials

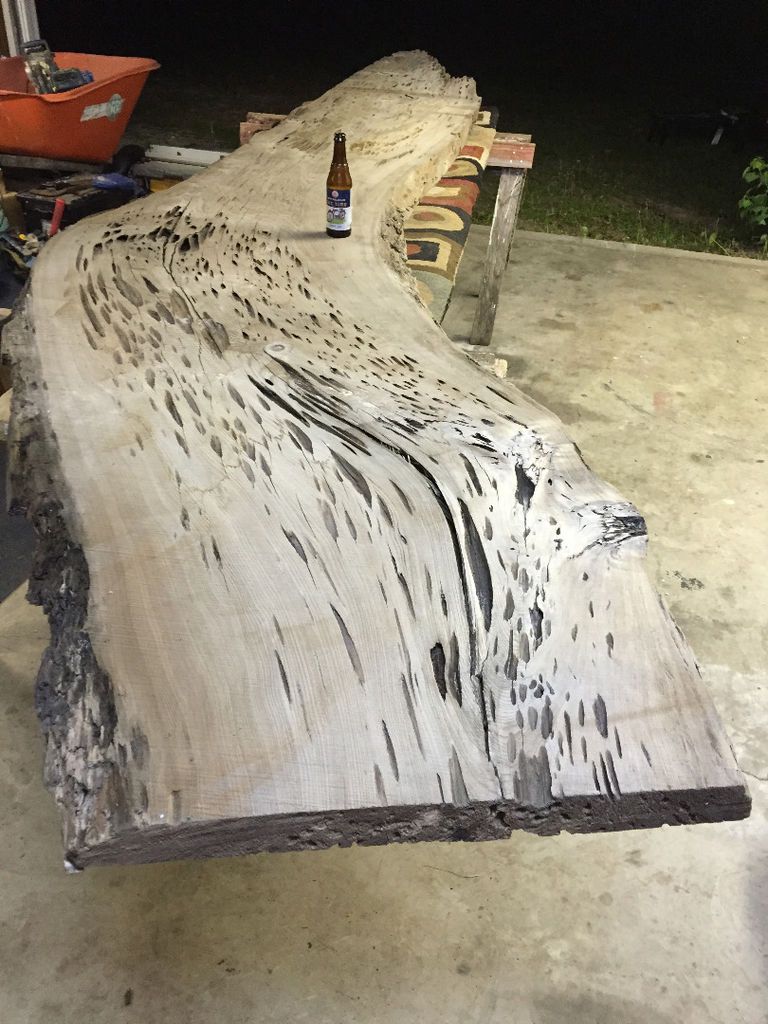
The type of wood I used for this board is known as "peyote cypress", which is a regular wood that has been naturally damaged with fungal growth on the inside that causes the sections to rot.
These damaged pockets can be easily removed and create cavities in the wood that are perfect for filling with resin and glitter powder.
Bags of damaged (rotten) cypress are soft and can be easily removed with compressed air or a hand tool.
Also, we will need:
- Blue glow in the dark dust
- Clear casting resin (I used 1:1 ratio type)
Step 2: Wood

The wood comes from the mill to the store in rough form, it is up to you to consume to decide how you want the product to look.
Knowing that I was going to make a table by joining a few boards, I grabbed some strips of Pecky Cypress and used a joiner to square the edges on both sides of the board.
These clean edges will make a great surface to attach the planks to.
Step 3: Cut the Planks to Size


With the board edges finished I was able to cut the boards to the correct length.
After marking each board with the desired final length, I cut them to size using a sled on the table saw.
Step 4: Join the planks to make a joint


Using a board joiner (cookie cutter) I cut the inlays into the boards, then glued the wood cookies and put them together.
To ensure the boards stayed still while I held them, I used some straight pieces of wood on the top and bottom of the boards.
I let the glue dry overnight.
Step 5: Fungal rot


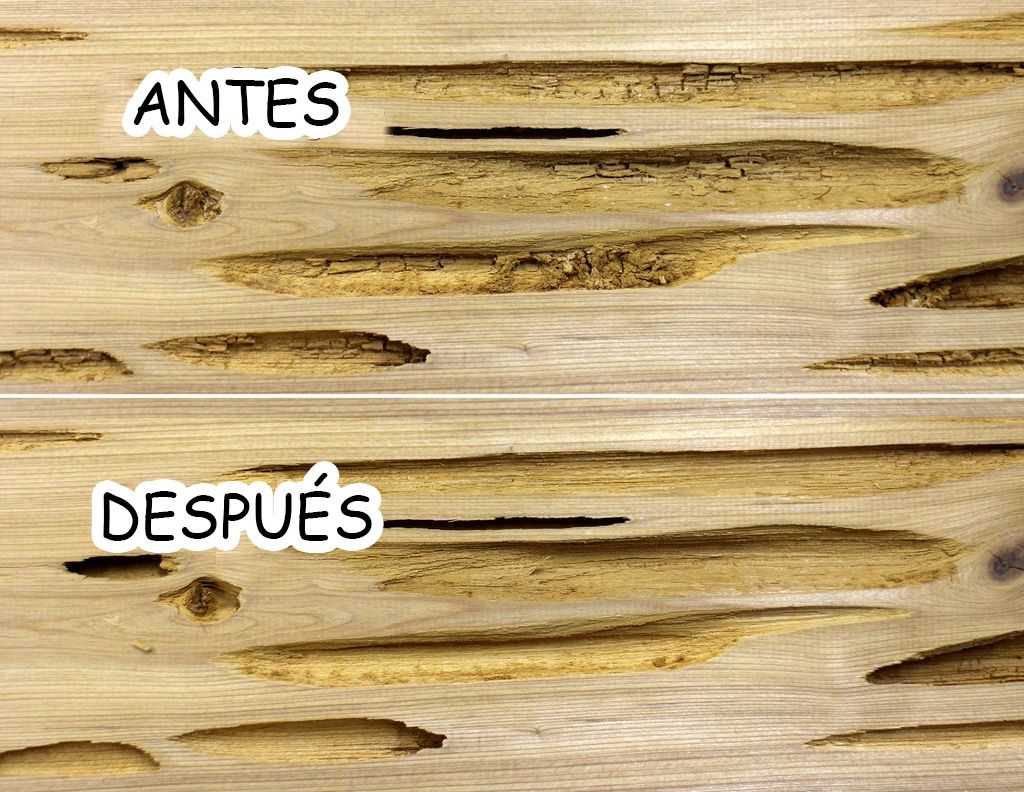
Damaged wood pockets on Pecky Cypress can be easily removed by gently digging with small tools to clean the cavities.
Starting with a vacuum cleaner, I gently pushed a flathead screwdriver into each rot cavity to dislodge the rot and remove it.
Next, I used compressed air to blow away any remaining debris and ensure the cavity was free of debris.
This can be very dirty and dusty, so wear proper safety equipment.

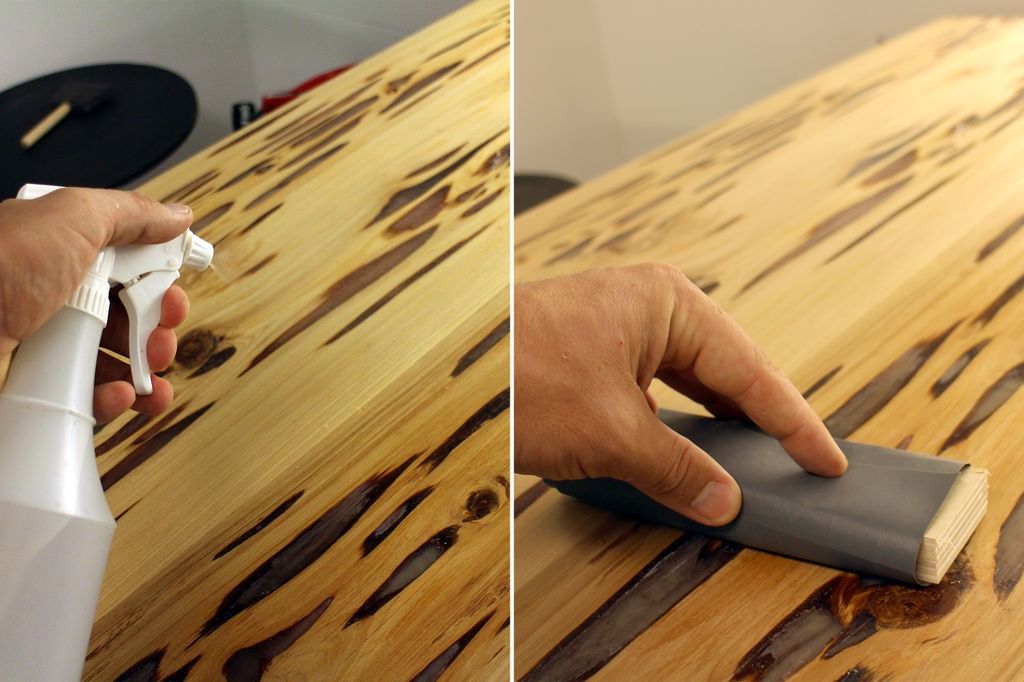
Step 6: Sand the surface

After the glue has dried, I sanded the surface with 80 grit sandpaper on a random orbital sander.
This cleaned up the transition between the glued boards.
Then I brushed the surface to remove any dust.
We will need a super clean surface before we can move on to resin casting.
Step 7: Mask and prepare the board for resin


Before casting the resin, we must ensure that the table can retain the medium.
Because some of the cavities in the boards extend all the way across the bottom, they were taped down, this way any resin that goes to the bottom will collect and not leak.
To prevent the resin from oozing out the ends, I place strips of thick acrylic on both ends.
I didn't worry about the sides, as these boards didn't have any open cavities on the sides.
The acrylic remains were fixed in place and a short edge of tape was placed on the sides, in case any resin migrated.
Step 8: Resin and glitter powder


I used clear casting resin, which is a 1:1 ratio type, meaning you don't need to measure a specific amount of catalyst, just equal parts resin and catalyst.
I prefer this method as I am not very careful and have mixed the mixing ratio before.
This resin is super easy to use and starts to set in about 7 minutes.
There are a lot of glitter in dark colors available, I chose blue glitter in dark powder which I got online. I would recommend using more shimmer powder rather than less, as the effect is much more striking.
For my 41″x22″ table, I used 64 oz (2 liters) of casting resin and about 3.5 ounces (100 g) of glitter powder. Your measurements will probably vary.
Step 9: Prepare the resin

To mix my resin I used large unwaxed paper cups.
Pour equal portions of resin and catalyst into separate cups, making sure to fill the cups less than half full. Pour a portion of glitter powder into a cup and mix well.
Know that when you combine the two resin liquids the chemical reaction will begin, allowing you only 5-7 minutes of working time before the resin sets.
When ready, add the catalyst to the resin and shake vigorously until the two liquids are a homogeneous mixture.
Be sure to scrape the stirring stick, and the sides and bottom of the cup. Pour the stirred mixture into the catalyst cup and continue stirring.
The entire mixing process should take less than 2 minutes to ensure you have enough time to pour the resin without it hardening.
Step 10: Pour the resin
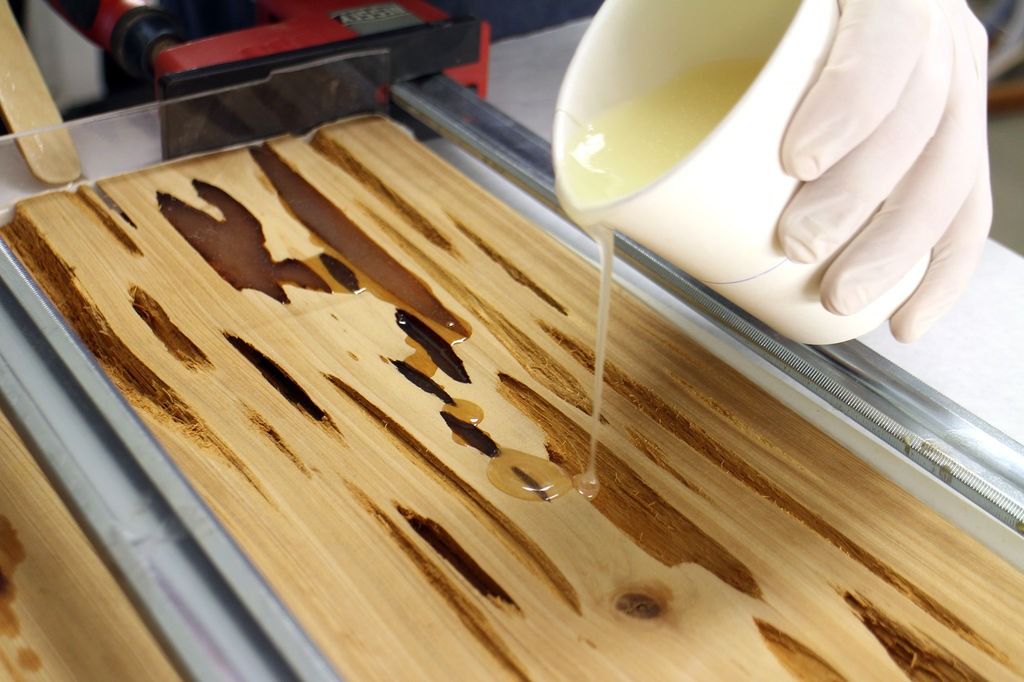

With its resin mixed, it can be poured into the cavities of the Pecky Cypress.
As the resin is not viscous enough to suspend the glitter powder, I had to take quick breaks from pouring to stir the mixture and ensure even distribution of the powder.
Gently pour the glitter resin into all the wood cavities.
You may find that the resin is absorbed into the wood or that some cavities take time to fill, this is normal. You can apply another coat of resin over previously poured sections.
I poured in smaller measures, about 10 total.
This process took about an hour to complete. I let the resin dry completely overnight.
Step 11: Let the resin dry


After allowing the resin to dry completely overnight, the acrylic edges and masking tape can be removed.
The resin will not stick to the acrylic, allowing it to be easily peeled from the ends.
The masking tape was a little more complicated, but can be easily removed with a little patience.
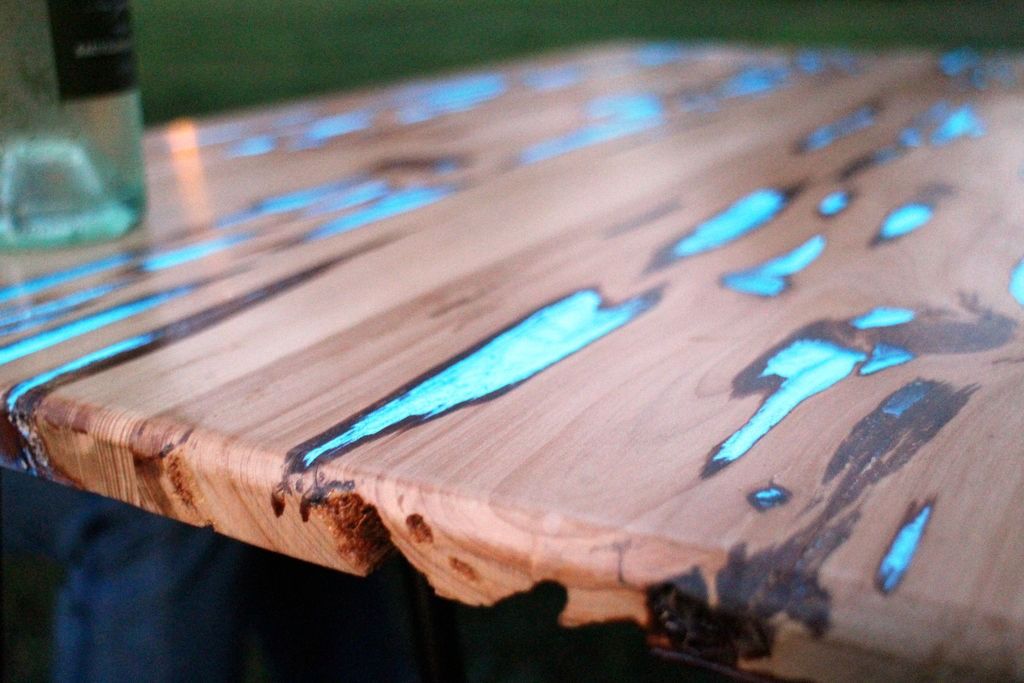
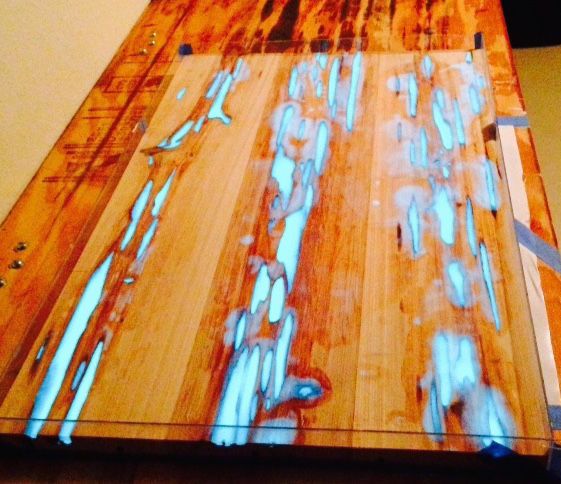
Step 12: Preliminary Glow Test

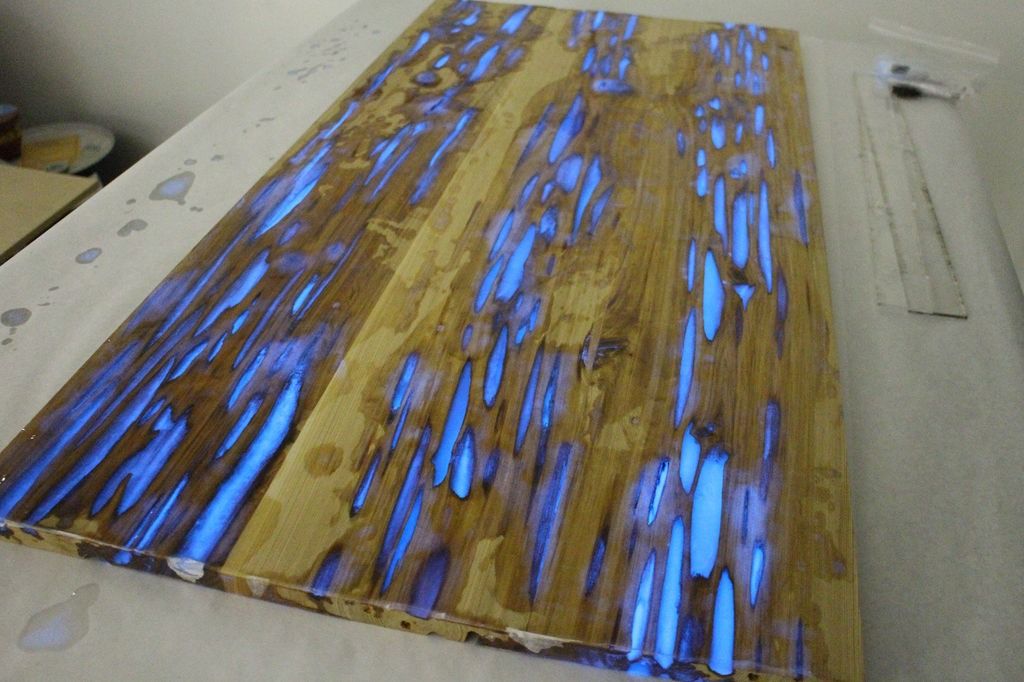
Anxious to test the results, I took the cast resin table top and let it soak for about 5 minutes, then quickly took it to an enclosed area and turned off the lights. The effect was incredible!
Image 1 shows the table with the additional resin spill in complete darkness.
No photo tricks here, this image is exactly how it appeared when the lights were off.
If anything, the effect in person was more vibrant.
Image 2 shows the same table with the door ajar, allowing natural light to enter the room. Here you can see the resin spill next to the vibrant blue and grain of the wood.
Step 13: Clean the edges

Along the edges where the resin touched the acrylic or masking tape there were small sections of raised resin due to capillary action.
Although the edges will route smoothly, removing these raised edges makes the sanding process easier. I used a sharp knife to cut the raised edges.
Step 14: Sanding


I have access to a 25″ drum sander.
This sander has a very coarse grit and is ideal for plowing through large flat pieces, such as tables.
However, this machine is not necessary and you can work the table surface to obtain a smooth finish just using an electric sander.
I turned this table over several times, each time raising the bed a small amount until the entire surface was level.
Step 15: After a few passes

After a few passes through the drum sander, the table surface has been leveled and any resin spilling over high spots has been removed.
Now we need to return the resin surface to a high gloss and smooth the wood surface.
Step 16: Final sanding
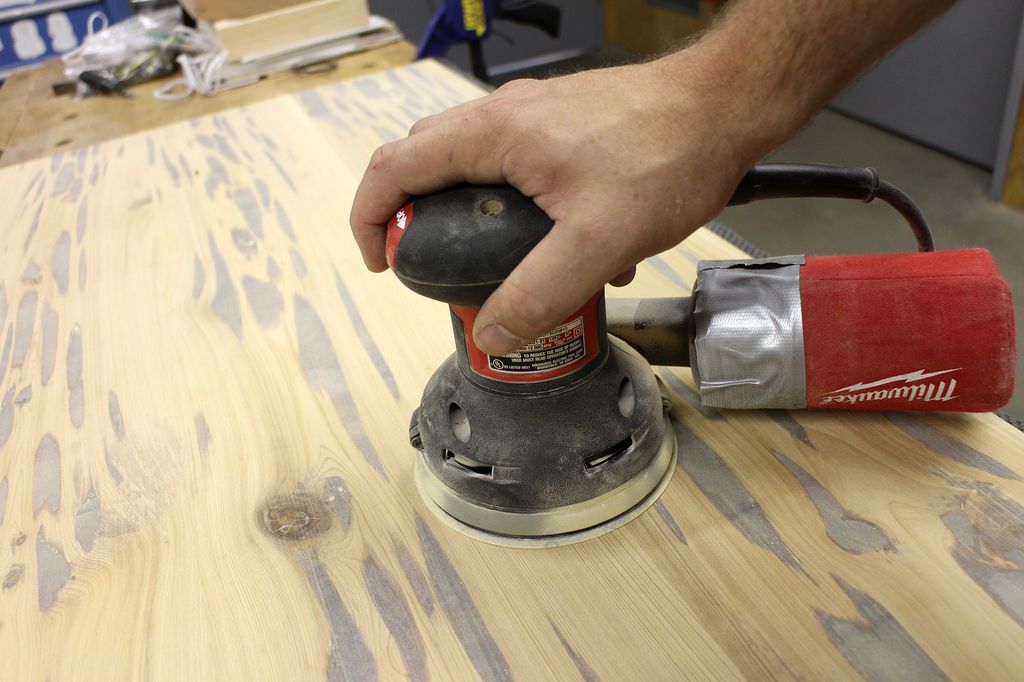

I used a random orbital sander that sanded rough grit up to 400 grit.
Since the drum sander I used had 80 grit sandpaper, I started at 120 grit and then progressively increased until I was at 400.
Spend enough time with each grit of sandpaper to ensure an even finish.
Step 17: Routing rule


After sanding the surface, I was able to turn my attention to the edges.
Although my router bit had an end bearing to maintain distance from the edge of the table, the nature of the Pecky Cypress wood made consistent distance on the edge with an end bearing impossible, which meant that the router blade would occasionally sink into the table further where there was a cavity in the edge of the table.
To solve this I made a fence for the router.
With the rounder bit installed in the router, I measured the distance from the edge of the end bearing to the edge of the router base, this distance would be the backspace of the fence.
I clamped a straight edge fence on this backhand perpendicular to the edge of the table sides.
Step 18: Routing Edges


With the fence installed, you could run the router around the edges of the table to make a nice rounded edge.
Step 19: Polyurethane finish

After routing and sanding I was finally able to apply a durable gloss polyurethane finish.
In uIn a well-ventilated area, I applied one coat with a foam brush and let it dry completely.
Step 20: Wet sanding
To achieve a high gloss finish, wet sand between coats of polyurethane.
Once one coat was completely dry, I sprayed the surface lightly with water, then used 1200-grit sandpaper to smooth out any brush strokes from the previous coat of polyurethane.
The surface was then cleaned and dried completely before another coat of polyurethane was applied. This process was repeated several times to achieve a very high gloss finish.
Step 21: Paint the Leg Anchor Plate


With the top part finished I was able to return to the base. I used hairpin table legs for my table. These legs are screwed to the bottom of the table.
Since the design of this table is different from the design of the legs, I had to make a new way to anchor them to the table.
To hide the leg fixture and really keep the focus on the shiny table, I decided to paint the leg anchor plate completely black.
Step 22: Anchor openings

Once the paint on the leg anchors were dry, I placed the anchor plates on the underside of the table and transferred the opening location to the table.
An opening was drilled at the markings, ensuring that it was only drilled as deep as the anchor nuts.
Step 23: Add Anchor Nuts + Plate
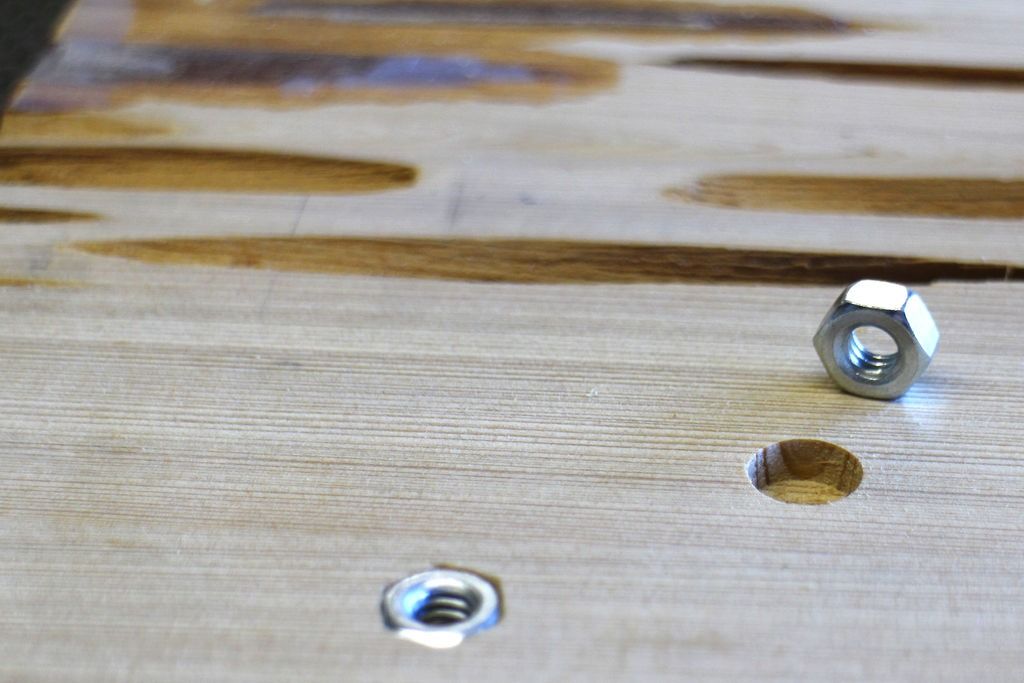

The anchor nuts were installed into the openings, then the anchor plate was installed over the anchor nuts.
As the Pecky Cypress had irregular cavities, some minor adjustments were needed to ensure the bolts and anchor plates had enough coverage on the underside of the table.
I used E-6000 Industrial Strength Adhesive, which bonds almost anything to anything else permanently.
This is unpleasant, but magical.
Step 24: Attach the legs


When the adhesive has dried completely, the fork legs can be installed.
Align the legs and screw in the anchor bolts to secure the legs to the bottom of the table.
Step 25: Set your table + glow!


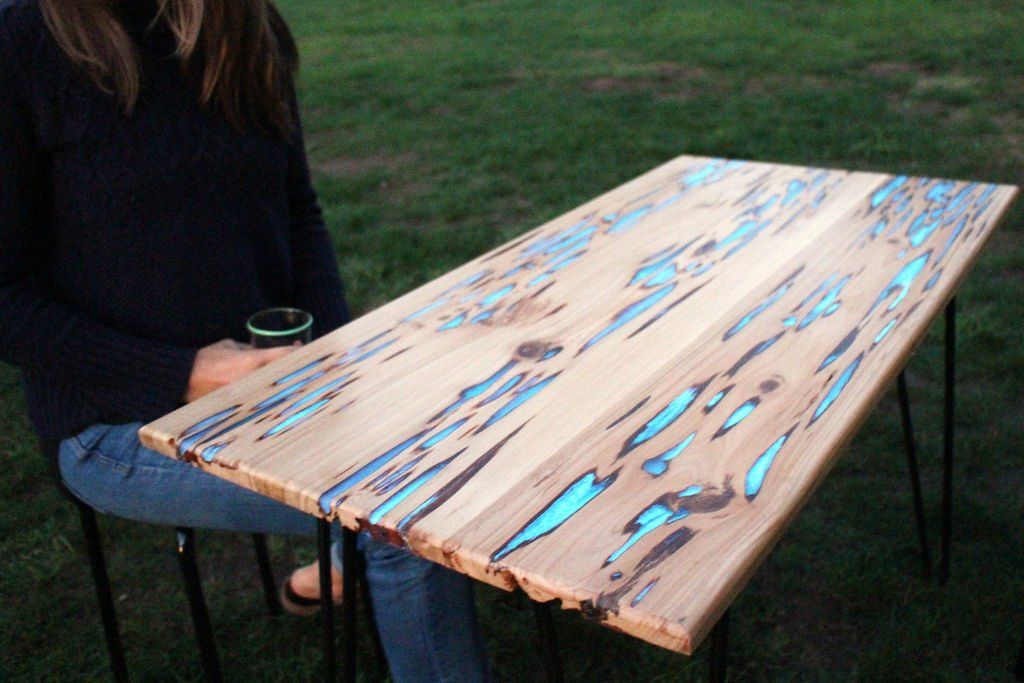
Your table is ready to shine all night.
This glowing powder needs UV light to activate, so dusk is a good time to enjoy the transition.
This table has a really neat effect, and looks great even in the twilight.
Depending on how much UV exposure your table has, it can glow for up to 20 minutes.
More Designs:


Get more information at perfectionidea.com and on our Facebook for more Beautiful Bright Table.
- Tags
- Guide
Popular Content
How to make a rocket stove for outdoors
Cardboard Drawers Lined with Jeans
Ideas and Advantages of Window Grilles for the Home!
Latest Articles
How to make a refrigerator out of insulating material: Practical step-by-step guide
How to make a Kilim for the Home: Complete Step by Step Guide
How to protect ourselves from accidents in our workplace: Complete prevention and safety guide
Related Content
Incredible Fantasy Sofas
How to Build Wooden Shutters
Farmer Style Bathroom Decoration
How to Build Corner Shelves
Creative Home Decor Ideas to Transform Every Space
Refreshing your home starts with smart design choices that combine comfort, personality, and functionality. Whether you want to modernize a small apartment, upgrade outdoor areas, or create cozy rustic interiors, these trending ideas can completely change the atmosphere of your space.
Outdoor Spaces That Increase Style and Functionality
Outdoor living continues to dominate modern home trends. Homeowners are increasingly investing in practical entertainment zones inspired by these BBQ shed ideas, which create the perfect setup for gatherings and weekend cooking sessions.
First impressions also matter when designing exteriors. Elegant farm entrance gates design ideas help properties stand out while improving privacy and curb appeal.
Compact living solutions are also gaining popularity. These inspiring 16x40 shed house interior design ideas show how smaller spaces can still feel luxurious and functional.
To enhance patios and entryways, homeowners are adding stylish protection with these creative porch awning exterior DIY ideas that blend aesthetics with practicality.

Rustic and Cozy Interior Design Trends
Warm and natural interiors remain timeless. These charming rustic decor ideas combine wood textures, vintage accents, and earthy tones to create welcoming spaces.
Bedrooms are becoming more personalized with curated wall arrangements. Many homeowners use these stylish picture wall ideas for bedroom spaces to display memories and artwork creatively.
Textured wall treatments are another major trend. Installing a board and batten wall adds architectural character while keeping interiors elegant and modern.
Similarly, bold accent wall ideas can instantly transform plain rooms into eye-catching focal points without requiring a full renovation.
Smart Kitchen and Organization Inspiration
Functional kitchens are essential for modern homes. These practical kitchen wall cabinet ideas maximize storage while maintaining a clean and stylish appearance.
Organization also starts at the entrance. Well-designed mud room ideas help families keep shoes, coats, and daily essentials neatly arranged.
Colorful and Personalized Home Styling
Vibrant interiors are becoming increasingly popular thanks to playful dopamine decor ideas that use bright colors and joyful accessories to improve mood and energy.
Gallery walls also continue to evolve as a major decorative feature. These trendy gallery wall inspiration ideas offer creative ways to combine prints, photos, and statement art.
Young renters and new homeowners are especially embracing these stylish first apartment aesthetic ideas to create sophisticated interiors on a budget.
Finally, selecting the right shades can dramatically influence any room’s atmosphere. These modern trendy color ideas help homeowners choose palettes that feel fresh, elegant, and timeless.
Final Thoughts
From rustic charm and colorful interiors to outdoor entertaining areas and functional storage solutions, today’s home decor trends focus on creating spaces that feel both beautiful and livable. By combining smart layouts, modern textures, and personalized decorative elements, any home can become more stylish, comfortable, and inspiring.


