
Spiral Wall Shelf, the children's books are all drastically different sizes. Putting them on a shelf seems almost pointless because they're either too big and don't fit or they're too small and waste space (plus they're minutes away from being thrown on the floor anyway).
Instead of worrying about this, I decided to embrace it and build a bookshelf where each shelf was different.

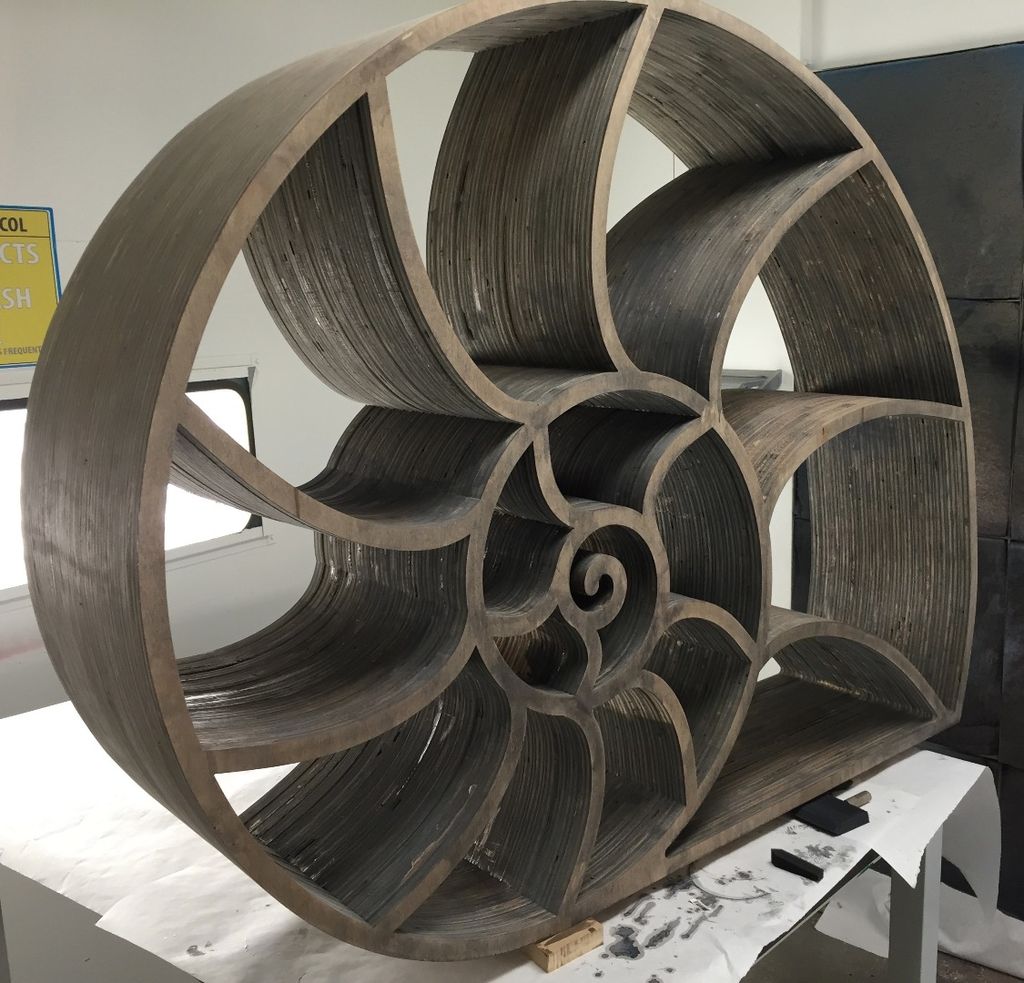
This Nautilus-inspired bookshelf isn't meant to be efficient or to pack books neatly, it's about eagerly and enthusiastically embracing the chaos that is children's books.
The bookcase is made of 15 sheets of maple plywood, jet machined, laminated together, stained and finished.
Step 1: Inspiration
Overall, I knew I wanted a bookcase with variable-sized shelves. However, I got stuck on things that looked like rectilinear shelves that were off-center or crooked.
I asked my 5-year-old daughter to draw the bookshelf she wanted and she drew a spiral. Perfect!
Step 2: Draw the shape

I used AutoCAD LT to draw the shapes.
First, I drew a logarithmic spiral and then cut it into regular sections while consulting pictures of nautilus shells to get the proportions roughly correct.
Near the center of the spiral, the sections sweep twice the angle because I didn't want the center shelves to become too small.
Then I offset the 0.75" spiral as a shelf thickness that seemed about right.
The overall scale of the shelves is such that two profiles can be cut from a single 4'x 8' sheet of plywood.
This makes the dimensions approximately 46" x 36".
Files attached both the AutoCAD LT drawing and a .DXF.
Step 3: Machine-cut layers of wood


I used 0.75” maple grade plywood and cut the profiles at the Pier 9Omax Jet Machining Center. I cut the plywood over the water so it wouldn't get completely soaked.
I cut 15 profiles from 8 pieces of plywood.
Profile 16 was a solid sketch of the shelf intended to be a backing that I ultimately decided not to use.
Each profile took almost 30 minutes to cut, so I monopolized the plane for 8 hours with this project.
Step 4: Reclaimed Wood


The very nature of my process generated a lot of waste wood.
With so many other projects happening on the pier, fortunately much of this was reused.
Step 5: 15 Stacked Layers


Here are all 15 layers stacked together.
The discoloration along the cut surfaces is maroon from the jet that has been forced into the wood, probably when the jet passes over its steel slats.
Moderate sanding did not remove the marks, so I decided to ignore them.
Step 6: First Layer


I wanted the exposed face to be free of marks, including nail holes.
To accomplish this, I glued it to the second layer and held the two pieces together with just about every clamp in the store.
Step 7: Inner Layers


The inner layers are maThey are held together with glue and nails.
Since each layer is the same shape, I aligned them by feel along the edges.
Step 8: Final Coat


Just like the first layer, I wanted the final layer to be free of marks, so both sides were intact.
I glued the final layer and, again, used all the clamps in the store that were big enough.
Step 9: Sand


Using 80 grit sandpaper, I roughly sanded the shelf until the individual layers were level.
Where I could, I used a belt sander, and on internal areas, a random orbital sander or sanding block.
I only sanded the larger cavities, the smaller ones were too difficult to access and are not easily visible.
Step 10: Fill the holes


Many holes in the plywood were exposed.
I filled them with wood filler and continued sanding.
Step 11: Sand until smooth


After filling the voids, I sanded with 100, 200, and 400 grit sandpaper.
This step literally took weeks, as I would spend 30 minutes sanding a couple of times a week.
Step 12: Staining


We tried a few stains and chose lead-colored Miniwax Classic.
At first I thought it wouldn't stain the shelf, but the gray stain looked good and did a great job covering the marks.
Step 13: Finish

With so much surface area and the possibility of many drops, I sought professional help to finish the shelf. I covered the shelf with a water-based acrylic lacquer.
Step 14: Everything Perfect


Similar Ideas:


Greetings!
Get more information at perfectionidea.com and on our Facebook for more Spiral Wall Shelves.
- Tags
- Shelves
Popular Content
How to make a rocket stove for outdoors
Cardboard Drawers Lined with Jeans
How to Create a Fairy Garden: Magic, Creativity and Nature in One Place
Latest Articles
How to make a refrigerator out of insulating material: Practical step-by-step guide
How to make a Kilim for the Home: Complete Step by Step Guide
How to protect ourselves from accidents in our workplace: Complete prevention and safety guide
Related Content
Uses that can be given to the Console Table
How to Decorate the Home with Pallets
Charger support for your wristwatch
The Best Colors to Combine with Red
Creative Home Decor Ideas to Transform Every Space
Refreshing your home starts with smart design choices that combine comfort, personality, and functionality. Whether you want to modernize a small apartment, upgrade outdoor areas, or create cozy rustic interiors, these trending ideas can completely change the atmosphere of your space.
Outdoor Spaces That Increase Style and Functionality
Outdoor living continues to dominate modern home trends. Homeowners are increasingly investing in practical entertainment zones inspired by these BBQ shed ideas, which create the perfect setup for gatherings and weekend cooking sessions.
First impressions also matter when designing exteriors. Elegant farm entrance gates design ideas help properties stand out while improving privacy and curb appeal.
Compact living solutions are also gaining popularity. These inspiring 16x40 shed house interior design ideas show how smaller spaces can still feel luxurious and functional.
To enhance patios and entryways, homeowners are adding stylish protection with these creative porch awning exterior DIY ideas that blend aesthetics with practicality.

Rustic and Cozy Interior Design Trends
Warm and natural interiors remain timeless. These charming rustic decor ideas combine wood textures, vintage accents, and earthy tones to create welcoming spaces.
Bedrooms are becoming more personalized with curated wall arrangements. Many homeowners use these stylish picture wall ideas for bedroom spaces to display memories and artwork creatively.
Textured wall treatments are another major trend. Installing a board and batten wall adds architectural character while keeping interiors elegant and modern.
Similarly, bold accent wall ideas can instantly transform plain rooms into eye-catching focal points without requiring a full renovation.
Smart Kitchen and Organization Inspiration
Functional kitchens are essential for modern homes. These practical kitchen wall cabinet ideas maximize storage while maintaining a clean and stylish appearance.
Organization also starts at the entrance. Well-designed mud room ideas help families keep shoes, coats, and daily essentials neatly arranged.
Colorful and Personalized Home Styling
Vibrant interiors are becoming increasingly popular thanks to playful dopamine decor ideas that use bright colors and joyful accessories to improve mood and energy.
Gallery walls also continue to evolve as a major decorative feature. These trendy gallery wall inspiration ideas offer creative ways to combine prints, photos, and statement art.
Young renters and new homeowners are especially embracing these stylish first apartment aesthetic ideas to create sophisticated interiors on a budget.
Finally, selecting the right shades can dramatically influence any room’s atmosphere. These modern trendy color ideas help homeowners choose palettes that feel fresh, elegant, and timeless.
Final Thoughts
From rustic charm and colorful interiors to outdoor entertaining areas and functional storage solutions, today’s home decor trends focus on creating spaces that feel both beautiful and livable. By combining smart layouts, modern textures, and personalized decorative elements, any home can become more stylish, comfortable, and inspiring.


