
This recycled glass countertop in bright blue was made as a shipping and packaging table, very easy to make and very practical for your home.
The countertop contains 75 pounds of recycled blue glass and 50 pounds of Surecrete terrazzo mix.

Steps to make a recycled glass countertop:
Step 1: Supporting the countertop


Before making a concrete countertop, consider how it will rest. A typical countertop would be installed over kitchen or bathroom cabinets and would not require any special support or reinforcement.
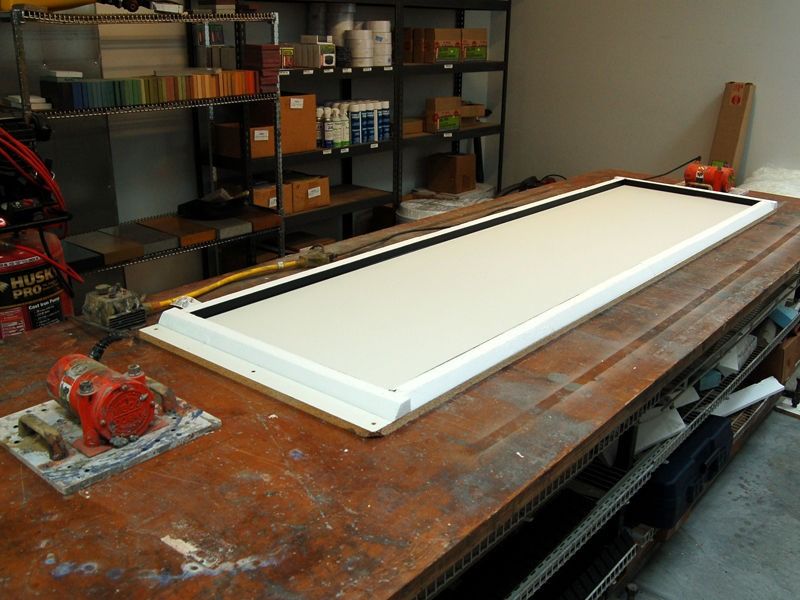
This project will be installed on a steel frame with no cabinets underneath to allow for under-counter storage of large items. The top measures 24″x91″ x1″ thick and weighs about 125 pounds.
Determine the type of countertop support:
- The support must be flat, level, stable, well anchored and strong enough to support a heavy load.
Anchor the support:
- We anchor our frame securely to the wall studs at the top, middle and bottom.
Step 2: Mold construction


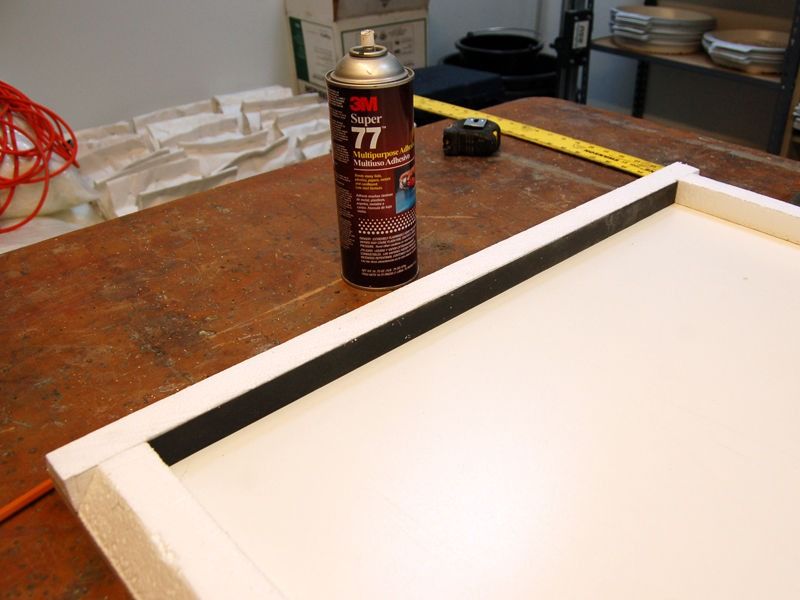

This is a basic 1″ thick slab that requires very little effort to form. Using our simple foam rail and adhesive forming system, we were able to build this entire countertop mold in about an hour.
Tools and supplies:
- 3/4″ melamine board base
- Caulking gun
- 100% silicone sealant for doors and windows
- CHENG Corner and Seam Shaping Tools
- CHENG Pro-Form Mold Making System
- Double-sided carpet tape
- Utility knife
- Spray adhesive
- Scissors
- Level
Extend in the form of melamine base:
- For this 24″x91″ recycled glass countertop, we cut the 3/4″ melamine shaped base to 28″x95″. This allows 2″ on each side (4″ total) to fit the walls in foam form.
- Mark the base of the mold with a pencil, noting the 24″x91″ dimensions of the finished countertop.
Cut the walls to the correct height:
- CHENG foam walls and liners are available in 2″ and 2-1/2″ heights. But for this project we need to reduce them to 1″.
- Use a ruler to mark the form walls 1″ high, along the foam.
- Cut off excess foam from the top with a fine hand saw. If you have access to a table saw, this can easily be accomplished with precision.
- It is not necessary to cut the size of the walls before attaching them to the melamine base. They can overlap in the corners.
Attach mold walls to base:
- Adhere double-stick carpet tape to the bottom of the mold walls.
- Press the walls of the mold onto the base board, making sure they remain straight and true to the pencil design marks.
Cut wall coverings:
- Since the CHENG Pro-Form wall coverings are over 2″ wide, we will need to trim them down to 1″ to use for this project.
- Mark and cut them to 1″ wide. Use a razor blade or knife to mark them.
- This will make an easily visible cut line follow.
- Trim the liners 1″ to length leaving a short pile. Any gaps in the corners will be filled with silicone when sealing the mold.
Plue wall coverings to form walls:
- The wall coverings are smooth and glossy on one side, matte on the other. Spray bright side de liners with spray adhesive. Wait a few minutes.
- Attach the liners to the walls of the form, with the factory edge aligned with the top of the form wall. Later, you'll rely on that straight factory edge to ensure the underside of your recycled glass counter section is uniform and straight.
- After the mold liners are glued in place, run a bead of silicone sealant along the top of the mold wall to prevent concrete from shifting between the foam wall sections and the wall liners.
Seal the mold:
- Sealing the mold with a bead of 100% silicone will make it water tight and fill any gaps in the corners or between the liner and the base of the form.
- Silicone tooling with corner and seam shaping tools produces professional-quality rounded edges. See the Corner and Seam Shaping Tool Guide for more information on how we seal the shape and create perfect rounded edges.
- After the shape is sealed and the silicone has dried, remove dust and debris with a vacuum cleaner or compressed air.
- Remove silicone residue with denatured alcohol.
Level:
- Level the shape before pouring to help maintain a uniform thickness throughout the pour.
Step 3: Mixing


Mix supplies and tools:
- Terrazzo mix
- Surecrete 1 gallon (2)
- Recycled glass aggregate
- Pigment
- Mixing Ladle
- 1/2″ corded drill with mixing paddle
- Palette
Safety:
- Thick rubber gloves
- Mask
Combine modifier liquid and pigment:
- Wear a mask and disposable gloves while mixing.
- Shake the liquid modifier well before pouring it into the 15-gallon mixing bucket.
- Add the entire bag of pigment to the Surecrete bucket.
- Mix with a paddle mixer to thoroughly mix the pigment into the Surecrete.
Add the terrazzo mix:
- Add 1/3 bag (16 lbs.) of Terrazzo mix to the pigment and Surecrete mixture.
- Mix vigorously until all concrete mixture is completely mixed and free of lumps or unmixed material.
- Occasionally scrape the material from the sides of the bucket with a trowel, mixing it well.
- Continue adding Terrazzo mix 1/3 bag at a time, repeating the above steps until a full bag of the mix has been added and thoroughly mixed.
- As the terrazzo mixture is mixed into the surecrete, the mixture becomes thicker; Hold the paddle mixer firmly to prevent kickback.
Add recycled bottle glass aggregate:
- Add 25 lbs. of the recycled blue glass aggregate into the terrazzo mixture and mix with the paddle mixer until all the glass is evenly distributed.
- Always wear a mask when working around glass dust or dust.
- Add another 25 pounds. From the glass aggregate and the mixture.
- Add the final 25 pounds. of the recycled glass aggregate and mix until all of the glass is evenly distributed throughout the terrazzo concrete mix.
Adjust the consistency of the mixture:
- Add 2-3 cups of water as needed to maintain a semi-pourable consistency.
Step 4: Pouring


Pitching a recycled glass terrazzo mix is very similar to that of ordinary concrete, with one notable exception: the aggregate is really sharp. Crushed glass will tear through thin latex gloves, so for mixing we will use heavy duty rubber gloves for protection.
Materials and Supplies:
- Vibco Tabletop Vibrator
- Vibco Variable Speed Vibrator Controller
- Cubes
- Thick rubber gloves
- Palette
Attach the vibrator to the casting table:
- The pouring table should be protected from weather and direct sunlight, preferably indoors. This is where your countertop will dry overnight.
- For this project we used two table vibrators, one at each end of the pouring table.
- Attach the tabletop vibrators and variable speed controller to the casting surface with long screws. Plug the controller into a wall outlet and the vibrators into the controller. Test to make sure they are working before you start mixing.
Pouring the concrete:
- Your table should be indoors so your countertop can cure from direct sunlight.
- Turn on the vibrator at a relatively high speed to help the recycled glass terrazzo mixture flow.
- Using a bucket, transfer the terrazzo concrete mixture from the tub to the form, bucket by bucket, until all of the mixture is in the form.
- Spread the mixture and push it into the corners with gloved hands or a trowel.
- The mold must be filled completely and evenly.
Vibrate and trowel:
- If you have overfilled the mold, wipe excess concrete from the piece with a clean, straight edge of wood or steel. Work the board diagonally across the concrete surface in a cutting motion being careful not to disturb the foam walls or wall coverings.
- Once the terrazzo mixture is level with the top of the mold and no more concrete is required to fill the mold, turn the vibrator to a low setting.
- Allow the vibrators to run for approximately 8 minutes while all trapped air is expelled from the terrazzo mixture. This will help reduce the amount of air bubbles in the recycled glass counter section.
- Tap the edges with a trowel so they are flush with the form.
Cover and Dry:
- Tent the form with a thin plastic cover to create a humid environment.
- Do not dry in the sun.
- Dry up to 24 hours.
- After drying, it is ready to grind the bottom flat.
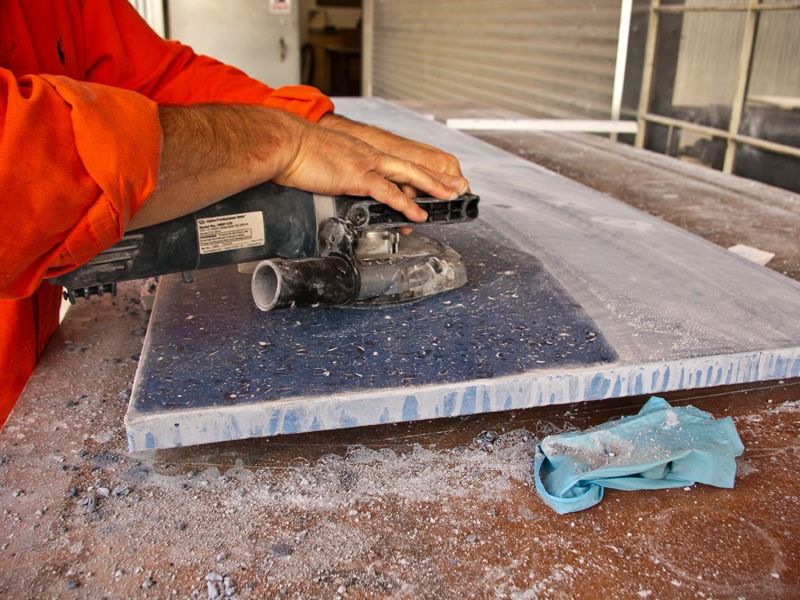
Step 5: Sand the recycled glass countertop


Before removing the concrete from the form, we use a grinder to flatten any areas of concrete that may be too high or have gone over the edges of our form.
This is also an ideal opportunity to grind the front, bottom edge, making it straight and consistent. It is much easier to shape the bottom of the recycled glass countertop before unmolding.
Tools:
- CS Unitec Vacuum Cleaner
- Alpha WDP-120 Wet/Dry Variable Speed Concrete Polisher
- Vexcel Alpha 4-1/2″ Rigid Diamond Grinding Disc
Safety:
- Particle mask
- Rubber gloves
- Safety glasses
Grind the bottom of the countertop:
- Always wear proper breathing and eye protection when grinding concrete. For this project we used an Alpha WDP-120 polisher connected to a HEPA vacuum cleaner, which helps minimizer the dust.
- The form wall liner is your grinding guide. You will be grinding until the casting material is flush with the wall lining. This will ensure a consistent thickness of the countertop.
- Using a grinder and disc (or a segmented grinding cup if the surface is very rough), grind the bottom of the slab around the perimeter of the casting.
- Continue grinding around the perimeter until the material moves flush with the mold wall liner.
Mark the location of the supports:
- The metal frame that the countertop will rest on has two support bars in the middle. Mark their locations on the slab and grind the concrete floor in those areas.
- Ground where the countertop supports will touch the bottom of the countertop.
- If your countertop support is a flat surface (not a metal frame like ours), you will need to grind the entire bottom surface.
Step 6: Demoulding


Don't be fooled by how easy it is to remove this recycled glass countertop from the mold. Most cracks or breaks will occur at this step if proper precautions are not taken to protect the counter from damage.
Once the countertop is removed from the mold, it should always be supported every 12 inches to ensure it does not crack.
Remove mold walls:
- Remove the walls of the mold and set aside. We will use them when we turn the hob.
- Before turning the top, knock down any jagged edges of the concrete with diamond pads. This will minimize shedding and create a smooth surface when you run your hand along the underside of the counter section.
- Gather the foam scraps from the wall and place them 12 inches apart as shown.
Turn around:
- Have 2 or 3 people on hand for this step. Roll the top onto the edge and then roll it completely over the leftover foam. Lift evenly and without prying at the corners.
- The base in the form of melamine can adhere to the slab. Remove it after the slab sits on the remaining foam.
- At this stage, before polishing, the finish is consistent, with only a few flecks of recycled glass showing through.
- The silicone that was applied and forged when sealing the shape has created smooth edges that do not need finishing.
Step 7: Polishing


Polishing your recycled glass countertop will take a considerable amount of time and patience. Glass aggregate is very hard and a large amount of material must be removed to expose the glass and create a homogeneous appearance.
For this project, we opted to use a single-head wet/dry polisher, but if this project were larger, we would have used a triple-head planetary polisher for faster results.
Tools:
- Alpha WDP-120 Wet/Dry Variable Speed Concrete Polisher
- Alpha polishing system
Polish:
- Start with a coarse 50 or 60 grit pad to remove as much material from the surface as quickly as possible. This is commonly known as the “cut” because you are cutting into the surface of the countertop to expose the aggregate cast into the concrete.
- For this countertop, we started with a 60 grit wet/dry polishing pad on the variable speed wet/dry polisher.
- As you polish, stop and periodically check the surface to make sure you are polishing the entire surface evenly.
- Then polish with the 150 grit pad. Each successive grit removes the cut marks created by the thicker pads.
- Once the aggregate is evenly exposed, thedensification process.
Step 8: Fine Polish and Densify the Recycled Glass Countertop


Use the lithium densifier while polishing to create a mixture to fill the air pockets as you go.
This method creates a slurry that closely resembles the base mix, but if you prefer to use conventional acrylic slurry, that option is always available.
Tools:
- Alpha WDP-120 Wet/Dry Variable Speed Concrete Polisher
- Alpha polishing system
- Surecrete LD1800 Lithium Densifier
- Spray bottle with water
- CS Unitec Vacuum Cleaner
Create mortar/grout:
- In a spray bottle, mix 1 part LD1800 Densifying Agent with 1 part water (50/50 ratio).
- Spray the surface with LD1800 dilution while dry buffing with a 300 grit pad on the variable speed polisher.
- This will create a suspension that will fill the air pockets on the surface. The weighting agent will cure to a glass-like consistency.
- Continue polishing and fogging the surface with the LD1800 dilution until the entire countertop has been polished and all air pockets have been filled.
Continue polishing:
- Follow dry polishing with higher grit pads to achieve desired appearance. Since we are going to seal this project with a sealant that forms a topical membrane, we will not need to use pads larger than 500 grit.
- Do not touch the unsealed surface with bare hands: the natural oil that stains your hands will stain the concrete.
After:
- Using the Lithium Densifier while polishing created a slurry that filled most of the small air holes in the surface.
- The suspension is seen here as a white/gray powder.
- Because we want a more uniform look, the surface will be sealed with Surecrete XS-PC12, a color-enhancing sealer, which will make the white slurry much less obvious.
- If we were using a sealer that does not enhance color, we would have used Pro-Formula acrylic paste instead of the lithium densifier.
Step 9: Sealing
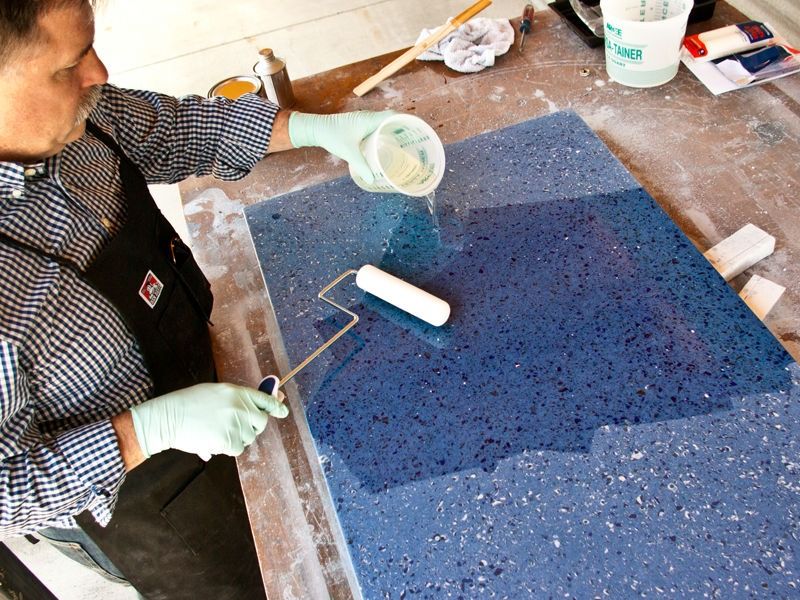


To achieve the boldest color possible, we will seal this recycled glass counter section with a sealant to enhance the high gloss color. We will apply two coats of Surecrete PC12 Sealer which will provide adequate protection and performance.
If this were a kitchen or bathroom project, we would probably sand and seal two additional coats to create a higher quality finish.
Tools to make the recycled glass countertop:
- Surecrete XS-PC12 Sealant
- 6″ paint roller
- 6″ foam roller cover
- Graduated mixing container
- Orbital sander 320 grit sandpaper
Safety:
- Rubber gloves
- Particle mask
- Mix and shake sealer:
For the first coat, you will need 6 ounces of sealer.
Mix 4.5 ounces of Part A with 1.5 ounces of Part B (3:1 ratio).
Stir the sealant for 3 minutess.
Apply Sealer:
- Pour a liberal amount of sealant onto the counter.
- Spread the sealant with a high-density foam roller, working the sealant into the surface, covering the entire countertop in an even layer.
- Using the roller, push excess sealant away from the edges.
Back roll:
- For a smooth finish, roll back the sealer with minimal pressure to knock down air bubbles.
Roll edges:
- Using the roller vertically, apply sealant to all 4 edges.
- Allow the sealant to dry.
- Allow the first coat of sealer to dry for 24 hours before sanding and applying the second coat.
Finishing sealant:
- After drying, lightly roughen the surface with 320 grit sandpaper.
- Using an orbital sander makes this quick, but be careful not to sand too much, just enough to flatten out any high spots and create a rough texture for the second coat to adhere to.
- Sand as evenly as possible, including the 3/4” edges.
Apply second coat of sealant:
- After cleaning the countertop, apply the second coat of sealant following the same steps as the first coat.
- Mix 6 ounces of sealant using 4.5 ounces of Part A and 1.5 ounces of Part B (3:1 ratio).
- Stir the sealant for 3 minutes.
- Apply the sealant all over the top and edges with the roller.
- Roll the sealer again to smooth the finish coat.
Final drying and polishing:
- After 24 hours, the second coat of sealer is ready for light duty.
- The sealant takes 48 hours to dry completely.
- If there are impurities or residue in the final coat, they can be sanded and the sealer can be progressively polished to a 2000 grit wet sand.
Step 10: Finished Recycled Glass Countertop


Due to heavy use, the sealer has lost its original shine and has some deep scratches, but it still holds up well. Greetings to all.
- Tags
- Concrete
Popular Content
How to make a rocket stove for outdoors
Cardboard Drawers Lined with Jeans
Bedroom furniture with secret compartments!
Latest Articles
How to make a refrigerator out of insulating material: Practical step-by-step guide
How to make a Kilim for the Home: Complete Step by Step Guide
How to protect ourselves from accidents in our workplace: Complete prevention and safety guide
Related Content
Transparent Ceilings: Covers that Capture Natural Light
How to Decorate your Home with Hearts
Tutorial to Transfer Images on Wood!
Starting the Car with a Rope (Dead Battery)
Creative Home Decor Ideas to Transform Every Space
Refreshing your home starts with smart design choices that combine comfort, personality, and functionality. Whether you want to modernize a small apartment, upgrade outdoor areas, or create cozy rustic interiors, these trending ideas can completely change the atmosphere of your space.
Outdoor Spaces That Increase Style and Functionality
Outdoor living continues to dominate modern home trends. Homeowners are increasingly investing in practical entertainment zones inspired by these BBQ shed ideas, which create the perfect setup for gatherings and weekend cooking sessions.
First impressions also matter when designing exteriors. Elegant farm entrance gates design ideas help properties stand out while improving privacy and curb appeal.
Compact living solutions are also gaining popularity. These inspiring 16x40 shed house interior design ideas show how smaller spaces can still feel luxurious and functional.
To enhance patios and entryways, homeowners are adding stylish protection with these creative porch awning exterior DIY ideas that blend aesthetics with practicality.

Rustic and Cozy Interior Design Trends
Warm and natural interiors remain timeless. These charming rustic decor ideas combine wood textures, vintage accents, and earthy tones to create welcoming spaces.
Bedrooms are becoming more personalized with curated wall arrangements. Many homeowners use these stylish picture wall ideas for bedroom spaces to display memories and artwork creatively.
Textured wall treatments are another major trend. Installing a board and batten wall adds architectural character while keeping interiors elegant and modern.
Similarly, bold accent wall ideas can instantly transform plain rooms into eye-catching focal points without requiring a full renovation.
Smart Kitchen and Organization Inspiration
Functional kitchens are essential for modern homes. These practical kitchen wall cabinet ideas maximize storage while maintaining a clean and stylish appearance.
Organization also starts at the entrance. Well-designed mud room ideas help families keep shoes, coats, and daily essentials neatly arranged.
Colorful and Personalized Home Styling
Vibrant interiors are becoming increasingly popular thanks to playful dopamine decor ideas that use bright colors and joyful accessories to improve mood and energy.
Gallery walls also continue to evolve as a major decorative feature. These trendy gallery wall inspiration ideas offer creative ways to combine prints, photos, and statement art.
Young renters and new homeowners are especially embracing these stylish first apartment aesthetic ideas to create sophisticated interiors on a budget.
Finally, selecting the right shades can dramatically influence any room’s atmosphere. These modern trendy color ideas help homeowners choose palettes that feel fresh, elegant, and timeless.
Final Thoughts
From rustic charm and colorful interiors to outdoor entertaining areas and functional storage solutions, today’s home decor trends focus on creating spaces that feel both beautiful and livable. By combining smart layouts, modern textures, and personalized decorative elements, any home can become more stylish, comfortable, and inspiring.


