

This DIY calendar is a stylish home decor piece that's easy to build and has a beautiful decorative effect. There's a DIY calendar for every taste and need, but our reader Giordano Bruno, not satisfied, made a completely personalized calendar all his own, practically eternal (valid for all years).
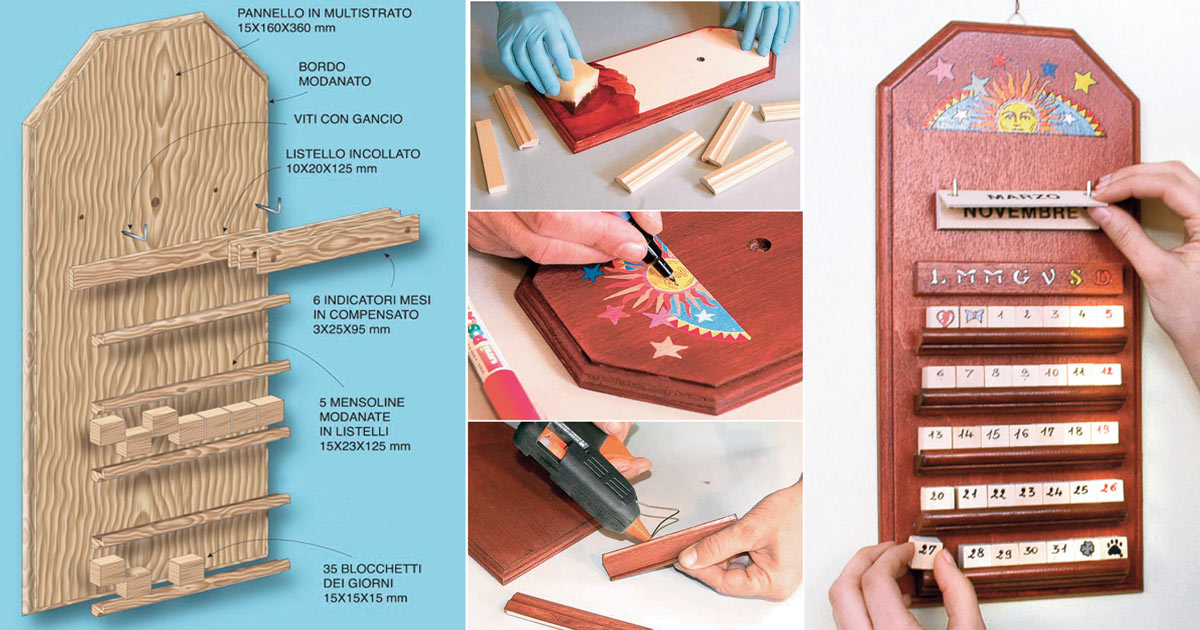
On a 15 mm thick poplar plywood board, 360 mm high and 160 mm wide, we find from top to bottom: the month indication placed on six thin plywood strips (25×95 mm) with one month on the front and one on the back, hung on small hooks; the days of the week marked with their initials on a ramin strip (10x20x125 mm); and five small shelves that hold 15x15x15 mm cubes with the day of the month from 1 to 31 written in red on one face and black on the opposite face.
Get Lifetime Access to Top AI Tools
Find Bleeding Edge Business Software at Scandalous Prices on Appsumo.

You'll need unlabeled cubes, variously decorated. The small shelves are made from 15x23x125 mm strips worked with a rabbet 15.5 mm wide and 5 mm deep to create a lip that holds the cubes in place.
By varying the project, we can also build a calendar with photos.
What You Need to Build a DIY Calendar
- Poplar plywood 15 mm, 360×160 mm
- 1 strip 10×20, 125 mm long
- 5 strips 23×15, 125 mm long
- 35 pieces 15x15x15 mm
- 2 L-shaped hooks 16×35
- 1 dowel N Ø 40
- 3 pieces 95×25 mm
For a complete home improvement setup, consider organizing your workspace with desks and work surfaces and proper lighting.
How to Make the Month Tags
On the strips made from hardwood plywood for model makers and carefully sanded, drill 8 mm diameter holes for hanging on the hooks, using a jig. After one or two coats of wood filler, well sanded, mark the names of the months, one on each face of the six strips.
You can use rubber stamps, but the work can also be done with India ink and a lettering stencil or with transfer letters.
How to Build Custom Calendars
The top corners of the base are cut at 45° with a miter saw or shaped with a jigsaw or band saw. Give it a coat of wood stain to match your decor.
This perpetual calendar makes a wonderful wall decor piece. For a complete look, pair it with rugs and curtains to tie your room together.

FAQ
What type of wood is best for this project?
Poplar plywood is recommended for the base, and hardwood plywood for the month tags. You can also use other types of wood based on your preference.
Can I customize the size of the calendar?
Yes, you can adjust the dimensions to fit your space. Just ensure the proportions remain balanced for the cubes and month tags.
How do I attach the calendar to the wall?
Use the L-shaped hooks or a dowel for hanging. For a more secure mount, consider wall mounting hardware.
Can I use this calendar outdoors?
If treated with weather-resistant finishes, it can be used in covered outdoor areas. For outdoor decor, explore our outdoor decor collection.
What if I don't have all the tools?
Many of these cuts can be done with basic hand tools. For power tools, check our home improvement selection for saws and sanders.
Browse Grand Goldman Home Decor
Discover unique craftsmanship home decor and furniture at the Grand Goldman Shop.
Home Decor Shop
 Acacia frida deluxe solid wood bed frame |
Bedroom bench |
Bed chest drawers |
Lingerie dresser |
Frame base |
Mirror with jewelry storage |
30 Bathroom Vanity |
Memory foam queen mattress |
Mattresses for back pain |
Nightstand set of 2 |
Grand Goldman Shop |
Civil Lawyer
Deutschland Trikot WM 2026
Acacia frida deluxe solid wood bed frame |
Bedroom bench |
Bed chest drawers |
Lingerie dresser |
Frame base |
Mirror with jewelry storage |
30 Bathroom Vanity |
Memory foam queen mattress |
Mattresses for back pain |
Nightstand set of 2 |
Grand Goldman Shop |
Civil Lawyer
Deutschland Trikot WM 2026







