
Would you like to have an elegant and functional wooden cart to accompany your grill? In this detailed guide, we'll show you how to build one from scratch, using affordable materials and simple techniques. Read on to discover how you can add a touch of style and practicality to your barbecues.
Necessary Materials
Before you start, make sure you have the following materials:

- Quality wood (we recommend oak or pine)
- Screws and nails
- Sandpaper of different grains
- Wood varnish or paint
- Robust wheels
- Metal handles
- Tools: drill, saw, hammer, screwdriver, etc.

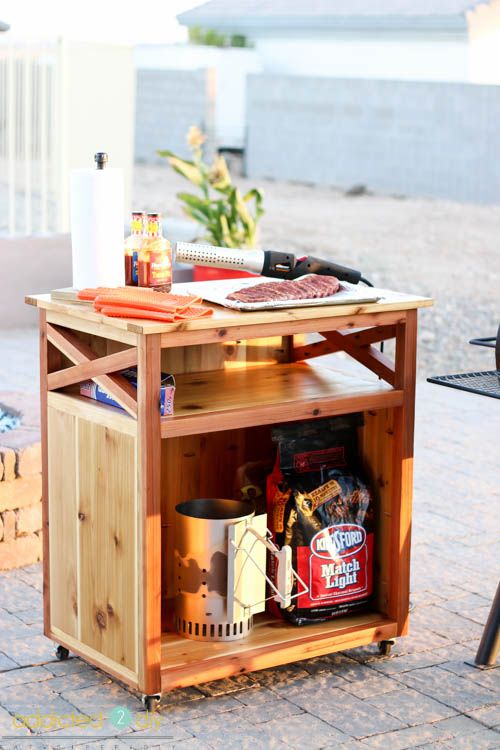
I built this cart for barbecue accessories, as well as to store the charcoal, cooking utensils and everything you need when you want to use it at any time of the summer.

Step by Step: Construction of the Wooden Cart
1. Wood Preparation
First, cut the wood into the desired dimensions for the different parts of the cart: base, shelves and sides. Sand all pieces to remove splinters and smooth the surface.
The cedar and redwood construction of this car means it will withstand the elements and the finished project will look great. Since all wood is not created equal, be sure to use measurements as a guide. The cedar boards lined up side by side should (in theory) equal 27 1/2″ width for the back, but in this case, it was 27 3/8″. We had to modify the cuts for the frame, shelf, bottom and top to reflect that.

To start, I distressed a bunch of redwood boards from 2x3s to 2x2s. These pieces will form the frame of the cart. I marked and drilled all my 1 1/2 pocket holes. I also planned all my cedar boards to be nice and smooth. Coarse grit sandpaper (80 grit) will smooth out the rough side.

2. Structure Assembly
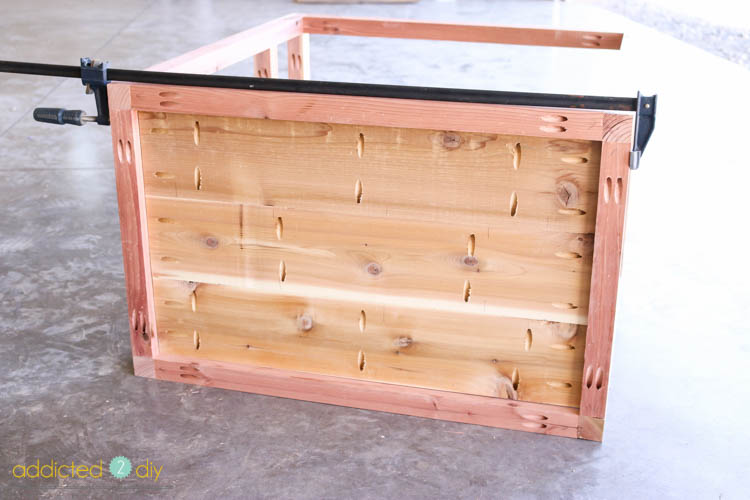
Assemble the main structure of the cart. Start by joining the sides to the base with screws. Make sure everything is level and firm.
Square all the corners and attach them with wood glue and 2 1/2″ pocket screws. Make sure the pocket holes are facing down so they will be hidden once the cart is assembled.

When the front and rear frame pieces are assembled, attach the 2×2 side stretchers with wood glue and 2 1/2″ pocket screws.

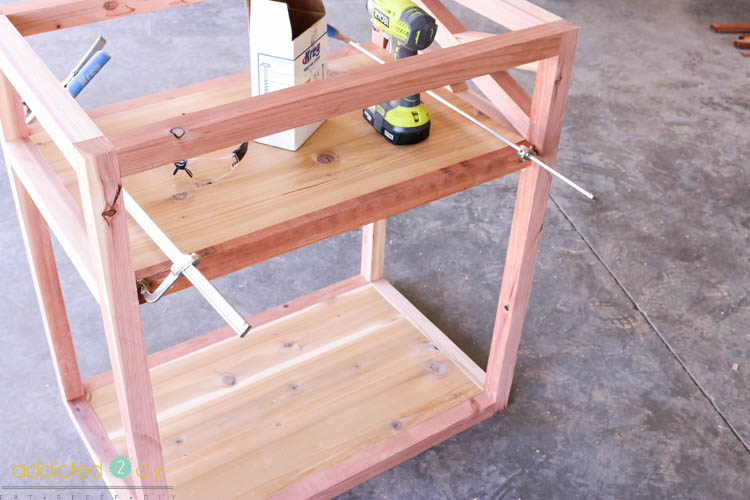
3. Installing the Shelves
Add shelves to the structure, securing them with nails or screws. These shelves will be useful for storing kitchen utensils, plates, and other necessary items during your barbecues.

To build the back, sides and shelves, attach the cedar boards with 3/4″ pocket holes and 1 1/4″ pocket screws.
Start with the bottom of the cart. Fit the bottom inside the frame, making it flush with the top side of the 2×2. Fasten everything with 1 1/4″ pocket screws.

To make the X on the sides, I clamped a 2x2 in place and marked the cuts with a pencil. In this case, cut the angles to 16 degrees. Once the longest piece of the X was in place, follow the same steps to determine where to cut the remaining pieces to make the X. The cuts ended sranging from 16 degrees on one side and 56 1/2 degrees to form the center. Then set aside for later.
The back is a solid panel, so a piece of leftover redwood (a 1×2) is used to fill the space between the top shelf and the back panel. Attach with 3/4″ pocket holes and 1 1/4″ pocket screws in the legs and then from the bottom, I attached the 1×2 to the shelf with the 3/4″ pocket holes that had been previously drilled into the shelf.

Attach the back panel and sides of the cart with 1 1/4″ pocket screws. Because the top shelf doesn't leave much room to work with, go back to drive the pocket screws into the frame.
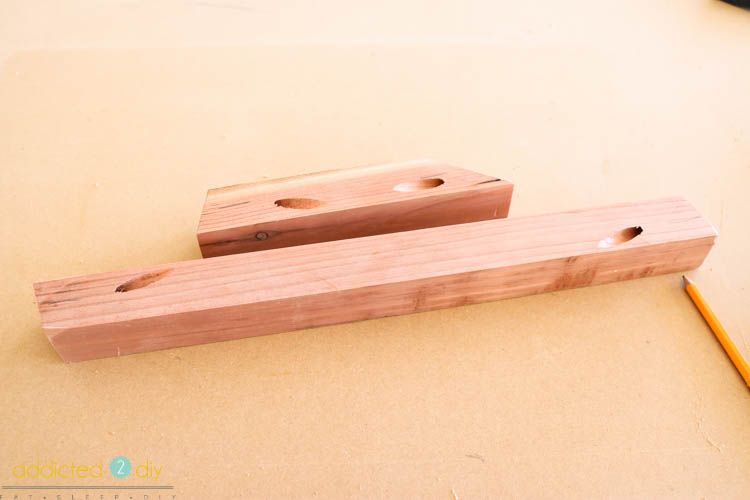
Drilling pocket holes in angled pieces is always a challenge, but an easy solution. For 16 degree angled ends, fit with the angled end flat against the bottom plate. Drill 1 1/2″ pocket holes in those ends with the drill bit to 1 1/2″ depth. For 56 1/2 degree ends, fit the 2×2s vertically, so only the tip of the angle touches the bottom plate. Set the drill bit 3/4″ deep and drill a pocket hole in the longer side of the 2×2 so the drill bit does not reach over the end.

I secured the pieces in place and attached with 2 1/2″ pocket screws.
4. Placing the Wheels
Fix the wheels to the bottom of the cart. Make sure they are sturdy and can support the weight of the loaded cart. The wheels should allow for smooth and easy movement.

Buy some 2″ wheels and place them in each corner of the bottom of the cart. Because the machine plate had a larger footprint than the corners, I tilted it to ensure each hole lined up with the wood for a screw to drive through. Secure with 1 1/4″ wood screws.

For the top, tear the remaining cedar into 1x3 pieces (2 1/2″ wide) to build the table frame. Again, it's important to make sure you measure your own project and use my measurements as a guide. The 1x6 center boards might be a little narrower than 5 1/2 inches, which will affect the length of the shorter frame pieces at each end. Assemble the table top with 3/4″ pocket holes and 1 1/4″ pocket screws.

To attach the table top to the cart base, drill 1/8″ pilot holes around the entire top. Center the table on the base and secure in place. Use offset adapter to drive 2″ screws through the bottom of the top pieces and into the top of the table. It gets a little tricky on the sides, where the X is, but it all worked out in the end.
5. Finishing and Varnishing
Once the cart is assembled, apply a layer of varnish or paint to protect the wood and give it a shiny finish. Allow to dry completely before use.

Benefits of Having a Wooden Grill Cart
- Practicality: Makes it easier to transport food and kitchen utensils to the grill.
- Style: Add a rustic and elegant touch to your outdoor space.
- Organization: Keeps everything you need within reach,improving efficiency in your barbecues.

Tips and Tricks
- Use Treated Wood: For greater durability, use wood treated against moisture and pests.
- Add Hooks: Consider installing hooks on the sides of the cart to hang grill tools.
- Personalize your Cart: Paint or decorate the cart according to your personal style to match your exterior decoration.

Conclusion
Building a wooden cart for your grill is not only a rewarding project, but it is also a practical and stylish addition to your grilling space. Follow this step-by-step guide and enjoy your meals outdoors in more comfort and style.
Get more information on our page perfectaidea.com and on our facebook for more ideas.
Popular Content
How to make a rocket stove for outdoors
Cardboard Drawers Lined with Jeans
How to Create a Fairy Garden: Magic, Creativity and Nature in One Place
Latest Articles
How to make a refrigerator out of insulating material: Practical step-by-step guide
How to make a Kilim for the Home: Complete Step by Step Guide
How to protect ourselves from accidents in our workplace: Complete prevention and safety guide
Related Content
Learn how to Maximize the space of a small room!
New method to build quickly and efficiently lightly!
From the Construction Quarry for your Home 6 Materials Used to Decorate
Lamps with Peculiar House Shapes: A Combination of Style and Functionality
Creative Home Decor Ideas to Transform Every Space
Refreshing your home starts with smart design choices that combine comfort, personality, and functionality. Whether you want to modernize a small apartment, upgrade outdoor areas, or create cozy rustic interiors, these trending ideas can completely change the atmosphere of your space.
Outdoor Spaces That Increase Style and Functionality
Outdoor living continues to dominate modern home trends. Homeowners are increasingly investing in practical entertainment zones inspired by these BBQ shed ideas, which create the perfect setup for gatherings and weekend cooking sessions.
First impressions also matter when designing exteriors. Elegant farm entrance gates design ideas help properties stand out while improving privacy and curb appeal.
Compact living solutions are also gaining popularity. These inspiring 16x40 shed house interior design ideas show how smaller spaces can still feel luxurious and functional.
To enhance patios and entryways, homeowners are adding stylish protection with these creative porch awning exterior DIY ideas that blend aesthetics with practicality.

Rustic and Cozy Interior Design Trends
Warm and natural interiors remain timeless. These charming rustic decor ideas combine wood textures, vintage accents, and earthy tones to create welcoming spaces.
Bedrooms are becoming more personalized with curated wall arrangements. Many homeowners use these stylish picture wall ideas for bedroom spaces to display memories and artwork creatively.
Textured wall treatments are another major trend. Installing a board and batten wall adds architectural character while keeping interiors elegant and modern.
Similarly, bold accent wall ideas can instantly transform plain rooms into eye-catching focal points without requiring a full renovation.
Smart Kitchen and Organization Inspiration
Functional kitchens are essential for modern homes. These practical kitchen wall cabinet ideas maximize storage while maintaining a clean and stylish appearance.
Organization also starts at the entrance. Well-designed mud room ideas help families keep shoes, coats, and daily essentials neatly arranged.
Colorful and Personalized Home Styling
Vibrant interiors are becoming increasingly popular thanks to playful dopamine decor ideas that use bright colors and joyful accessories to improve mood and energy.
Gallery walls also continue to evolve as a major decorative feature. These trendy gallery wall inspiration ideas offer creative ways to combine prints, photos, and statement art.
Young renters and new homeowners are especially embracing these stylish first apartment aesthetic ideas to create sophisticated interiors on a budget.
Finally, selecting the right shades can dramatically influence any room’s atmosphere. These modern trendy color ideas help homeowners choose palettes that feel fresh, elegant, and timeless.
Final Thoughts
From rustic charm and colorful interiors to outdoor entertaining areas and functional storage solutions, today’s home decor trends focus on creating spaces that feel both beautiful and livable. By combining smart layouts, modern textures, and personalized decorative elements, any home can become more stylish, comfortable, and inspiring.


