
On this occasion we will teach you how to make a conference table, which you can use in an office or in your home. The table I'm making here is a conference table, but it can be scaled up or down to meet your specific needs.
The top of this table is 10' long, 3' wide and is made of 1 ½" thick red oak. Needless to say, at the end of this build, it was extremely heavy. I buy all my lumber and usually move it myself, but in this case I had these S3S lumber boards for me simply because their team can do it much faster than mine.

Tools I used:
- Table saw
- Chisels
- Japanese hand saw
- Drill and Driver Set
Materials:
- Wood (Red Oak) 120″x9″ x 1 1/2″
- Hairpin table legs
Steps on how to make a conference table:
Step 1: Cut boards to width


The boards I'm starting with are S3S (pop up on three sides). Depending on your material, you may need to process your wood differently. Since these boards are S3S, there is an edge that was not milled. That edge was cut on the table saw when I trimmed these boards to their final width. This table is 36″ wide and is made up of four boards, so each board is reduced to 9″ wide.
Step 2: Orient the boards and cut slots for the cookies


Next, orient the boards so that they look best and fix them without glue. Then mark the areas where you will add cookies and number the boards so you don't accidentally mix them up.
These cookies are added to help keep the board faces even with each other during gluing. I suggest adding two rows of biscuits for boards this thickness and cutting each slot about 12″ from its neighbor.
To cut the second row, you will need to flip the board and reference the cookie joiner at the bottom of the board. All four boards got these cookies.
Dogs or dominoes will work just like cookies in this app.
Step 3: Glue and Clamps


Here I took some time to think about what glue I was going to use. Titebond is my go-to wood glue. I ended up using 1 because it matched the color of the wood better. If I were to build this board again, I would use titebond 3 simply because it has a longer work time.
After adding the cookies and completely covering the joint with glue, tap them lightly with a hammer to make sure they are fully seated in their slots.
To make the glue more manageable, glue the two halves of the table individually. Here it is important to keep these panels as flat as possible during gluing. I have some 2x4s on hand that I flattened their sides and covered with packing tape so the glue wouldn't stick to them. I added a lot of glue and on both ends. It's also a good idea to alternate your tweezers. Put some on the top and bottom of these panels to disperse clamping pressure.
Step 4: Clean the seams


After your first glue, clean up the seams between the boards. ORA block plane works great for leveling any high points. Then draw a bunch of pencil lines on the top surface. This helps me see where I may have missed any spots during sanding.
Start with a belt sander that sands the grain to remove material quickly. Once all the pencil lines are gone, do a light sanding pass with the grit to remove any heavy scratches. Then repeat the pencil trick for your orbital sander. Only sand at around 80 grit as more sanding will be needed here later.
This whole step can be done with an orbital sander. The other tools mentioned simply speed up the process.
Step 5: Cut the cookies


Clamp the boards together again and mark where to cut the grooves to join the two sections together.
Step 6: Glue the table up


This glue should be the same as the previous one. A good tip here is to also rub sanding sawdust over the joint to absorb the squeezed out glue and fill in any small gaps if there are any.
Your table may weigh less depending on its size, but after the glue dries, this top weighs almost 200 lbs. Always get help moving things that are big and heavy like this.
Step 7: Cut the spikes


There are many ways to cut these tenons, but first we must square the ends of the table. Use a circular saw or a circular saw and a straight saw like I did here.
Mark where the shoulder of the tenon will be and align the marking router bit. Next, clamp a straight edge to the table to use as a reference for the base of your router to travel from. There is a lot of material to remove, so take light passes to ensure a good quality cut.
Of course, these steps are repeated on the opposite side of the table and once this is done, you spread out where the tenons are and mark the areas to remove with a marker.
My tenons are 5″ wide, 4″ apart, and 2″ from the edge.
Step 8: Prepare everything for cutting the board


With that out of the way, we can start on the ends of the board. These are pieces of wood that will be placed on the short end of the table to help keep the table surface flat over time.
Start by cutting the boards to their final width. Next, set the exterior walls and the thickness of the mortise. I use my table saw to do this, but a router board will also work. I make several cuts and move my fence to take several passes to remove the remaining material between the two outer cuts.
Step 9: Mark and cut the mortises

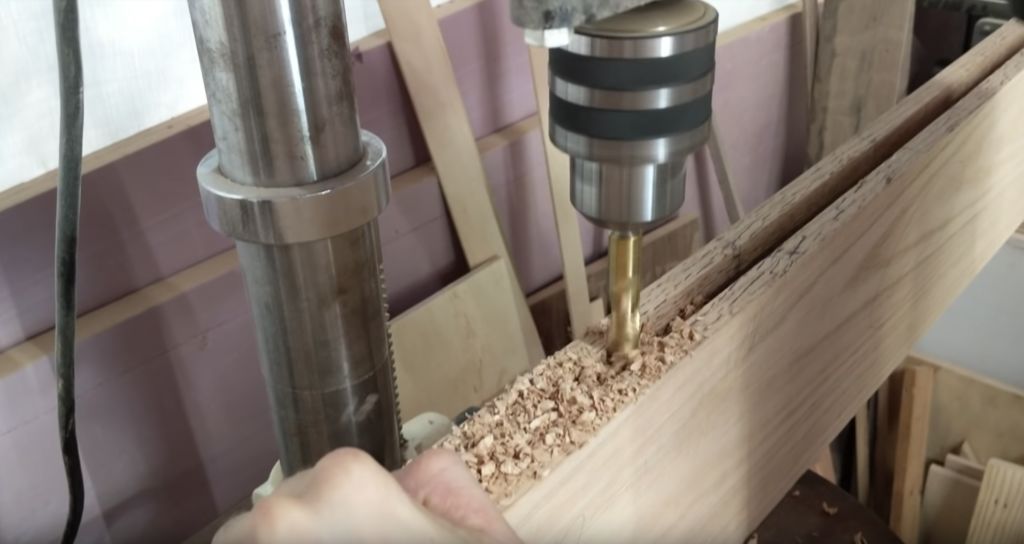
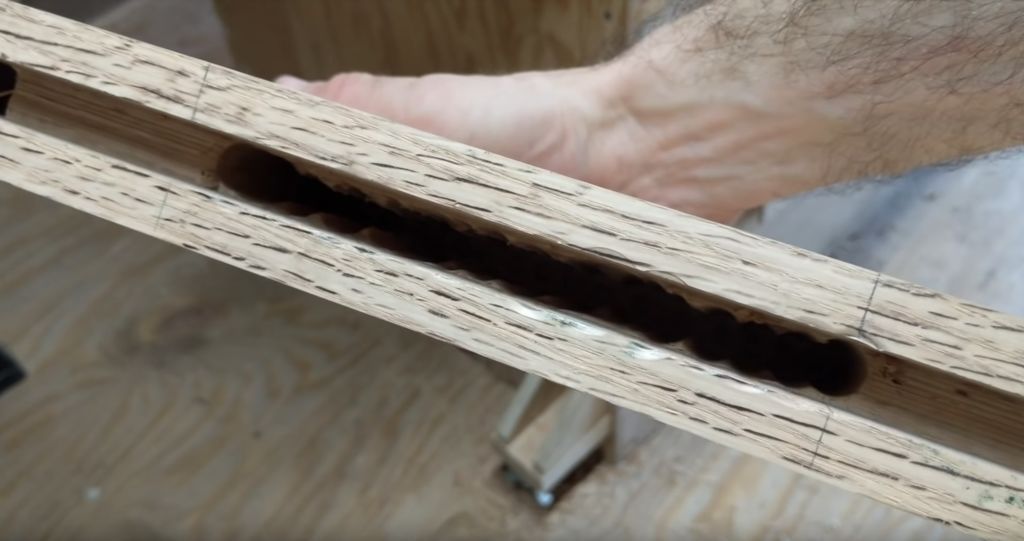
Transfer the tenon lines to the breadboard so you can cut the full depth of the mortises with the drill.
Drill the two outer holes first to establish the length of the mortise and then push the piece to drill a series of holes to remove most of the material. This leaves a messy looking mortise that then needs to be cleaned up with some light chisel.
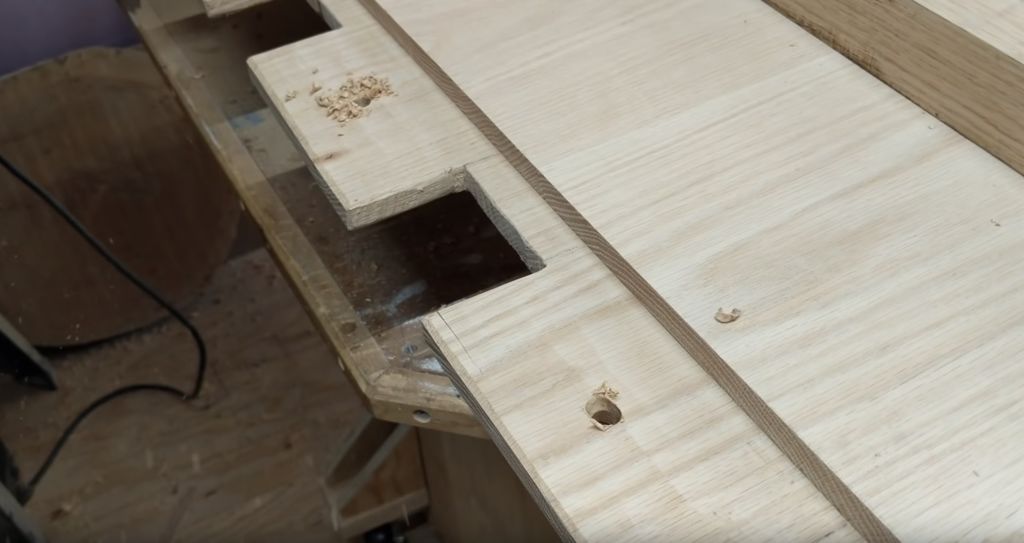
Step 10: Cut the spikes


Next, use a handsaw and saw to remove the material between the tenons.
Also, smooth the edges of the tenons with a chisel to help the end of the plate slide more easily
Step 11: Fit Test


With everything done, we can finally see if we deleted everything correctly. This joint should be snug but not too tight. You should be able to press it into place by hand or by gently tapping it with a hammer.
Make the necessary settings.
It is important to keep the board long at this point to make it easier to remove for the next step. Place a scrap block on the ledge and use a hammer or mallet to remove the bread plate if it is tight to remove my hand.
Step 12: Drill for the Pins

Breadboards cannot be glued in place because movement of the wood could cause the joint to fail. Because of this they need to be fixed in place. Mark where to drill the holes for the pins and drill with a drill to ensure they are straight. I used dowels as dowels here, so I'm using my pocket hole drill bit to drill the holes since it's the same diameter.
After placing the breadboard back in place, transfer the hole locations to the tenons with a pencil. When drilling the holes, place the bit a little closer to the shoulder of the tenon. This way, when you drive the pins into place, they will help you draw the bread board tighter on the table. This technique is called boring drawing. Also lengthen the outermost holes to allow the pins to move freely from side to side within the tenon as the table expands and contracts during seasonal change.
Step 13: Add the pins


Sharpen one end of the pins so you can hammer it into the hole more easily and chamfer the other end to reduce the risk of it breaking when hit into place.
Then, apply some glue and tap the pins to secure them to the breadboard and make sure they don't come out.
Step 14: Final Touches


Trim excess material on breadboards and pins. Now it's time to do some sanding. Scroll up and finish with 220 grit. You can take this up a notch if you want. Then, add a chamfer or round the edges of the table to give it a more comfortable feel.
Route back into corners to reduce the risk of breakage. Hold your router firmly and take your time.
Step 15: Finish the table

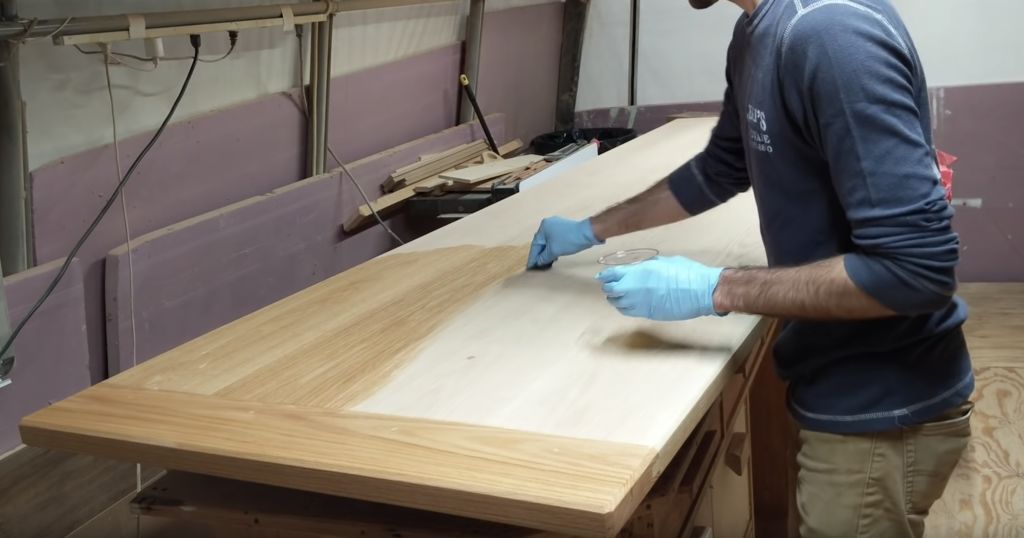

Using a polyurethane finish to finish the table is a great and simple option. It really brings out the natural colors of the wood and offers a good amount of protection over time. It's also incredibly easy to apply. I added a total of 4 coats of sanding with 220 grit between coats.
Step 16: Congratulations! It's all done!


Attach the legs and you're done! I hope you liked this project! Remember that you can make a conference table with your own measurements.
Don't forget to watch the video.
Thank you for your support!
Popular Content
How to make a rocket stove for outdoors
Cardboard Drawers Lined with Jeans
Change the facade of your home with simple steps!
Latest Articles
How to make a refrigerator out of insulating material: Practical step-by-step guide
How to make a Kilim for the Home: Complete Step by Step Guide
How to protect ourselves from accidents in our workplace: Complete prevention and safety guide
Related Content
PVC Tube Support for Skateboards (LongBoards)!
Barbecue and Grill Construction Plans
Building a Curved Concrete Bench!
Chandelier Shaped Lamp
Creative Home Decor Ideas to Transform Every Space
Refreshing your home starts with smart design choices that combine comfort, personality, and functionality. Whether you want to modernize a small apartment, upgrade outdoor areas, or create cozy rustic interiors, these trending ideas can completely change the atmosphere of your space.
Outdoor Spaces That Increase Style and Functionality
Outdoor living continues to dominate modern home trends. Homeowners are increasingly investing in practical entertainment zones inspired by these BBQ shed ideas, which create the perfect setup for gatherings and weekend cooking sessions.
First impressions also matter when designing exteriors. Elegant farm entrance gates design ideas help properties stand out while improving privacy and curb appeal.
Compact living solutions are also gaining popularity. These inspiring 16x40 shed house interior design ideas show how smaller spaces can still feel luxurious and functional.
To enhance patios and entryways, homeowners are adding stylish protection with these creative porch awning exterior DIY ideas that blend aesthetics with practicality.

Rustic and Cozy Interior Design Trends
Warm and natural interiors remain timeless. These charming rustic decor ideas combine wood textures, vintage accents, and earthy tones to create welcoming spaces.
Bedrooms are becoming more personalized with curated wall arrangements. Many homeowners use these stylish picture wall ideas for bedroom spaces to display memories and artwork creatively.
Textured wall treatments are another major trend. Installing a board and batten wall adds architectural character while keeping interiors elegant and modern.
Similarly, bold accent wall ideas can instantly transform plain rooms into eye-catching focal points without requiring a full renovation.
Smart Kitchen and Organization Inspiration
Functional kitchens are essential for modern homes. These practical kitchen wall cabinet ideas maximize storage while maintaining a clean and stylish appearance.
Organization also starts at the entrance. Well-designed mud room ideas help families keep shoes, coats, and daily essentials neatly arranged.
Colorful and Personalized Home Styling
Vibrant interiors are becoming increasingly popular thanks to playful dopamine decor ideas that use bright colors and joyful accessories to improve mood and energy.
Gallery walls also continue to evolve as a major decorative feature. These trendy gallery wall inspiration ideas offer creative ways to combine prints, photos, and statement art.
Young renters and new homeowners are especially embracing these stylish first apartment aesthetic ideas to create sophisticated interiors on a budget.
Finally, selecting the right shades can dramatically influence any room’s atmosphere. These modern trendy color ideas help homeowners choose palettes that feel fresh, elegant, and timeless.
Final Thoughts
From rustic charm and colorful interiors to outdoor entertaining areas and functional storage solutions, today’s home decor trends focus on creating spaces that feel both beautiful and livable. By combining smart layouts, modern textures, and personalized decorative elements, any home can become more stylish, comfortable, and inspiring.


