
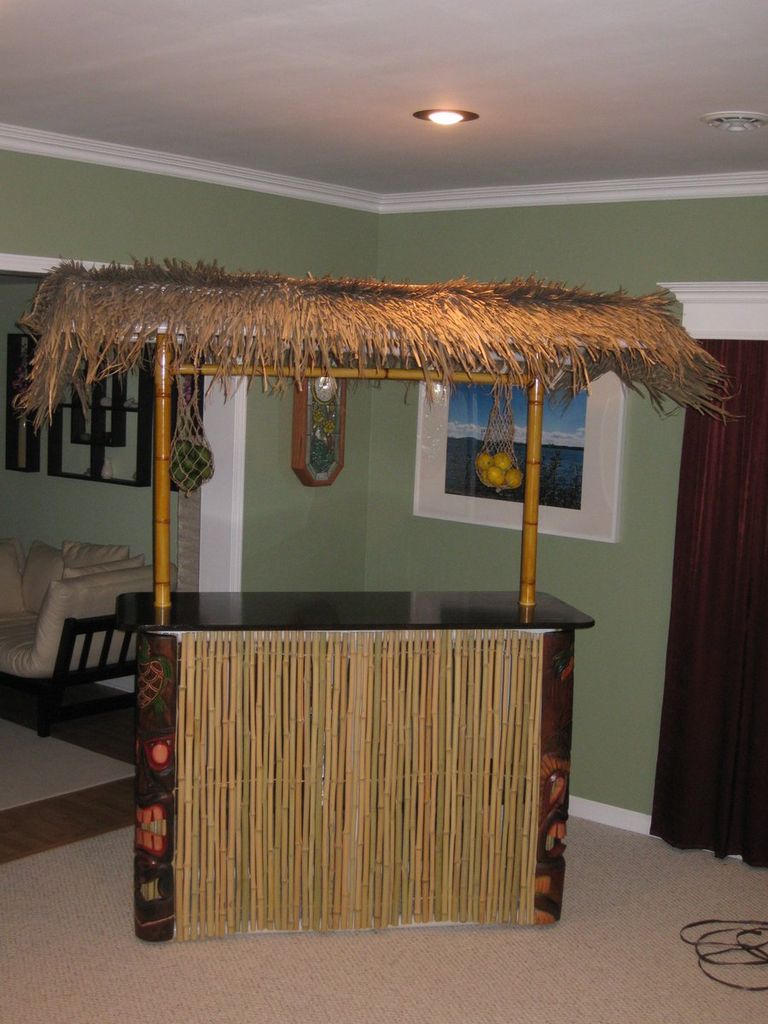
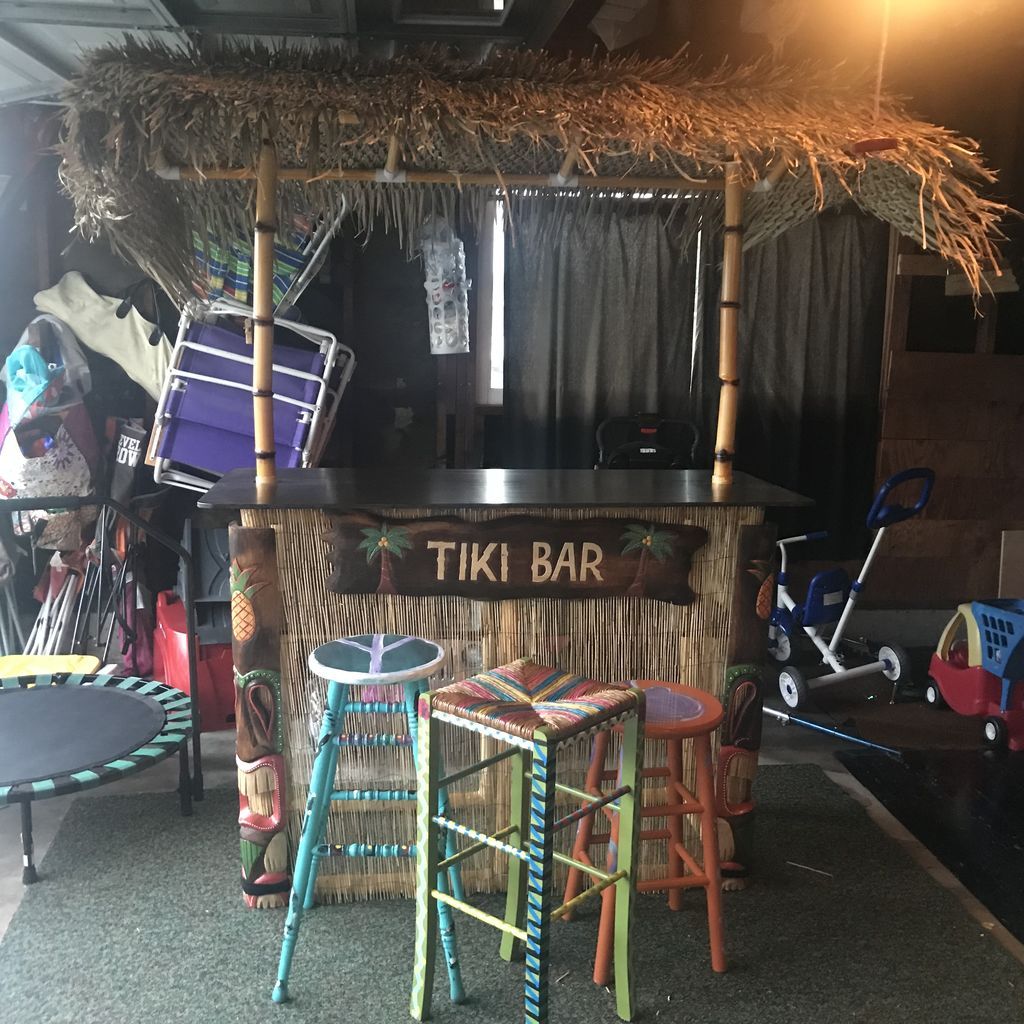
PVC Tiki Bar, the project is actually very easy, the hardest part is making the PVC look like bamboo and cutting it into sections to build the bar.
To get started, you will first need to familiarize yourself with these instructions as they are at the core of this project: Steps to Make PVC Pipe Look Like Natural Bamboo!

Next the steps…
Step 1: Tools/Materials
So what does it take to set up your own bar? The list below contains recommended tools and parts.
Please note that the base of the Tiki bar is made up of 1-1/2″ PVC pipe and fittings, while the cover is made of 1″ PVC pipe and fittings, I tried using 3/4″ PVC but it wasn't rigid enough, so I recommend the 1″.
Tools:
- PVC Cutting Device (I chose for miter saw, but hacksaw or pipe cutter works too)
- Propane Gas Torch (to make it look like bamboo)
- Knife
- Saw (to cut corners and grooves for the countertop and shelf)
- Circular saw (to cut wood for the countertop and shelf)
- Drill + 2-3/4″ hole saw (a jigsaw can be used instead to cut holes for the canopy support posts)
- 2″ foam brushes (I went through a dozen after varnishing the countertops)
- Sandpaper (always a requirement when painting and varnishing)
- Compass (for rounding corners and cutting holes)
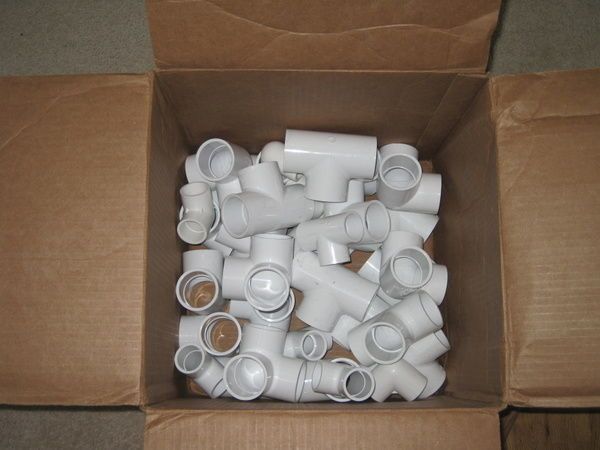
Materials:
- 8 PVC Side Elbows 1-1/2
- 14 1-1/2 PVC Tee Fittings
- 6 PVC pipes 1-1/2 x10 ft
- 1 1-1/2 PVC X-connection
- 1 Tri-Ply Hardwood Panel (Ash) 24″x60″
- 1 Tri-Ply Hardwood Panel (Ash) 18″x60″
- 4 1″x10 ft PVC Pipes
- 8 Elbows (Deg. 22.5) of 1″
- 8 1″ PVC Tee Connections
- 2 1″ PVC Elbows
- 4 1″ 90° Elbows
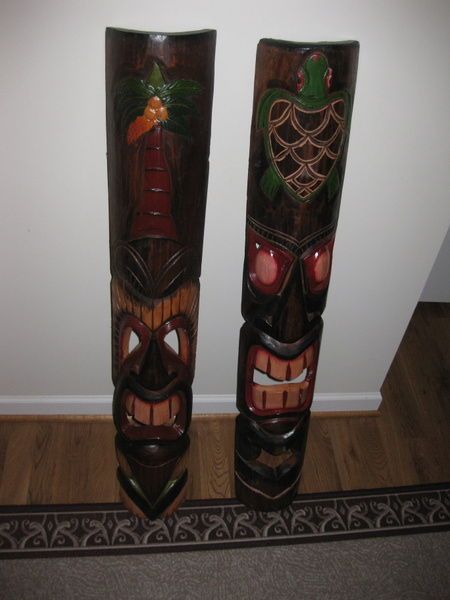
- 2 Tiki Masks
- 1 4’x8’x¾” Bamboo Fence Fence
- 2 Fences of 7'x30″
- Wood sealant (Amber Shelac)
- Polyurethane
- PVC glue
- 1 Pack of Velcro Cable Ties
- 1 can of acetone
- 2 Rolls of straw 30″ x 7′
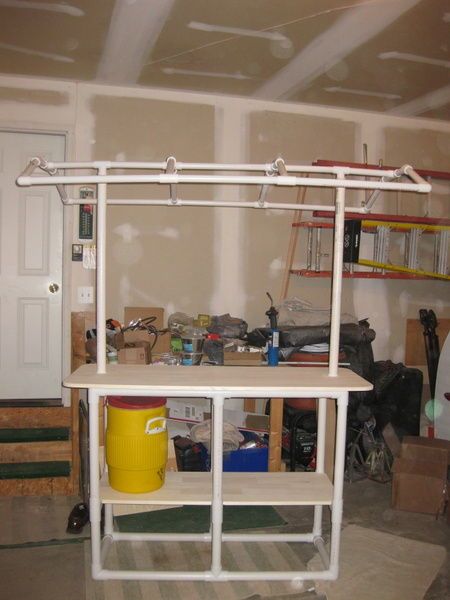
Step 2: Building the PVC base
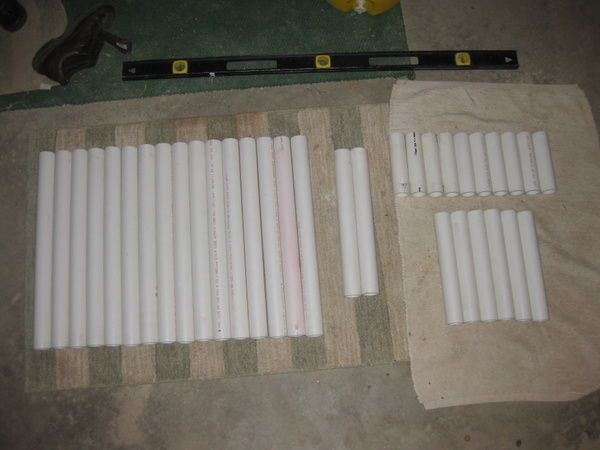

Cut the 1-1/2″ Tubing into the following sections: Quantity Length (inches) Length (centimeters) 16 22 inches 56 cm 6 12 inches 15 cm 2 16 inches 40.5 cm 10 7 inches 25.5 cm
Once you've cut all of this out, and it's good to note that keeping them all the same length is critical to construction, that's why I chose to use the miter saw, as I was able to cut two at a time, and after that was done, you can use all the saw chips to make artificial snow.
Optional:
Now that you have everything cut out, if you want to remove all the labels for a cleaner look, I recommend a rag and some acetone, grab any black, blue or pink letters from the pipe pretty quickly (including any barcode labels from the hardware store).
The first thing to do is connect the final pieces at this point, leave the PVC glue in the can and familiarize yourself with the general assembly:
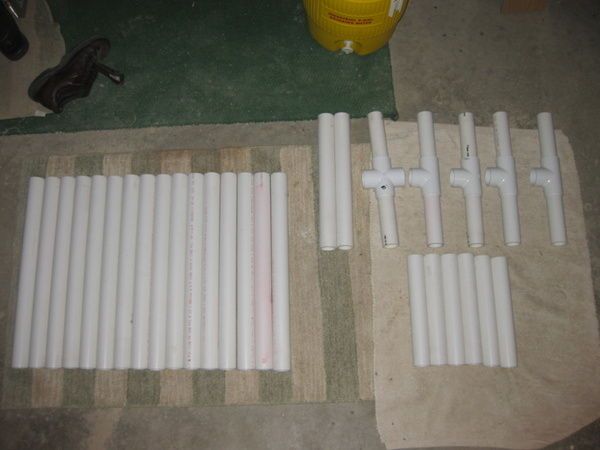
Assemble the sides and center support (Image #2):
Take all the 7″ pieces and connect two of them together using 4 of the 1-1/2″ T connections and 1 of the 1-1/2″ Cross.
This will give you the four side pieces (2 for the top and 2 for the shelf), as well as the center cross that is used for the shelf support.
Assemble the lower side pieceseriors (Image N°3):
Using 4 of the 1-1/2″ side elbows, take the 16″ pipe and place an elbow on each end of the pipe.
These will be used to create the lower side pieces.
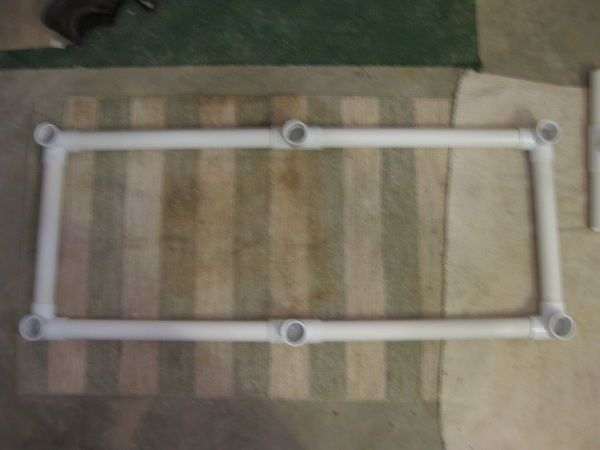
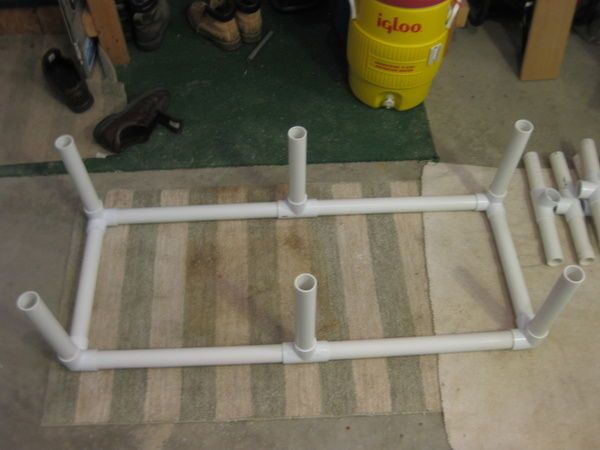
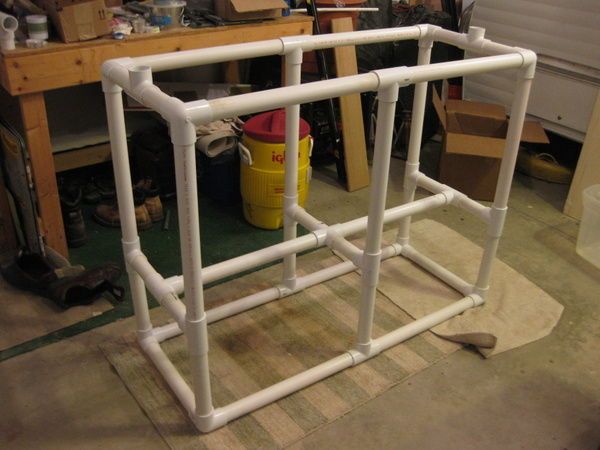
Assemble the base (Image #4):
To make things easier, 22″ pieces are used for both the crossbars and the top stiles.
I chose this size not only to keep them consistent and fewer pieces to figure out where to put them, but also at 22″ high above the shelf it allows a 5 gallon freezer to sit on the shelf below the bar.
Then, using the additional T-connections build the base of the bar using the bottom side pieces created in step #2 and 4 of the 22″ pieces (see fourth image).
Make sure the T-connections in the middle are facing up along with the side elbows.
Upload (Image #5):
Now that you have the base, use the 6 shorter 12″ pieces and insert them into all the holes in the base facing up, this allows the shelf to be in the lowest position
OPTIONAL:
If you want the shelf to be higher, start with the 22″ pieces works either way.
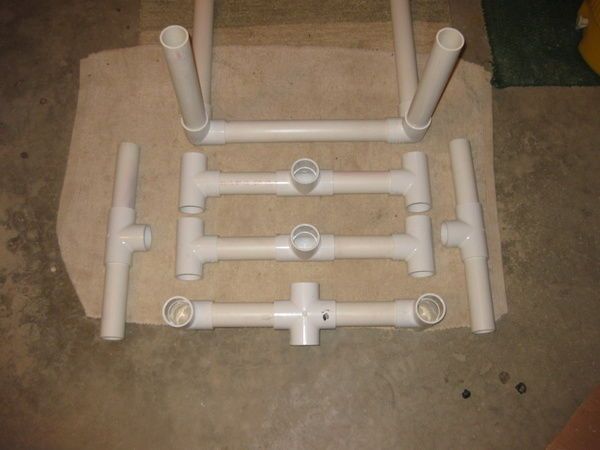
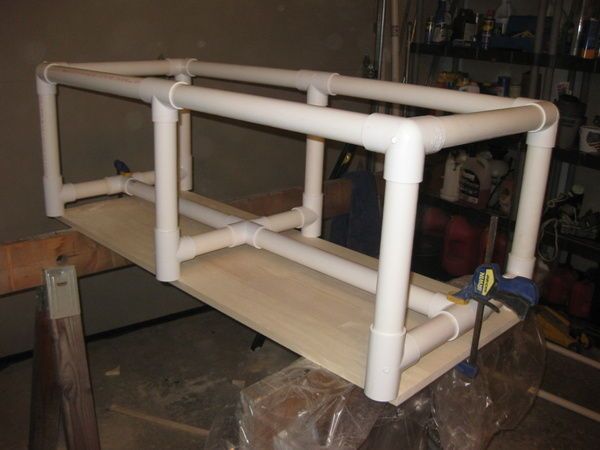
Create the shelf support (Image #6 and #7):
So, because your favorite liquor or drinks are probably heavy, I create cross members to support the wooden shelf to keep the weight down.
Using two of the side supports and the center support created in step #1, attach the T-connections to the ends of each of these (a total of 6) as shown in the image. Once they are assembled, place them on the assembled base frame with the cross fitting in the middle.
Connect the ends to the middle using 2 of the 22″ pieces of PVC.
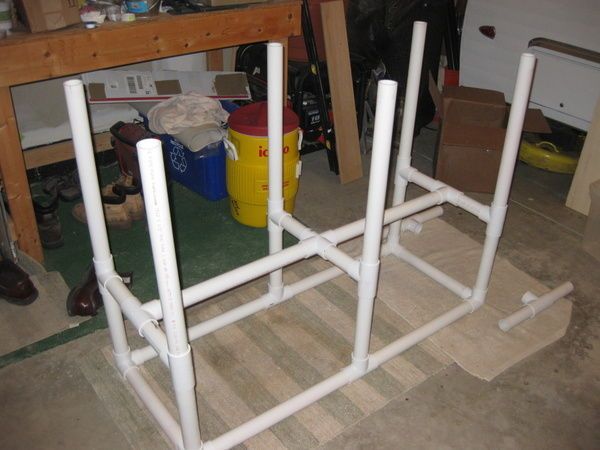
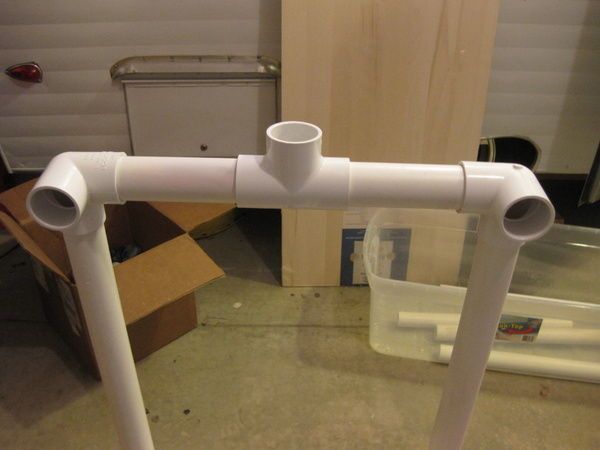
Get to the top (Image #8, #9 and #10):
Using 6 of the remaining 22″ pieces, insert them into the vertical holes. Take the remaining 4 side elbows and place one at each corner and the remaining 2 T-connections on the center studs facing the corners.
Attach all of these accessories to the other 22″ pieces and the two remaining end pieces created in step #1. The top middle T-connections should face up (these will be used later for the canopy supports).
Push and tighten all the fittings and this completes the PVC base.
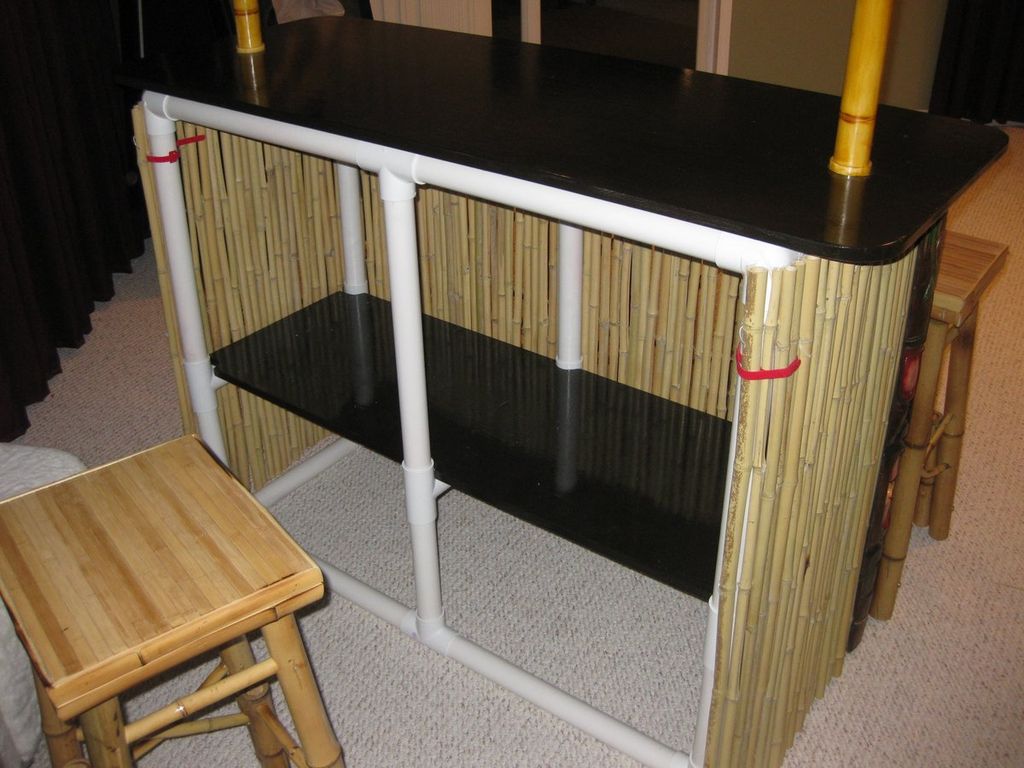
Step 3: Top bar and shelf
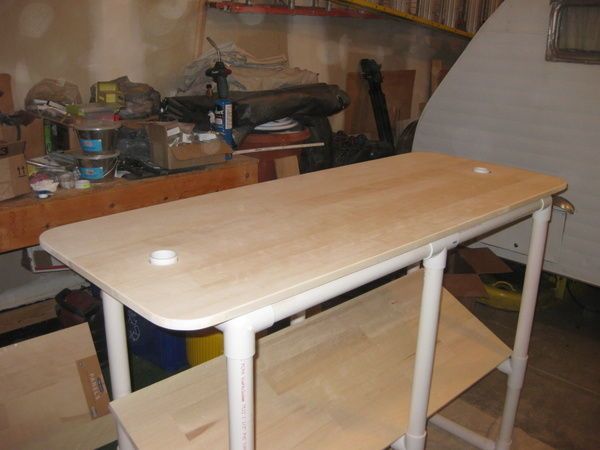

Now that you have your PVC base complete, it's time to attach the top bar and shelf. I used wood, you can go for more expensive or cheaper (plywood) depending on taste. For those who want to get really fancy, I recommend channeling the edges, but I only use a sander to blunt any sharp corners.
The upper part:
Pretty simple actually, cut the first piece of wood 60″x24″ wide, OPTIONAL: Using a compass and jigsaw, I curve the corners to a 4″ radius. You need to create the holes for the brackets to go through, to do this you can use a 2-3/4″ hole saw and drill motor or use a compass and jigsaw to cut the holes.
I measured at 5-3/4″ from each end and 10-1/2″ from the back to mark the center of the holes
Caution:
I recommend that you measure the distance between your Tee Fittings on your PVC base twice to check and make sure the holes line up correctly.
I did not center the holes from front to back to allow the front to overhang the bar and the counter to be flush with the PVC on the back.
The shelf:
Cut the second piece of wood to 18″x51″ long. Using the bottom of the base with the 12″ pieces inserted, place this on the board and trace the template on the board to cut the notches to accommodate the PVC studs (see image #2).
Note:
Make sure your PVC is assembled firmly to ensure accurate measurements. Use the jigsaw to remove the pieces you trace and the shelf should easily fit on top of the bottom of the base when finished (see image #3).
The fun part:
Sand, stain and sellar, I'm not going to go into detail on this as I'm sure there are plenty of instructions on this, but I used two coats of sealant on the shelf and top, and then on the top cover with 5 coats of Polyurethane.
Step 4: Supports for the cover


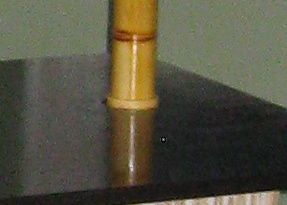
Key notes on making False Bamboo:
- Be sure to use acetone as directed to remove all labels before marking your PVC (I learned the hard way that if you burn the PVC with the marking on, it won't come off with acetone afterwards).
- I recommend giving it a good sanding before using the faux bamboo technique (easier to do before the nodes are created and you don't lose the burn marks)
- Do not cut the PVC until you have made it look like Bamboo. The process involves compressing the tubing to get a natural look, and if you cut it first, it won't be the same length when you're done.
- Once you finished lacquering the bamboo, I used Polyurethane in a can to seal the shellac, it also hardened a lot so that if you hit the pipe it wouldn't chip as easily.
Okay, now that you've created the faux bamboo, cut two pieces 38″ long. If you want to get creative, I recommend you also use the technique to at least apply lacquer to the two T-connections with the top middle on the base (since they are glued) from the countertop bar).
If the faux bamboo pipe does not fit into the T fitting now (due to shellac), this can be easily mediated by cutting the slot in the end of the pipe with a hacksaw 1/2″ deep.
Optional:
I used two more 1-1/2" top.
Step 5: The canopy
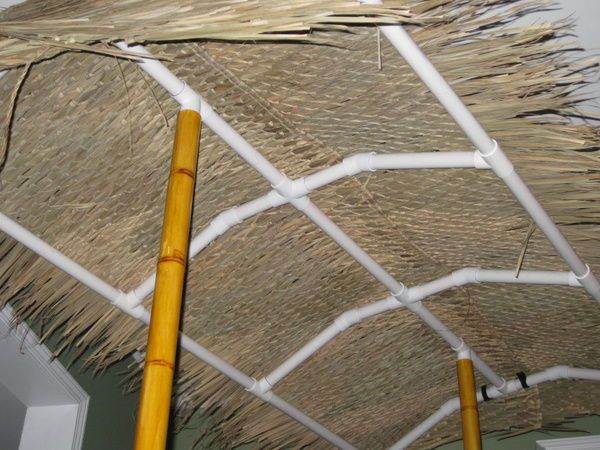
The canopy supports will be made from 1″ PVC pipe. So break out that miter saw one last time (because you can't make enough PVC fake snow in your shop) and get cutting:
1.- The central line:
Let's start with the center, there are 4 tees and two crossovers used in this set, start at one end in this order:
- Start by inserting a 10″ tee into the center of the other tee
- Insert the end of the next T into the end of the 12″ Piece in the previous step (the T should be face down)
- Insert a 12″ piece into the opposite end of the T in the previous step
- Insert a cross into the end of the 12″ piece in the previous step
- Insert a 19″ piece into the opposite end of the cross in the previous step
- Insert a cross into the end of the 19″ piece from the previous step
- Insert a 12″ piece into the opposite end of the cross from the previous step
- Insert the end of a T into the end of the 12″ piece in the previous step (the T should be face down)
- Insert a 10″ piece into the end of the T used in the previous step
- Insert the center of a T into the end of the 10″ piece.
At the end of the center line, you should have two Ts pointing down, you can insert two 6″ pieces into those down Ts, these will go to the center of your 1-1/2 Faux Bamboo.
2.- Upper flat roof:
Now for something a little less complex; At the two T's at the ends of your center line and your two center cross fittings, insert all the remaining pieces (qty 8) 6″ into these 8 holes, this will create a flat level surface in the center of the cover.
Once you have all of those ends, place a 22.5 degree elbow pointing down on the end of each of the 6″ pieces (qty 8).
3.- Percentage of angled roof:
Now to create the sloped roof supports, at the ends of each of the 22.5 degree elbows, insert a 10″ piece into each of these pointing down, this will create the even slopefor the straw to rest.
4.- The outer edges:
Similar to the center line, create two of the following; These completed sections will be attached directly to the 10″ pieces you inserted in step 3.
- Start with a standard elbow (for the corner) insert a 24″ piece into the elbow
- Insert the end of a T into the 24″ piece in the previous step
- Insert a 19″ piece into the opposite end of the T in the previous step
- Insert the end of a T into a 19″ Piece in the previous step
- Insert a 24″ piece into the opposite end of the T in the previous step
- Insert the final elbow (corner) into the end of the 24″ piece in the previous step
5.- Final assembly:
Now that you have the center line and the two outer edges, line up the Ts and elbows and join the outer edges to the center line.
Place your faux bamboo pieces (Dry Urethane) on the bottom base, and then place the two 6″ PVC pieces down from your canopy onto your Faux Bamboo.
6.- Optional:
If you are making the Tiki bar for more permanent use, I recommend that you continue gluing and painting the top canopy supports using the paint that was used on the canopy supports for a more natural look.
I haven't done this yet, as I'm making mine for mobile use, and I didn't want to have to worry about capping all the ends that go into the PVC fittings, making sure they stay tight after painting.
Step 6: Finish and Customize


So, you should now have made the decision on how “portable” you need your bar to be. Using the PVC glue, you can place the parts and accessories you want, if you are not going to move them frequently, I recommend gluing all the accessories for greater strength and stability.
Because I tend to move mine around often, I chose to connect all the accessories to the smallest accessory they connect to. This allows me to break it down and throw it in a bin to take camping...
Complement:
Now that you have the structure, it's time for the really fun part... Adding the accessories... This is where you bring in those remaining parts mentioned in the materials list.
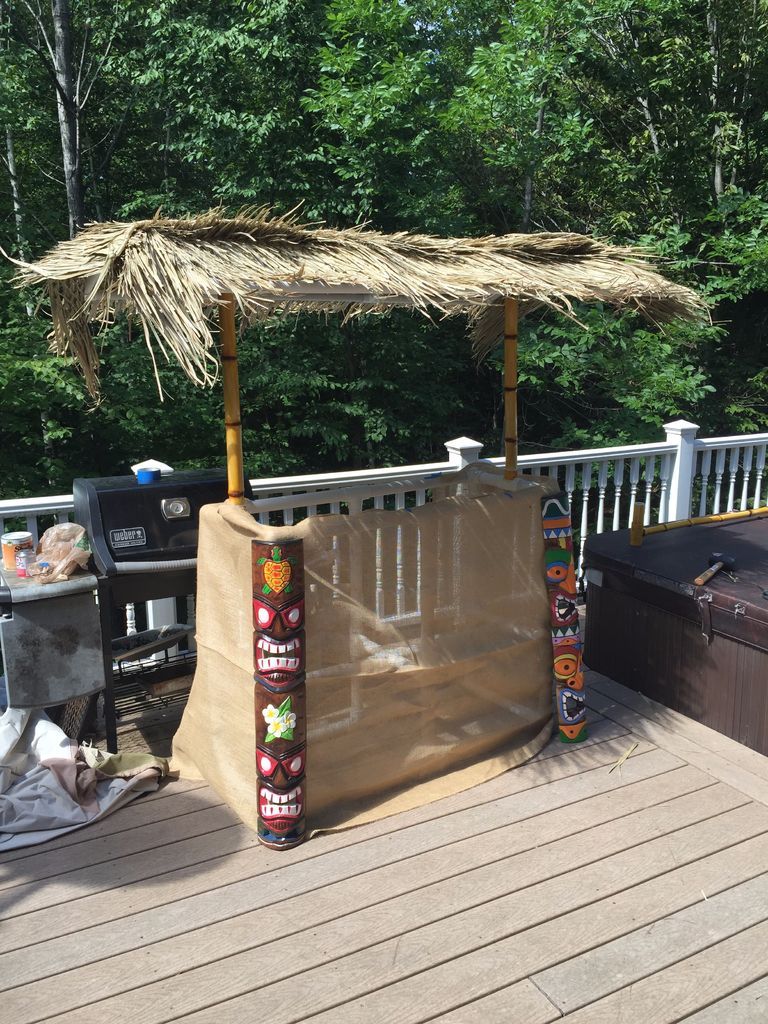
- Thatch: Starting with the canopy and illustrated in the previous step, I used Velcro to attach the thatch to the canopy frame, overlapping the two pieces by about 6″ and letting them hang about 10″ at each end. I found that if you find Velcro cable ties, they make it easier to attach to the PVC. Obviously, this is easier to do with the canopy on the ground and then elevate the entire assembly to the Faux Bamboo.
- Bamboo Fence: So you will need to cut the 48″ of the bamboo fence down to about 39″, this is easily done with a pair of scissors or a hacksaw if you get thicker bamboo. Using Velcro or zip ties (if permanent), place it under the bar and wrap around the PVC pipe at the ends leaving the back open (you can also trim the 8′ length).
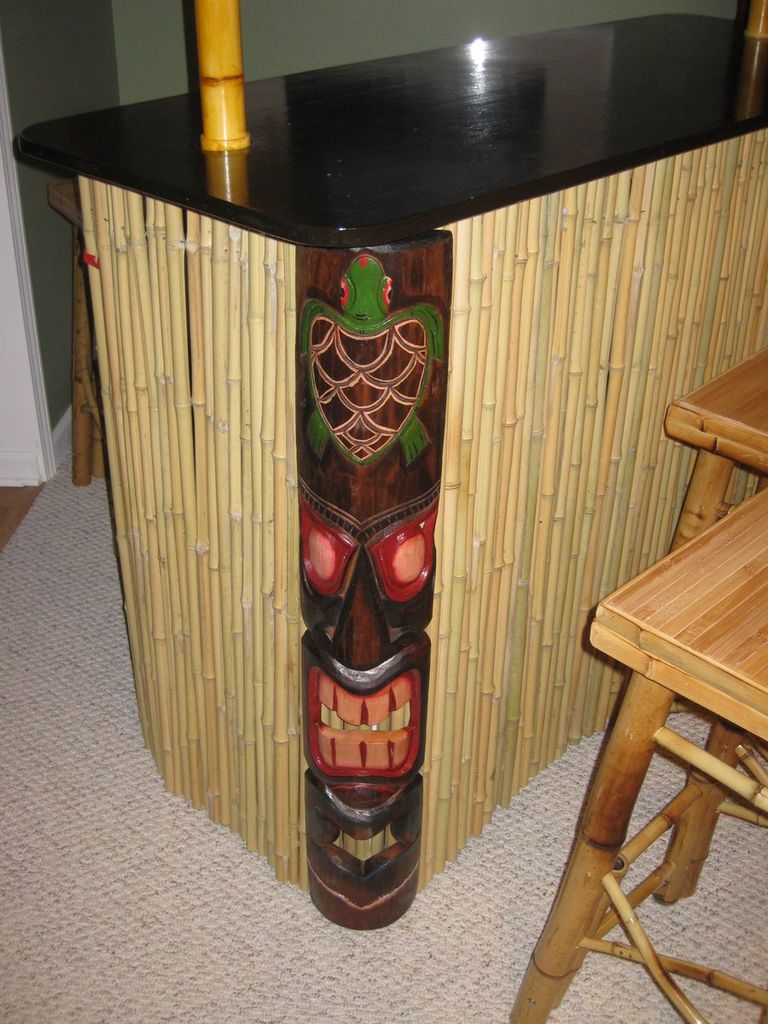
- Tiki Masks: I attached Velcro strips to the back of the Tiki masks at the top and bottom with a little glue and a staple gun, then ran the Velcro over the bamboo fence and around the PVC post to securely attach them to the bar.
- Stools: Totally optional.
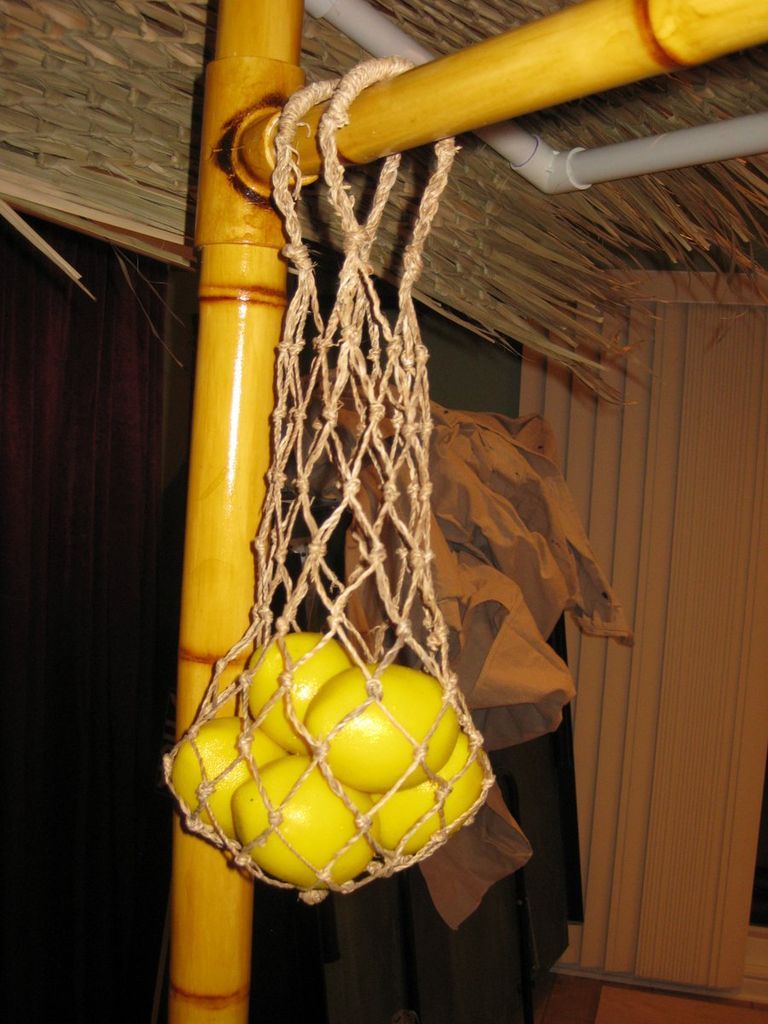
I ended up adding a rod to the top of the faux bamboo canopy later, I use these hanging patio lights, an easy option to add using two additional PVC tees and a bit more PVC pipe. I found some old nets, fake lemons and limes to add some extra touches.
Similar Ideas:

That's it! Oh wait? Don't forget to stock the bar with your favorite drinks! Enjoy!
Learn more at Perfectidea.com and on our Facebook for more PVC Tiki Bar.
- Tags
- PVC pipes
Popular Content
How to make a rocket stove for outdoors
Cardboard Drawers Lined with Jeans
Change the facade of your home with simple steps!
Latest Articles
How to make a refrigerator out of insulating material: Practical step-by-step guide
How to make a Kilim for the Home: Complete Step by Step Guide
How to protect ourselves from accidents in our workplace: Complete prevention and safety guide
Related Content
Glass Jar Flashlight (With Independent Power)
Magnificent Wooden and Steel Wall Bike Racks
170m² House Built with Reused Materials
Washer and Dryer Pedestals with Storage!
Creative Home Decor Ideas to Transform Every Space
Refreshing your home starts with smart design choices that combine comfort, personality, and functionality. Whether you want to modernize a small apartment, upgrade outdoor areas, or create cozy rustic interiors, these trending ideas can completely change the atmosphere of your space.
Outdoor Spaces That Increase Style and Functionality
Outdoor living continues to dominate modern home trends. Homeowners are increasingly investing in practical entertainment zones inspired by these BBQ shed ideas, which create the perfect setup for gatherings and weekend cooking sessions.
First impressions also matter when designing exteriors. Elegant farm entrance gates design ideas help properties stand out while improving privacy and curb appeal.
Compact living solutions are also gaining popularity. These inspiring 16x40 shed house interior design ideas show how smaller spaces can still feel luxurious and functional.
To enhance patios and entryways, homeowners are adding stylish protection with these creative porch awning exterior DIY ideas that blend aesthetics with practicality.

Rustic and Cozy Interior Design Trends
Warm and natural interiors remain timeless. These charming rustic decor ideas combine wood textures, vintage accents, and earthy tones to create welcoming spaces.
Bedrooms are becoming more personalized with curated wall arrangements. Many homeowners use these stylish picture wall ideas for bedroom spaces to display memories and artwork creatively.
Textured wall treatments are another major trend. Installing a board and batten wall adds architectural character while keeping interiors elegant and modern.
Similarly, bold accent wall ideas can instantly transform plain rooms into eye-catching focal points without requiring a full renovation.
Smart Kitchen and Organization Inspiration
Functional kitchens are essential for modern homes. These practical kitchen wall cabinet ideas maximize storage while maintaining a clean and stylish appearance.
Organization also starts at the entrance. Well-designed mud room ideas help families keep shoes, coats, and daily essentials neatly arranged.
Colorful and Personalized Home Styling
Vibrant interiors are becoming increasingly popular thanks to playful dopamine decor ideas that use bright colors and joyful accessories to improve mood and energy.
Gallery walls also continue to evolve as a major decorative feature. These trendy gallery wall inspiration ideas offer creative ways to combine prints, photos, and statement art.
Young renters and new homeowners are especially embracing these stylish first apartment aesthetic ideas to create sophisticated interiors on a budget.
Finally, selecting the right shades can dramatically influence any room’s atmosphere. These modern trendy color ideas help homeowners choose palettes that feel fresh, elegant, and timeless.
Final Thoughts
From rustic charm and colorful interiors to outdoor entertaining areas and functional storage solutions, today’s home decor trends focus on creating spaces that feel both beautiful and livable. By combining smart layouts, modern textures, and personalized decorative elements, any home can become more stylish, comfortable, and inspiring.


