


Learn how to build a table tennis Pong table easily thanks to our following tutorial that you can do yourself in the comfort of your home.
Are you looking for a fun, social and easy-to-play game?

Look no further than this DIY ping pong table you can build it for a much lower cost than what you would find in any store. It only takes a few hours to build; and it will be the envy of your town.
Add it to your outdoor space/garage/indoor space and help make your home the one people want to visit to have a good time!
Step by step on how to build a ping pong table
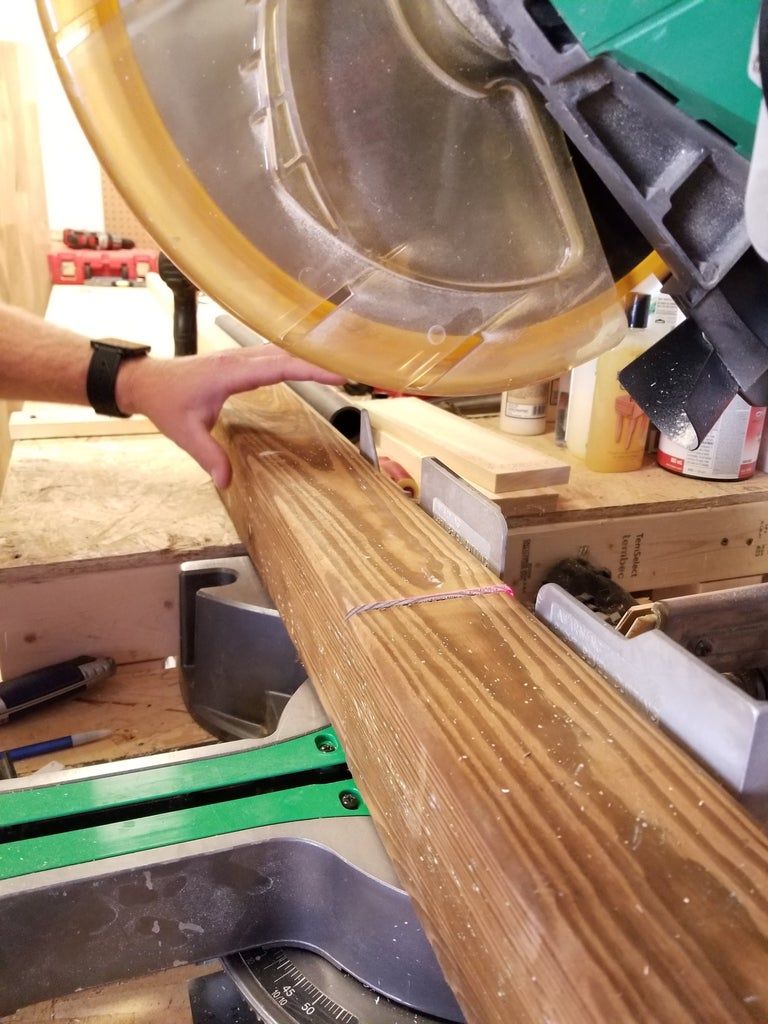
#1: Head to the local hardware store

Recommendation:
Remember that building a Ping Pong table can be a little complicated to make if you don't have the right tools.
That is why it is recommended to first have all the necessary tools to move forward with this DIY project.

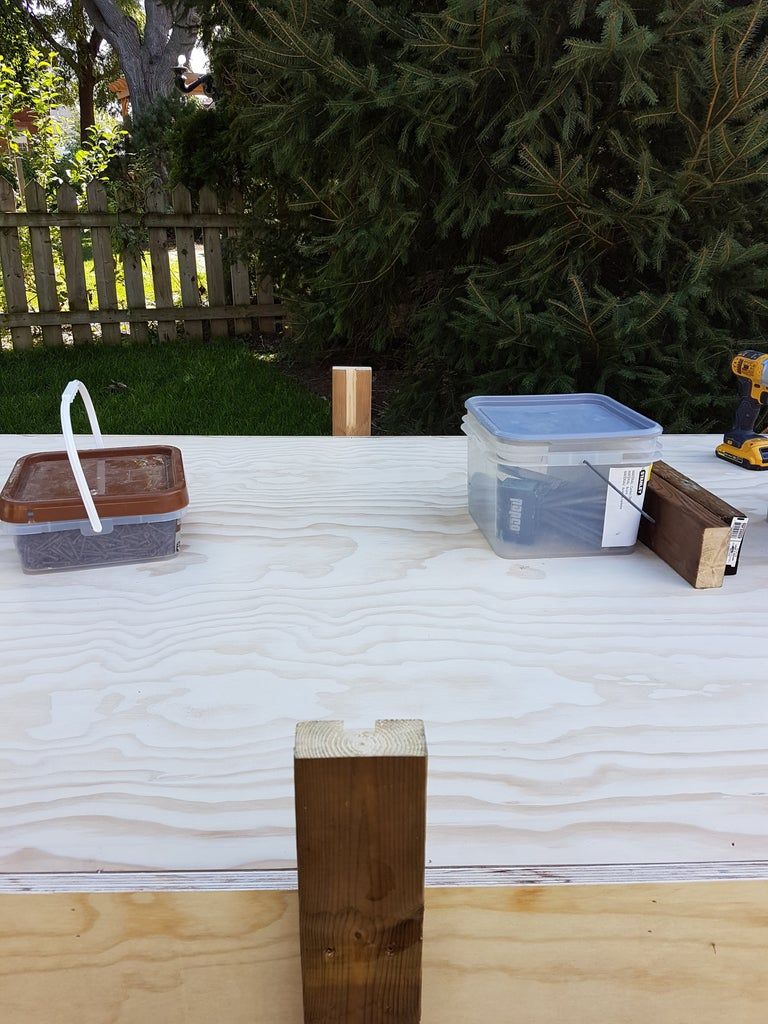
Please note that I already had the equipment at home and did not need to purchase it, but I have included what I used in the images.
Woods:
- 1 – 4x4x10 PT
- 8 – 2x4x8 PT
- 8 – 2x3x8
- 2 – 4x8x23/32 Plywood
Team:
- 2 Brown Screws 1/2″ # 8
- 1 Brown Screw 1/2″ # 8
- 5/8″ LedgerLOK 3 screws (not necessary… Can be replaced with 2 1/2″ screws)
- 2″ Galvanized Nails
- Framing nails for 3 1/4″ 30 degree paper strips (not necessary…Can be replaced with 2 1/2″ screws)
- Wood glue (outdoor grade)
Tools:
- Miter saw (you can cut wood at the store if you don't have this)
- Impact screwdriver/drill
- Framed nail gun
- 16 ga nail gun
- Carpentry squares
- Tape measure
- Clamps
- 4×8 Centipede Table
- Table saw
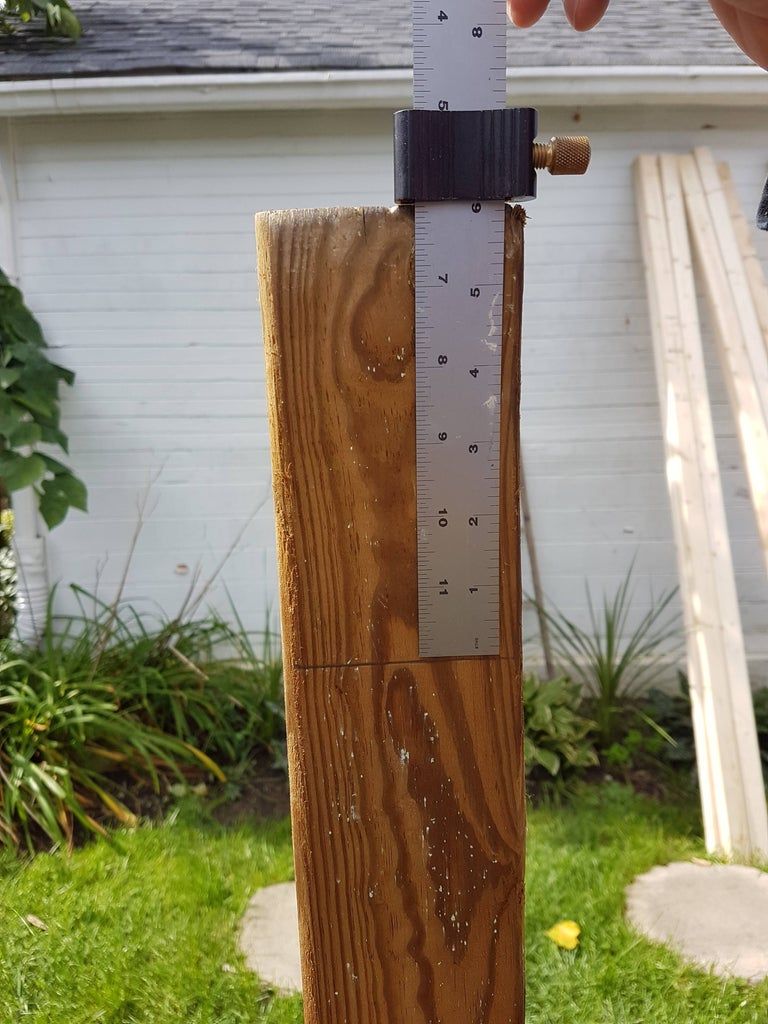
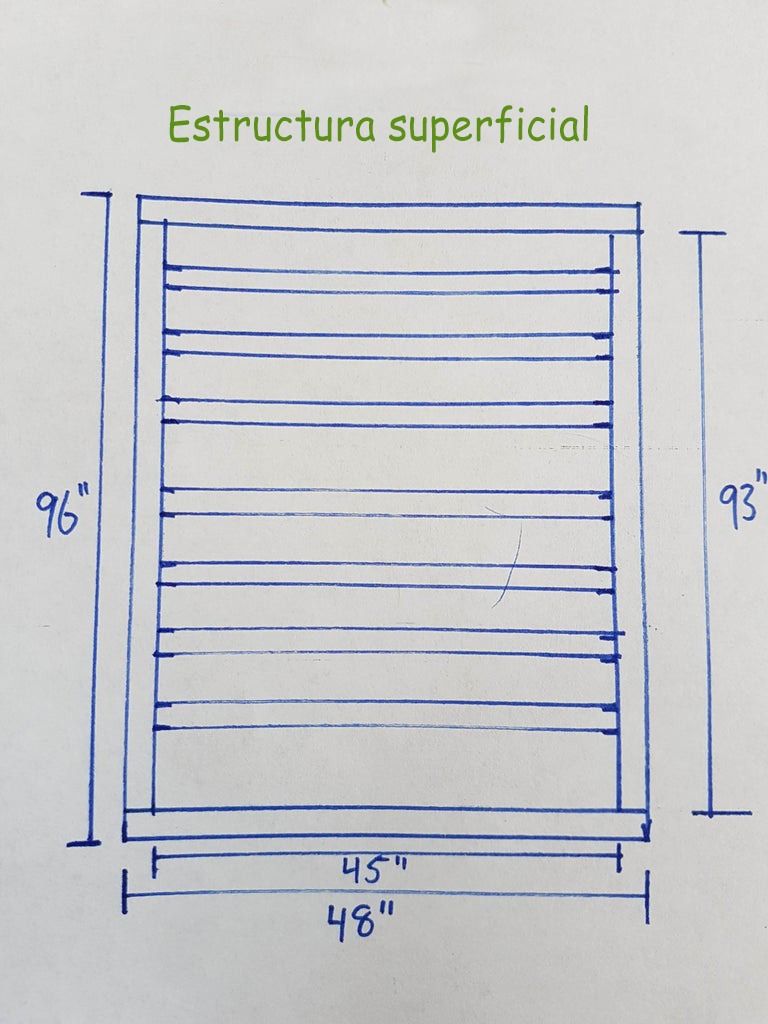
#2: Cut List
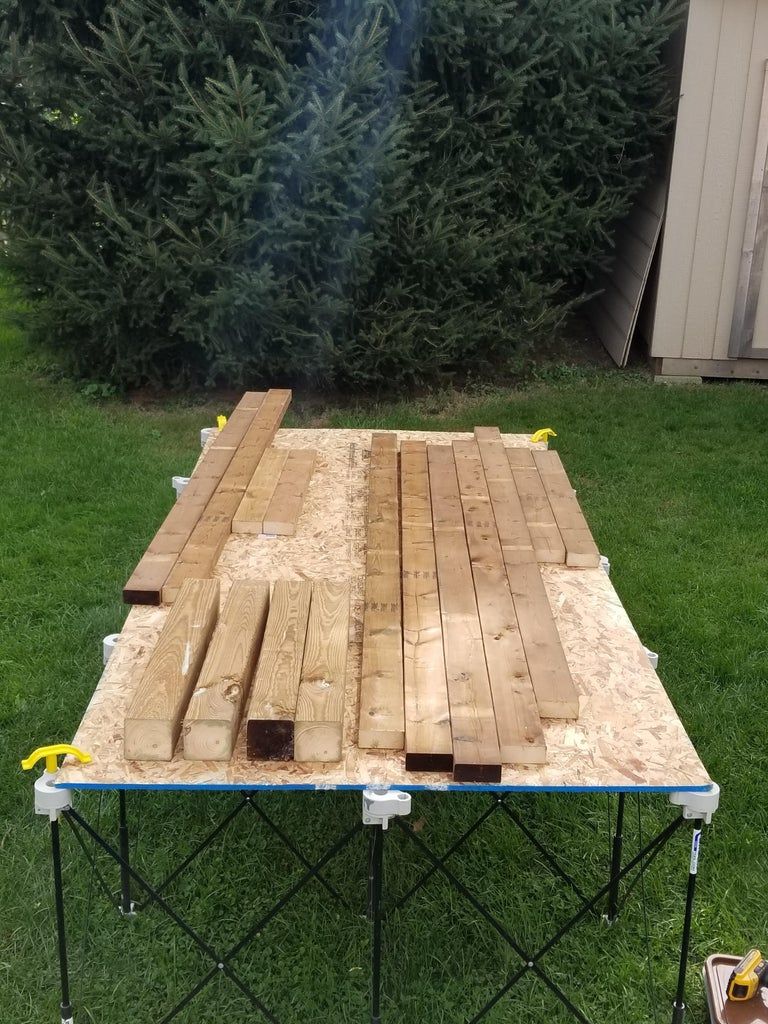
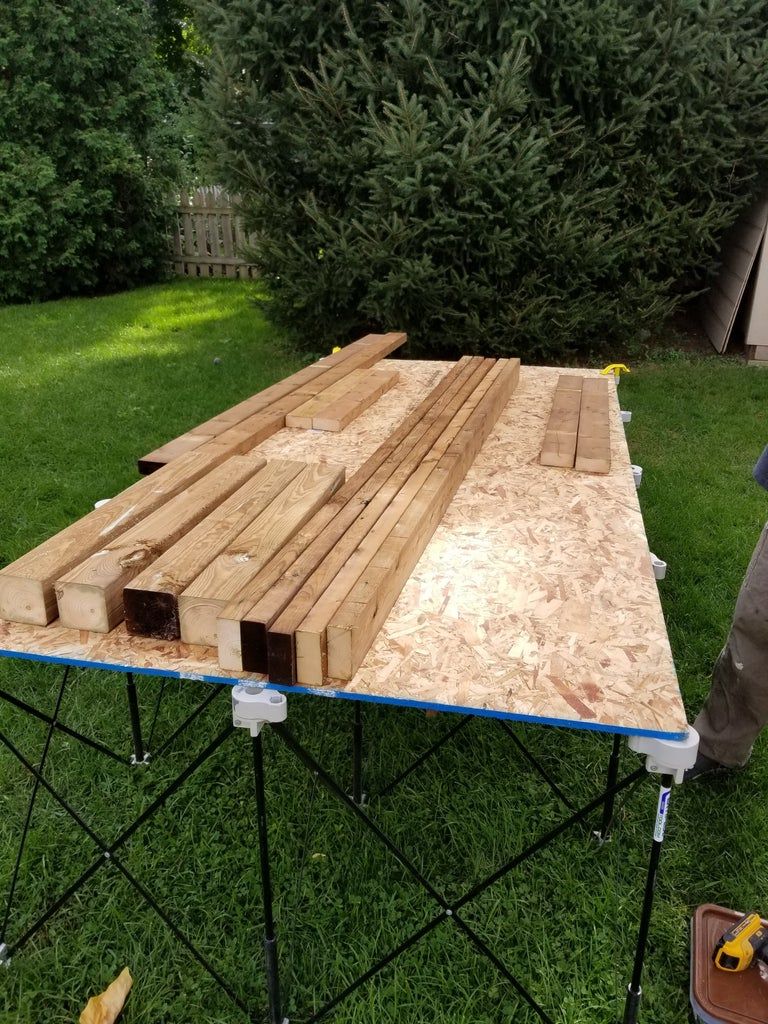
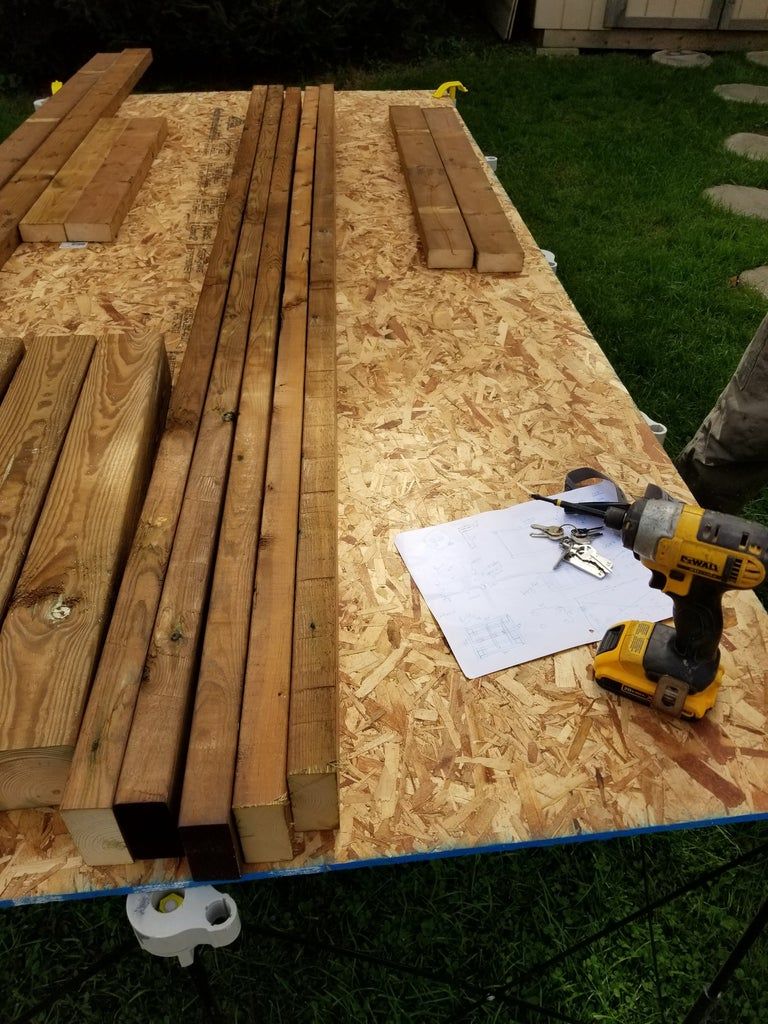
First of all cut all the materials and organize them! I would recommend writing what each element is for on the cut ends (for example, BB for the bottom base).
Cut List:
4x4x10:
- 4 pieces @ 27″
2x4x8:
- 5 @ 84″
- 2 @ 39″ – 2 @ 29″ – 2 @ 81″
- 4 @ 14″
2x3x8:
- 2 @ 48″
- 2 @ 93″
- 6/7 at 45″
23/32 4×8 plywood:
- 4 @ 8” x 96″: 2 of these @ 8″ x approx. 49 1/2″)
- 1 @ 6” x 96″
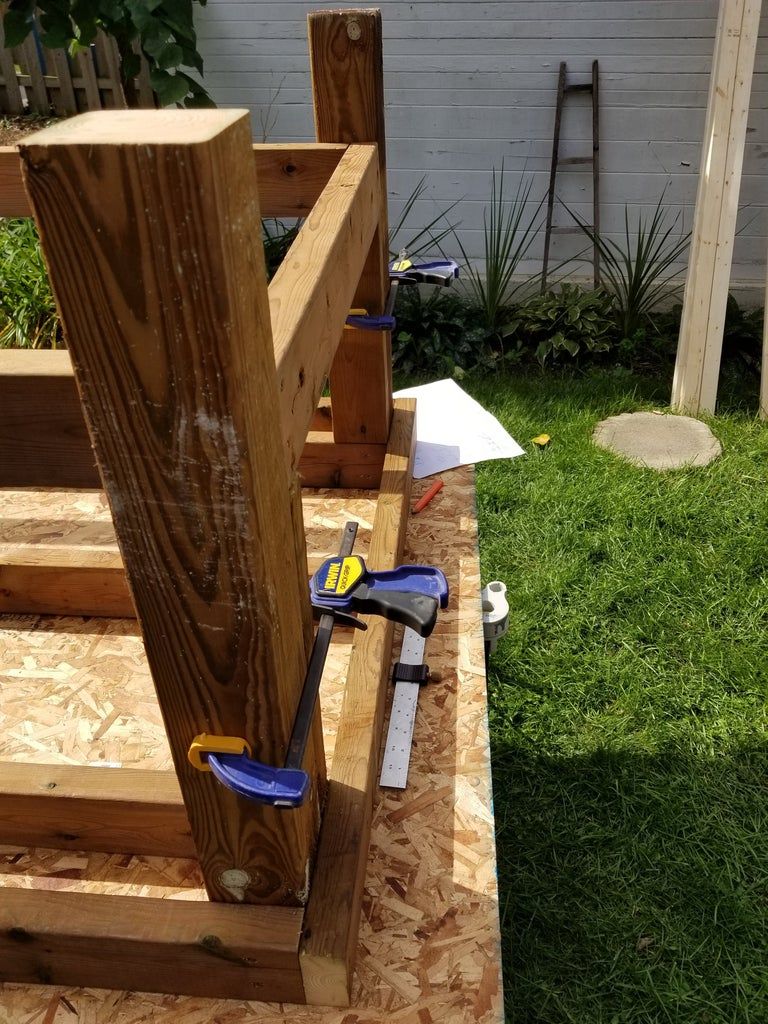
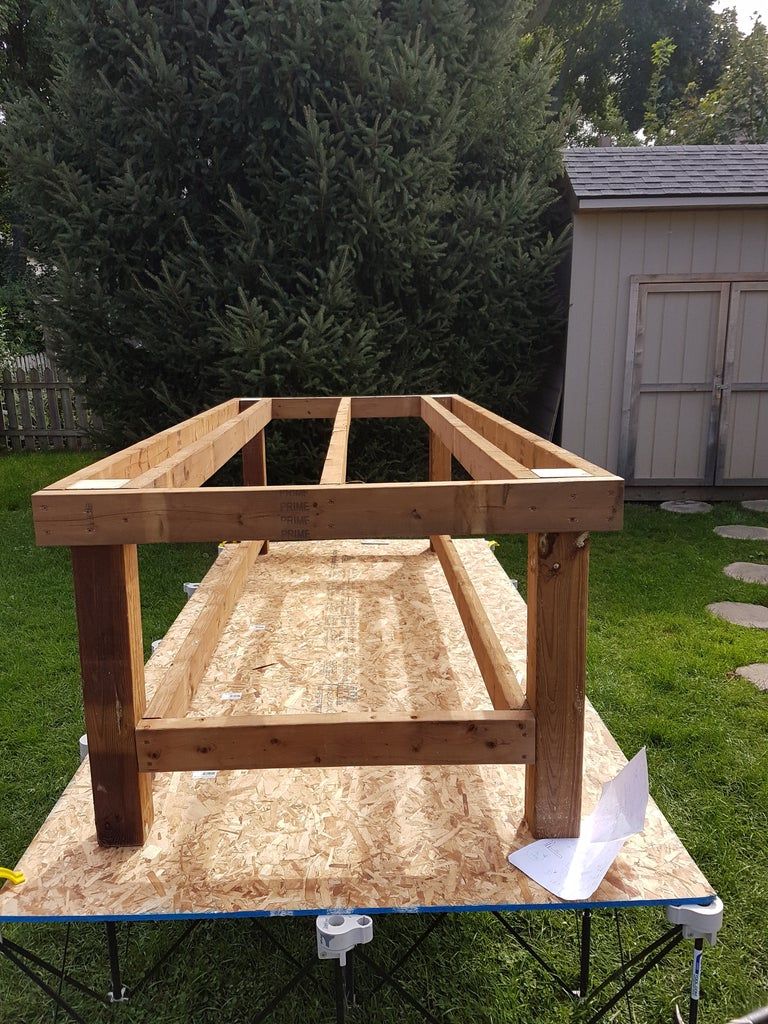
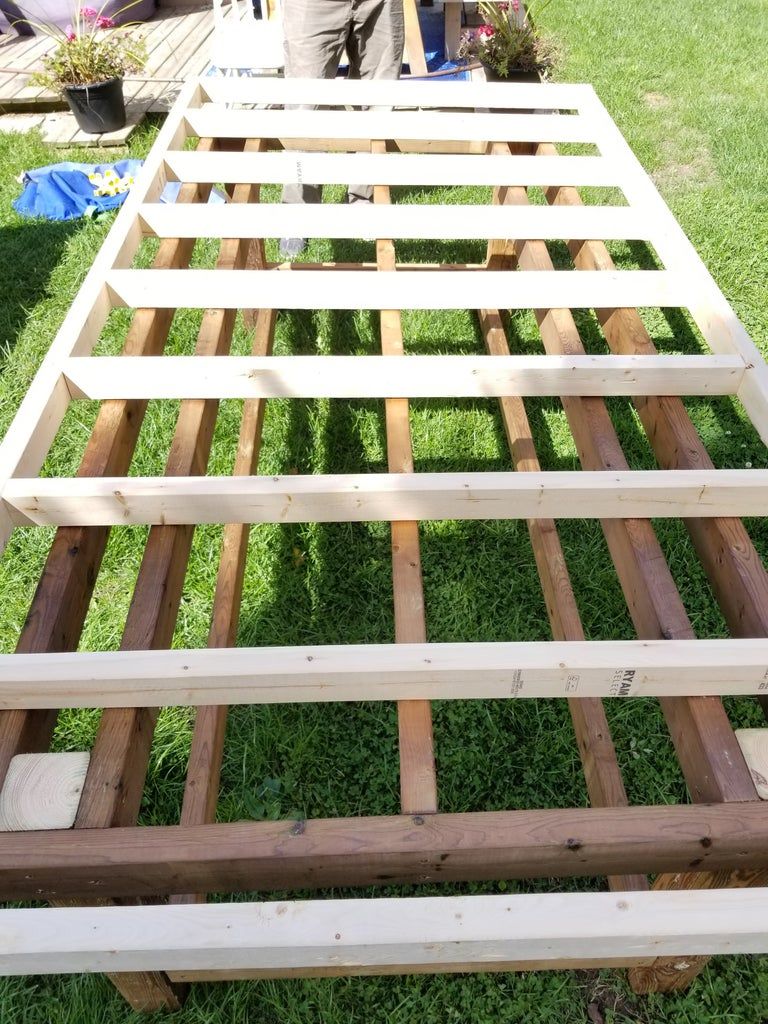
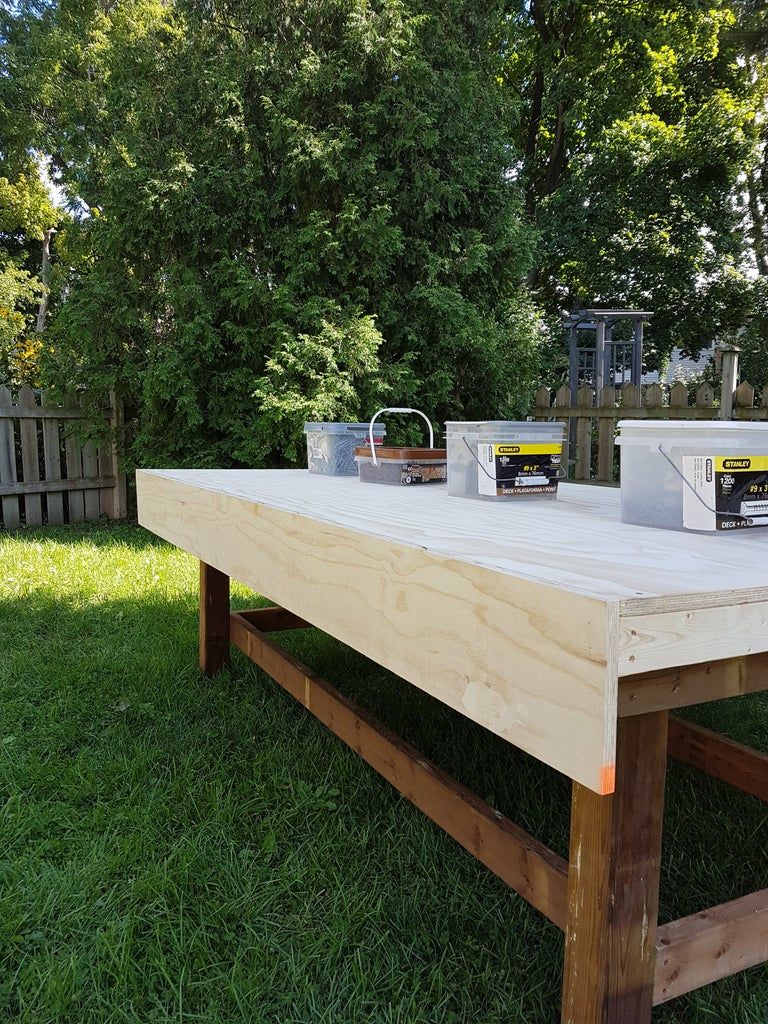
#3: Construction Base (Upper Part)
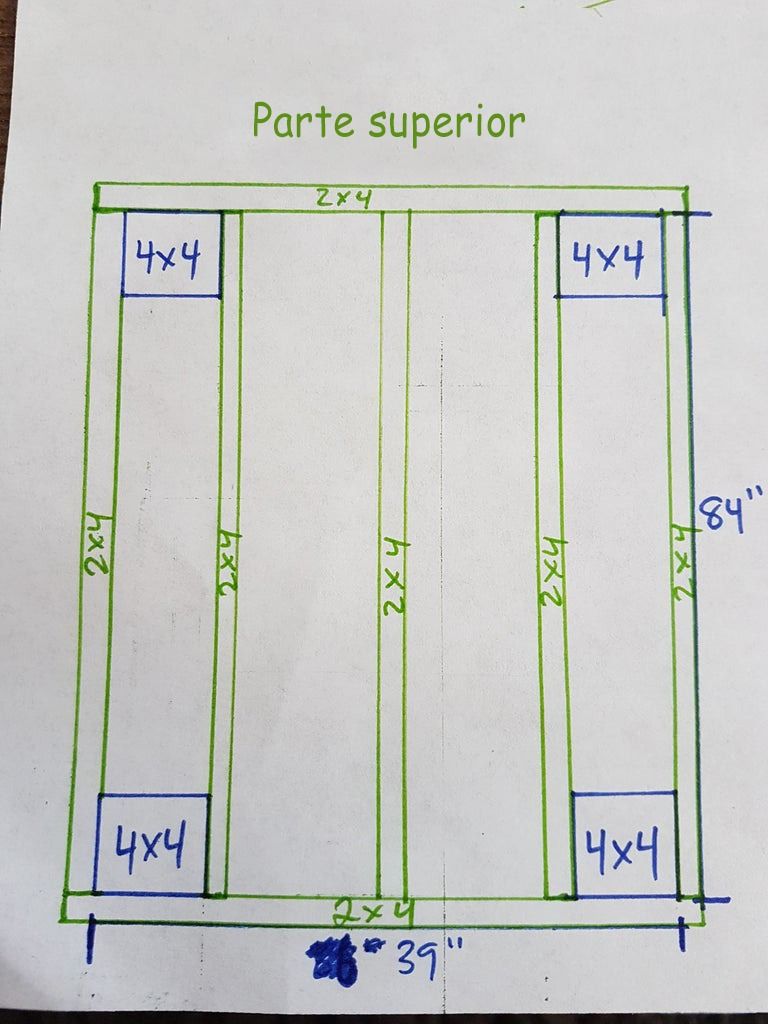

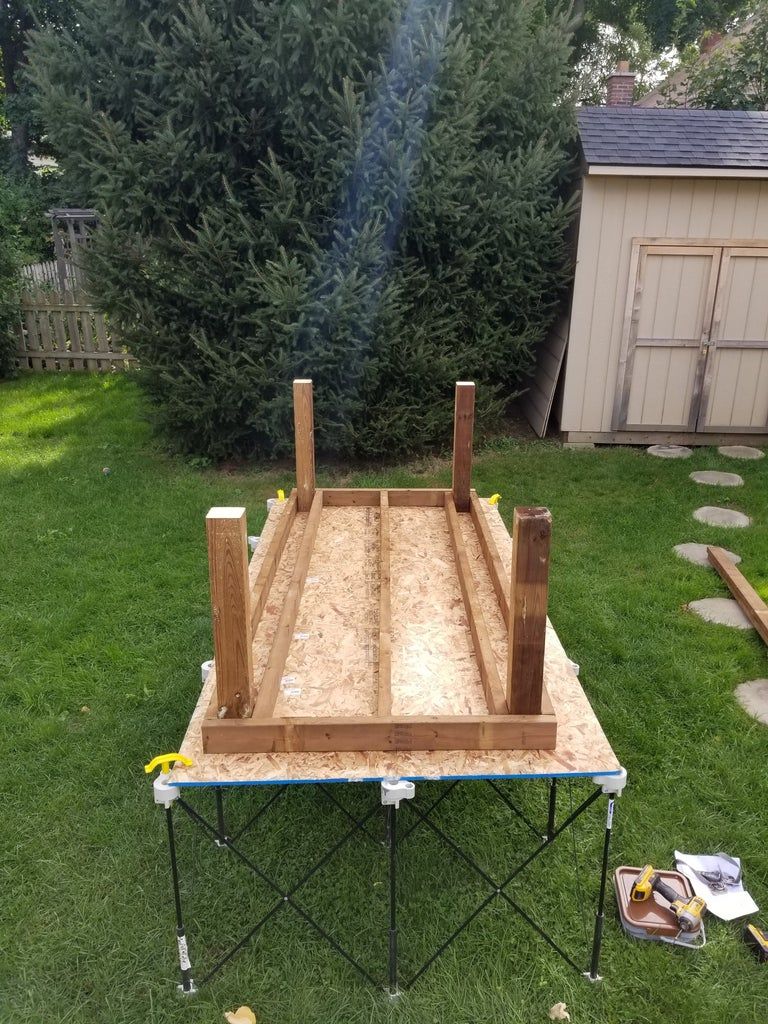
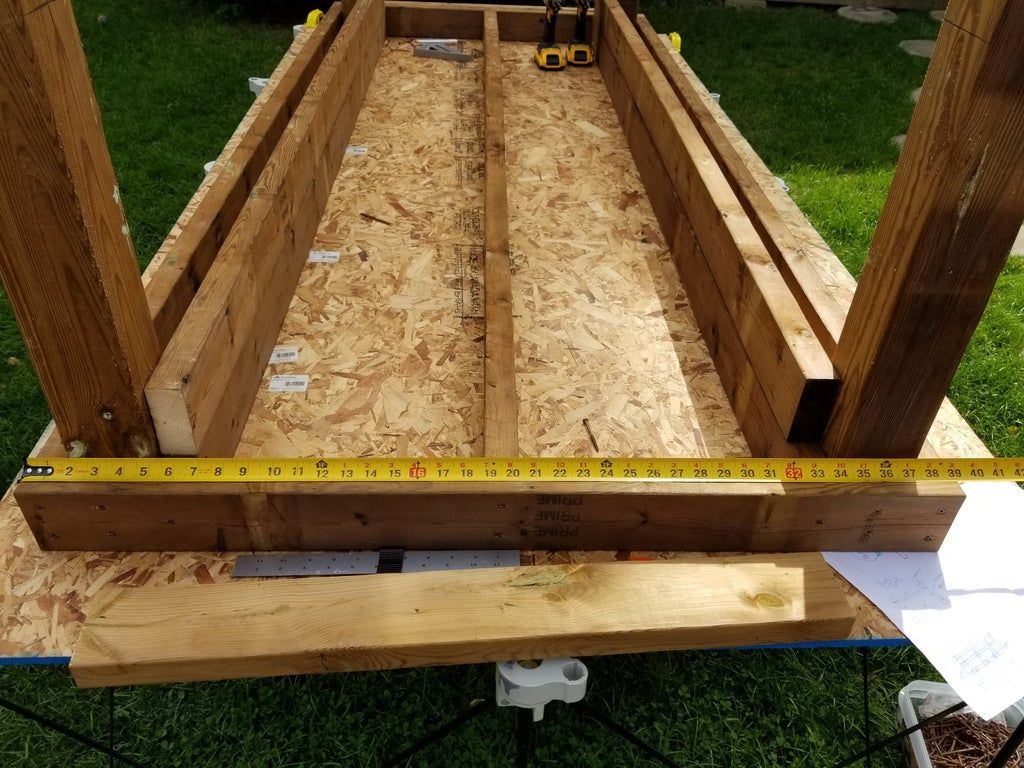
- Now that you have all your cuts made, it's just a matter of assembly. I started with building the base first. The base can be divided into two parts: the upper and the lower. The top of the base is where the table frame will rest. The bottom of the base will be visible to players and will act as support 6″ off the ground.
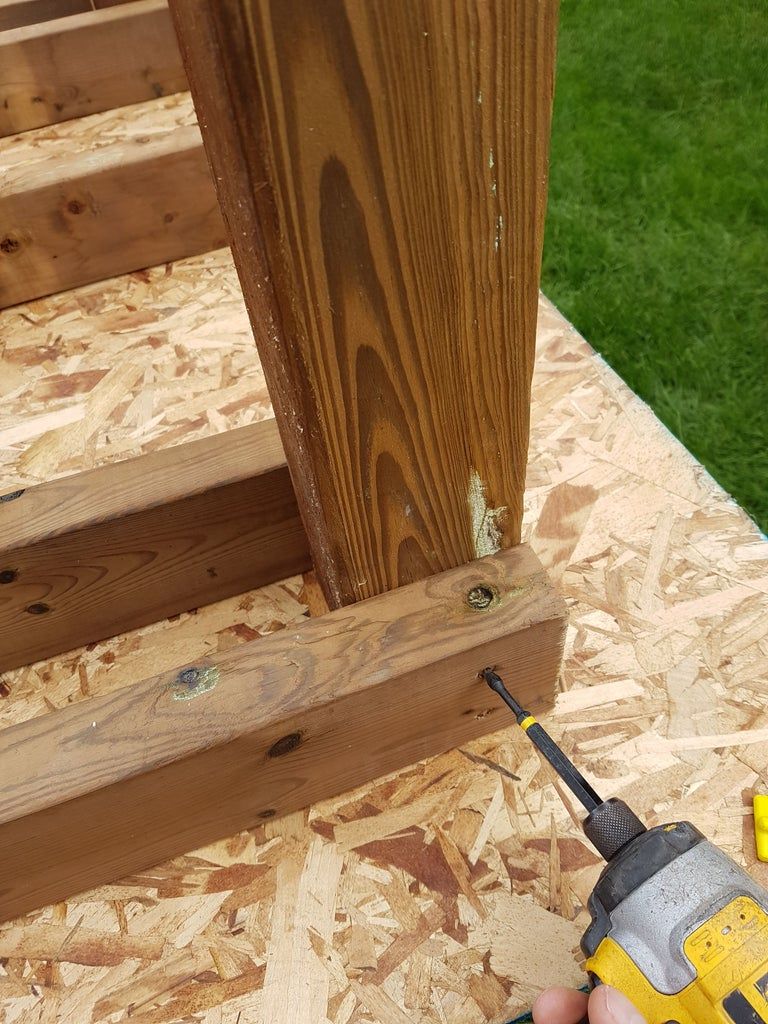
- Place 4 posts (4x4x27) on your table and place 5 rails (2x4x84) and 2 ends (2x4x39) in their place… See photos
- Attach the outer rails to the posts with a couple of screws ensuring the bottom of the posts and rails are flush
- Fix the riversinteriors to the posts (interspersing the posts) with screws
- Attach ends to outer and inner rails and posts
- Attach the last middle rail to both ends
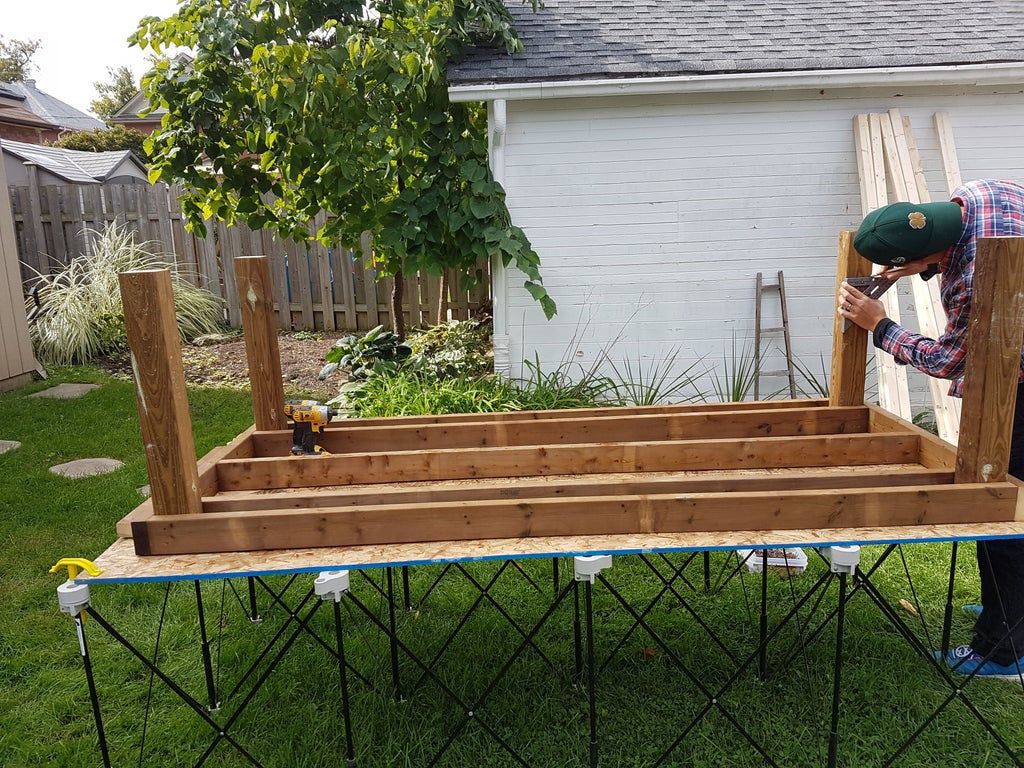
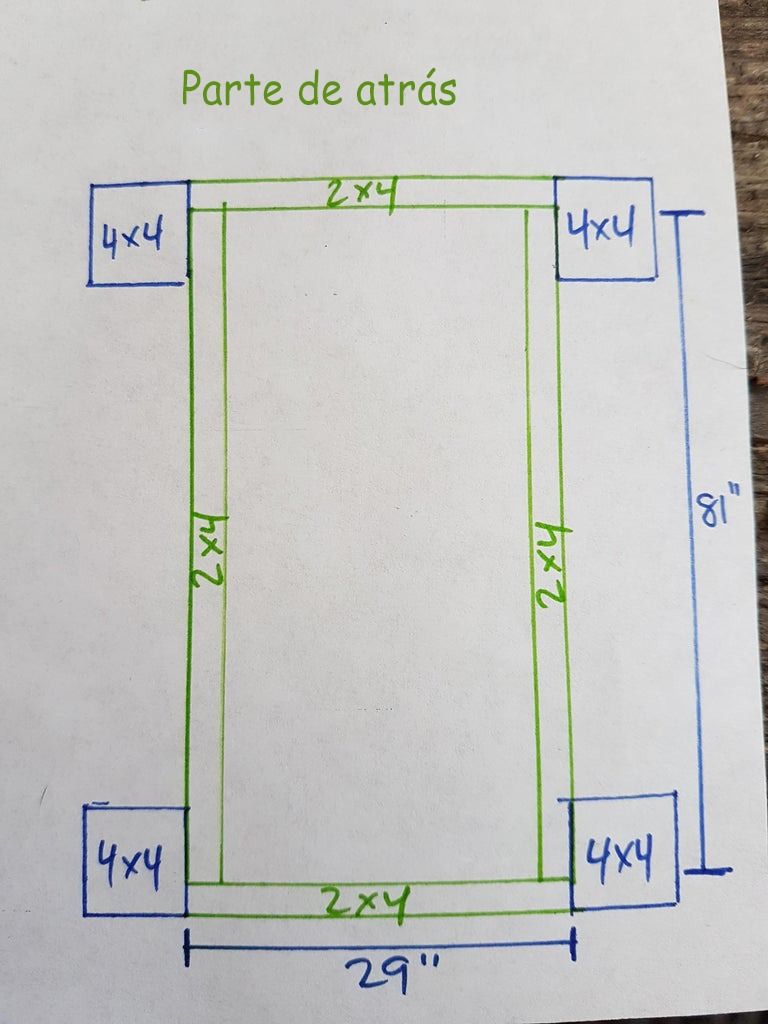
#4: Construction Base (Back)

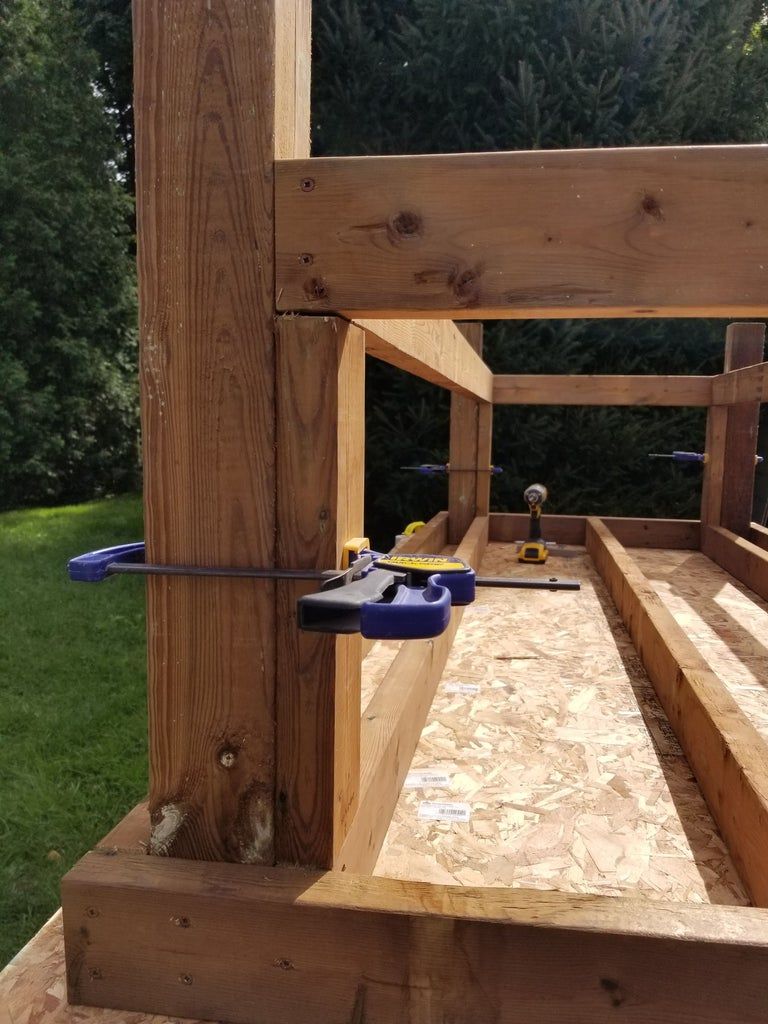

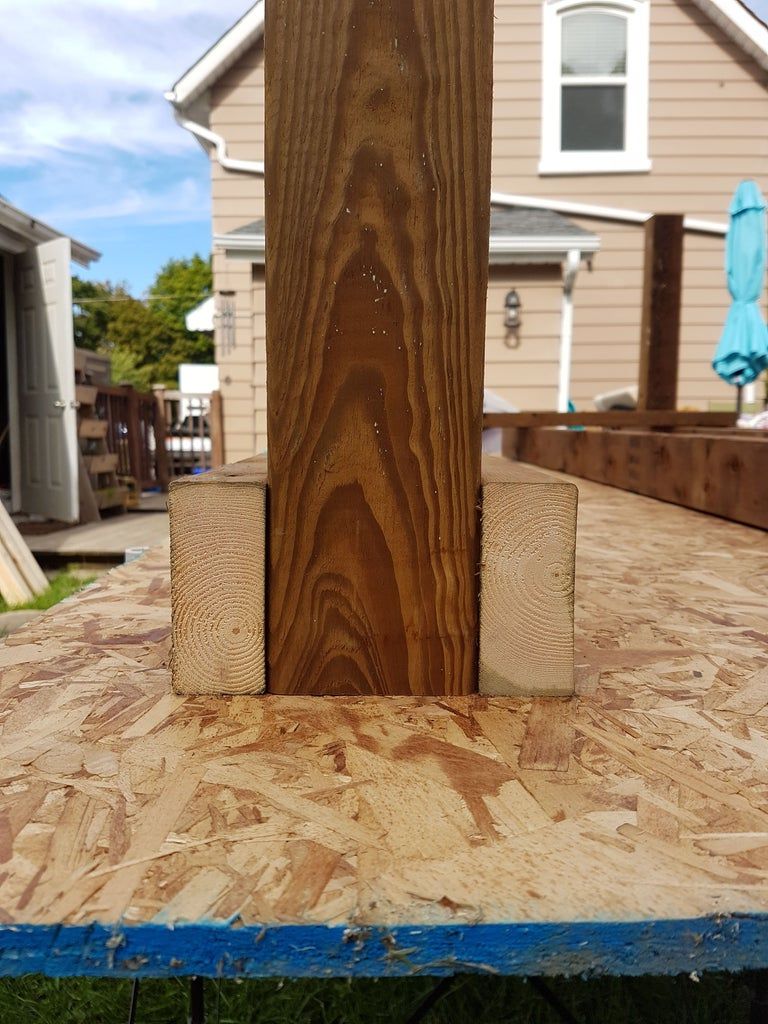
- Once the top of the base is attached, it's time to build the bottom. These are the 2x4s exposed when the board is complete. Take the time to choose the “nice” side of the 2x4s and face them as they will look.
- While the base is still upside down, start by marking the inside of each post 6″ from the bottom and attaching a 14″ 2x4 to the inside. The mark represents the bottom of the 2×4 with respect to the ground.
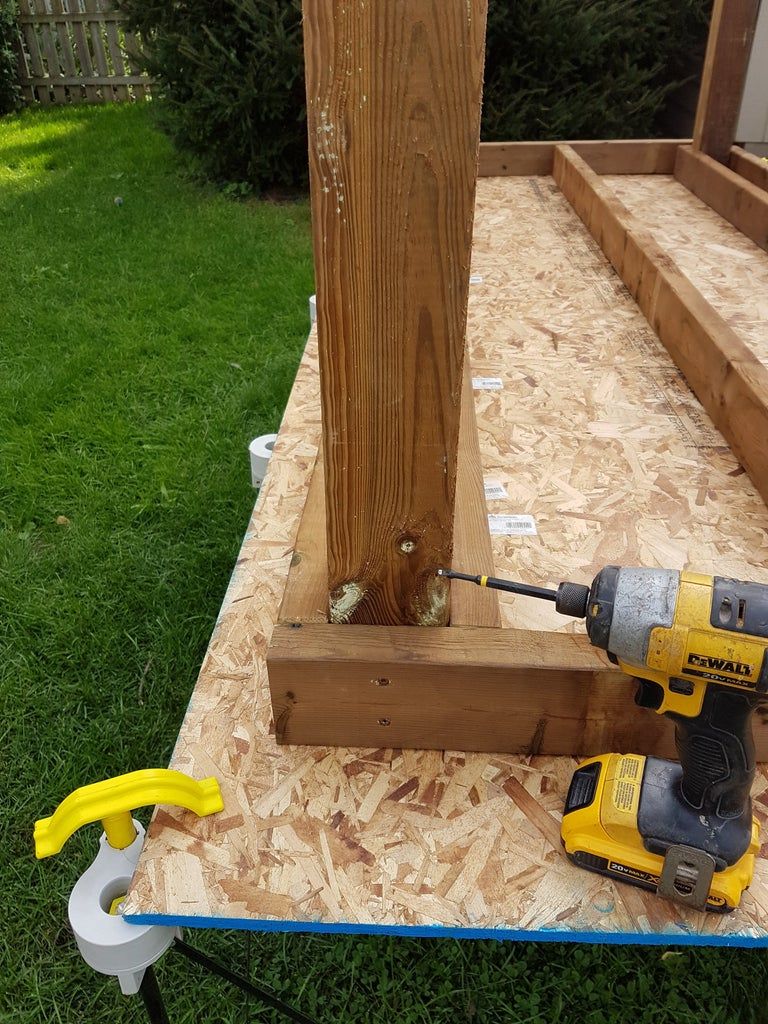
- Place (resting on the 2x4x14″) the 2x4x81 along the inside of the posts lengthwise and the 2x4x29 on the inside of each post at the ends… Make sure the two 2x4x29 ends are “flush” with the outside of each post.
- Attach the final 2x4s to the longer 2x4s
- Attach the long 2x4s to the posts. I used the LedgerLOK screws as it adds a little more support and I had them lying around, why not?
- Once the base of the table is complete, turn it over and set it aside… It's time to move on to the top!
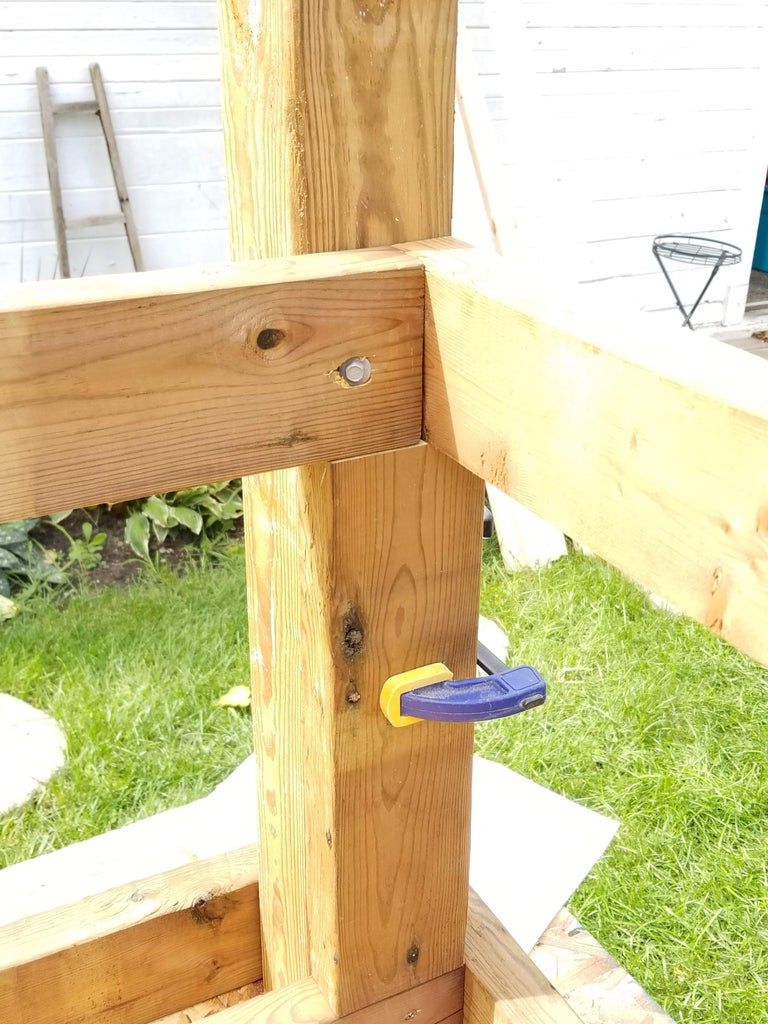
#5: Create the desktop support
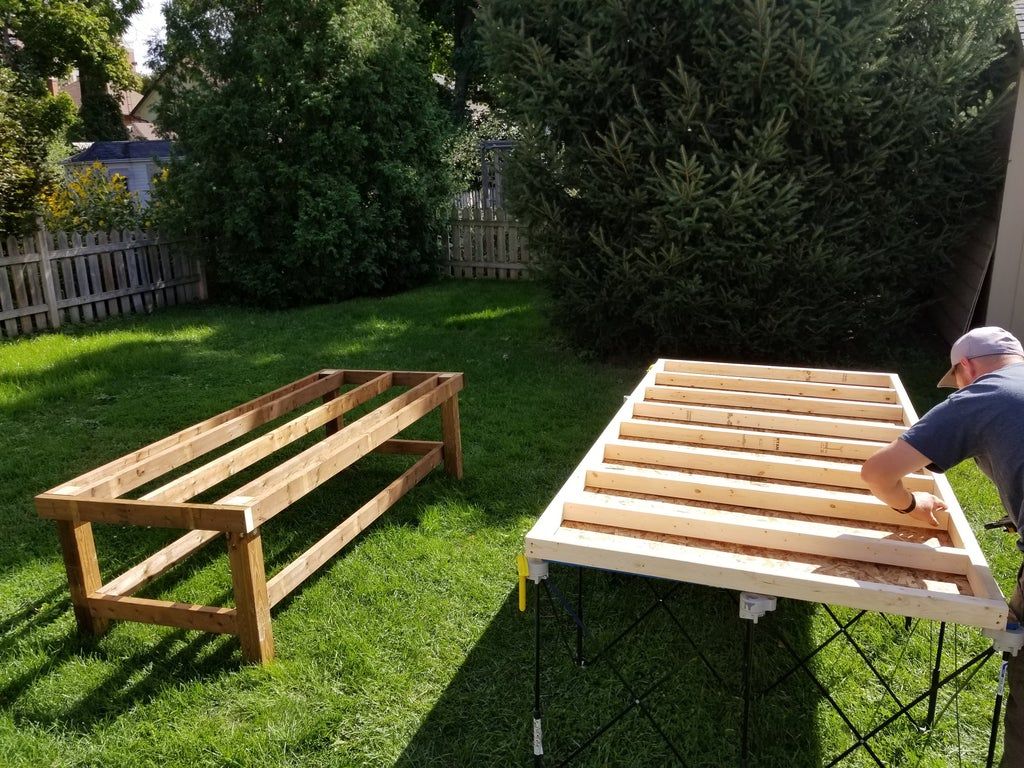
- Now that your workbench is clear again, it's time to build the tabletop stand. This is the bottom of the table and will sit on top of your newly built base.
- You will notice that it is constructed from non-PT wood (it is not intended to withstand the elements or be left outdoors). I will advise that if it is to be left outside and fixed to the base then it will need to be treated to be able to withstand water penetration.
- I decided not to use PT wood as the table will be stored in a garage/shed when not in use or in bad weather. This part of the build will use the 2x3 lumber you cut earlier.
- Also, you'll notice that the top supports sit perpendicular to the base rails to ensure the sturdiest construction.
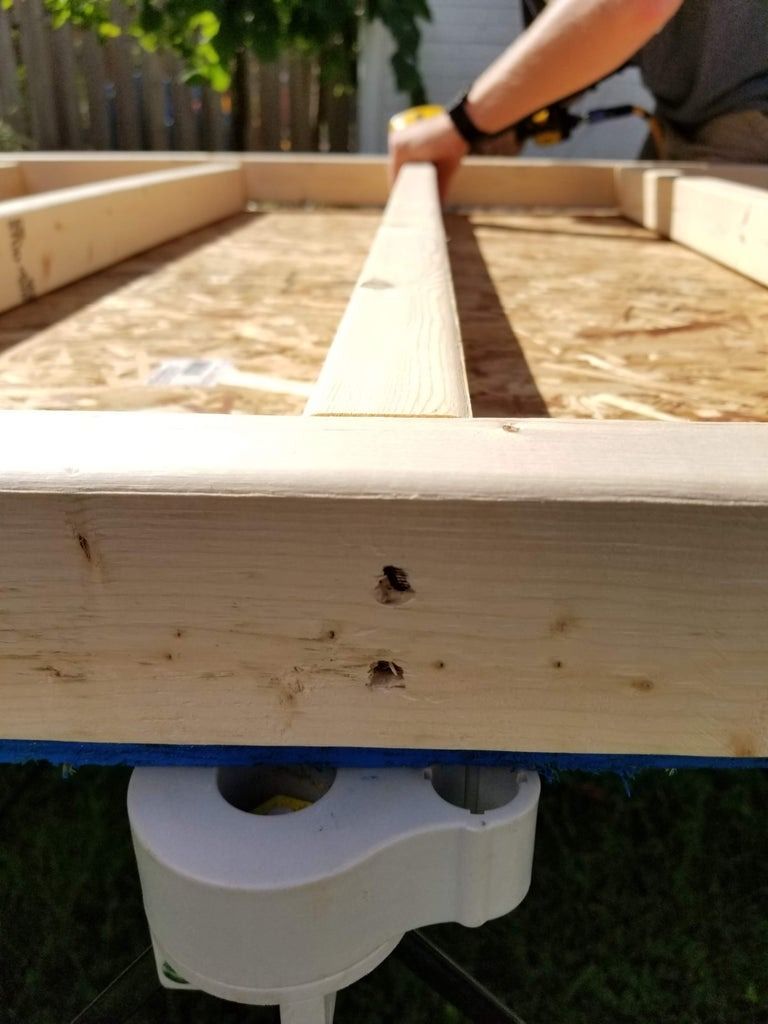
- Place the 2x3x93 outer rail and finish 2x3x48 on the flat work surface to create an exact 48x96 rectangle (from outside to outside).
- Attach the ends to the outside rails with nails/screws… I used brads.
- Mark the inside of the outside rails either 12″ on center or 16″ OC (how many 2x3x45s you use will depend on this) to make assembly easier and ensure the 2x3x45s are evenly spaced.
- Another strategy used by many framers is to cut a spacer and use it to evenly space each center rail.
- Attach all 2x3x45s according to your spacing and markings. Make sure the top of the middle rails and outer rails are flush as the board MUST be perfectly level.
- Once all the rails are attached, lift the table stand onto the base.
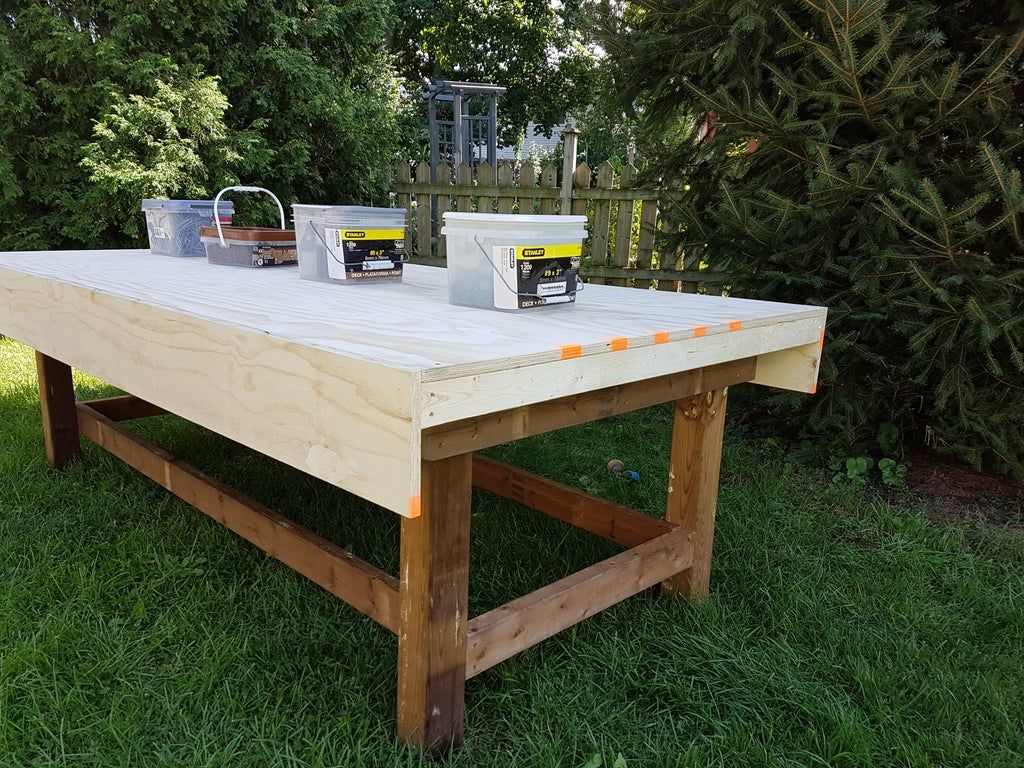
#6: Attach the table

- This pThis is very simple, but arguably the most important… You can't get away with any error in measurement as every step from now on will be seen and played.
- Add a bead of glue to the top of each rail on the table stand.
- With another person, carefully lift the entire sheet of 4x8 plywood onto the support. Make sure every corner and edge is perfectly flush.
- Once you MAKE SURE everything is level, drive a screw into each corner (1 1/2″ screw and make sure to pre-drill and leave the screw flush with the plywood top).
- Weigh the top with heavy items such as boxes of screws/nails, paint cans, weights, etc. But make sure not to damage the tabletop.
- Also, attach the table top to the table top support with 2″ brads. I drove nails all the way around the outside (nailing in 2x3x93 and 2x3x48) and then one nail in the middle of each 2x3x45.
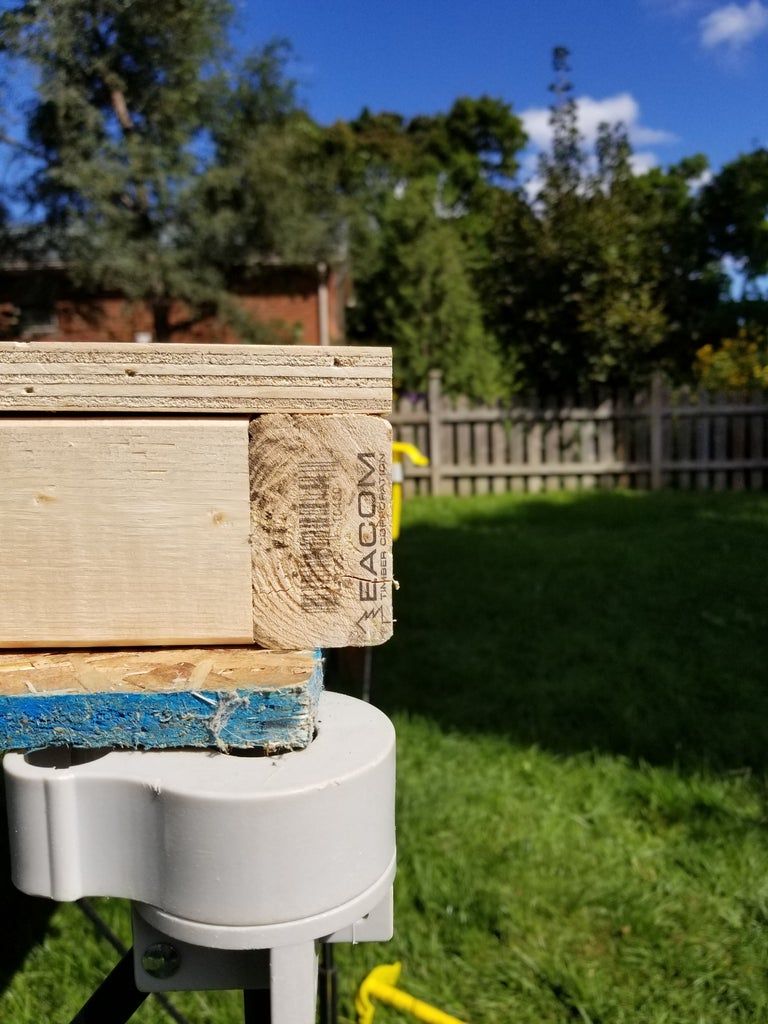
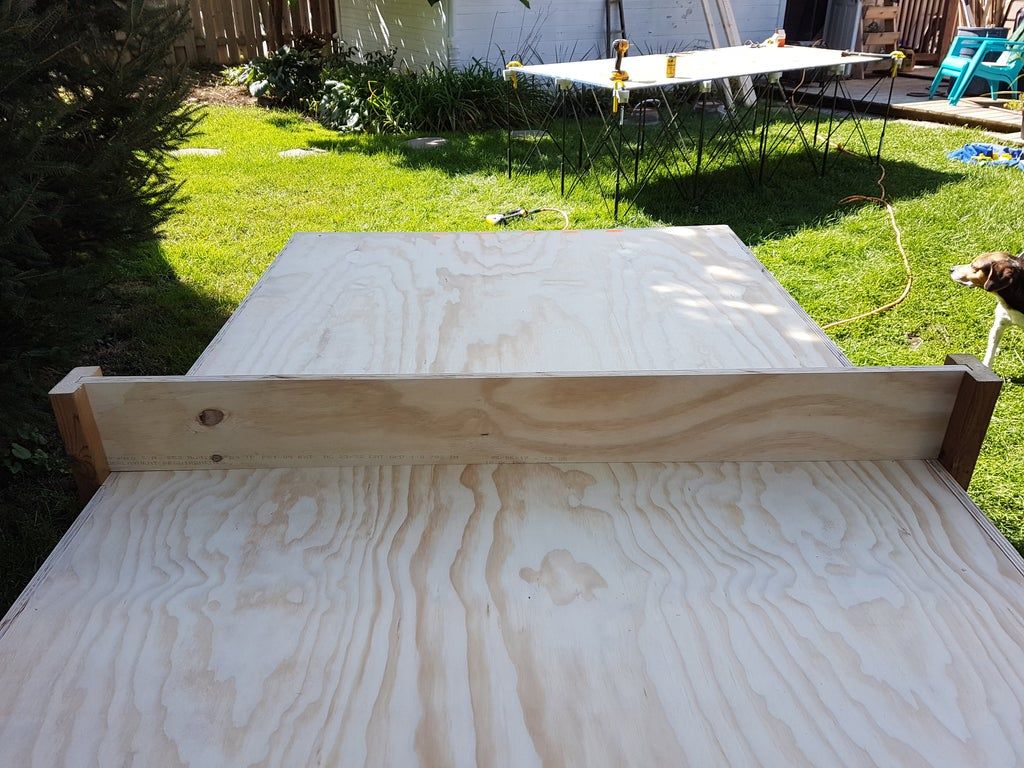
#7: Attach the outer surface to the table
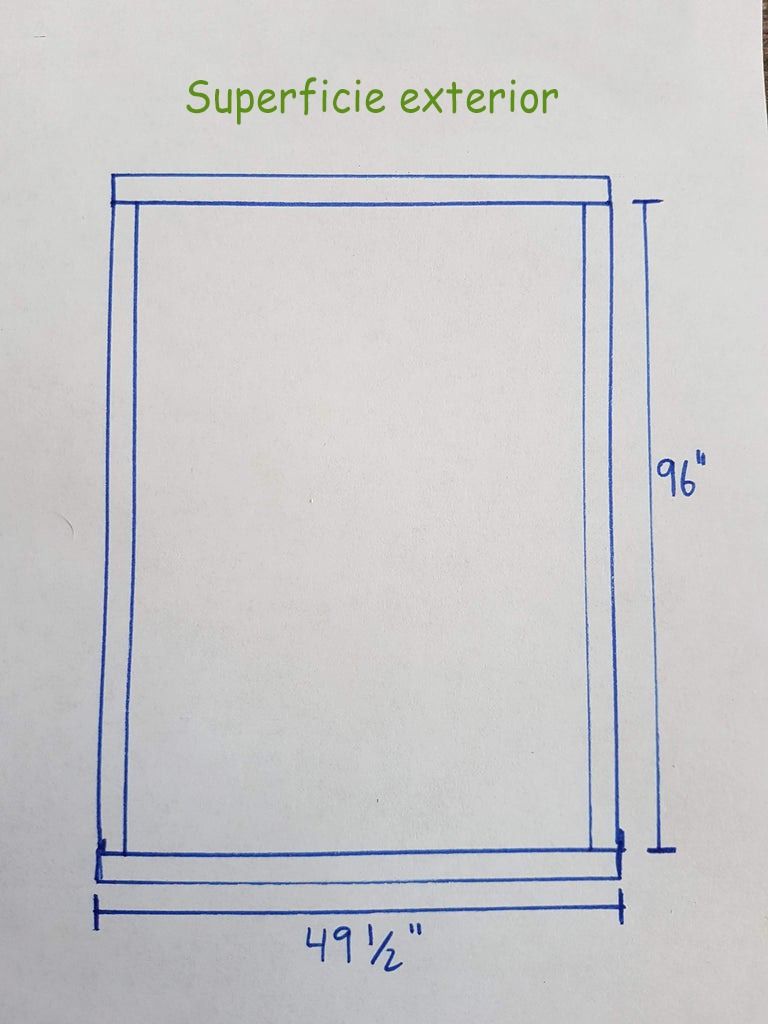

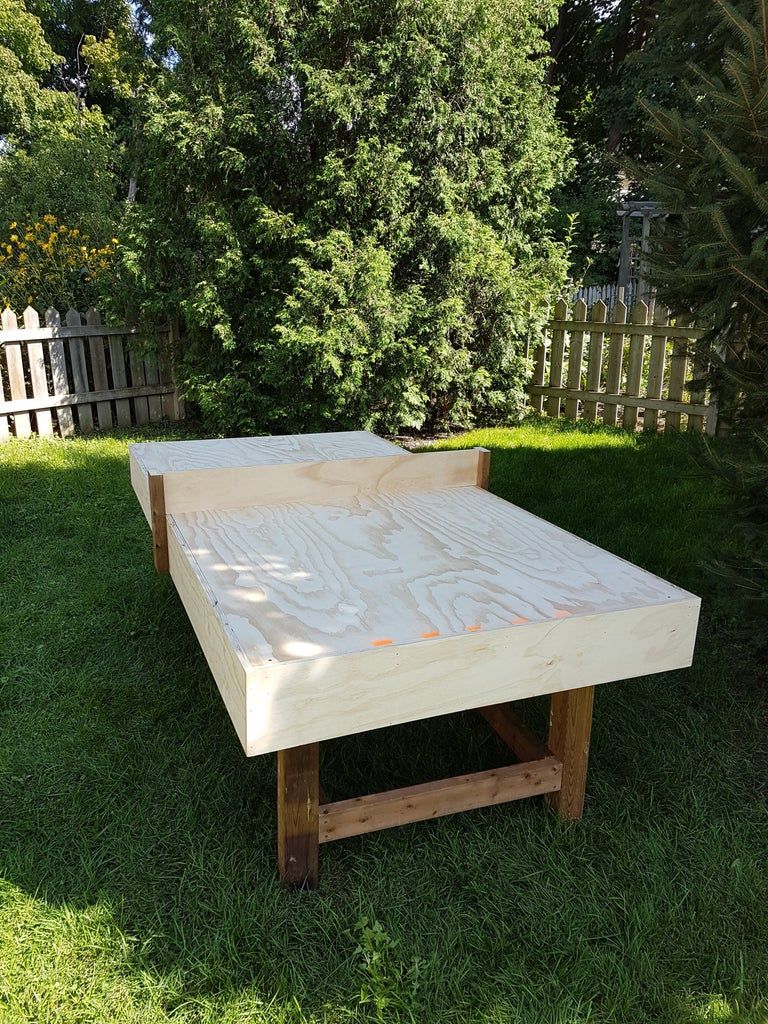
- Grab your plywood "rips" and an extra pair of hands for this step.
- You will have to be very precise since this is the "glory" of the construction. It's what everyone will notice and comment on when they see your craft (or craft).
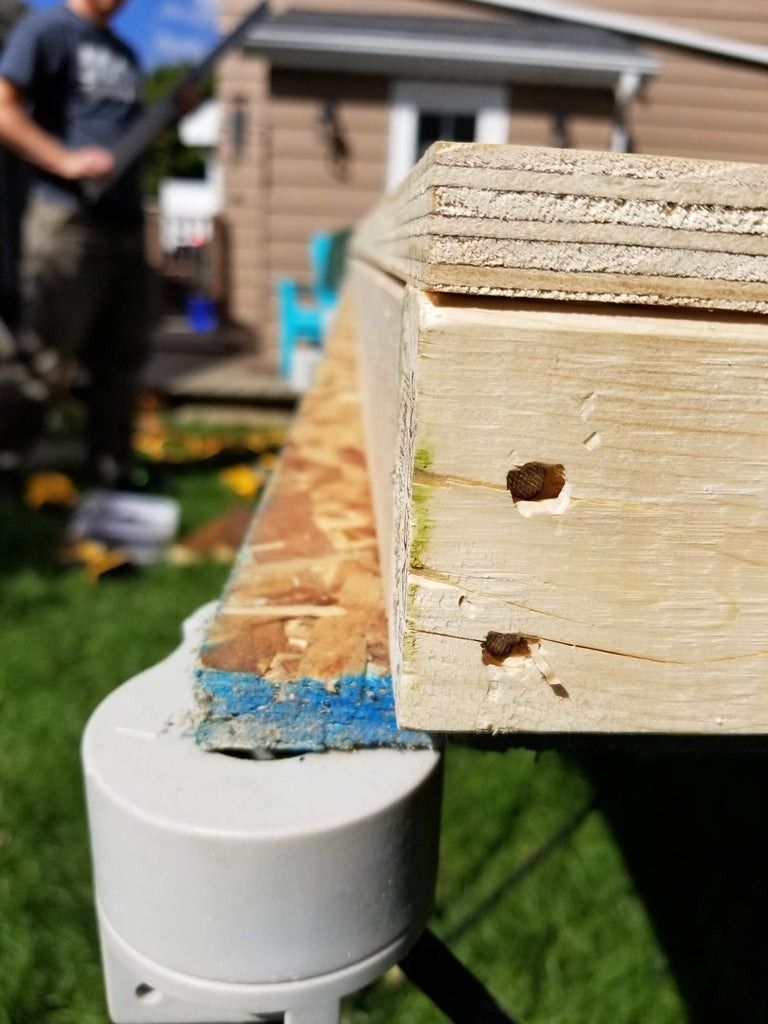
- Begin by nailing the two outer boards (8″ x 96″) to the top 2x3 support, making sure the ends are flush and the top is flush with the table you just glued.
- Then take a second to work by the old adage "measure twice, cut once" and measure the ends from the outside to the outside of the newly adhered boards. My measurement was 49 1/2″, but it ended up being 49 7/16″.
- Cut the boards if necessary and join them like the sides in step 1.
- Very carefully add nails to the outside of the ends nailed directly into the plywood sides you attached in step 1. This will help ensure that all of the surface boards are flush with each other.
#8: Cut grooves for supports

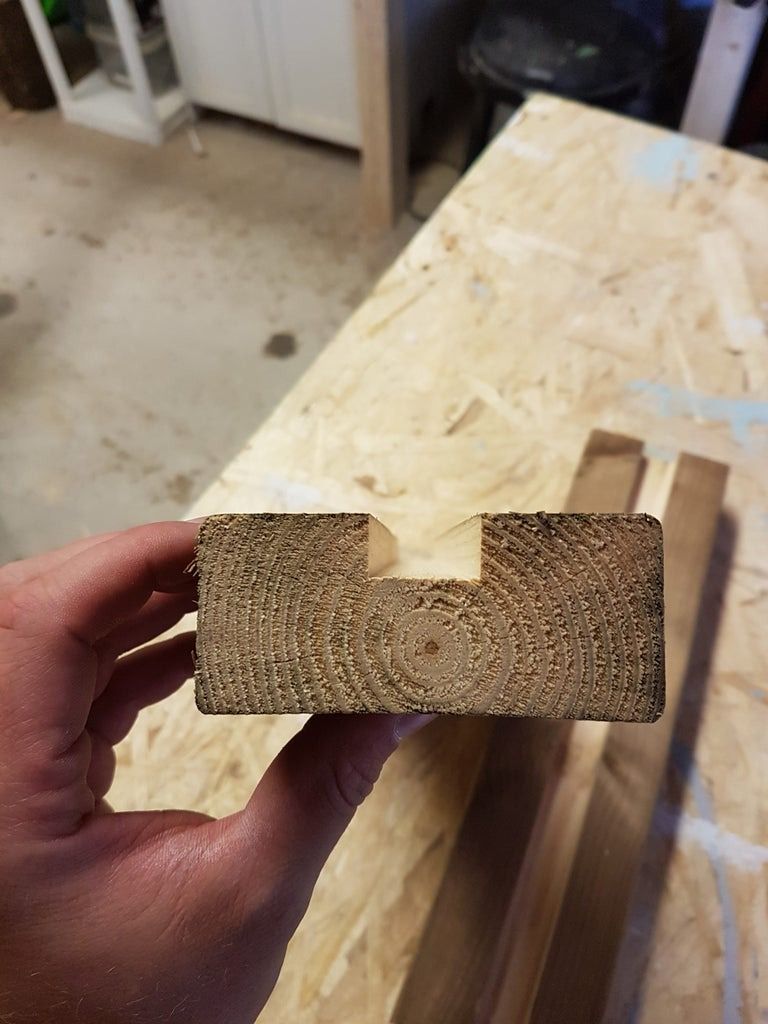
- I completed this step on my table saw, and it is by far the most difficult part of the build.
- I highly recommend that if you do not have adequate table saw experience, get help for this step or have it done by someone who does.
- Many things can go wrong and at the end of the day, your fingers and safety are more important than a ping pong table net stand.
- The slots I cut are 3/4″ wide and 1/2″ deep in the 2x4x14″. I set my table saw fence at 1 3/8″.
- I cut a slot, moved my fence 1/8 inch larger and cut again. I repeated these steps until the fence was at 2 1/8″.
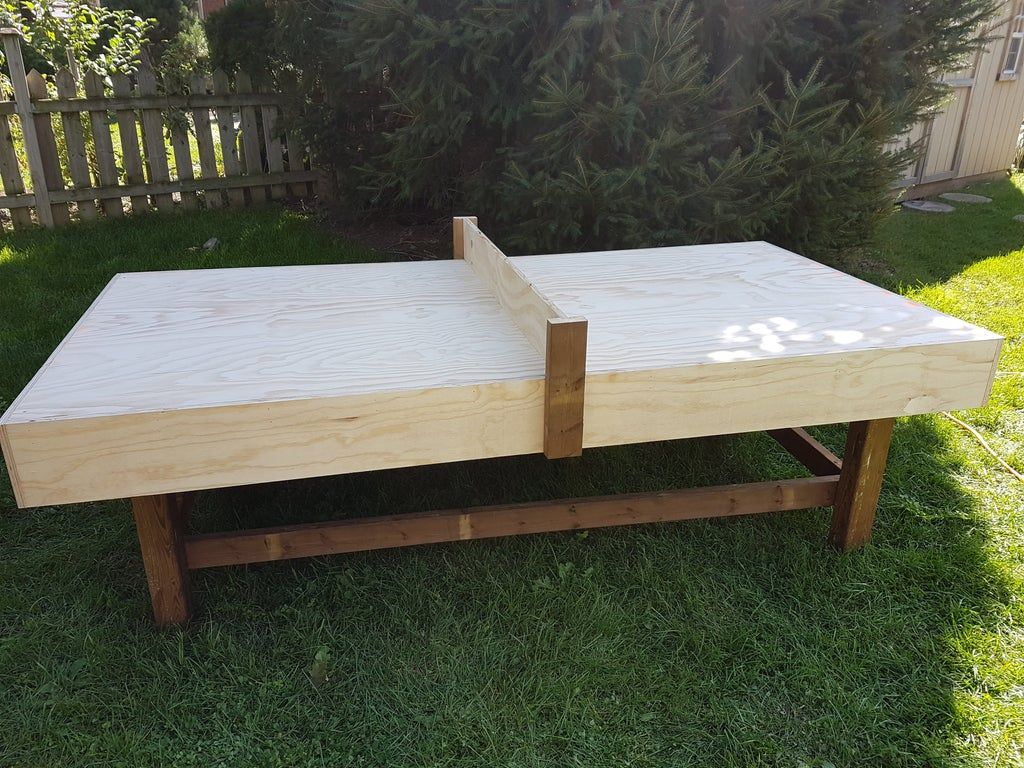
#9: Attach supports
- Once all my grooves were cut into my 2x4x14s (two of them obviously), I placed them centered on the top of the table making sure the bottom was flush with the bottom of the fascia. This ensured that they were 6" above the table for the net.
- To center the net supports, I did a little math.
- Each 2x4 is 3 1/2″ thick, so the center of the slot should be 1 3/4″ from the edge.
- I measured from the outside of one side of the table to the center of the table and made a mark at 47″.
- This marking represents the outside edge of the net stand, and therefore places the center of the table at 48 3/4″ from the outside of the end of the table (96″+ 1 1/2″ = 97 1/2" divided by 2 = 48 3/4").
#10: Insert the Network and Play!
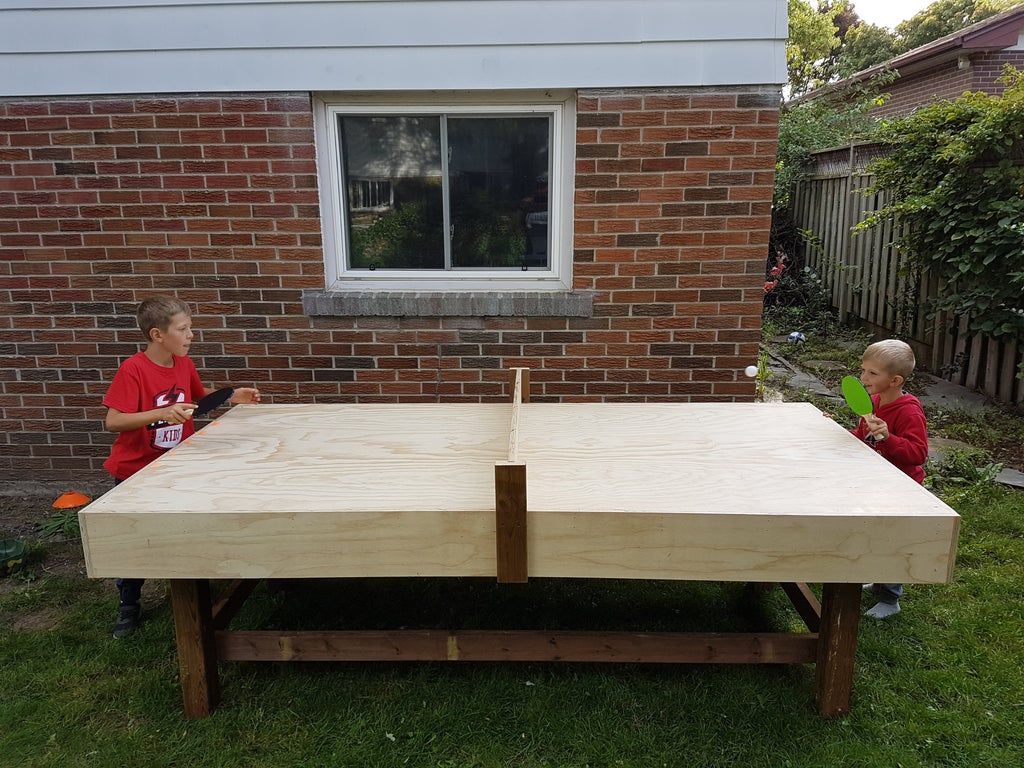
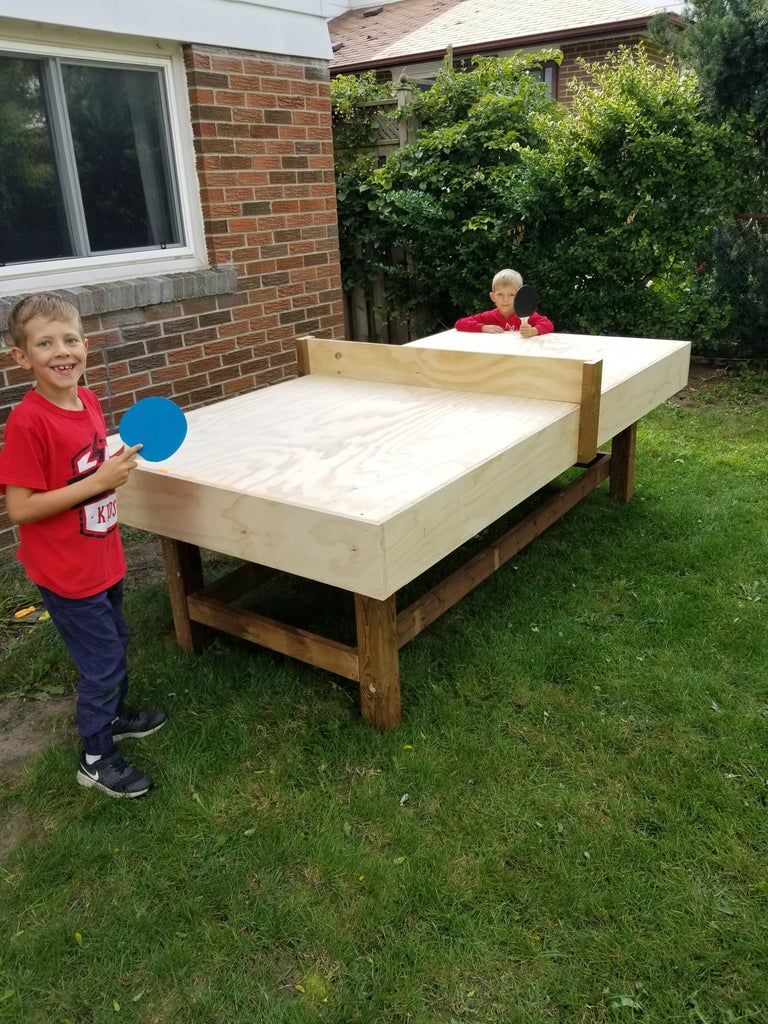
As the last step take the last piece of the puzzle and put a smile on your face... The end is literally in sight.
- Measure the distance from one furrow to the other, where the net will be located.
- Subtract 1/8″ and cut the 6″ plywood to that length.
- Drop the net into the furrows. There should be a little "play" so the net can slide in and out easily. Remember that over time the net will “wear out” and sliding it in and out will become smoother and easier. The first time might be a little comfortable.
Finally invite a friend, or in my case, my nephews, a couple of paddles and ping pong balls, and enjoy a game!
I recommend purchasing the balls and paddles ahead of time so that when you finish your build you can have the satisfaction of playing and watching others play on something you just built from scratch!
Don't forget to follow us on our social networks for more news!
Popular Content
How to make a rocket stove for outdoors
Cardboard Drawers Lined with Jeans
Ideas and Advantages of Window Grilles for the Home!
Latest Articles
How to make a refrigerator out of insulating material: Practical step-by-step guide
How to make a Kilim for the Home: Complete Step by Step Guide
How to protect ourselves from accidents in our workplace: Complete prevention and safety guide
Related Content
River Stone Planter!
Advantages of Installing Artificial Grass
Uses that can be given to the Console Table
How to Make a Mini Bar from a Plastic Container!
Creative Home Decor Ideas to Transform Every Space
Refreshing your home starts with smart design choices that combine comfort, personality, and functionality. Whether you want to modernize a small apartment, upgrade outdoor areas, or create cozy rustic interiors, these trending ideas can completely change the atmosphere of your space.
Outdoor Spaces That Increase Style and Functionality
Outdoor living continues to dominate modern home trends. Homeowners are increasingly investing in practical entertainment zones inspired by these BBQ shed ideas, which create the perfect setup for gatherings and weekend cooking sessions.
First impressions also matter when designing exteriors. Elegant farm entrance gates design ideas help properties stand out while improving privacy and curb appeal.
Compact living solutions are also gaining popularity. These inspiring 16x40 shed house interior design ideas show how smaller spaces can still feel luxurious and functional.
To enhance patios and entryways, homeowners are adding stylish protection with these creative porch awning exterior DIY ideas that blend aesthetics with practicality.

Rustic and Cozy Interior Design Trends
Warm and natural interiors remain timeless. These charming rustic decor ideas combine wood textures, vintage accents, and earthy tones to create welcoming spaces.
Bedrooms are becoming more personalized with curated wall arrangements. Many homeowners use these stylish picture wall ideas for bedroom spaces to display memories and artwork creatively.
Textured wall treatments are another major trend. Installing a board and batten wall adds architectural character while keeping interiors elegant and modern.
Similarly, bold accent wall ideas can instantly transform plain rooms into eye-catching focal points without requiring a full renovation.
Smart Kitchen and Organization Inspiration
Functional kitchens are essential for modern homes. These practical kitchen wall cabinet ideas maximize storage while maintaining a clean and stylish appearance.
Organization also starts at the entrance. Well-designed mud room ideas help families keep shoes, coats, and daily essentials neatly arranged.
Colorful and Personalized Home Styling
Vibrant interiors are becoming increasingly popular thanks to playful dopamine decor ideas that use bright colors and joyful accessories to improve mood and energy.
Gallery walls also continue to evolve as a major decorative feature. These trendy gallery wall inspiration ideas offer creative ways to combine prints, photos, and statement art.
Young renters and new homeowners are especially embracing these stylish first apartment aesthetic ideas to create sophisticated interiors on a budget.
Finally, selecting the right shades can dramatically influence any room’s atmosphere. These modern trendy color ideas help homeowners choose palettes that feel fresh, elegant, and timeless.
Final Thoughts
From rustic charm and colorful interiors to outdoor entertaining areas and functional storage solutions, today’s home decor trends focus on creating spaces that feel both beautiful and livable. By combining smart layouts, modern textures, and personalized decorative elements, any home can become more stylish, comfortable, and inspiring.


