


How to Make a Cool Glass Bottle Lamp (Cut Glass), being able to cut my own empty beer bottles, I wanted to build something that takes advantage of that nice warm color of glass. A lamp took shape in my brain...
Step 1: The lampshades


For a simple way to cut a glass bottle, you can read my previous instructions here. Actually, there are many methods and you can find a lot of tutorials on the Internet.
For this project I used a large 66cl bottle and two smaller ones (33cl each). Of course, you can choose any number or combination of sizes, and make a different design.
Step 2: The bulbs


As a light source, you can choose between old incandescent bulbs or more environmentally friendly CFL or LED lamps. There are pros and cons for both types.
Incandescent bulbs give a vintage look to the lamp in my opinion, but they consume more energy and get very hot, which may not be good since the glass is not tempered. CFL and LED are a little more expensive and although you can choose a warm light, in my opinion they miss out on the heat of a flame.
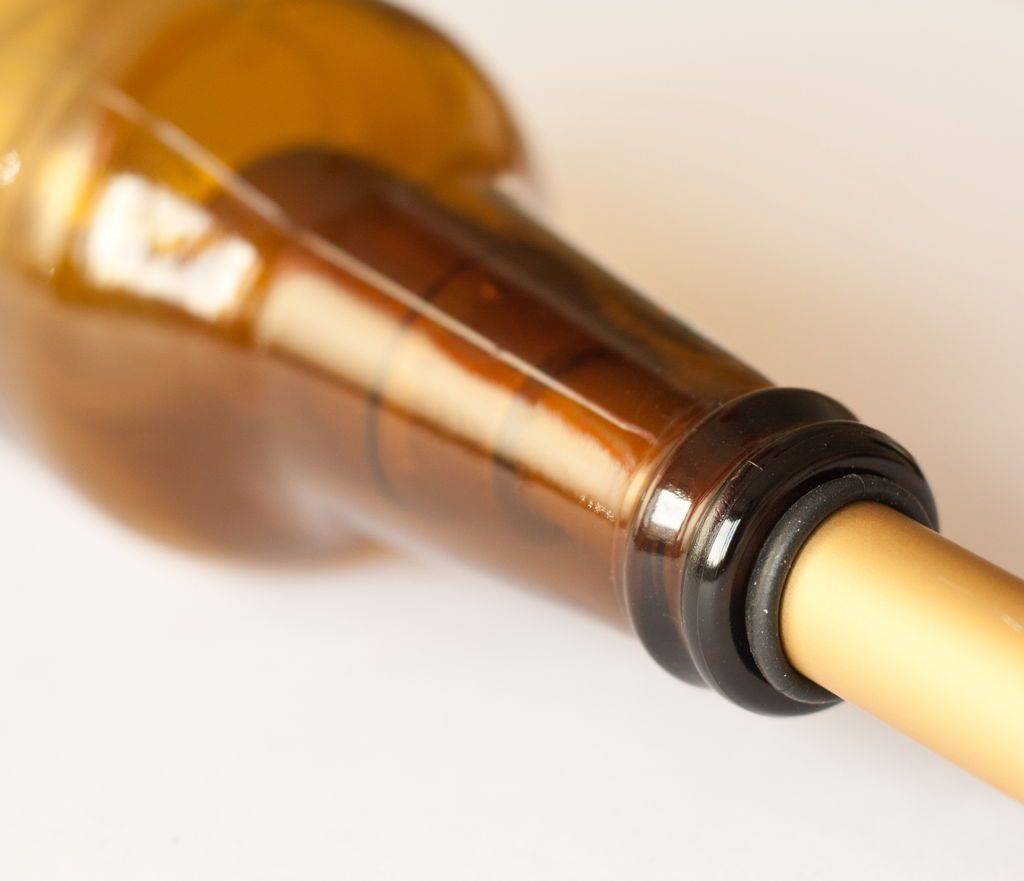
You also need three sockets, and it is best to look for E14 lamps and sockets, which are smaller than E27 and fit well into the neck of the bottle.
As a wall plug cable I chose a gold one, with the switch already connected, I use it to store some of them, in different colors, since they are very cheap and useful in many projects.
Step 3: Design and body part


My design considers three "stems" with different heights and placed at the base at the vertices of an equilateral triangle. To add noticeable weight to the base, I decided to build it with concrete, both to experience a concrete design and to obtain a vintage look.
The aluminum pipes used as stems are sold here in pieces of 1 m each. You can cut a piece into two parts of 35 and 65 cm, as you can see in the diagram.
Leave another piece 1 meter long. If you want a taller lamp, you can buy three 2 meter long bars and cut two of them to 135 and 165 cm.
The bowl is big enough for a 2m lamp too. Another design could be to cut a 2 m bar into 160 + 40 cm and add the 40 cm piece to the third 2 m tube, to have a very tall lamp (160, 200, 240 cm).
Step 4: Connections

To connect the stems to the base and bulb sockets, I used two different sizes of threaded iron pipes.
The larger ones are a little more expensive, they fit exactly inside the aluminum stems, and you need about a meter of them (for a three-stem lamp).
Cut the one meter bar into three equal parts (about 33 cm each).
The smaller ones have a thread that fits the bulb sockets. You need three pieces about 6-8 cm long.
Step 5: Some spacers

Since the socket thread is a little small compared to the inner diameter of the stems, we have to wrap the 6-8 cm rods with a ribbon.
Test how many turns you need to make some friction between the tubes.
I then secured the electrical tape with a stickier tape.
Step 6: Assembling the stems


You need to wrap the tape in two positions for each bar, as in the picture. Leave enough thread on one end to screw in the bulb sockets. Then connect the wires and place the piece together.a.
Step 7: Bottle Holders

To keep the bottles, I decided to go in a very simple and naive way. Just cut three rubber bands from a thin bicycle tube.
Attach a band to the top end of the stem (you may want to remove the wires and jacks for now), then flip the outer edge of the band over, so it assumes the shape shown.
Now you can insert the stem, cable and socket into the neck of the bottle, then push the rubber band and by pulling the cable you can lock the bottle in position.
Step 8: Drill the base

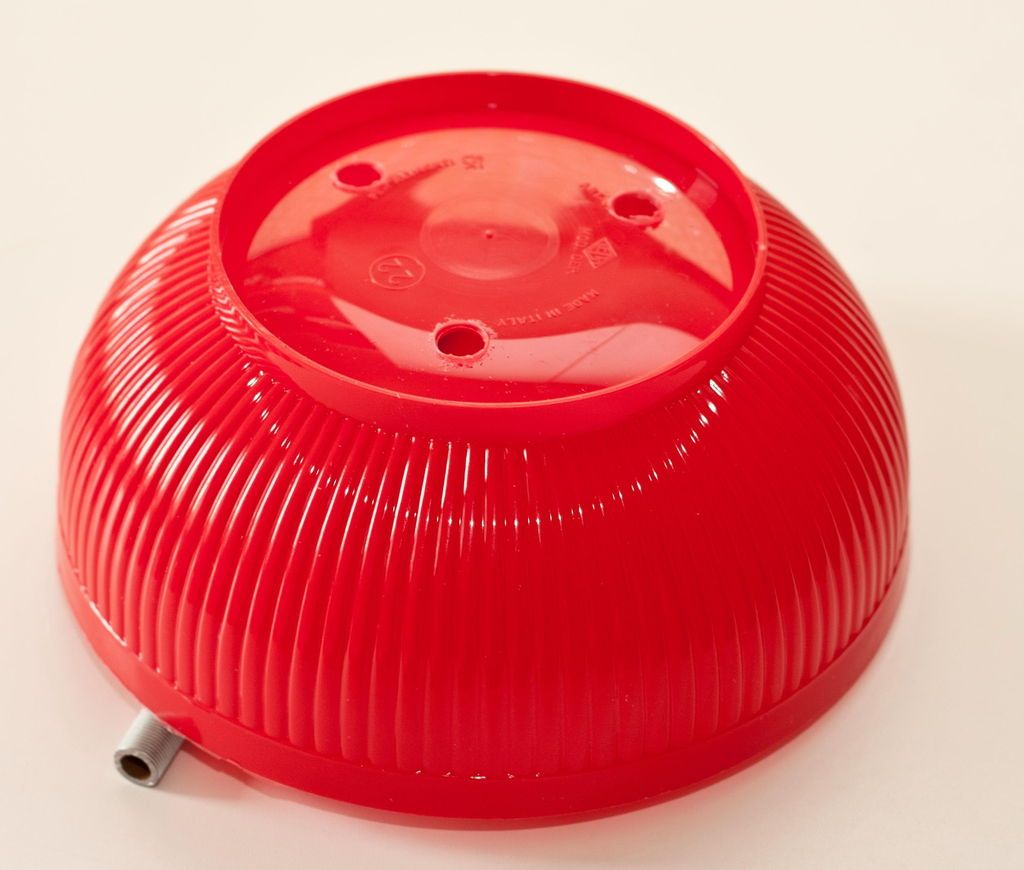
Let's focus on the base now. To locate the three holes, look at the diagram. If you don't have a goniometer, you can simply measure the distances between the holes and verify that they are centered on the base.
The diameter of the hole must be very tight around the threaded bars, since we have to fill the container with liquid concrete that could otherwise leak out of the divisions.
In addition, the bars would act as supports for the full (and heavy) bowl.
Step 9: Adjust the cavity mold

This cylindrical plastic container will create a cavity in the bottom of the concrete base, where there will be enough space for cable connections, and perhaps a future light-colored controller.
Cut between the cavity and the external edge, where the power cable will pass. Close the end of the straw with wet paper or something sticky.
Step 10: Put the Base Brackets in Place

The 33 cm long threaded rods must be screwed into the holes.
To speed up the operation, you can use a drill or electric screwdriver. Screw them in until they protrude into the cup by about 5-6 cm, then carefully check that the internal length of the tubes is exactly the same.
I also shaped two sheets of cardboard with the three holes, to help keep the legs exactly vertical.
You can now add a thin layer of silicone grease to the entire inner surface of the container, this will help remove the plastic from the consolidated base.
Step 11: New concrete bars

To reinforce the base a little, I added a thin metal bar bent into a large spiral. If you want to do something more effective you can build a cage about 2 or 3 cm smaller than the bowl.
Wrap the ends of the wires around adjacent elements of the shape, then add some bobby pins to keep the shape 1 inch up in the container.
I also filled the holes in the pipes with pressed paper, so that the concrete cannot pass through, and I can remove them by pushing from the inside of the pipes.
Step 12: The mixture
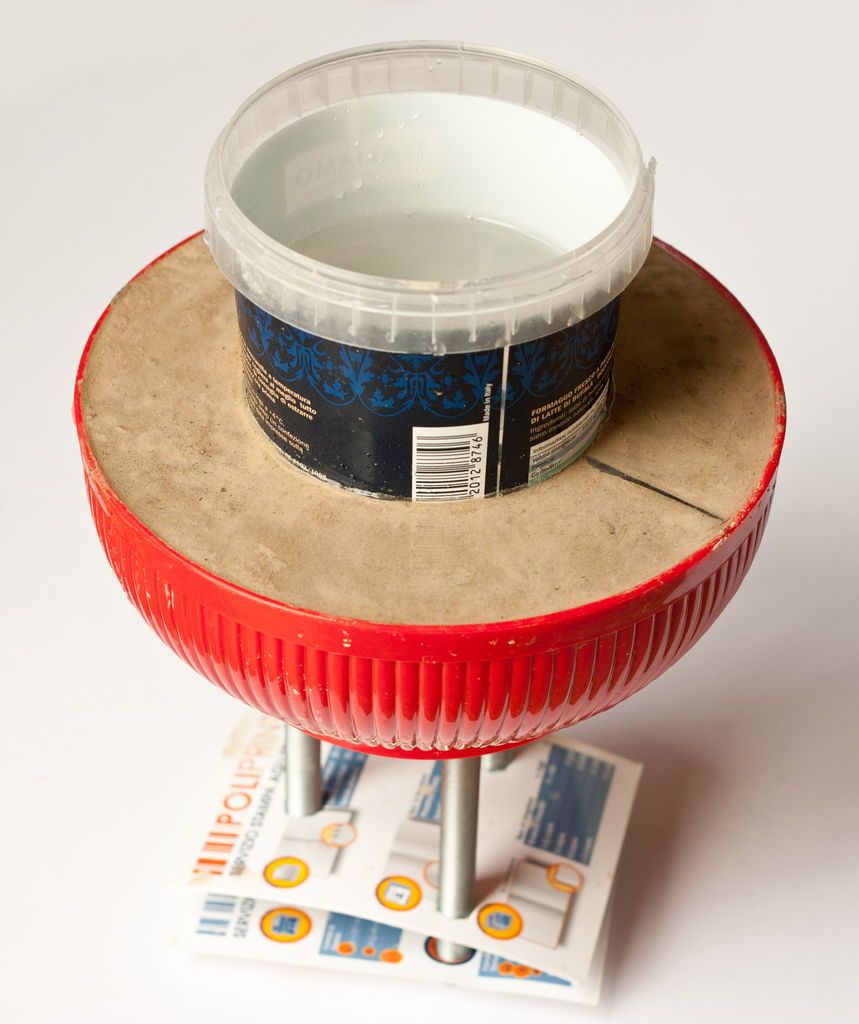
To keep the bowl stable, I suggest placing it against two cornered walls and adding something heavy to the free side. Check that all three legs are exactly vertical.
Place the smaller container on the bars centered on the container, then fill it with water, so the weight of the water will keep it down. The straw should be in contact with the edge of the bowl.
Step 13: Open the holes

The concrete will reach 90% of its strength after 28 days, but I believe that by paying attention you can remove the base from its mold after 2 weeks.
You must also open the holes to allow the cable to pass through. Push from the open end of the bars or dig a little into the concrete.
Step 14: Remove the mold

Removing the base from the mold is a little difficult. I decided to put it in the oven at 140°C for about 10 minutes. This softened the plastic and allowed me to remove it without much effort.
Step 15: Paint

I painted the base black, but you can also keep the concrete visible. The three small rubber O-rings should be threaded onto the threaded bars, so that the aluminum stems do not ruin the surface of the base.
Next, add some masking tape as thickness on the threaded bars, so that the stems fit with a resistance to the bit.
Step 16: Connect the cables

I closed the three cables with a cable tie, so they hold everything together.
Connect the three pairs of wires so that you have only two contacts (one color each) to connect to the line from the outlet.
Step 17: The wooden plate
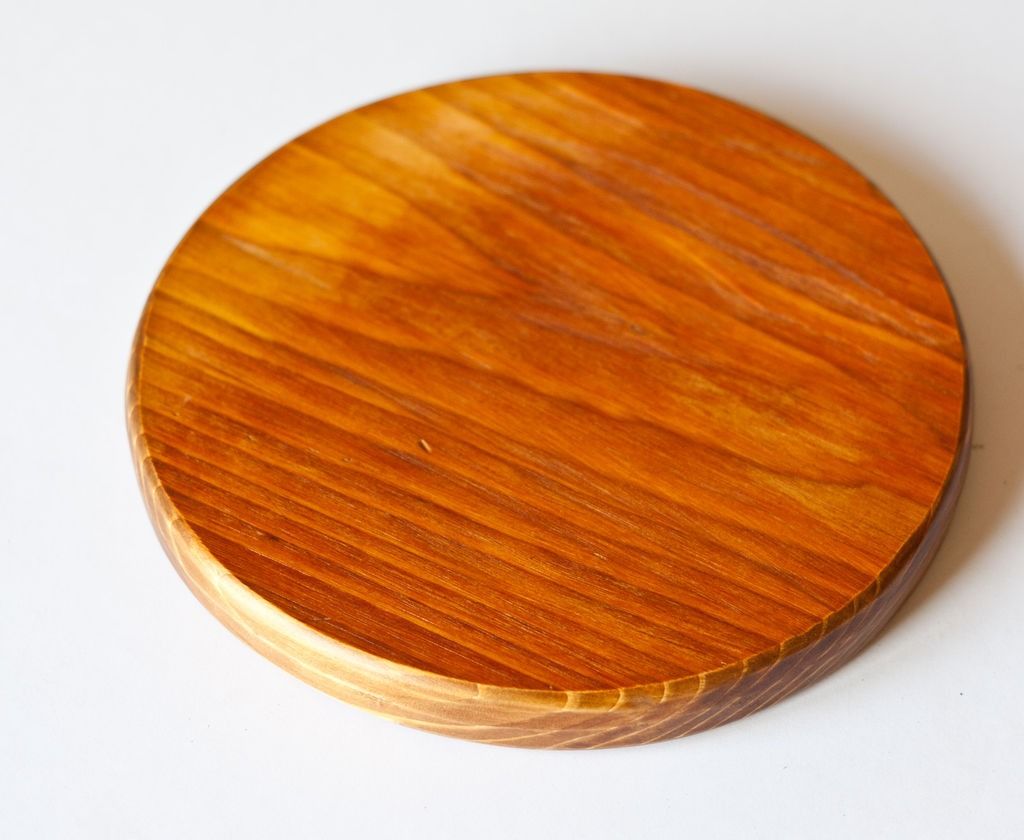

I glued the concrete base to a wooden plate, treated with shellac.
I wanted to make the disc a little wider than the concrete base, but I probably went overboard with the sanding, and the diameters are identical. The consequence is that the edge of the concrete is very exposed to collisions and is very easily ruined.
So I taped a ribbon around the circumference to cover any imperfections.
Step 18: Ready


It's time to turn on the lamp and relax with the warm atmosphere. Greetings!
Get more information at Perfectidea.com and on our Facebook for more How to Make a Cool Lamp from Glass Bottles (Cut Glass).
Popular Content
How to make a rocket stove for outdoors
Cardboard Drawers Lined with Jeans
Ideas and Advantages of Window Grilles for the Home!
Latest Articles
How to make a refrigerator out of insulating material: Practical step-by-step guide
How to make a Kilim for the Home: Complete Step by Step Guide
How to protect ourselves from accidents in our workplace: Complete prevention and safety guide
Related Content
Building a Sofa-Bed with Style!
From an Old Table to an Adorable Toy Kitchen for Girls!
Creative Room Dividers
How to Build PVC Pipe Fences
Creative Home Decor Ideas to Transform Every Space
Refreshing your home starts with smart design choices that combine comfort, personality, and functionality. Whether you want to modernize a small apartment, upgrade outdoor areas, or create cozy rustic interiors, these trending ideas can completely change the atmosphere of your space.
Outdoor Spaces That Increase Style and Functionality
Outdoor living continues to dominate modern home trends. Homeowners are increasingly investing in practical entertainment zones inspired by these BBQ shed ideas, which create the perfect setup for gatherings and weekend cooking sessions.
First impressions also matter when designing exteriors. Elegant farm entrance gates design ideas help properties stand out while improving privacy and curb appeal.
Compact living solutions are also gaining popularity. These inspiring 16x40 shed house interior design ideas show how smaller spaces can still feel luxurious and functional.
To enhance patios and entryways, homeowners are adding stylish protection with these creative porch awning exterior DIY ideas that blend aesthetics with practicality.

Rustic and Cozy Interior Design Trends
Warm and natural interiors remain timeless. These charming rustic decor ideas combine wood textures, vintage accents, and earthy tones to create welcoming spaces.
Bedrooms are becoming more personalized with curated wall arrangements. Many homeowners use these stylish picture wall ideas for bedroom spaces to display memories and artwork creatively.
Textured wall treatments are another major trend. Installing a board and batten wall adds architectural character while keeping interiors elegant and modern.
Similarly, bold accent wall ideas can instantly transform plain rooms into eye-catching focal points without requiring a full renovation.
Smart Kitchen and Organization Inspiration
Functional kitchens are essential for modern homes. These practical kitchen wall cabinet ideas maximize storage while maintaining a clean and stylish appearance.
Organization also starts at the entrance. Well-designed mud room ideas help families keep shoes, coats, and daily essentials neatly arranged.
Colorful and Personalized Home Styling
Vibrant interiors are becoming increasingly popular thanks to playful dopamine decor ideas that use bright colors and joyful accessories to improve mood and energy.
Gallery walls also continue to evolve as a major decorative feature. These trendy gallery wall inspiration ideas offer creative ways to combine prints, photos, and statement art.
Young renters and new homeowners are especially embracing these stylish first apartment aesthetic ideas to create sophisticated interiors on a budget.
Finally, selecting the right shades can dramatically influence any room’s atmosphere. These modern trendy color ideas help homeowners choose palettes that feel fresh, elegant, and timeless.
Final Thoughts
From rustic charm and colorful interiors to outdoor entertaining areas and functional storage solutions, today’s home decor trends focus on creating spaces that feel both beautiful and livable. By combining smart layouts, modern textures, and personalized decorative elements, any home can become more stylish, comfortable, and inspiring.


