


Bored of plain black, white or brown shoes? In this article we will teach you how to paint leather shoes in an incredible way.
Today we will guide you through the process of turning a pair of blank shoes into a colorful fashion statement.

Of course, what that statement says is completely up to you.
The finished shoes are durable, flexible, colorful and even wear-resistant. Read on to find out how to paint your own leather shoes!
Steps on how to paint leather shoes:
Step 1: An overview


There are four stages to repainting a leather shoe:
- Removing Shoe Finish: Almost all shoes already have a protective coating applied by the manufacturer. This needs to be removed so you can paint directly onto the leather.
- When writing on your design, this step can be skipped if you are very confident in your painting skills. I definitely don't...
- Paint: Use flexible paint to create your own design on the leather.
- Finish: Seal the painted shoes in a coat of acrylic to protect the beautiful new paint job.
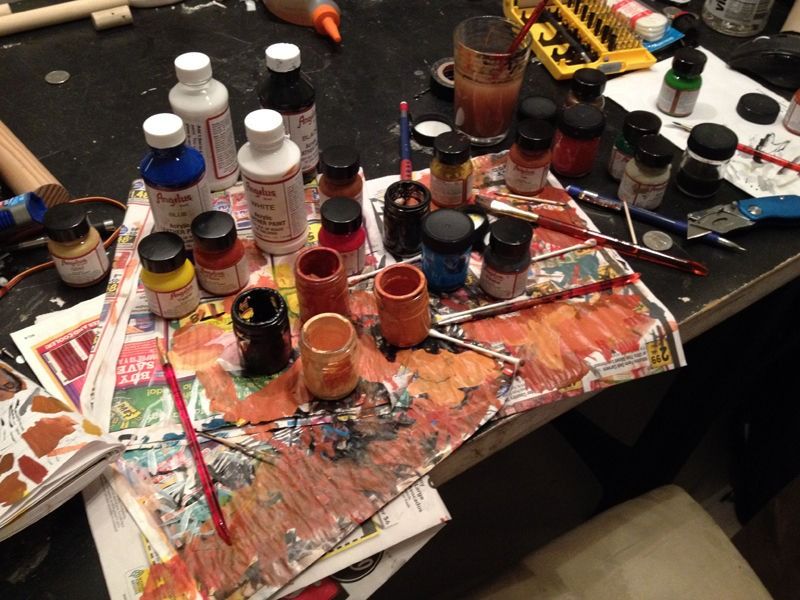
What you will need:
- Solvent to remove the finish from the shoes: I used the professional leather prep and deglazer.
- Flexible leather paints – I used Angelus brand paints. I was surprised at how little of each paint I needed.
- Acrylic finish
- Pencil and eraser.
- Brushes
- Cotton
- Wooden skewers for fine details.
- Disposable sponge.
- Shoes
- I also recommend a waterproof cloth or a pile of newspapers to catch all the mess you are going to make.
Warning: This is a smelly project. Leather deglazer, in particular, emits some pretty noxious fumes. Be sure to do this in a well-ventilated area, away from flames. Also, keep a lid on paint/solvent containers when not in use. You have been warned.
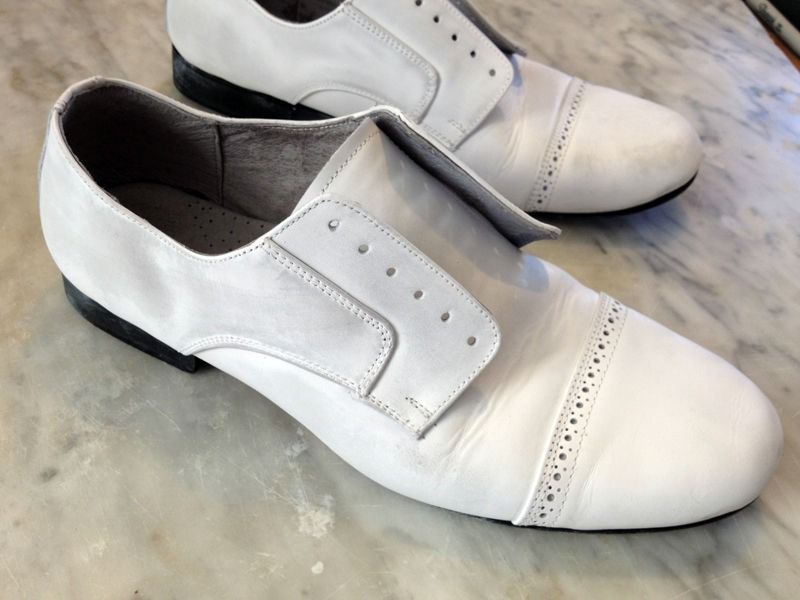
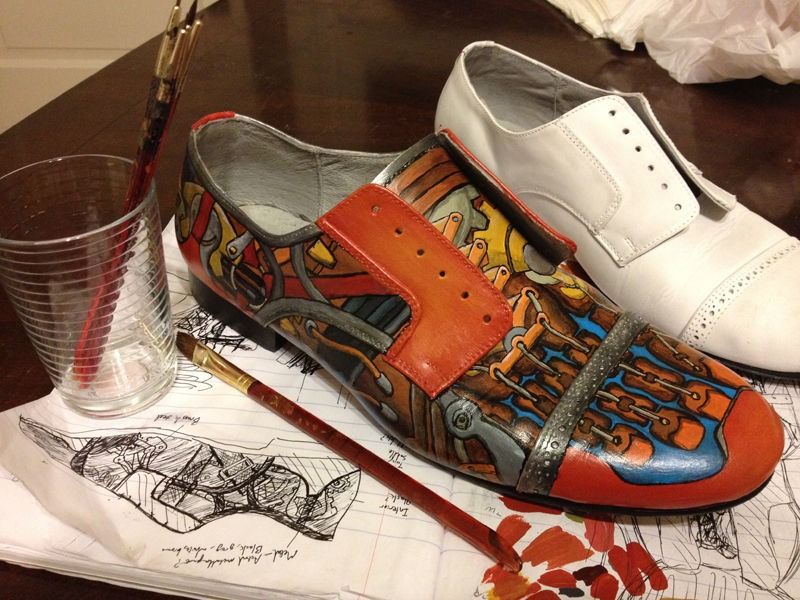
Step 2: Choose your shoes and make some sketches

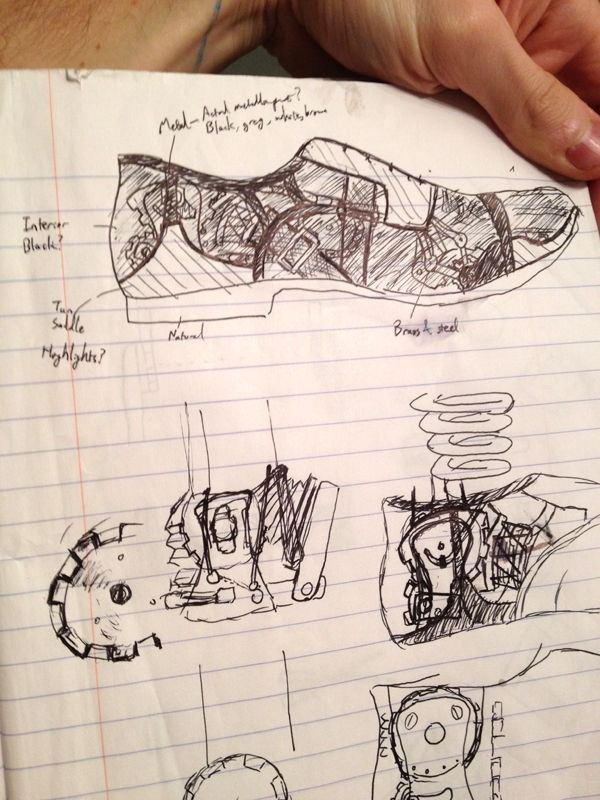

I always find it useful to do some thinking before starting to paint/project a project. In this case, your shoes will be out of action for a few days while you paint them, so it's best to have a good plan for the entire project before removing the protective finish. Now may also be a good time to try out some paint colors. Mix, play and experiment on paper before attacking your shoes.
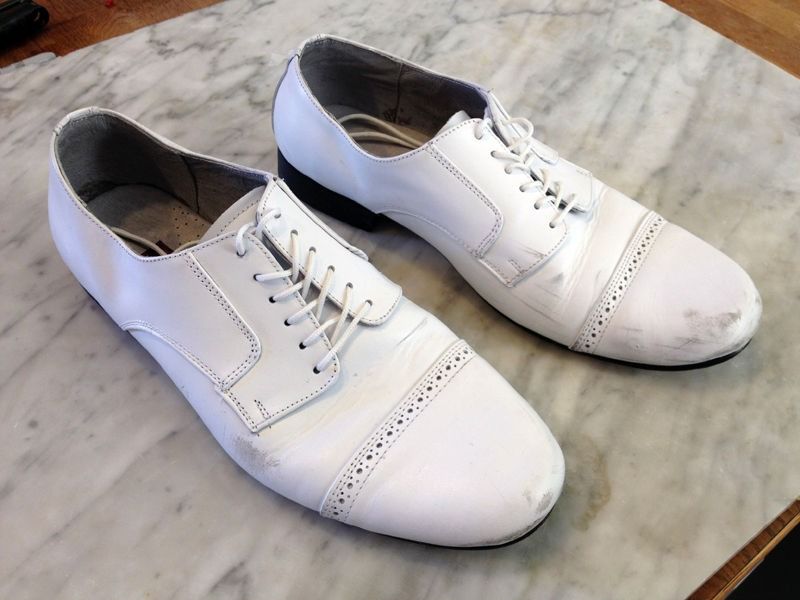
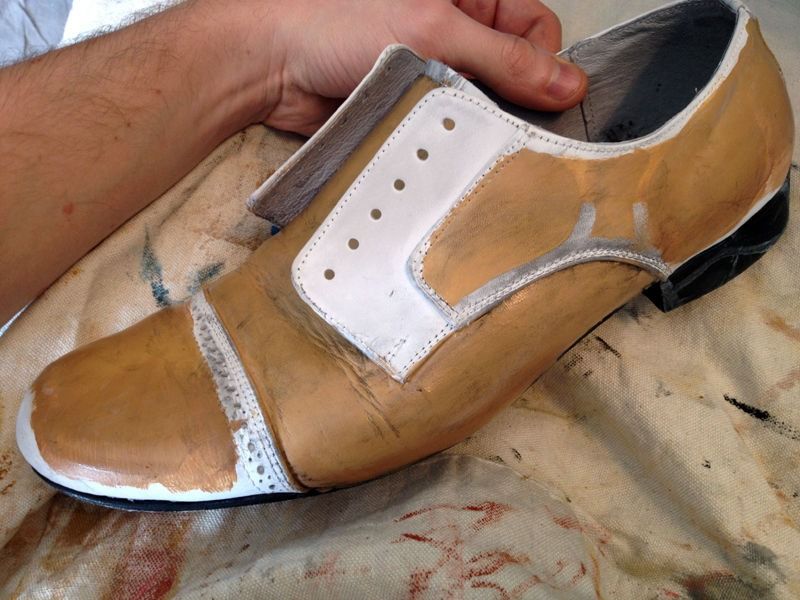
Step 3: Clean the shoes

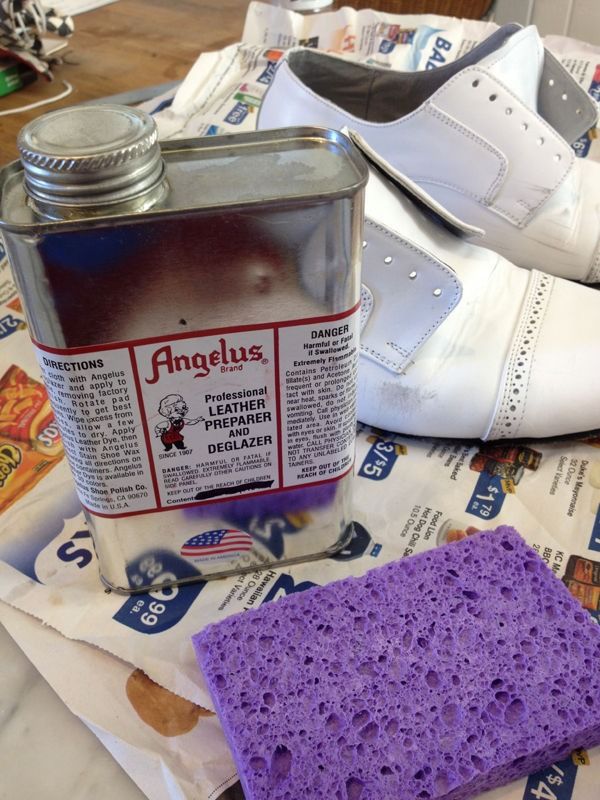

First, remove the laces. Apply a little degreaser to the corner of a sponge and scrub your shoes. You should immediately notice a difference in your surface when the finish is removed. In this case, you can also see some of the original dye coming off the sponge. Repeat this for the entire surface of both shoes.
Remember: any original finish patches will prevent the paint from adhering properly
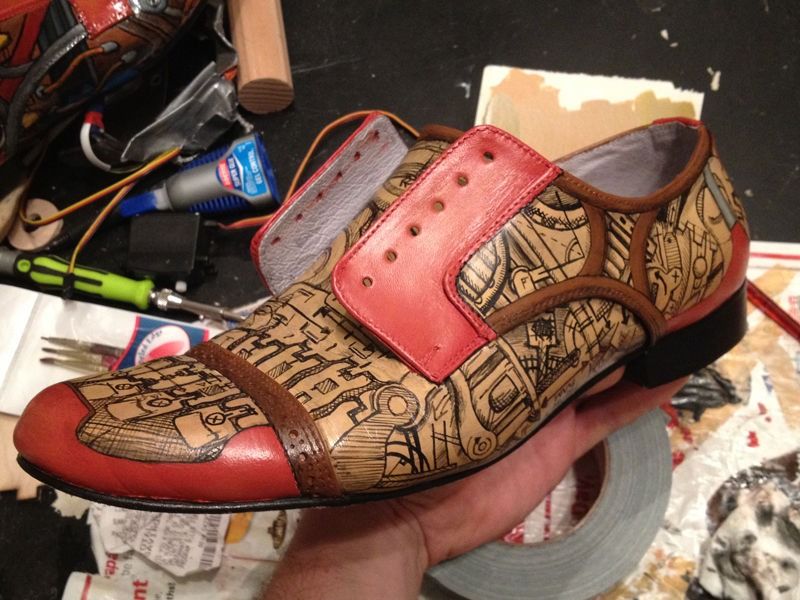
Step 4: Pencil on your design


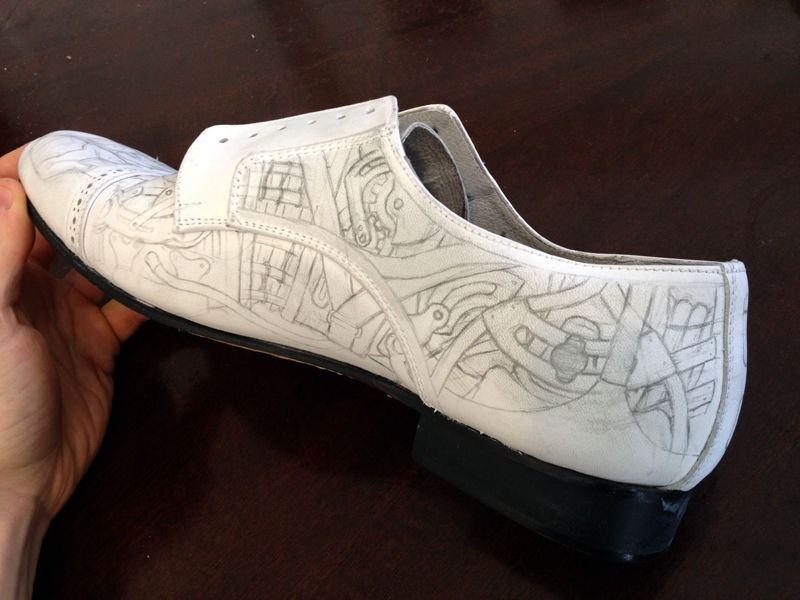
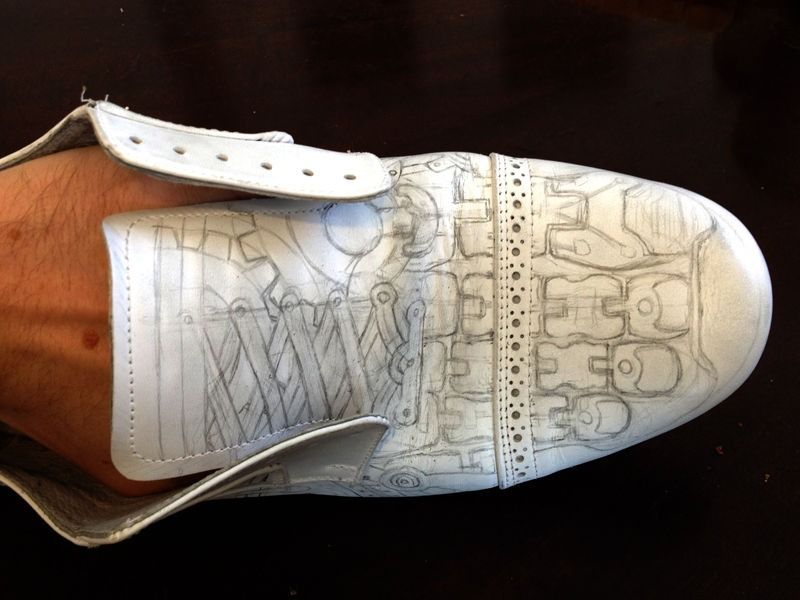
This stage is very fun! Draw on your freshly peeled shoes with pencil. If you make a mistake, delete it and try again. There's no pressure to get everything right the first time, so you can try as many patterns as you want. If you have trouble using your eraser on shoe leather, find a softer eraser or use a few drops of deglazer on the end to clean the graphite pencil.
Note: I drew and painted my shoes one by one because (a) I wasn't sure if it would work and (b) I wasn't sure I wanted both shoes to look the same. However, I highly recommend painting both shoes at the same time. That way, all the colors will match and you can wear your shoes again much sooner.
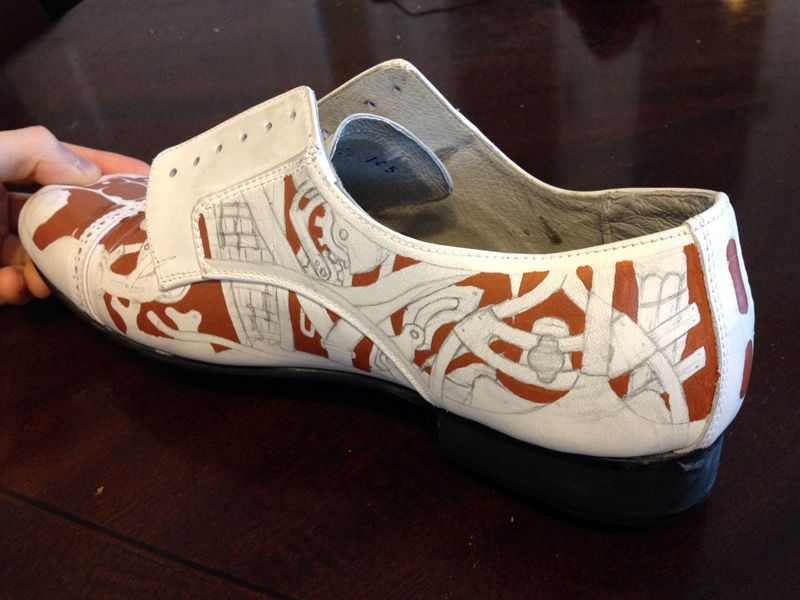
Step 5: Paint on the base coat

Disclaimer: I am not a painter by habit or training, so the following steps are not necessarily the best way to achieve the look you want. If you're aiming for a rather cartoony and gloomy design like mine, then by all means take my advice. However, you could imitate almost any style of painting if you have the talent and inclination.
Paint your shoes one shade at a time, using bold, solid color areas for now. Later, you can add shading and texture to these areas. Leather paint provides very good opaque coverage, so a thin coat will usually completely cover everything underneath. However, sometimes you may need to apply multiple coats to achieve this coverage. This is almost a better option than trying to apply a thick coat, which will smear or dry unevenly. Fortunately, the paint dries so quickly that you can apply several coats in one sitting.
Yes, at the end of this stage, your shoe will look much uglier than it did while you were drawing it. Don't worry, you'll add borders to tidy it up in the next step.
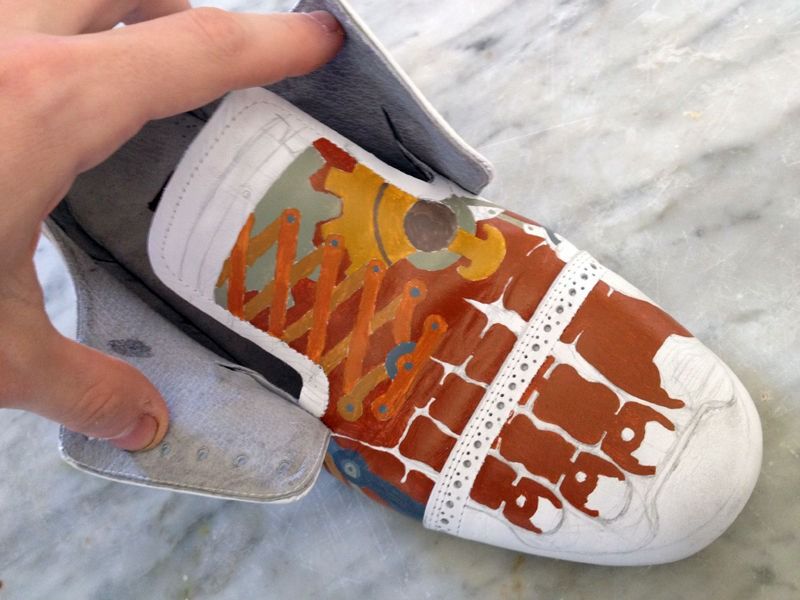
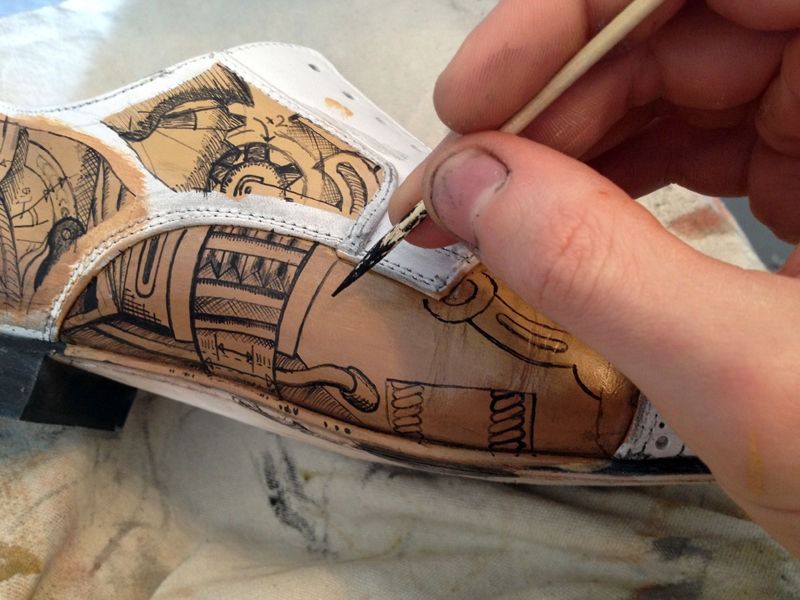
Step 6: Paint

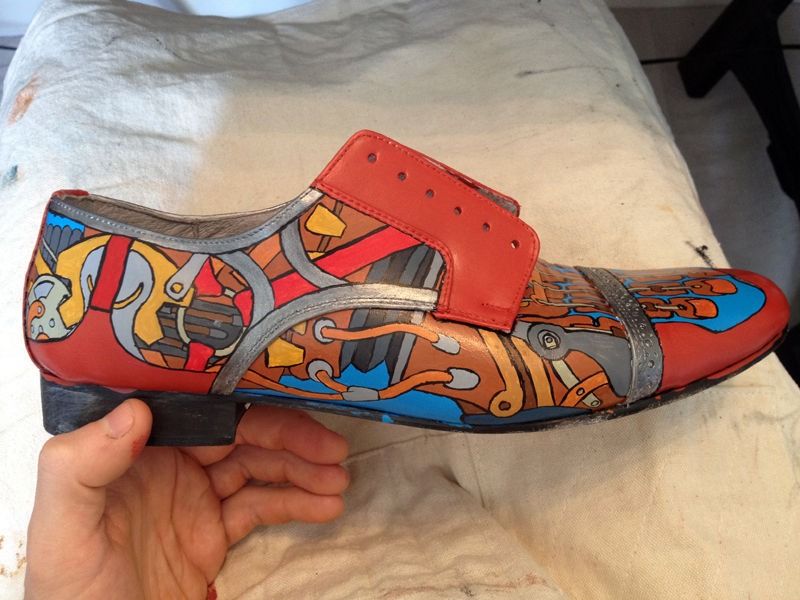
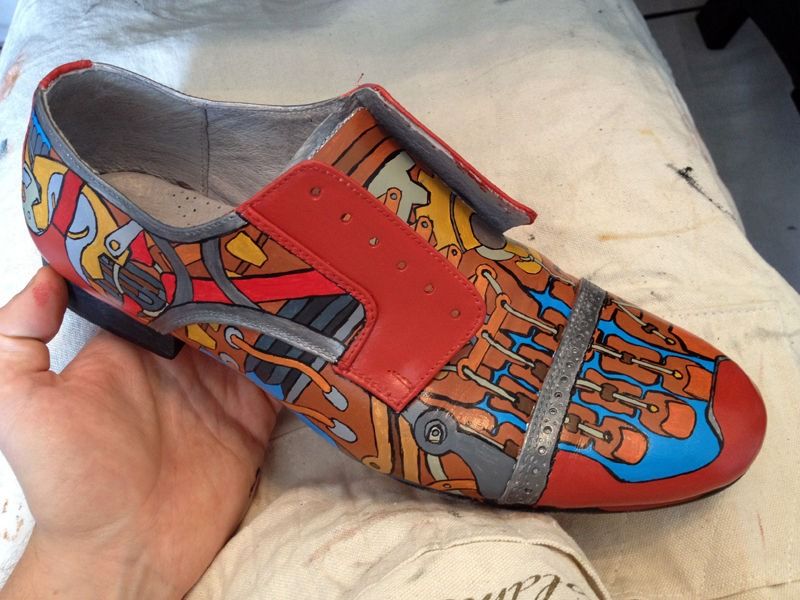
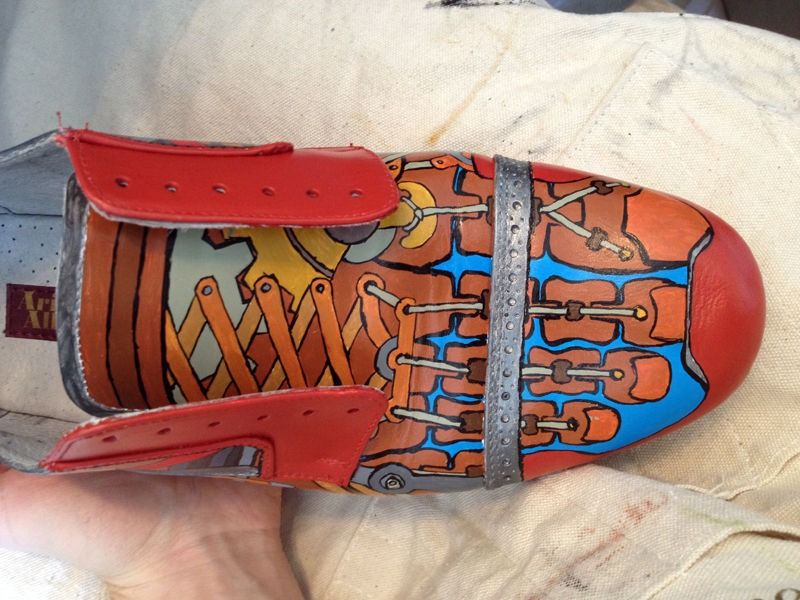
Wherever one color meets another, draw in a black border to cover the border. Vary the thickness of the borders, depending on the areas you want to emphasize. To achieve very fine edges, use a wooden skewer dipped in black paint instead of a paintbrush.
There, isn't that much neater? However, it still looks somewhat flat and cartoonish. If that's what you like, great! Otherwise, it's time for some shade.
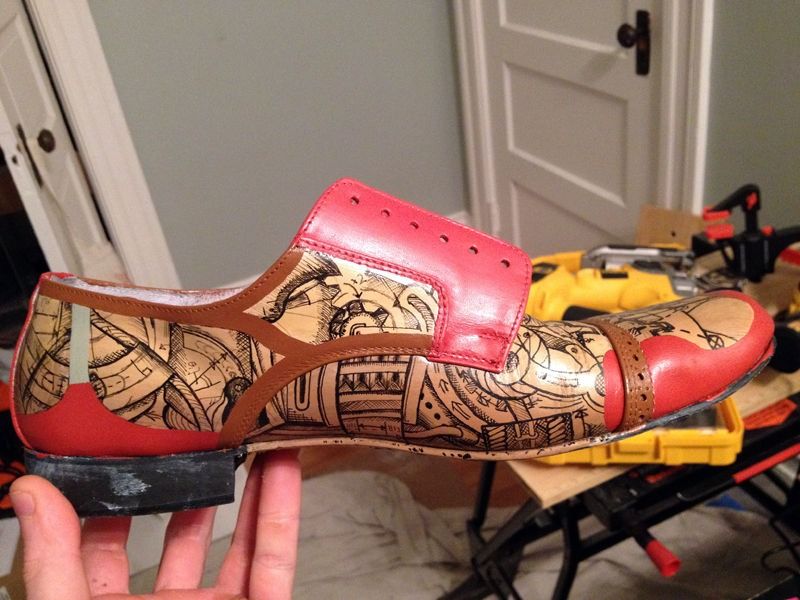
Step 7: Apply shading and highlights

Shadow away! I used watered down versions of the original colors, along with black and white to add some texture to the color blocks. You may want to redraw some of the borders at the end of this step.
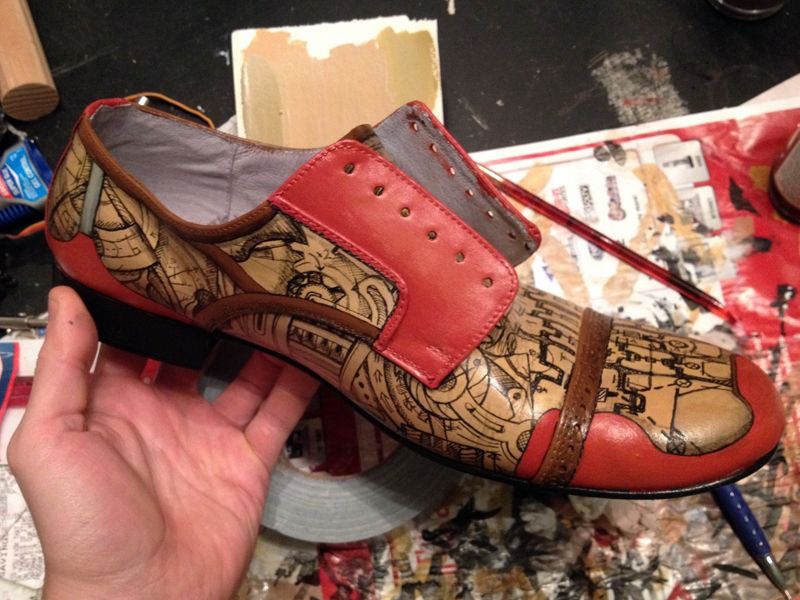
Step 8: Seal it

When you are sure the paint is completely dry, use a large paintbrush to liberally slap on a coat of acrylic finish. Make sure it is applied evenly, or you might have some bumps or bubbles on the surface of the shoe. Also check for accidental drips.Place them down on your soles (unless you want to tape your shoes to your work table). Wait for the finisher to dry, then repeat. Apply at least three coats to protect your beautiful masterpieces.
The finish makes a huge difference; In addition to protecting the shoe, encasing your paint in a thin layer of acrylic adds an eye-catching look of professionalism to the shoes' appearance.
Note:Although I used a matte finish, the shoes are still quite shiny. This could be minimized by combining a dulling agent (also available from most paint suppliers) with the paints and/or sealants.
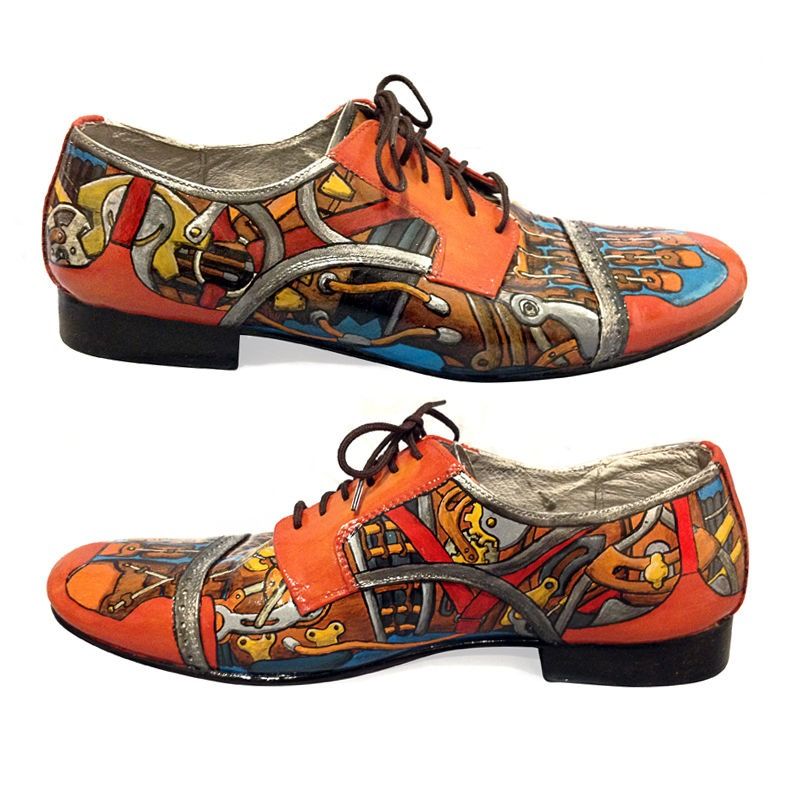
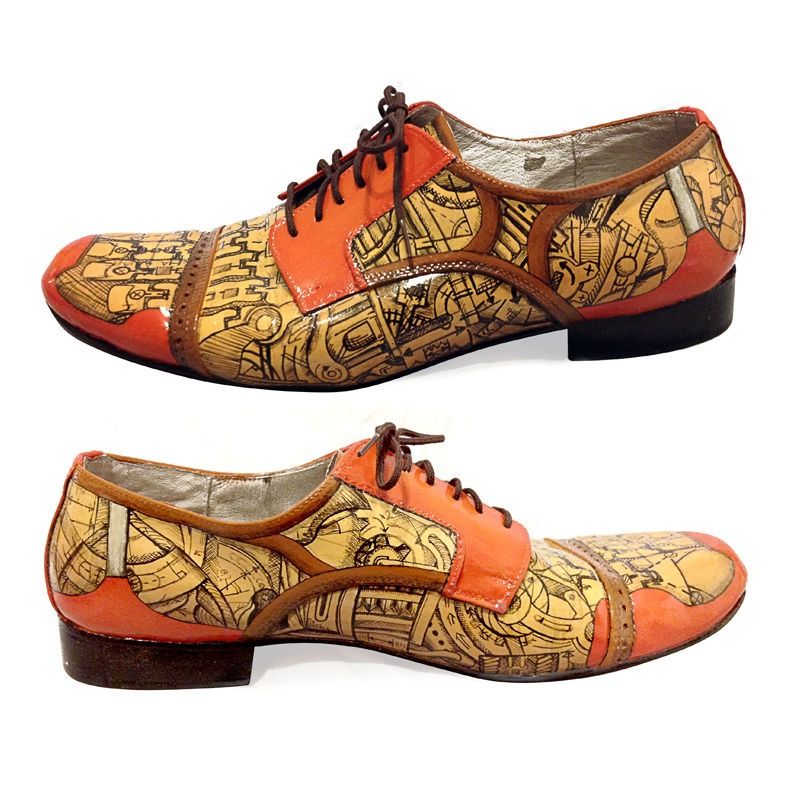
Step 9: Shoe number two


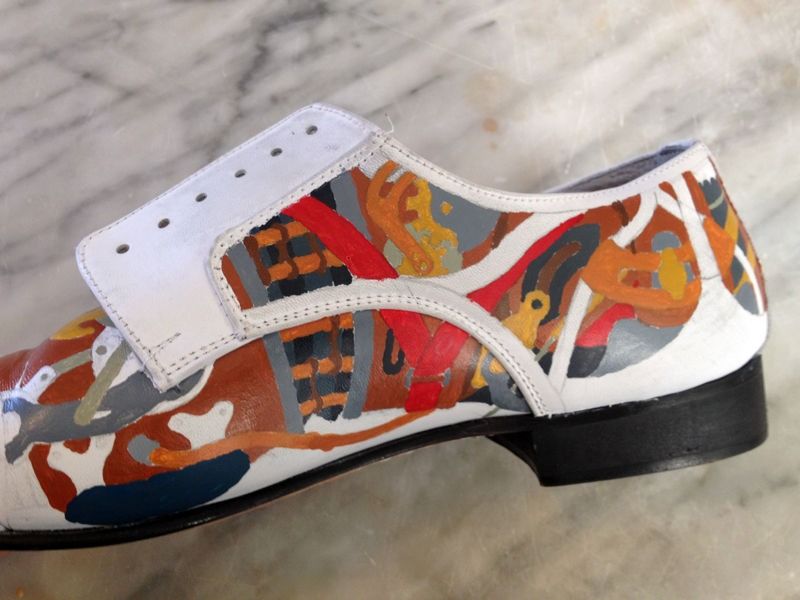
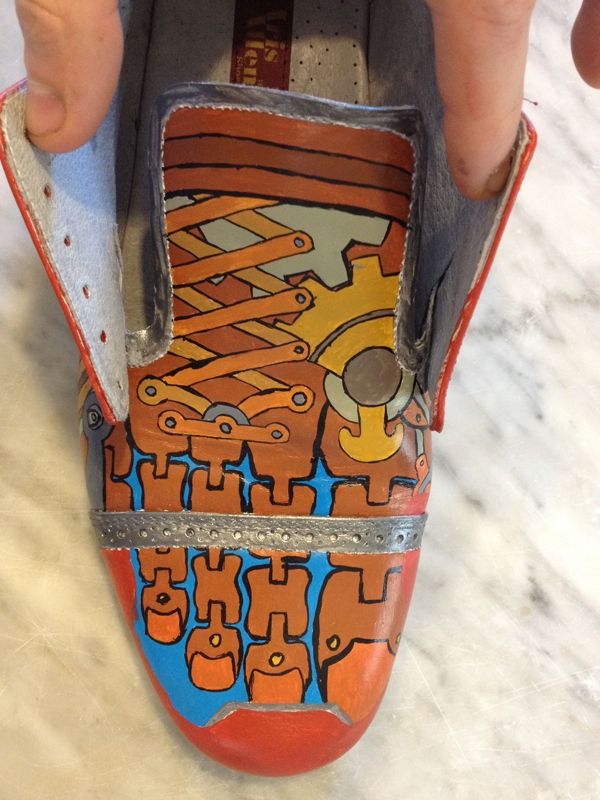
I used a slightly different, faster technique for my second shoe. I wanted to give this shoe the look of the sketches that had been used to design the internal mechanism of the first shoe. I started by painting a base coat of various browns and some black spots, to create an aged paper texture. I then used a wooden skewer to carefully draw over this in black, before adding bold colors and subtle details and shading to match the other shoe.
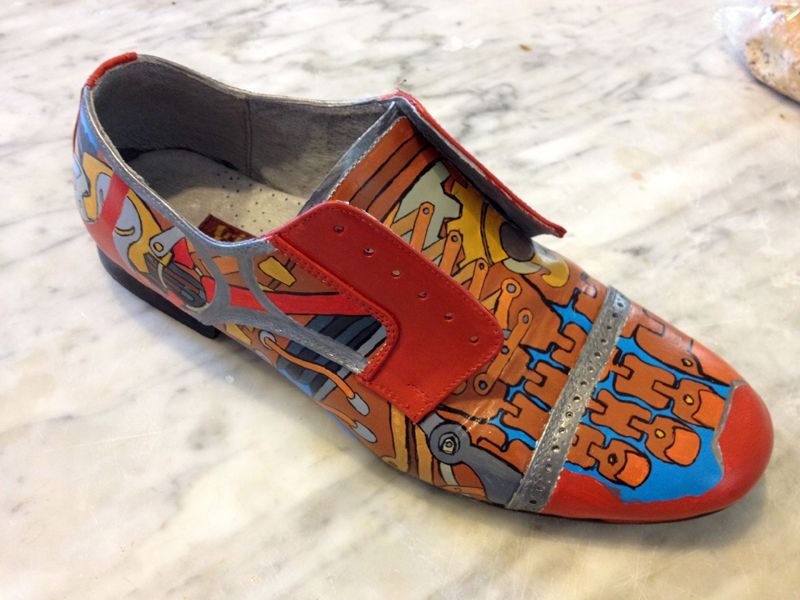
Step 10: The finished shoes

Remember that you can paint your leather shoes any color you like.
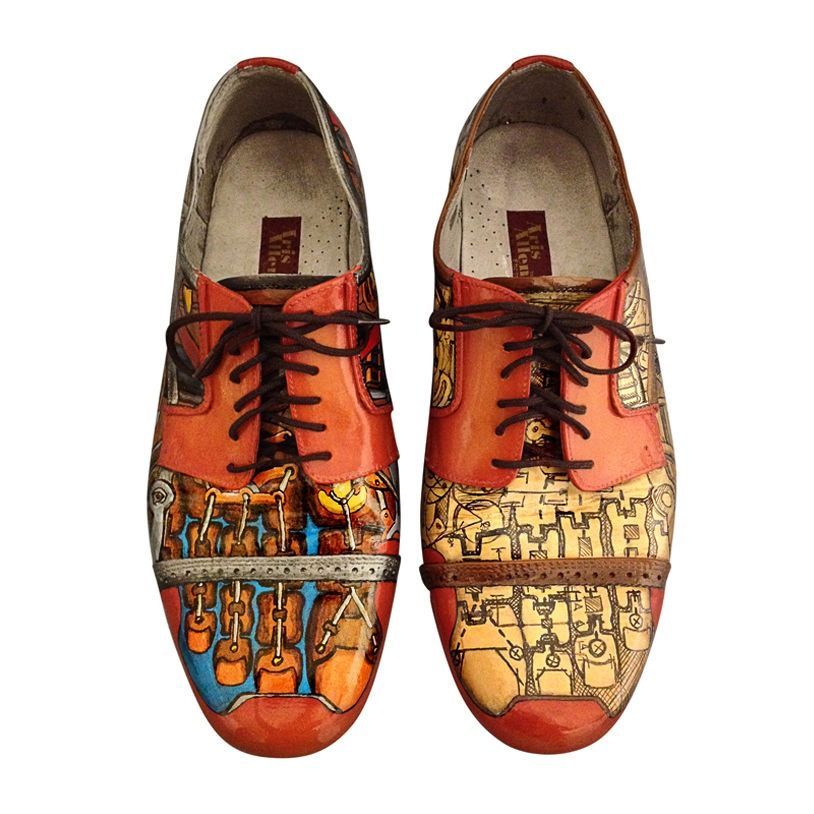
I don't know how long they will survive this regular use. So far, I've worn them for three nights of social dancing and they haven't scratched them. The surface appears flexible and resistant. However, I'm sure they will eventually go the way of all shiny shoes. If that happens, I'll have an excuse to repaint them with a new design.
Let me know what you think and, as always, share photos of your own shoe painting projects! see you soon.
Don't forget to follow us on our social networks for more news!
- Tags
- Painting
- Shoes
Popular Content
How to make a rocket stove for outdoors
Cardboard Drawers Lined with Jeans
Ideas and Advantages of Window Grilles for the Home!
Latest Articles
How to make a refrigerator out of insulating material: Practical step-by-step guide
How to make a Kilim for the Home: Complete Step by Step Guide
How to protect ourselves from accidents in our workplace: Complete prevention and safety guide
Related Content
How to Decorate the Garden with Old Tires
Custom Gamer Desk
Wooden Discs – The Latest Trend in Home Decoration
How to use a table saw - basic guide and recommendations
Creative Home Decor Ideas to Transform Every Space
Refreshing your home starts with smart design choices that combine comfort, personality, and functionality. Whether you want to modernize a small apartment, upgrade outdoor areas, or create cozy rustic interiors, these trending ideas can completely change the atmosphere of your space.
Outdoor Spaces That Increase Style and Functionality
Outdoor living continues to dominate modern home trends. Homeowners are increasingly investing in practical entertainment zones inspired by these BBQ shed ideas, which create the perfect setup for gatherings and weekend cooking sessions.
First impressions also matter when designing exteriors. Elegant farm entrance gates design ideas help properties stand out while improving privacy and curb appeal.
Compact living solutions are also gaining popularity. These inspiring 16x40 shed house interior design ideas show how smaller spaces can still feel luxurious and functional.
To enhance patios and entryways, homeowners are adding stylish protection with these creative porch awning exterior DIY ideas that blend aesthetics with practicality.

Rustic and Cozy Interior Design Trends
Warm and natural interiors remain timeless. These charming rustic decor ideas combine wood textures, vintage accents, and earthy tones to create welcoming spaces.
Bedrooms are becoming more personalized with curated wall arrangements. Many homeowners use these stylish picture wall ideas for bedroom spaces to display memories and artwork creatively.
Textured wall treatments are another major trend. Installing a board and batten wall adds architectural character while keeping interiors elegant and modern.
Similarly, bold accent wall ideas can instantly transform plain rooms into eye-catching focal points without requiring a full renovation.
Smart Kitchen and Organization Inspiration
Functional kitchens are essential for modern homes. These practical kitchen wall cabinet ideas maximize storage while maintaining a clean and stylish appearance.
Organization also starts at the entrance. Well-designed mud room ideas help families keep shoes, coats, and daily essentials neatly arranged.
Colorful and Personalized Home Styling
Vibrant interiors are becoming increasingly popular thanks to playful dopamine decor ideas that use bright colors and joyful accessories to improve mood and energy.
Gallery walls also continue to evolve as a major decorative feature. These trendy gallery wall inspiration ideas offer creative ways to combine prints, photos, and statement art.
Young renters and new homeowners are especially embracing these stylish first apartment aesthetic ideas to create sophisticated interiors on a budget.
Finally, selecting the right shades can dramatically influence any room’s atmosphere. These modern trendy color ideas help homeowners choose palettes that feel fresh, elegant, and timeless.
Final Thoughts
From rustic charm and colorful interiors to outdoor entertaining areas and functional storage solutions, today’s home decor trends focus on creating spaces that feel both beautiful and livable. By combining smart layouts, modern textures, and personalized decorative elements, any home can become more stylish, comfortable, and inspiring.


