


Building a Fantastic Oven to Make Pizza at Home, we decided to give life to a little used corner of our garden by building a brick and mortar pizza oven.


This turned out to be a great family activity and now that the oven is built, making pizzas is a regular family activity in our home.
Step 1: Prepare the base
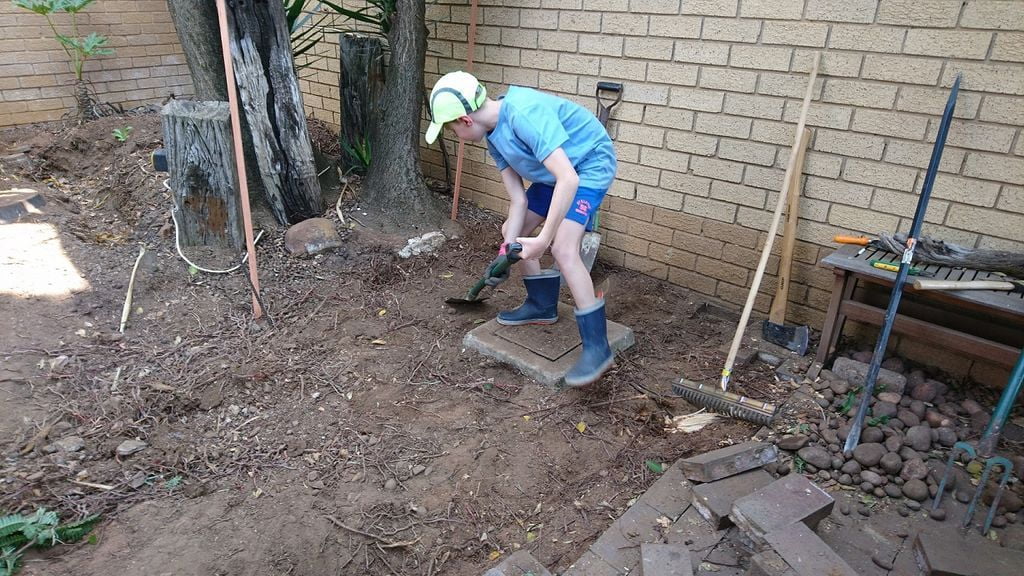


Clear an area for the base of approximately 1.5 x 1.5 m.
The base will be a 100 mm thick concrete slab. The final level of the slab should be approximately 50 mm above ground level so that groundwater does not run into the slab. Level and compact the base area to a level approximately 60 mm below the natural ground level. Using blanking board or 114 x 38 pine sections, construct a box with interior dimensions of 1420 mm x 1370 mm (1420 mm is the width of the front end of the furnace). Place the box on the level base area. We threw a 40kg bag of sand into the box and compacted it with a hand stamper to create a good base for the slab.
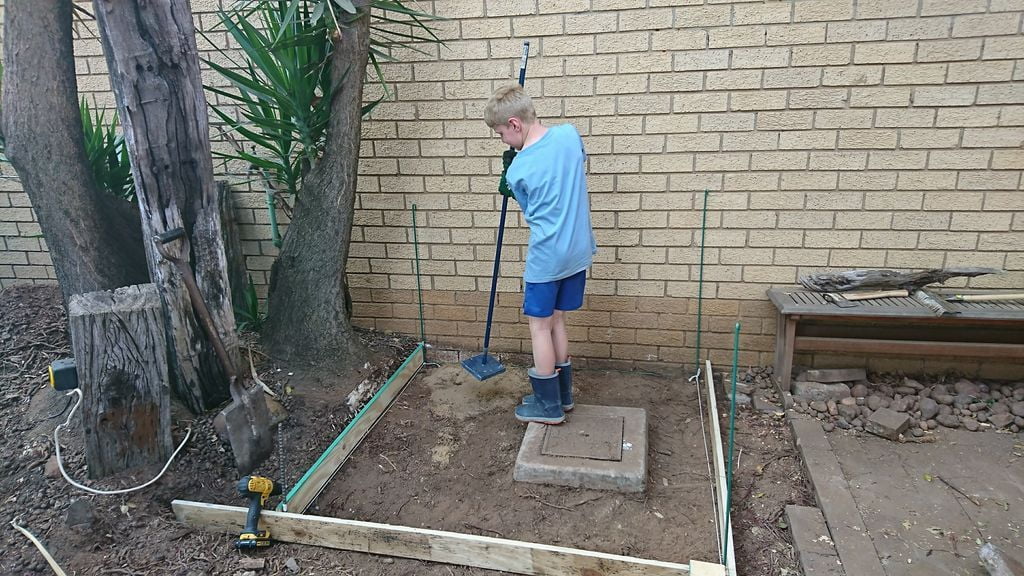
Step 2: Compact Base


Mix 2 40kg bags of ready-mixed concrete in a wheelbarrow (mixing concrete by hand can be a challenge for the inexperienced builder so try mixing one at a time).
Pour concrete directly onto the level surface inside the plug box and level with a board. Let the concrete dry for at least 24 hours before continuing construction. The formwork can be removed after 3 days.
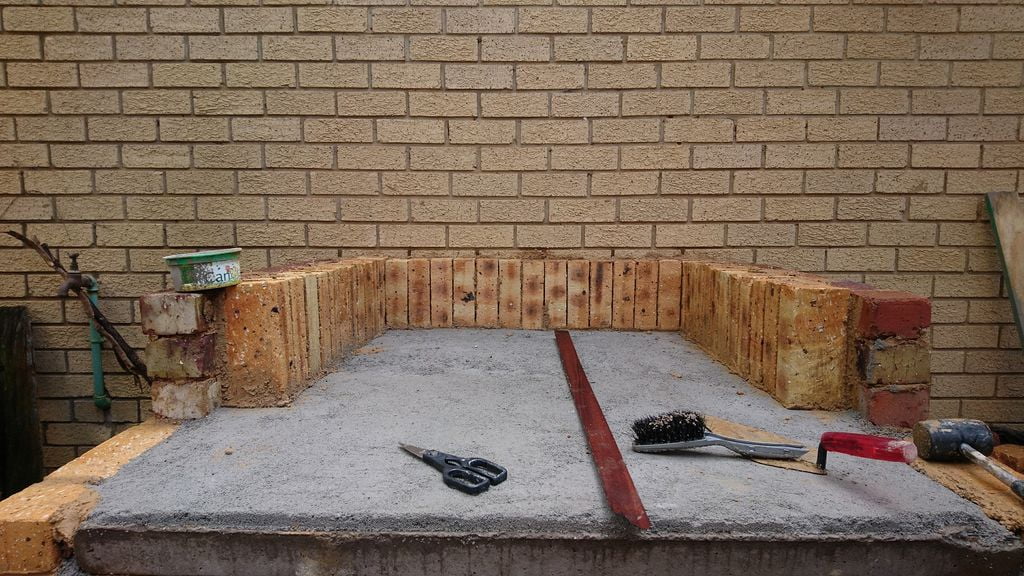
Step 3: Building the Base Walls


Now you are ready to start building the base walls. We used a cheap facing brick for the outside of the wall and a clay brick for the inside.
The base walls required 118 full face bricks + 22 half face bricks; 90 full clay blocks + 16 half bricks. We used around 6 40kg bags of cement mix. Place the 13x100x75x1200mm precast concrete lintels on the inside of the surface on a mortar base (you may need to trim the lintels to fit using an angle grinder).
Step 4: Building Oven Walls and Floor


Now start building the outside of the side walls of the oven. Build paths using clay bricks for the external surface. Each path consists of four and a half bricks. Once the cement has been placed and leveled, cover it with a plastic sheet and let it dry for at least 24 hours. If it dries too quickly, it will collapse.
Step 5: Continue the oven walls

Build the inner surface of the oven walls with face brick. A common face brick has a strength of approximately 1200°C and should easily withstand oven heat; no refractory bricks needed. Make the joints between bricks as small as possible (about 5mm) to minimize the amount of cement exposed to direct heat and reduce the amount of cement in the mortar mix by half (do this for all kiln-oriented bricks).
Draw the curve of the vault on a piece of hardboard on the floor (or other horizontal surface if there are unwanted obstructions on the floor). Place the bricks in a curve with the edge of the bricks facing the fire. Butt joints are used so that the cement does not crumble in the heat of the fire and fall into the kiln.
The height of the oven must not exceed 500 mm at the apex of the arch. If the oven roof is too high, the oven will take too long to heat up and lose heat too quickly.
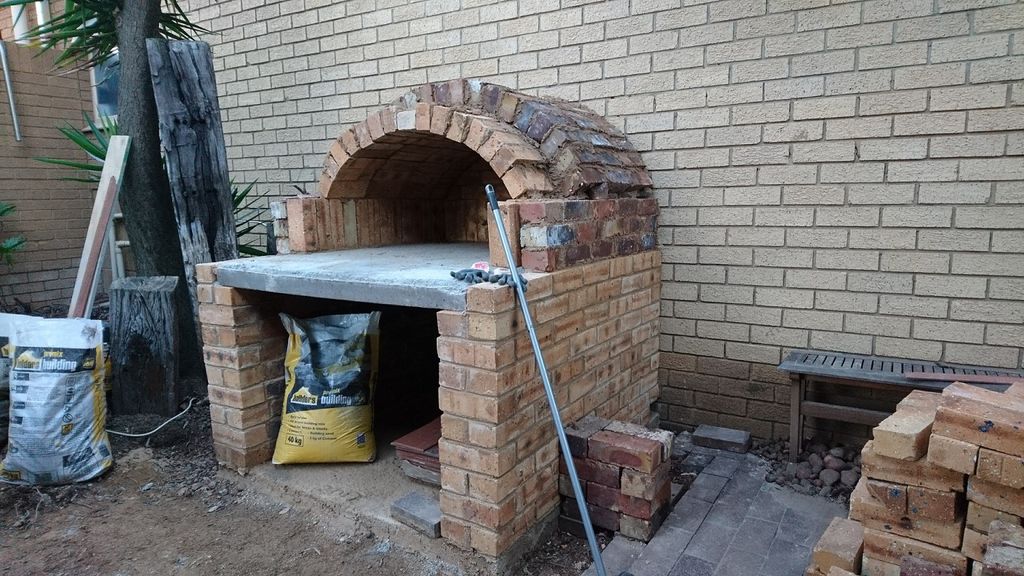
Build the back wall of the oven, cutting bricks as necessary to fit the arch.
Note:
Since this particular kiln was built against a double brick retaining wall, we only built a single surface on the back of the kiln. For a freestanding oven, a double wall is needed to ensure sufficient thermal mass to retain the heat of the oven.
Step 6: Building the vault

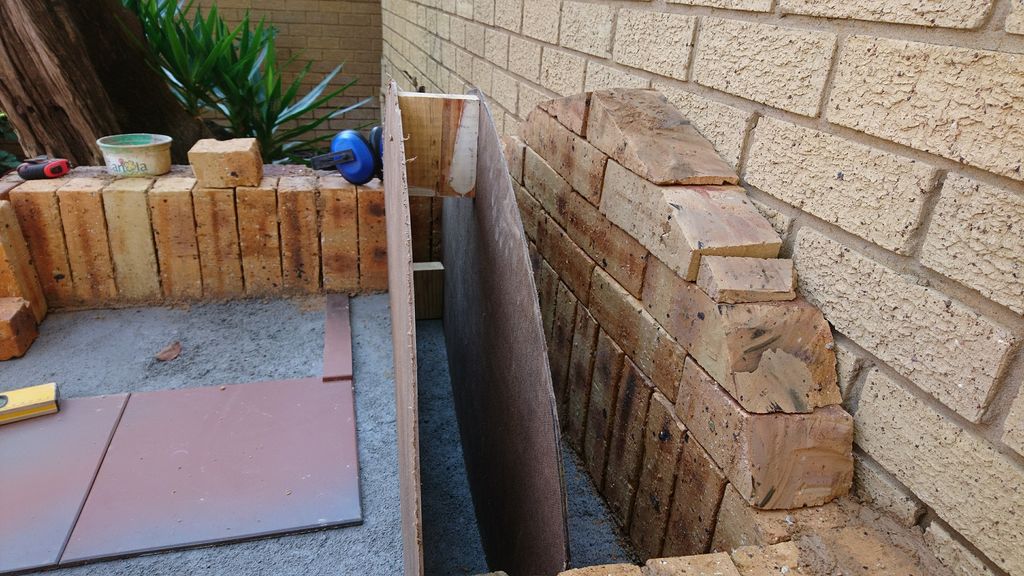

Cut two equal pieces of pressed wood to make the formwork.
Screw three or four pieces of wood of equal length between the two pieces of chipboard to place them 150 to 200 mm apart. At this point, it would be a good idea to drill two finger holes in one of the boards to make removing the formwork easier.
Place the bricks for the first arch resting on top of the formwork before committing to the mortar. Once you're satisfied they fit, set them into place with the mortar mix.
We used 40 kg bags of mix for the mortar, but we eliminated half of the cement. Arch bricks with butt joints are supported so the strength of the mortar is not too important.
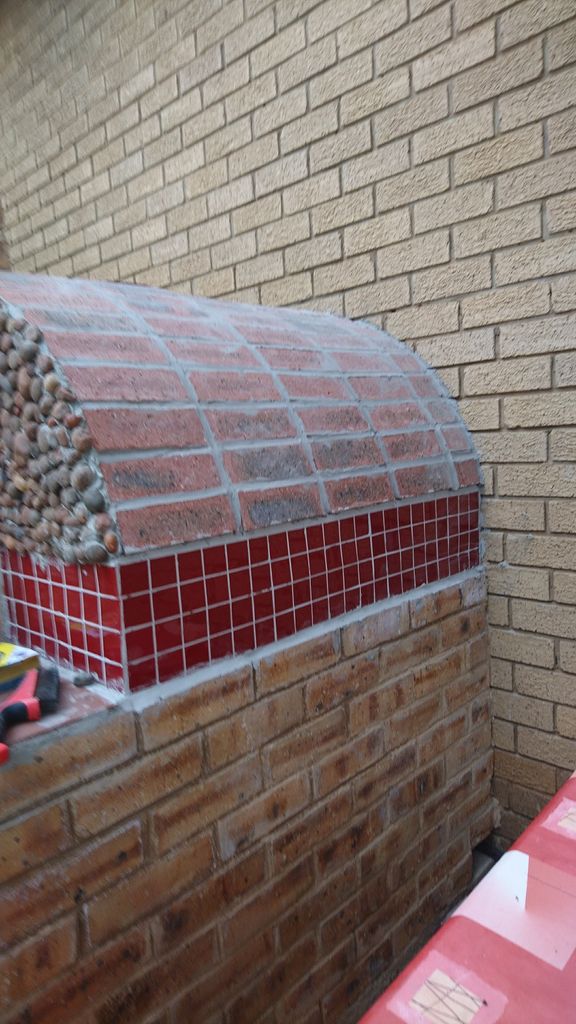
Step 7: Complete the Vault


Shift the formwork lengthwise and build the next arch that runs directly into the first. Continue in this way until you have built 4 arches. Then start building the outer surface of the vault using clay bricks.
Step 8: Building the entrance
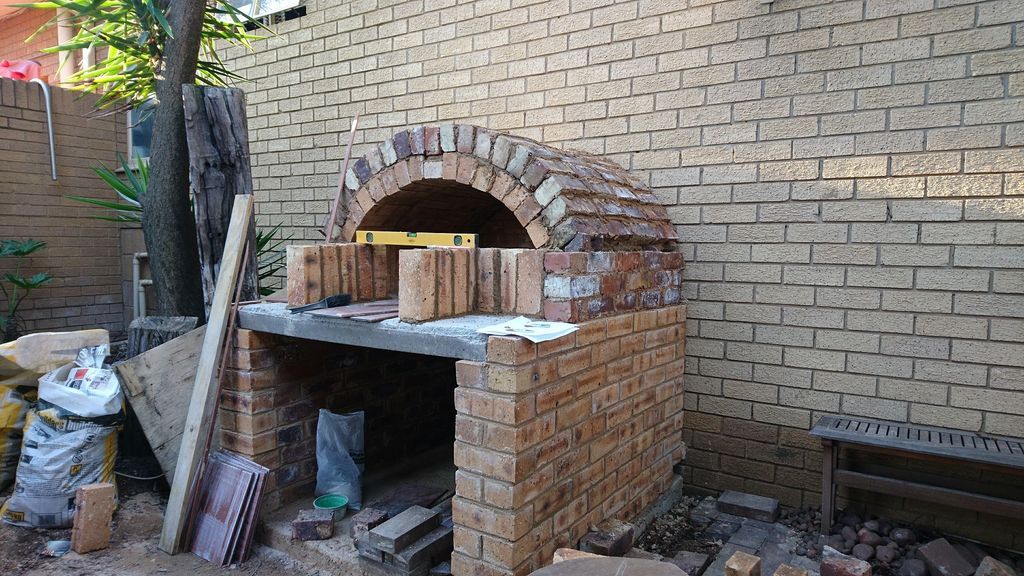

Plan the formwork for the arched door. The size of the door is important: it should be functional and big enough but not too big, otherwise heat escapes. The width should be approximately 500 mm and the top of the arch approximately 270 mm. Build a formwork similar to that of the oven vault.
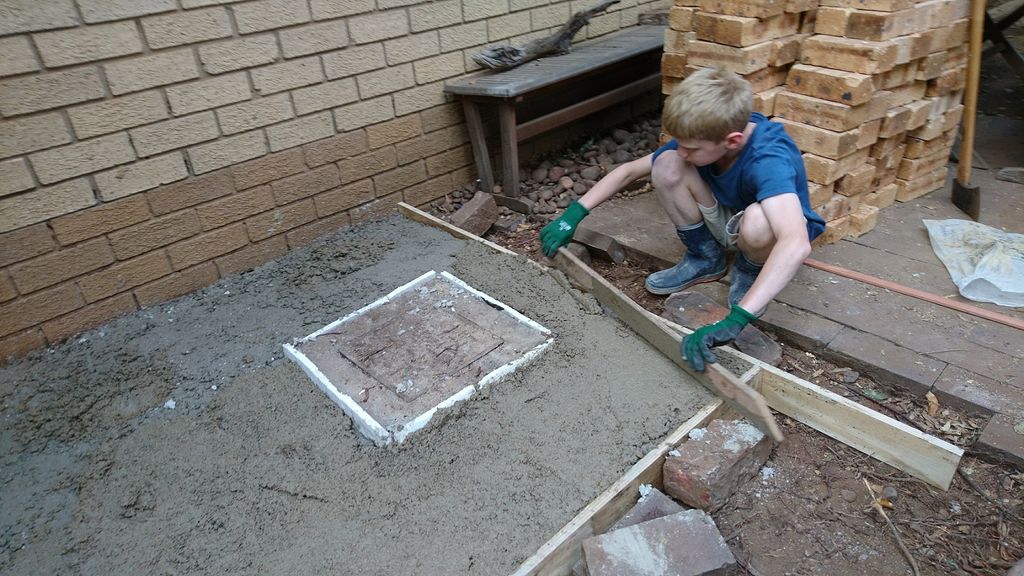
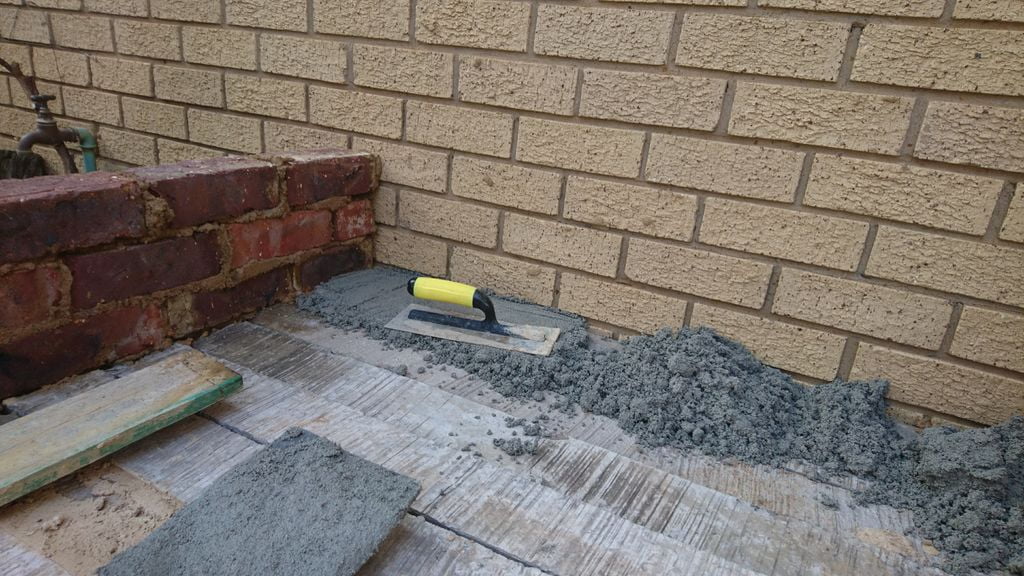
Step 9: Finishing the oven floor


It is important to finish the furnace floor before completing the chimney and doorway while the furnace is still easy to access. Fix the door floor with a plaster or plaster mixture about 10 mm thick. Place dry gypsum sand inside the oven; spread it out and smooth it out to be level with the driveway.
Place the loose oven floor tiles on top of the bed dand gypsum sand. We use contemporary unglazed terracotta tiles (300x300x8 mm). The tiles at the entrance were installed with tile adhesive to secure the design, while the tiles inside the oven are loose to accommodate thermal movement.
Step 10: Continuing with the door and fireplace
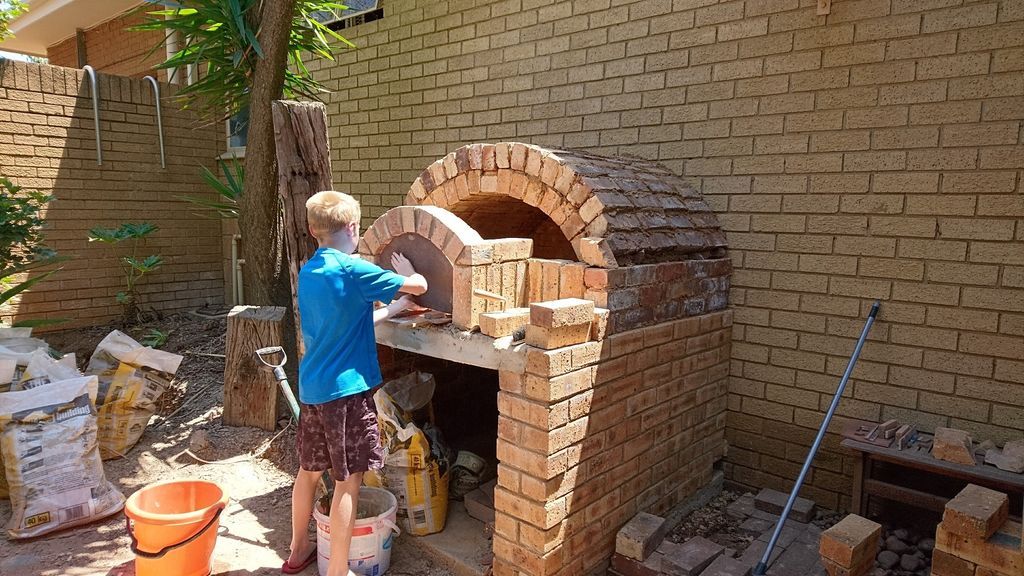


Build an arch over the entrance using half a face of bricks on the formwork.
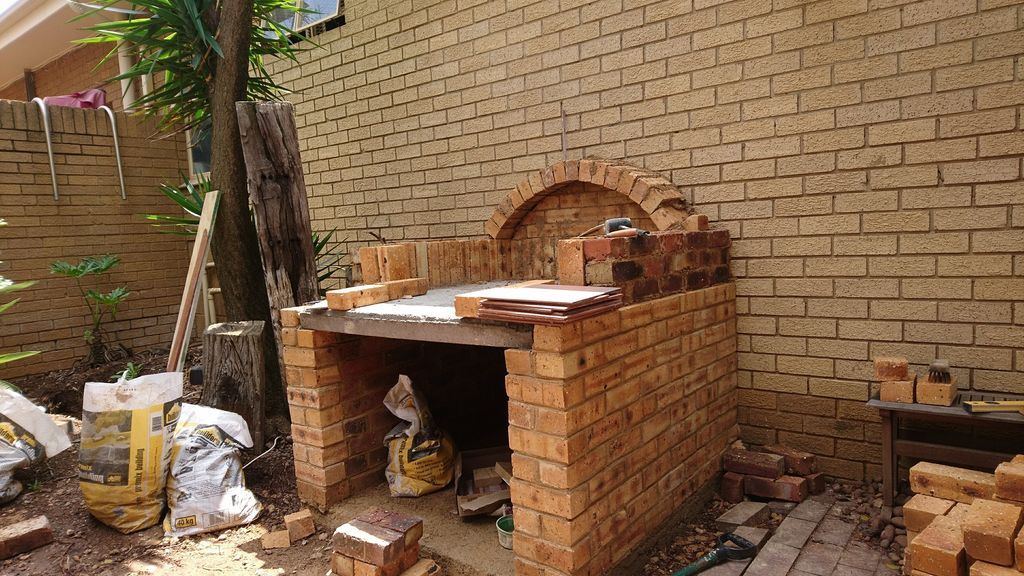
Start building the chimney behind the arch. The actual cross-sectional area of the chimney is only the size of a brick. The taller the chimney, the better the draft, so build as high as you can reach or afford!
We completed the front wall of the barrel, cutting bricks as necessary to fit the arch. (We only built a single brick wall in the front and the heat transfers very quickly, so a double wall would be better.)
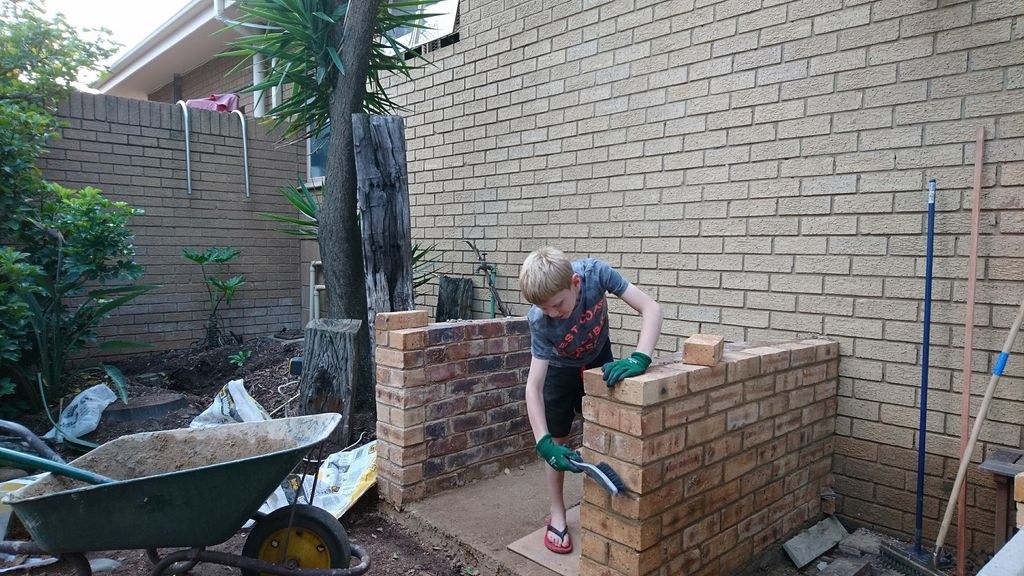
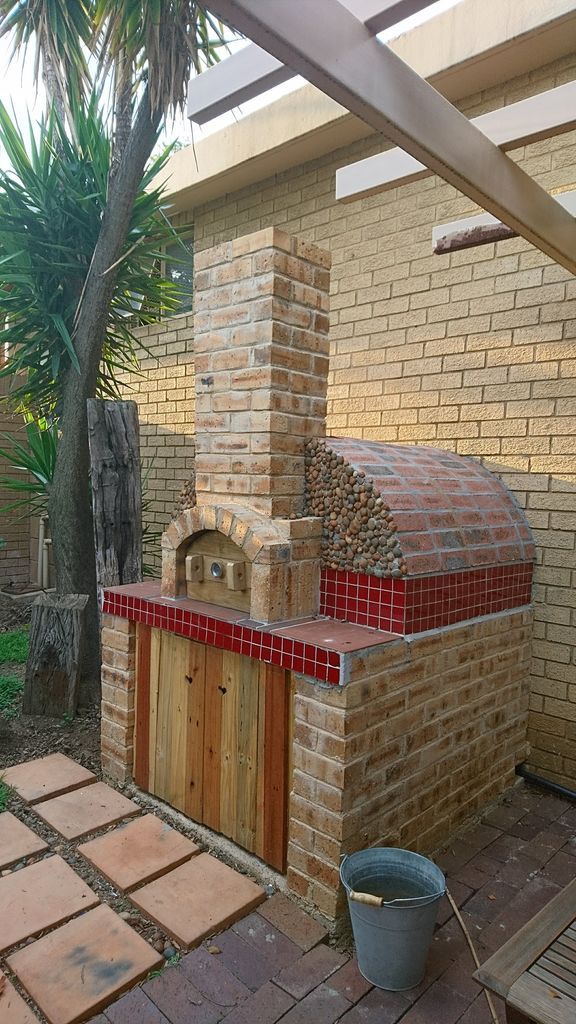
Step 11: Final Touches
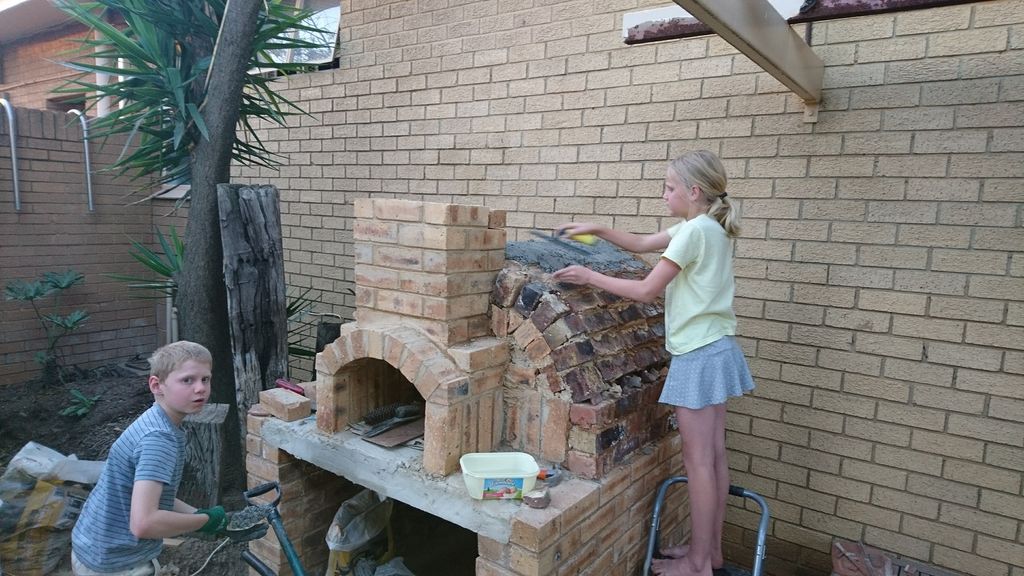

The exterior was plastered with plaster to insulate it. This required a bit of skill as the mixture was very dry and tends to flake off if not applied correctly, we patted it by hand. It is preferable to use the thermal mass of the bricks to radiate heat into the oven and insulate the exterior to prevent heat escape. The perlite plaster was not very clean, so we softened it with normal plaster.
We added wooden doors with old pallets and hinges on a wooden frame for the firewood store under the oven and added a wooden door for the oven. The oven door is loose and simply snaps into place in the doorway. We use the door when we bake bread or roast meat in the oven.
Step 12: Testing!
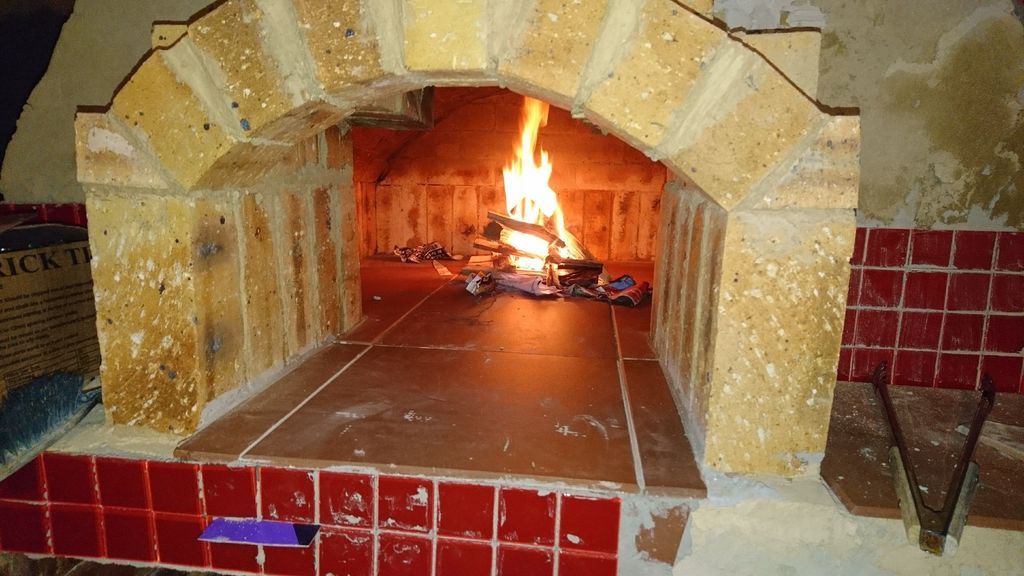


Before finishing the decoration, we built our first fire to check if the oven would hold up. A few cracks appeared that we have not yet repaired, but other than small streams of smoke, the oven works wonderfully.
The biggest problem was the floor tiles, which cracked. We replaced the broken tiles with new ones that we cut smaller, thinking the cracks were due to insufficient tolerance for thermal expansion. However, after several tests, we came to the conclusion that the thin tiles simply could not withstand the heat (Be careful with this).
As the oven slabs were loose, it was relatively easy to replace them, except this time the chimney and entrance were already built, so access was a bit tricky!
Step 13: The final product


The next step is to perfect your pizza making technique.
Project measures
Get more information at perfectionidea.com and on our Facebook for more Construction of a Fantastic Oven to Make Pizza at Home.
Popular Content
How to make a rocket stove for outdoors
Cardboard Drawers Lined with Jeans
How to Build an Octagonal Platform
Latest Articles
How to make a refrigerator out of insulating material: Practical step-by-step guide
How to make a Kilim for the Home: Complete Step by Step Guide
How to protect ourselves from accidents in our workplace: Complete prevention and safety guide
Related Content
How to Decorate the Mirrors in your Home
The Best Ideas for Raised Planters
Barn Doors Made of Wood and Epoxy Resin
Recycle Old Tires and Learn to Create Amazing Seats!
Creative Home Decor Ideas to Transform Every Space
Refreshing your home starts with smart design choices that combine comfort, personality, and functionality. Whether you want to modernize a small apartment, upgrade outdoor areas, or create cozy rustic interiors, these trending ideas can completely change the atmosphere of your space.
Outdoor Spaces That Increase Style and Functionality
Outdoor living continues to dominate modern home trends. Homeowners are increasingly investing in practical entertainment zones inspired by these BBQ shed ideas, which create the perfect setup for gatherings and weekend cooking sessions.
First impressions also matter when designing exteriors. Elegant farm entrance gates design ideas help properties stand out while improving privacy and curb appeal.
Compact living solutions are also gaining popularity. These inspiring 16x40 shed house interior design ideas show how smaller spaces can still feel luxurious and functional.
To enhance patios and entryways, homeowners are adding stylish protection with these creative porch awning exterior DIY ideas that blend aesthetics with practicality.

Rustic and Cozy Interior Design Trends
Warm and natural interiors remain timeless. These charming rustic decor ideas combine wood textures, vintage accents, and earthy tones to create welcoming spaces.
Bedrooms are becoming more personalized with curated wall arrangements. Many homeowners use these stylish picture wall ideas for bedroom spaces to display memories and artwork creatively.
Textured wall treatments are another major trend. Installing a board and batten wall adds architectural character while keeping interiors elegant and modern.
Similarly, bold accent wall ideas can instantly transform plain rooms into eye-catching focal points without requiring a full renovation.
Smart Kitchen and Organization Inspiration
Functional kitchens are essential for modern homes. These practical kitchen wall cabinet ideas maximize storage while maintaining a clean and stylish appearance.
Organization also starts at the entrance. Well-designed mud room ideas help families keep shoes, coats, and daily essentials neatly arranged.
Colorful and Personalized Home Styling
Vibrant interiors are becoming increasingly popular thanks to playful dopamine decor ideas that use bright colors and joyful accessories to improve mood and energy.
Gallery walls also continue to evolve as a major decorative feature. These trendy gallery wall inspiration ideas offer creative ways to combine prints, photos, and statement art.
Young renters and new homeowners are especially embracing these stylish first apartment aesthetic ideas to create sophisticated interiors on a budget.
Finally, selecting the right shades can dramatically influence any room’s atmosphere. These modern trendy color ideas help homeowners choose palettes that feel fresh, elegant, and timeless.
Final Thoughts
From rustic charm and colorful interiors to outdoor entertaining areas and functional storage solutions, today’s home decor trends focus on creating spaces that feel both beautiful and livable. By combining smart layouts, modern textures, and personalized decorative elements, any home can become more stylish, comfortable, and inspiring.


