


How to Build Concrete Floating Shelves, they look amazing and are really cheap to make. A year ago, I decided to make a concrete garden bench. This was a great success and my hands were itching to do something more specifically. My girlfriend needed some shelves to display her cameras. A new project was born: concrete shelves!

If you like this project, vote for me in the shelving or concrete and casting contest or even purchase a shelf in my Etsy store.

Step 1: Materials and tools


Materials:
- Plywood Formwork: To make your mold, you need a waterproof plywood with a smooth surface. Plywood is a material designed for making molds. It has a very smooth surface and is water resistant. It's also expensive. When you plan to make just one shelf, melamine board is a cheap alternative.
- Concrete (leveling cement): For this project I did not use regular concrete but I did use leveling cement. Leveling cement provides a really smooth surface and has a fine grain that makes sanding much easier.
- 3D printed part (see step 5)
- Hidden shelf supports
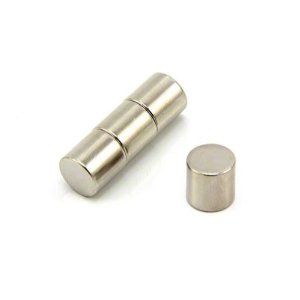
- Magnets 10mmx10mm
- Tube with an internal diameter of 12 mm (I used a 15 mm heating tube)
- Release agent: Silicone spray, Vaseline, WD40, etc.
- 4 Nuts and screws M6
- 4 M6 Screws
- 4 M6 Screws
- Polymorphic plastic (optional)
- Concrete coloring (optional)
Tools
- Electric drill
- Hammer
- Iron saw
- Mortar or bucket mixer
- Carpentry tools and level
- Old sander (optional)
Step 2: Design

The shelf has a minimalist rectangular shape. The size of the shelf is 22.5 cm x 15 cm x 5 cm.
The weight of the shelf is 3 kg. Therefore, I chose to use two sturdy stands. Inside the shelf are two sliding tubes that will fit perfectly into the brackets on the stand. There are two magnets built into the concrete. Those magnets will stick to the brackets and keep the shelf close to the wall.
Many people are afraid of weight but they are not! The stands can hold approx. 10kg each, so 3kg rack is no problem.
Step 3: Make the mold


The mold is made up of 6 pieces of plywood, 5 to create the mold and 1 to hold the supports in place. Because I am holding the mold, it is very important to cut each piece to exactly the right size.
Holes in the sixth piece of plywood are drilled in the way the brackets will be arranged on the shelf. There will be a spacing of 11cm between the support straps. The holes are drilled 7mm to be used for the m6 screws.
If you want to reuse the formwork plywood, it is recommended to seal the front faces. I forgot, but in the future I will definitely seal them.
This is the size I used but of course you can choose your own size.
Step 4: Slide the tubes


The clamps have a diameter of 12 mm. The slide tubes should fit snugly into the pins to ensure the shelf hangs at a 90-degree angle to the wall.
Cut the tubes to 12 cm each. After this, you need to make sure that concrete cannot get into the bottom of the pipe. I chose to hammer the flat end. This way, concrete cannot enter the tube and the flat side of the tube anchors the tube in the concrete.
Step 5: 3D printed mold


There should be a void on the back of the shelf to accommodate the bracket and bolt. To create the void, I designed a 3D printed part.
The angles on the piece are designed for easy demolding. Unfortunately, I don't have access to a 3D printer. I used 3dhubs.com to print the two pieces. The cost of the two pieces was 20 dollars.
When the part came out of the printer, it was a little rough. Also make sure the piece comes out of the mold easily and sand it with fine grit sandpaper. In the image you can see the difference between a sanded piece and an unsanded one.
The piece is designed to be 3 mm above the concrete surface. The support has a thickness of 5 mm for a total of 8 mm. I used M10 bolts to create this 8mm gap (see next step), but you can use whatever you want with a thickness of 8mm.
Polymorphic plastic
Before using the 3D printed part, I used polymorphic plastic to make the vacuum. I covered the support with polymorphic plastic and poured the mortar. When the concrete dried, I prepared the polymorphic plastic and the support came out easily. This method will work, but it will take a while and will not give a good back to the shelf.
Download 3D File
Step 6: Pouring the mortar (concrete)


Apply the release agent:
For the formwork plywood I used silicone as a mold release. Just spray it on the surface and spread it evenly. 3D printed parts are treated with Vaseline.
Clamp the mold parts:
Holding the mold pieces together is pretty easy, but make sure everything is nice and straight.
Set up supports:
Start by installing the brackets and the 3D printed part onto the plywood with the M6 screws. As the holes are drilled at 7mm, there is a bit of room to align the two brackets. By placing the piece on a flat surface, you can feel if it wobbles. When there is no wobble, you are sure that the two supports are at the same height (see image).
Place the slide tubes and magnets:
To secure the sliding tubes I use a piece of clamp that fits between the tube and the bracket. In this way, the sliding tubes are secured. The magnets are easy to open on 2 of the bolts.
Mix the concrete following the manufacturer's instructions:
When mixing concrete, it is easier to calculate the amount of water first and then add the concrete to the water instead of adding water to the concrete. This way, it is much easier to mix the two parts. You can choose to add coloring; Never add more than 5% powder colorant or it may affect the strength of your concrete.
Pour the concrete into the mold:
First pour the concrete into the mold without the supports. If you are using regular concrete, you want to tap or vibrate the mold to release air bubbles. You can use an old sander to vibrate the mold. I found this was not necessary when using leveling cement.
Align the supports:
Make sure the brackets are placed parallel to the surface of the shelf. You can do this by lining up the plywood piece with the mold (see image).
Step 7: Demoulding


When you do everything right, demolding is a really easy step. The supports and moldings should appear immediately.
I always delay after a short period of time, for leveling cement I only wait for four hours. The leveling cement is hard enough to fall apart, but still a little soft.
The back of the shelf will not be completely flat. Use a flat surface and some sandpaper to flatten the back.
After demolding, you can clean the molding parts and use them again.
Step 8: Final product


I chose to paint the shelves with a clear polyurethane floor covering. This will give the shelf a smooth finish but will also protect against stains.
To fix the brackets, I used guide screws. When hanging the shelf you must first assemble the two brackets, but only fix one of them. Next, place the shelf in place and tighten the remaining carriage screw with a wrench while the shelf is in place. This way, the supports will align perfectly.
My girlfriend loves her new shelves and this works for me too because "a happy wife makes a happy life" 🙂
Enjoy your concrete shelf!
Similar Ideas:


🙂 join our great community on Instagram: bit.ly/2FothPC

See this post on InstagramA post shared by Ingenio Extra (@ingenio.extra) on
Get more information at perfectionidea.com and on our Facebook for more How to Build Floating Concrete Shelves.
- Tags
- Concrete
Popular Content
How to make a rocket stove for outdoors
Cardboard Drawers Lined with Jeans
Ideas and Advantages of Window Grilles for the Home!
Latest Articles
How to make a refrigerator out of insulating material: Guidestep by step practice
How to make a Kilim for the Home: Complete Step by Step Guide
How to protect ourselves from accidents in our workplace: Complete prevention and safety guide
Related Content
Wood carving using a router
Decoration Ideas with Washi Tape
How to Make a Stool
Beautiful Bright Table!
Creative Home Decor Ideas to Transform Every Space
Refreshing your home starts with smart design choices that combine comfort, personality, and functionality. Whether you want to modernize a small apartment, upgrade outdoor areas, or create cozy rustic interiors, these trending ideas can completely change the atmosphere of your space.
Outdoor Spaces That Increase Style and Functionality
Outdoor living continues to dominate modern home trends. Homeowners are increasingly investing in practical entertainment zones inspired by these BBQ shed ideas, which create the perfect setup for gatherings and weekend cooking sessions.
First impressions also matter when designing exteriors. Elegant farm entrance gates design ideas help properties stand out while improving privacy and curb appeal.
Compact living solutions are also gaining popularity. These inspiring 16x40 shed house interior design ideas show how smaller spaces can still feel luxurious and functional.
To enhance patios and entryways, homeowners are adding stylish protection with these creative porch awning exterior DIY ideas that blend aesthetics with practicality.

Rustic and Cozy Interior Design Trends
Warm and natural interiors remain timeless. These charming rustic decor ideas combine wood textures, vintage accents, and earthy tones to create welcoming spaces.
Bedrooms are becoming more personalized with curated wall arrangements. Many homeowners use these stylish picture wall ideas for bedroom spaces to display memories and artwork creatively.
Textured wall treatments are another major trend. Installing a board and batten wall adds architectural character while keeping interiors elegant and modern.
Similarly, bold accent wall ideas can instantly transform plain rooms into eye-catching focal points without requiring a full renovation.
Smart Kitchen and Organization Inspiration
Functional kitchens are essential for modern homes. These practical kitchen wall cabinet ideas maximize storage while maintaining a clean and stylish appearance.
Organization also starts at the entrance. Well-designed mud room ideas help families keep shoes, coats, and daily essentials neatly arranged.
Colorful and Personalized Home Styling
Vibrant interiors are becoming increasingly popular thanks to playful dopamine decor ideas that use bright colors and joyful accessories to improve mood and energy.
Gallery walls also continue to evolve as a major decorative feature. These trendy gallery wall inspiration ideas offer creative ways to combine prints, photos, and statement art.
Young renters and new homeowners are especially embracing these stylish first apartment aesthetic ideas to create sophisticated interiors on a budget.
Finally, selecting the right shades can dramatically influence any room’s atmosphere. These modern trendy color ideas help homeowners choose palettes that feel fresh, elegant, and timeless.
Final Thoughts
From rustic charm and colorful interiors to outdoor entertaining areas and functional storage solutions, today’s home decor trends focus on creating spaces that feel both beautiful and livable. By combining smart layouts, modern textures, and personalized decorative elements, any home can become more stylish, comfortable, and inspiring.


