


Guide to Build a Floating Bed, with a minimum of tools and can be done by just one person. It is designed to come apart into pieces small enough for a single person to carry around a house and assemble.
The bed in this article is a standard size, and is designed to be used with a box spring. If you don't have a box spring, simply cut a piece of plywood, fiberboard, MDF to place across the "ladder" sections.

Step 1: Tools and Supplies

Tools
- Miter saw
- Electric drill
- Tape measure
- Hammer
- Sander
- Clamps
- Pilot drill for construction screws No. 8
- 1/2″ drill bit
- Impact driver (optional)
- Planer (optional)
- Drilling guide (optional, but recommended)
Supplies
- Pine 2x4x8: 12
- Pine 2x6x8: 8
- Pine 2x10x5: 2
- 1/2″ pins
- 2.5″ #8 wood screws
- 3″ #8 wood screws
- Wood glue
- Rope with lights (single color or RGB)
- Cable clips
Step 2: Sections


The bed base rests mainly on three "ladder" sections. This is what you will build first. Before you begin, be sure to measure the dimensions of the box spring.
In the case of a double bed, the exterior dimensions are approximately 60″ x 80″. Therefore, you will need six pieces of 2x4s cut to 60″ long. In addition to this, ten more pieces of 2x4 are cut to about 14″.
Build two ladder sections consisting of two 60″ pieces and three 14″ “rungs.” One step at each end and a third centered in the middle.
Build a third ladder that uses four rungs, again with one rung at each end and the other two spaced evenly apart (i.e., 20″ and 40″ apart). This third ladder is going to be at the foot of the bed, where the extra rung helps support the ledge.
The classic “glue and screw” method works well here: simply place a thick bead of glue along the end of the 14″ rail, and drive two 3″ screws to hold the pieces of wood together. Stair sections should be reasonably square.
Step 3: Head and Foot Bed Rails


The bed rail serves to prevent the box from sliding and provides a nice finish with no visible fasteners. In this step, we will connect the rails to the head and foot of the bed.
Cut two pieces of 2x6 wood to 60″ long. One of these should be glued and screwed to one of the three-rung ladders, and the other to the four-rung ladder. CAREFUL! Move the screws from the INSIDE of the ladder, so that the screw heads are hidden.
Also be sure to use 2.5″ long screws here, so there is less chance of the screw point breaking the opposite side.
Step 4: Side Rails


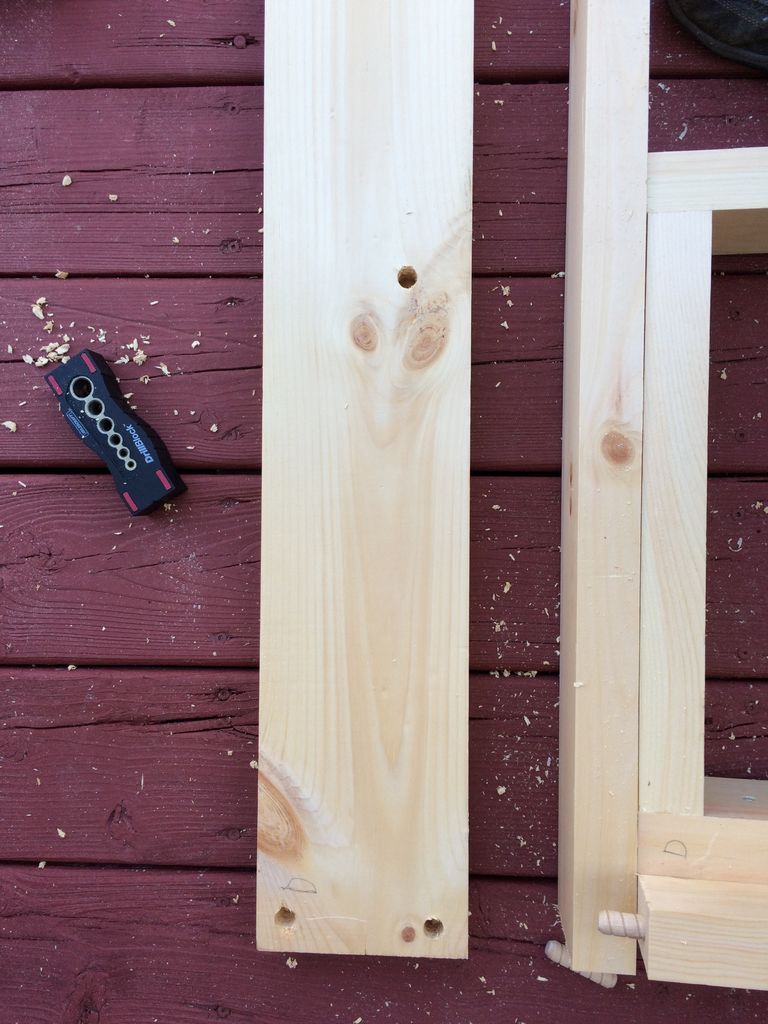


This is probably the most complex and time-consuming part of the build. Here we are going to drill and attach the side rails of the bed. The side rails basically hold everything together, but they do it in a way that can be taken apart!
This is achieved through the use of pins. The dowels align the various pieces and serve as structural support. Fortunately, they are one of the easiest woodworking techniques. A hole is drilled in one piece of the gasket, a dowel centering plug is inserted, and the second is pressed against the first.
The center of the pin presses into an impression, not the second piece of wood, which can then be used as a drilling guide.
On the head and foot sections of the ladder, drill two holes in the end of each 2x6, and one hole in the end of each 2x4. The holes should be approximately half the length of the pin.
I recommend using a drill guide for this, so that the resulting hole is as perpendicular to the surface of the wood as possible. The side rails are each approximately 83″ long 2x6 wood (80″ for the box spring plus 1.5″ on each end to overlap the head and foot rails).
Very carefully align the ladder sections with the side rail, and using the dowel centers transfer the hole positions to the side rails. I only had two in the 1/2″ size, so I had to work in pairs.
With the hole positions marked, drill the dowel holes. Be sure to limit the depth of the holes made in the side rails! I like to use a piece of masking tape to mark the depth right on the drill bit. Do this for both side rails.
The pins can now be inserted into the ladder sections. Squeeze some glue into the hole and then press the dowel.
Be sure to clean up any glue that runs out of the hole. Next, align the side rails with the pins and place them together. Naturally, you don't want to put any glue in the side rail hole, or it will be impossible to take the frame apart!
Finish the job by driving 2.5″ screws from the inside of the ladder sections to the side rails.
Step 5: Build the platform


The bed frame rests on a raised platform. The platform is made of two sturdy 66″ long 2x10s and some 2x6 lumber to join them together. The length of those 2x6 pieces will depend on the size of the bed.
In a double bed they are approximately 24″ long. Too long and the wood will be too visible from the side.
Too short and the bed won't have the floating look.
Glue and screw the wood together to form a nice, simple rectangle.
Step 6: Attach the frame to the platform


The frame is attached to the platform by screwing them at four points.
Place the frame on top of the platform, so that the "head" end of the platform is aligned with the outside face of the "head" rail.
The majority of one ray of the ladder's "foot" should align with the other end of the platform. Left-right centers the frame on the platform.
There is no way our 3″ screws will be long enough to fasten through the frame rails to the deck, so we will need to drill holes.
Using the 1/2″ drill bit, drill a 2-2.5″ deep hole in 4 or 6 locations.nes. Then, insert a 3″ screw into each.
Step 7: Build the header


You could attach almost any headboard to this bed. To maintain the design aesthetic, I chose a simple stack of spaced 2x6 boards.
Start by attaching the headboard uprights to the bed frame. The length of the vertical support will depend on the height you want the headboard to be.
Four 2.5″ screws per vertical support are sufficient. As you can see in the pictures, I attached them to both the frame and the platform, all the way to the ground.
The horizontal sections are made up of three 63″ long 2x6 pieces, spaced 3″ apart.
I used a piece of wood as a spacer - simply place the spacer, place the horizontal board on top, and then screw it in with 2.5″ screws. As you may have guessed, drive the screws in from the back so they are not visible. Then stack the next horizontal piece on top and repeat!
Step 8: Finishing

Once assembled, the entire frame can be sanded with an electric sander. I also used a chamfer for any edges that would likely be stepped on or touched frequently. You can choose to leave it as is.
I left the wood of my bed "natural" and unfinished. Of course, paint the wood to your liking!
Step 9: Add the string light


Using wire clips (the type used to attach electrical wiring to wooden posts), run the rope light around the circumference of the platform, as high as possible.
I have my rope light on a timer, so it turns on and off automatically each day.
Step 10: Disassembly/assembly
As I mentioned in the introduction step, this bed is designed to be easily disassembled and moved.
- If necessary, remove the mattress and box spring. Unplug the light.
- If you have not already done so, mark joint locations with letters or numbers to make assembly easier.
- Remove the headboard by loosening the eight screws that secure it to the frame and platform
- Remove the remaining screws securing the frame to the platform.
- Remove the screws securing the ladder sections to the side rails.
- Slide the side rails out.
That's all. Thank you for visiting and see you soon.
Get more information at Perfectidea.com and on our Facebook for more Guide to Building a Floating Bed
- Tags
- Bed
Popular Content
How to make a rocket stove for outdoors
Cardboard Drawers Lined with Jeans
Ideas and Advantages of Window Grilles for the Home!
Latest Articles
How to make a refrigerator out of insulating material: Practical step-by-step guide
How to make a Kilim for the Home: Complete Step by Step Guide
How to protect ourselves from accidents in our workplace: Complete prevention and safety guide
Related Content
Shelf for Car Doors
Pacman Design Bean Bag!
Rustic Sliding Doors Made of Wood
Floating Shelf with Hidden Storage!
Creative Home Decor Ideas to Transform Every Space
Refreshing your home starts with smart design choices that combine comfort, personality, and functionality. Whether you want to modernize a small apartment, upgrade outdoor areas, or create cozy rustic interiors, these trending ideas can completely change the atmosphere of your space.
Outdoor Spaces That Increase Style and Functionality
Outdoor living continues to dominate modern home trends. Homeowners are increasingly investing in practical entertainment zones inspired by these BBQ shed ideas, which create the perfect setup for gatherings and weekend cooking sessions.
First impressions also matter when designing exteriors. Elegant farm entrance gates design ideas help properties stand out while improving privacy and curb appeal.
Compact living solutions are also gaining popularity. These inspiring 16x40 shed house interior design ideas show how smaller spaces can still feel luxurious and functional.
To enhance patios and entryways, homeowners are adding stylish protection with these creative porch awning exterior DIY ideas that blend aesthetics with practicality.

Rustic and Cozy Interior Design Trends
Warm and natural interiors remain timeless. These charming rustic decor ideas combine wood textures, vintage accents, and earthy tones to create welcoming spaces.
Bedrooms are becoming more personalized with curated wall arrangements. Many homeowners use these stylish picture wall ideas for bedroom spaces to display memories and artwork creatively.
Textured wall treatments are another major trend. Installing a board and batten wall adds architectural character while keeping interiors elegant and modern.
Similarly, bold accent wall ideas can instantly transform plain rooms into eye-catching focal points without requiring a full renovation.
Smart Kitchen and Organization Inspiration
Functional kitchens are essential for modern homes. These practical kitchen wall cabinet ideas maximize storage while maintaining a clean and stylish appearance.
Organization also starts at the entrance. Well-designed mud room ideas help families keep shoes, coats, and daily essentials neatly arranged.
Colorful and Personalized Home Styling
Vibrant interiors are becoming increasingly popular thanks to playful dopamine decor ideas that use bright colors and joyful accessories to improve mood and energy.
Gallery walls also continue to evolve as a major decorative feature. These trendy gallery wall inspiration ideas offer creative ways to combine prints, photos, and statement art.
Young renters and new homeowners are especially embracing these stylish first apartment aesthetic ideas to create sophisticated interiors on a budget.
Finally, selecting the right shades can dramatically influence any room’s atmosphere. These modern trendy color ideas help homeowners choose palettes that feel fresh, elegant, and timeless.
Final Thoughts
From rustic charm and colorful interiors to outdoor entertaining areas and functional storage solutions, today’s home decor trends focus on creating spaces that feel both beautiful and livable. By combining smart layouts, modern textures, and personalized decorative elements, any home can become more stylish, comfortable, and inspiring.


