


Vertical Laptop Stand, I made a metal and wood base that holds my laptop vertically when I connect it to the monitor on my desk.
Docking it minimizes my desk space and transforms my laptop into a desktop when closed and plugged into my display. It looks so clean, too!

Video of a Kamikazee design vertical laptop stand:
Video link.
Steps to make a vertical laptop stand:
#1: Tools, materials and measurements


Materials and tools that I used to carry out this project:
- Maple 2″ round
- 3/4″ plywood
- Miter saw
- Wood glue
- Table saw
- 3/4″ Maple Dowel
- Spray Glue
- Metal Felt Sheet – 16 Gauge
- Angle grinder
- Orbital sander
- Acetone
- Paste wax
- Drill
- Polycrylic matte
Here are some graphs of the measurements, reconstructed for a better view.
- Metal background is 8″ x 2 5/8″
- Wood frame is 8″ long, 1.5″ high, 7/8″ deep
- Square tabs are 3/4″ square and 1/8″ deep
This stand is made for my 15 2017 MacBook Pro (but can easily be adjusted for other sizes)
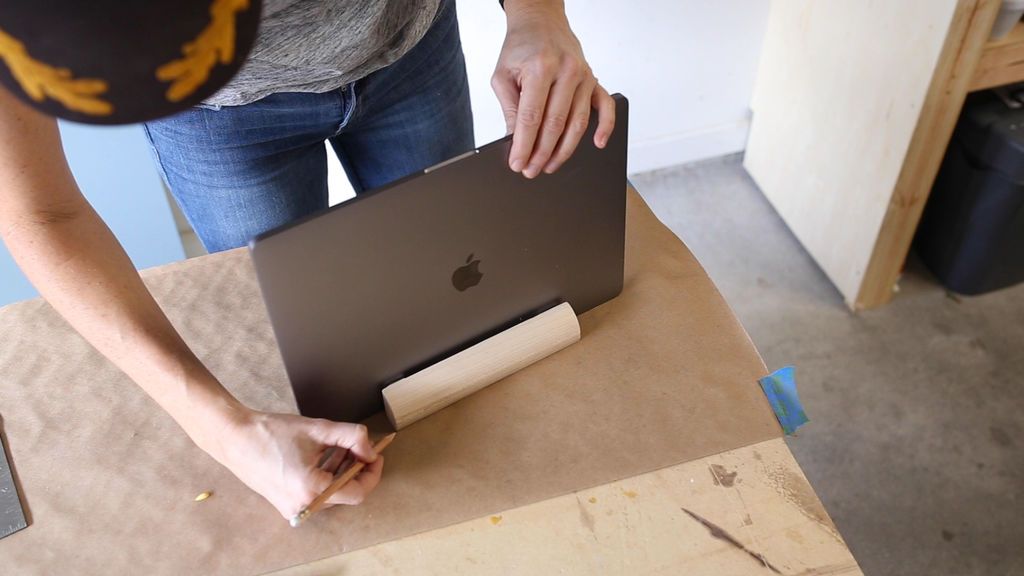
#2: Prepare the dowel for cutting


- I'm going to cut this dowel lengthwise through the wood, and doing that with a cylindrical object is tricky. My solution for this was to cut two square pieces of reclaimed wood and glue them to each end of the tenon, creating a flat surface. I'll show you how in a second.
- I measured the ends and then cut two pieces of plywood ¾ inch square on my miter saw.
- Then I took the dowel to my miter saw and cut it to size. I left the cylinder a little long so I could trim it to the exact length later.
- Then I took those two square flat ends and glued them to the ends of my cylinder with wood glue.
#3: Cut the pin (cylinder) in half


- After the pieces were dry, I found the center of the cylinder so I could cut it in half. For that I moved to my table saw.
- And here you can see how those two flat square ends allowed me to do this without the cylinder unwinding dangerously out of position.
- I cut the center from one side and then flipped it over and cut the center from the other side.
#4: One more cut on the table saw


- Now, with two pieces, I put them through the saw once again, this time on their flat sides, and cut a half inch off one side.
- I was very cautious when making these cuts, so I cut too slowly and that resulted in some burn marks from the blade. But don't worry... These sides will be hidden in the end.
#5: Cut the final guides and sand


- Now, with my cylinder cut, I cut the end guides out of the scrap and cut the two pieces to their final length.
- Then I took my two pieces and sanded them by hand just to clean up the edges and make everything smooth.
#6: Make the interior wooden tabs


- The next step in this project is to make the wooden tabs that I will use to hold the laptop in place. For this I got a square maple headstock. I wrapped the end I'm going to cut with painters tape to minimize tearing.
- Then I cut 4 1/8 inch squares from one end. And then I cleaned them up with a little hand sanding.
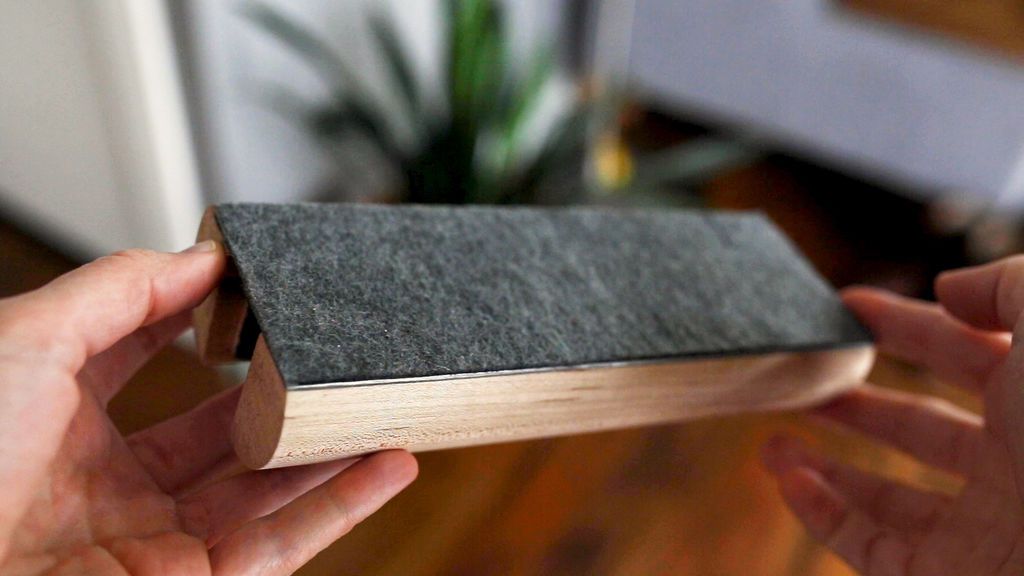
#7: Add felt to the tabs


- To prevent my laptop from being scratched, I felt that I will apply to any part that touches the computer.
- I grabbed some spray adhesive and sprayed one side of the 4 tabs and an area of the felt.
- Then I placed the sprayed side of the wooden tabs on the felt and let them dry.
- Using a sharp knife, I cut the felt tabs. But after doing this, I think some good scissors would have been easier and cleaner.
#8: Glue on the tabs

- To attach these tabs, I first measured their placement. I wanted them to sit slightly from the edges. I then glued them together with a little wood glue and let them dry.
#9: Find the dimensions for the metal base


- For the bottom base of this dock, I decided to use sheet steel. I really like the mixed use of metal and wood. Not only did it appeal to me ascetically, but it will also give this spring greater stability as it will increase the weight.
- Here, you see me holding the pieces together to get an idea of the size needed for the bottom plate.
- Then I marked the edges on this brown paper that left me with my dimensions.
#10: Cut the metal base


- The steel I am using is a 16 gauge sheet metal that I found on a small 18″ piece from the nearest center of my house.
- I used a marker to mark my lines and then cut my piece with a wheel cut on an angle grinder.
- I find it very easy to make straight cuts in shallow passes with this method.
#11: Sand and seal the metal


- To smooth out the sharp edges, I sanded all of my corners down with my orbital sander.
- Then I used acetone and gave it a good clean. And I ended up sealing it with a layer of wax paste. I put on a thick coat, waited 15 minutes, then polished it. This is a great way to seal and polish metal that doesn't leave it oily.
#12: Pre-drill the metal and add finish to the wood


- I'm going to attach the bottom plate to the wooden sides with screws. To prepare for this, I pre-drilled some holes in the metal and then used a sinking bit and drilled some holes so the screws could sit flush.
- ABefore joining the pieces, I finished the wood with a coat of water-based polycrylic in a matte finish. This is an excellent finish for light-colored wood that does not turn it yellow or shiny.
#13: Place the metal bottom on a wooden side


- Using my metal holes as guides, I marked the bottom of the wood... And then I pre-drilled and attached the first side with screws.
#14: Add the inner felt strip


- Before attaching the second wooden side, and while my fingers could still access the center, I cut a long strip of felt and glued it to the metal between the two pieces of wood with a thin layer of gorilla glue.
- This will be a weak point for the end of the laptop to rest on while docked.
#15: Place the second wooden side


- Then, using calipers to check the width of the laptop, I repeated the process and attached the second wooden side to the bottom metal plate.
- At this point, I was able to set up my laptop and see how the dock holds it for the first time.
#16: Add felt to the bottom


- The last thing I did was cut a last piece of felt to glue to the bottom of the metal plate. This will prevent the metal from scratching my desk or any surface it sits on.
And with that, the project is done!
Popular Content
How to make a rocket stove for outdoors
Cardboard Drawers Lined with Jeans
How to Build an Octagonal Platform
Latest Articles
How to make a refrigerator out of insulating material: Practical step-by-step guide
How to make a Kilim for the Home: Complete Step by Step Guide
How to protect ourselves from accidents in our workplace: Complete prevention and safety guide
Related Content
Carpentry Solutions for Small Spaces at Home!
Learn How to Build a Wall Mount for Your Laptop!
Building a Cool Wooden Patio Chair!
Watermelon Barrel with Tap and Delicious Juice!
Creative Home Decor Ideas to Transform Every Space
Refreshing your home starts with smart design choices that combine comfort, personality, and functionality. Whether you want to modernize a small apartment, upgrade outdoor areas, or create cozy rustic interiors, these trending ideas can completely change the atmosphere of your space.
Outdoor Spaces That Increase Style and Functionality
Outdoor living continues to dominate modern home trends. Homeowners are increasingly investing in practical entertainment zones inspired by these BBQ shed ideas, which create the perfect setup for gatherings and weekend cooking sessions.
First impressions also matter when designing exteriors. Elegant farm entrance gates design ideas help properties stand out while improving privacy and curb appeal.
Compact living solutions are also gaining popularity. These inspiring 16x40 shed house interior design ideas show how smaller spaces can still feel luxurious and functional.
To enhance patios and entryways, homeowners are adding stylish protection with these creative porch awning exterior DIY ideas that blend aesthetics with practicality.

Rustic and Cozy Interior Design Trends
Warm and natural interiors remain timeless. These charming rustic decor ideas combine wood textures, vintage accents, and earthy tones to create welcoming spaces.
Bedrooms are becoming more personalized with curated wall arrangements. Many homeowners use these stylish picture wall ideas for bedroom spaces to display memories and artwork creatively.
Textured wall treatments are another major trend. Installing a board and batten wall adds architectural character while keeping interiors elegant and modern.
Similarly, bold accent wall ideas can instantly transform plain rooms into eye-catching focal points without requiring a full renovation.
Smart Kitchen and Organization Inspiration
Functional kitchens are essential for modern homes. These practical kitchen wall cabinet ideas maximize storage while maintaining a clean and stylish appearance.
Organization also starts at the entrance. Well-designed mud room ideas help families keep shoes, coats, and daily essentials neatly arranged.
Colorful and Personalized Home Styling
Vibrant interiors are becoming increasingly popular thanks to playful dopamine decor ideas that use bright colors and joyful accessories to improve mood and energy.
Gallery walls also continue to evolve as a major decorative feature. These trendy gallery wall inspiration ideas offer creative ways to combine prints, photos, and statement art.
Young renters and new homeowners are especially embracing these stylish first apartment aesthetic ideas to create sophisticated interiors on a budget.
Finally, selecting the right shades can dramatically influence any room’s atmosphere. These modern trendy color ideas help homeowners choose palettes that feel fresh, elegant, and timeless.
Final Thoughts
From rustic charm and colorful interiors to outdoor entertaining areas and functional storage solutions, today’s home decor trends focus on creating spaces that feel both beautiful and livable. By combining smart layouts, modern textures, and personalized decorative elements, any home can become more stylish, comfortable, and inspiring.


