
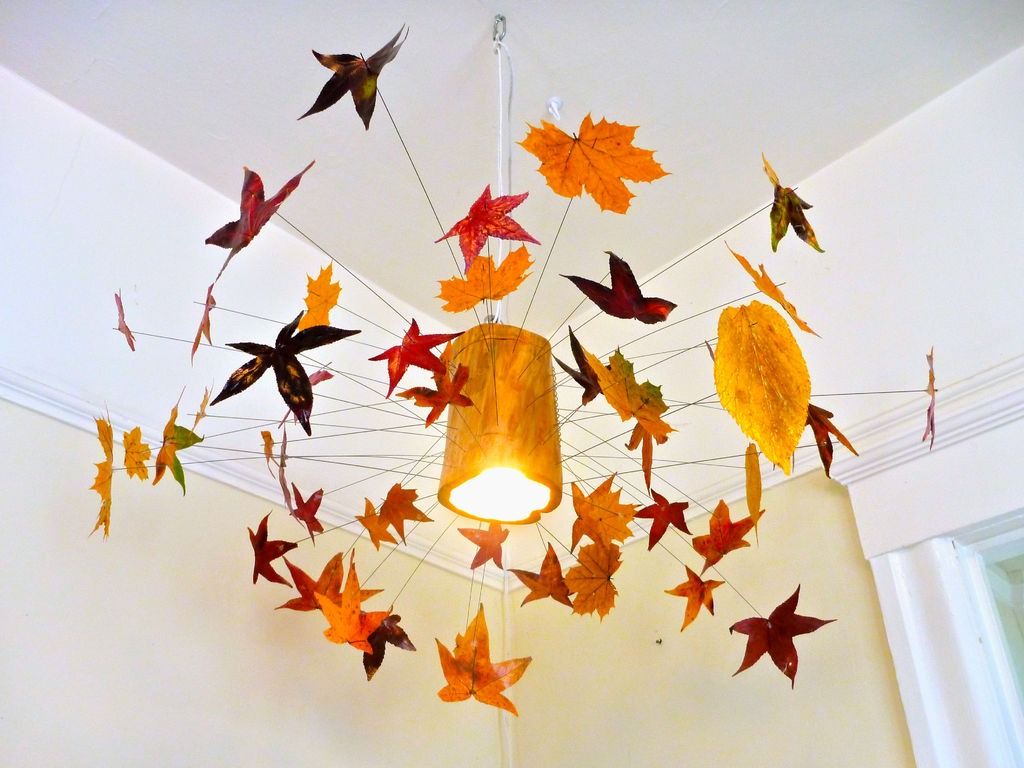
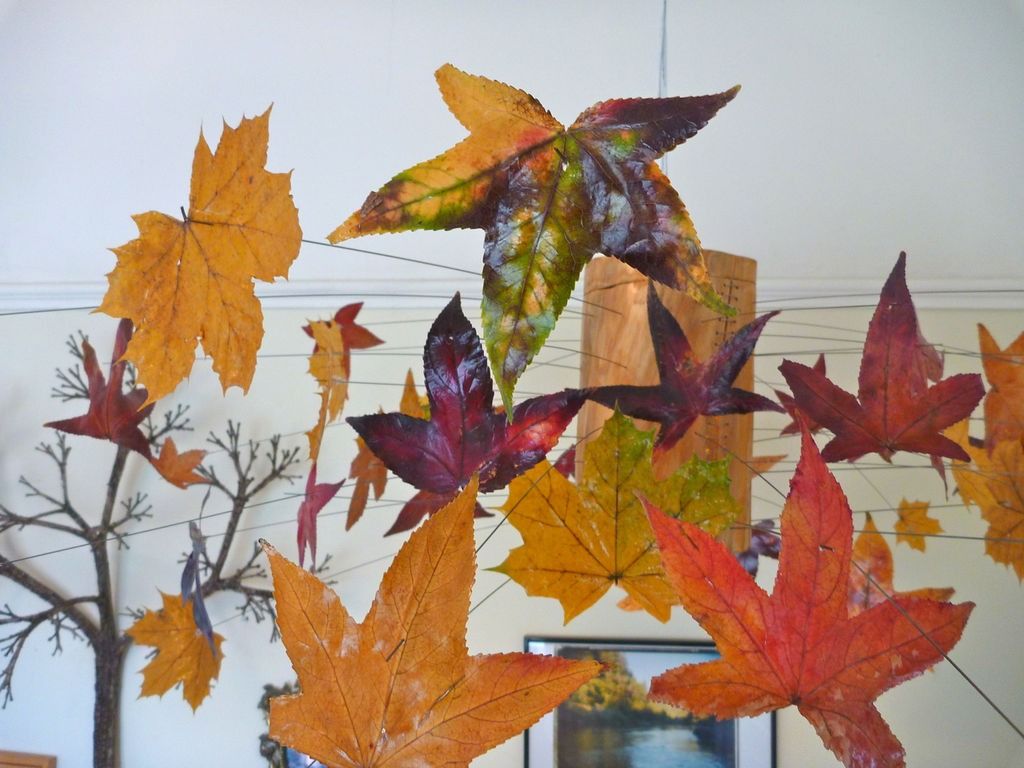
Making an autumn leaf lamp can be a very interesting idea that you can do easily and in the comfort of your home.
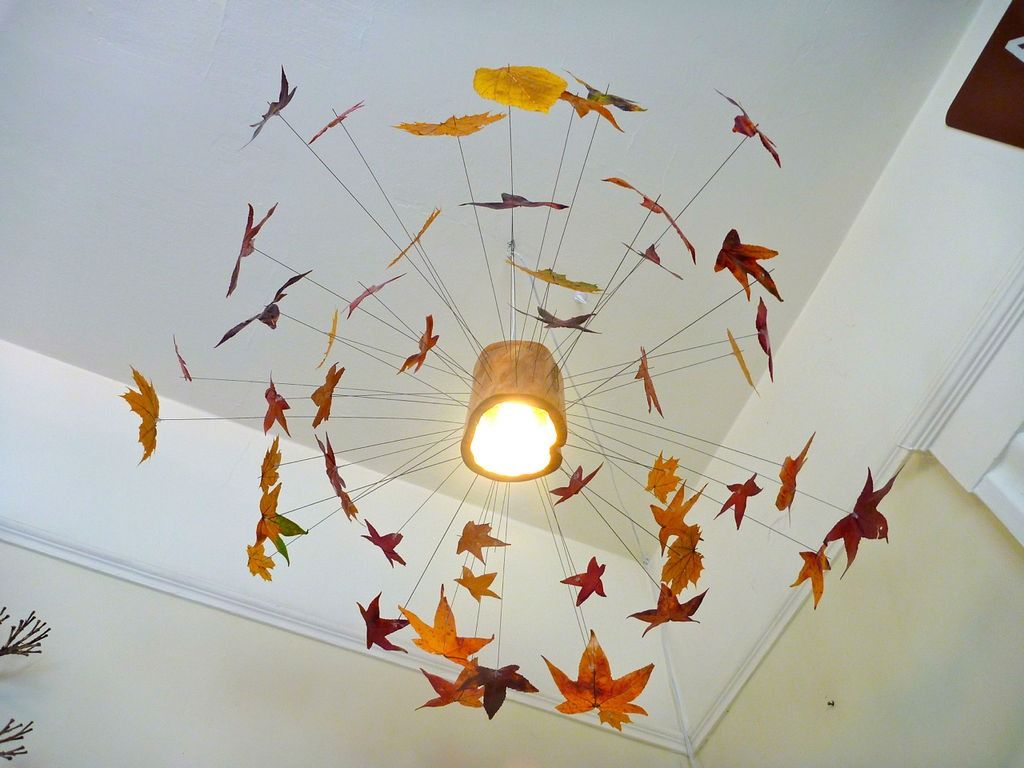
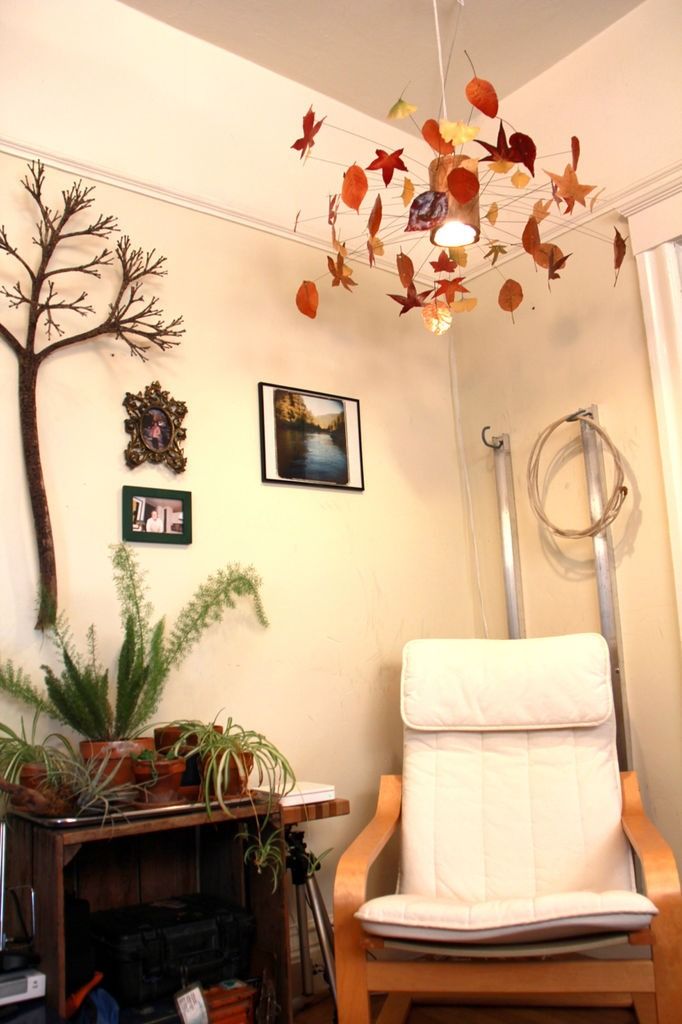
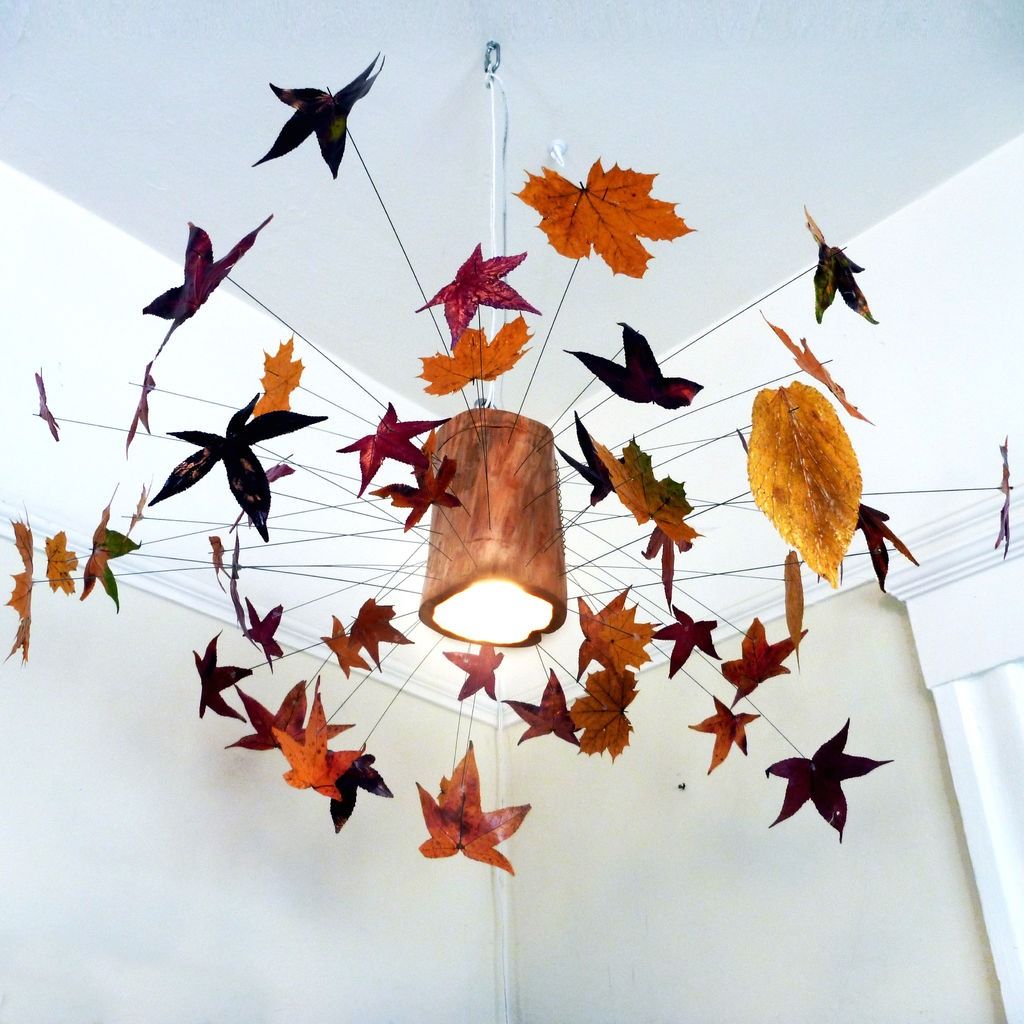
This colorful hanging lamp is made from fallen autumn leaves and a section of reclaimed tree trunk.

It's almost free to make since almost every part is provided by Mother Nature, and it helps preserve the wonder of fall all year long. Even if it's not fall where you live, you can still collect and press different types of nice foliage: flowers, plants, etc.
#1: Collect the leaves

- Keep your eyes open to see the fallen leaves with pleasant shapes and spectacular colors.
- Wander through the streets, comb the gutters, break your neck looking at the trees and dance the wind to summon a gust and make them fall on your hands.
- Green leaves also look good when pressed, so don't think they all have to be in the prime of their color-changing show.
- Having many candidates is a good idea, as some of the leaves tend to be damaged in the drying and spraying process (future steps).
This wasn't exactly what it looked like when I was collecting leaves...
#2: Press Sheets in Books
- Once you've collected a sufficient number of leaves (I collected about 200), it's time to press them.
- Grab a set of encyclopedias, if you haven't already thrown yours away, or any other type of large hardcover book.
- Place the leaves on the pages of the book, making sure they are flat and that none of their edges are bent.
- The stems are fine, but not necessary, so it's free to cut them if you want.
- This step is quite long: you have to wait until the leaves are dry before you can proceed.
- Expect to wait one to two weeks depending on the humidity of the climate you are in.
- If you're in a hurry, you may be able to place them in a food dehydrator or dry them under a high-wattage light bulb, but be sure to create some type of net or mesh to keep them flat while they dry. They may tend to curl up on you.
- The book method is tried and true from years and years of collective work by kindergartners everywhere, so if you have the time, wait.
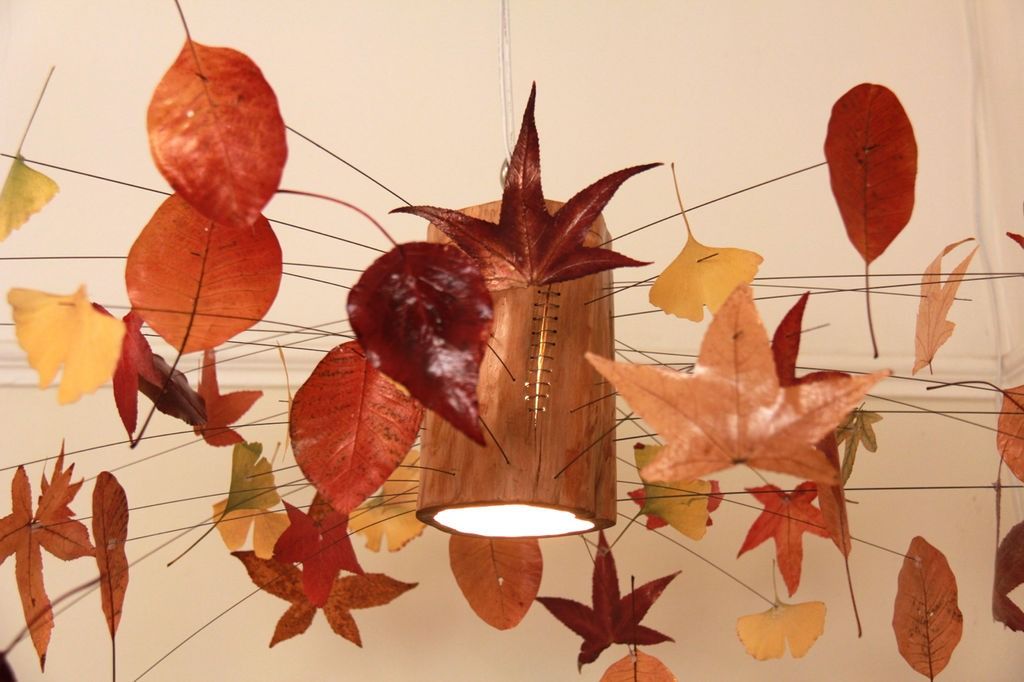
#3: Find the trunk and remove the center


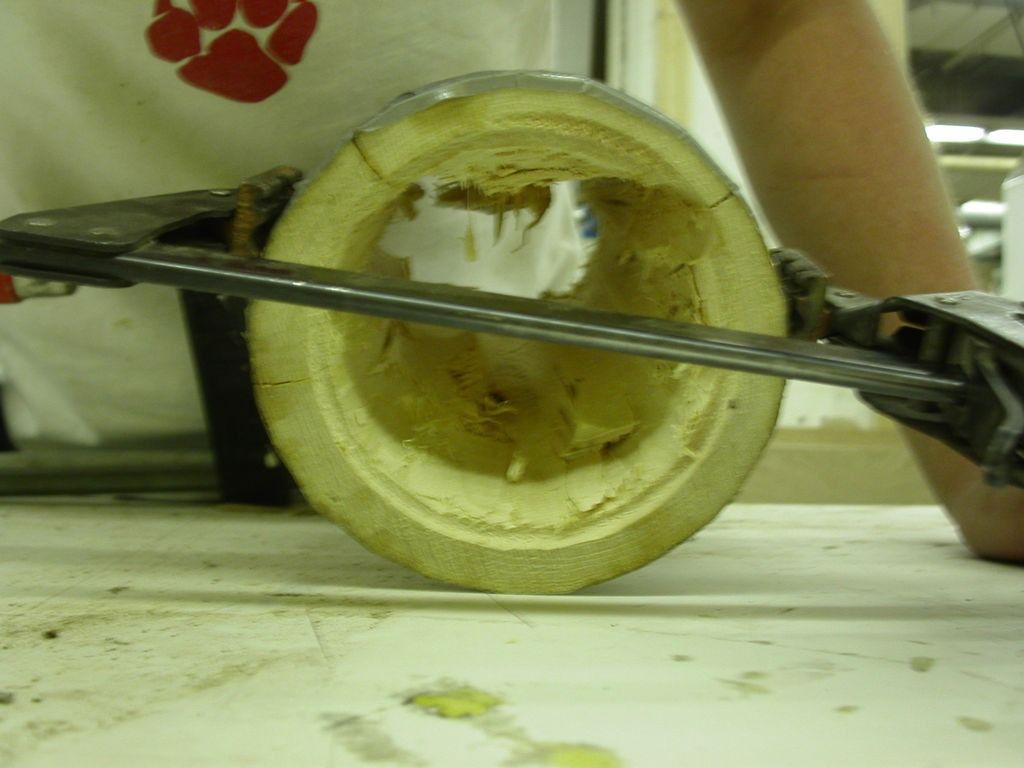
- Find a medium section of a tree branch that is approximately 6″ or 7″ in diameter and 12″ long.
- Take a 3/4″- 1″ slice of the wood on one end of the round by running it through a band saw or using a hand saw as an alternative.
- Punch a network of holes in the back of the slice to allow hot air to escape from the fixture.
- See the last photo below to see how I organized mine.
- Then, in the center of the vent holes you just drilled, drill another hole that will fit a medium to large eye bolt (about 3/8″ or larger); This will be where we will hang the lamp later.
- Using a spade bit (ok), a front bit (best), or a large drill bit (best) and a corded drill, drill a honeycomb of holes in the center of the log, being careful not to get too close to the outside of the log.
- Drill the holes as close as possible, if the drill jumps to the next hole, don't worry about it.
- The goal here is to remove the center of the trunk leaving behind an outer ring. Think of it as making a "log tube."
- Continue drilling holes until the honeycomb net is ready to be removed.
- There are many ways to break out the core, drilling with a hammer and chisel, drilling random, wild holes at weird angles, doing whatever works best for you, making sure you don't damage the exterior:
- Once the center section has been freed, use a drill tool or sanding drum on the end of a drill to smooth the inside of the round a littleand get rid of the wood fragments that hang inside the trunk.
#4: Take care of any cracks
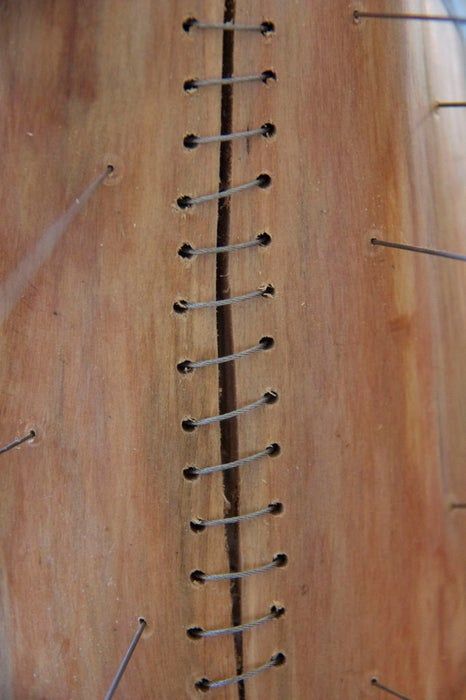
- Watch out for cracks or check your wood deck when it dries and stabilize it by gluing it shut or, as I've done in the image below, "sew" the cracks closed with steel wire.
- The crack that appeared in the piece of wood I was working with did not cause much damage structurally to the wood shell.
- I thought it would be a fun time to experiment with sewing pieces of wood together with steel anyway.
- Drill holes along the edge of the crack and, using a thin gauge steel wire, stitch back and forth across the crack.
- Secure the cable with a knot (hard due to the elastic nature of the cable) or with a ferrule designed to secure steel cables (easy and strong).
- Take this opportunity to finish the record (including the slice) with a polyurethane, varnish or protective oil.
- I used a water based polyurethane from minwax called polycrylic. It doesn't smell bad, is easy to clean and has a nice satin finish.
#5: Clean the layer of leaves
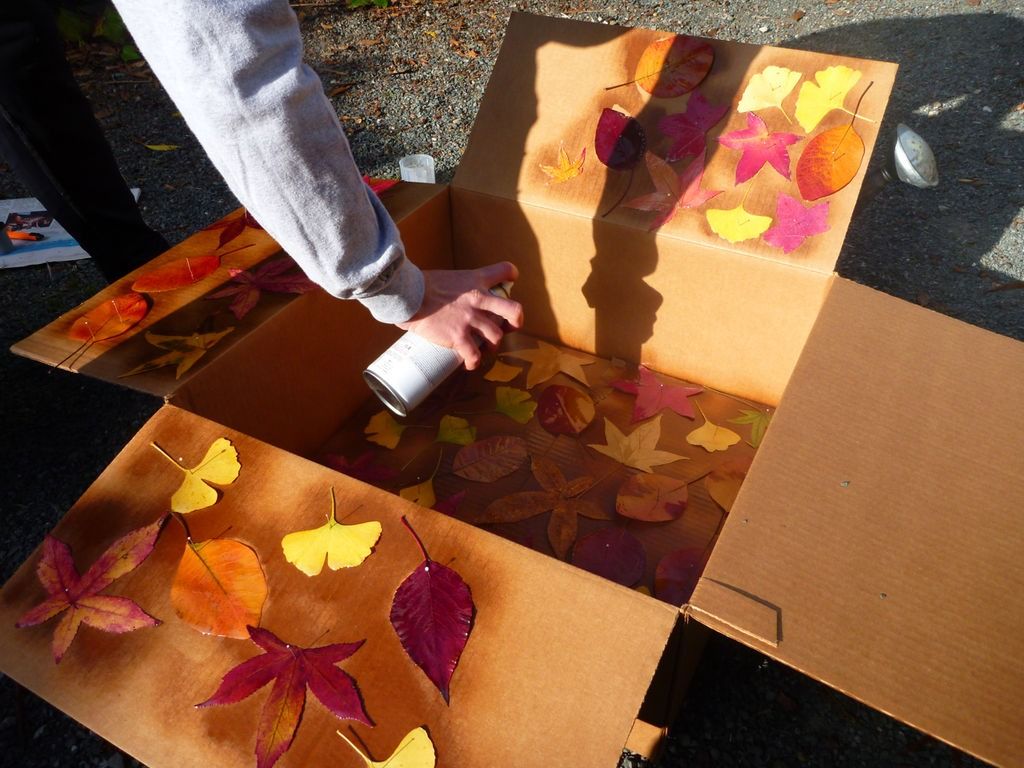
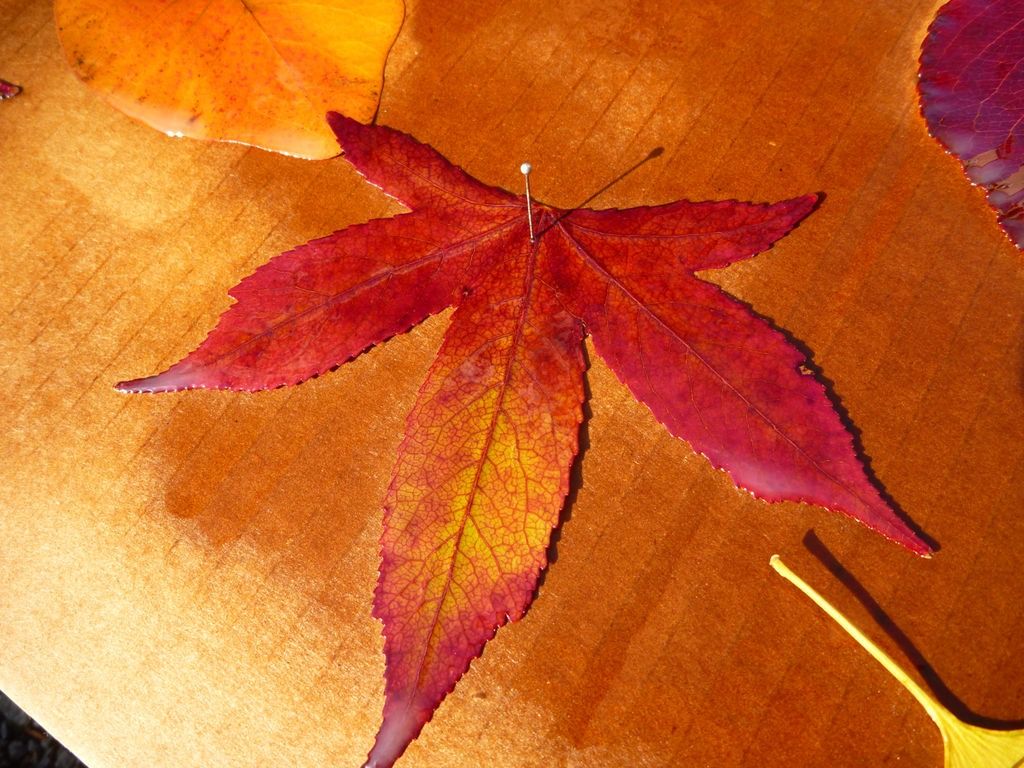
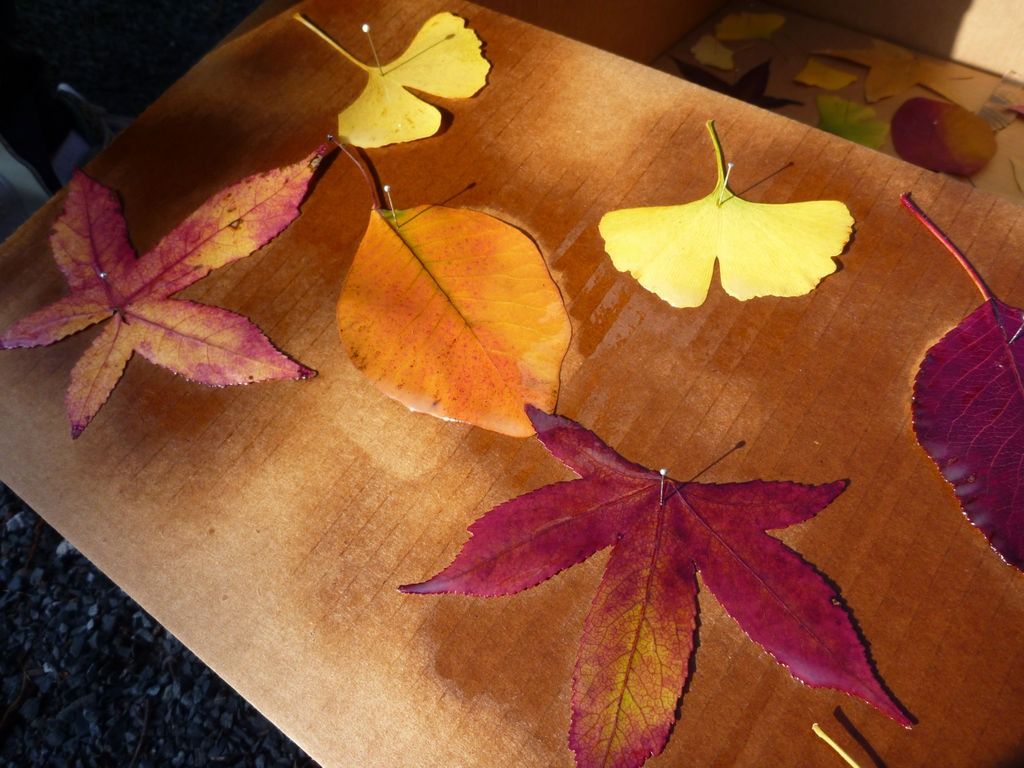
- Once the leaves are completely dry, take them out of the books and using straight pins, stick them on a cardboard box or something else disposable with a large surface area that is easy to poke.
- Spray all leaves with a clear coat of enamel or clear artist varnish.
- I have found that Krylon clear enamel paint works best, even after it dries.
- It remains quite flexible and helps the leaves retain their color. I like to use a medium or high gloss finish on the leaves to enhance them.
- Clear coat is not a permanent protective finish.
- I found that it slows the browning of the leaves up to about 6 to 12 months when applied carefully, and that after 1 year, the clear coat begins to peel off, making it necessary to change the leaves.
- I'm fine with this annual leaf change, as freshly fallen leaves are much prettier to look at and real fall leaves only retain their color for so long.
#6: Drill holes in wood
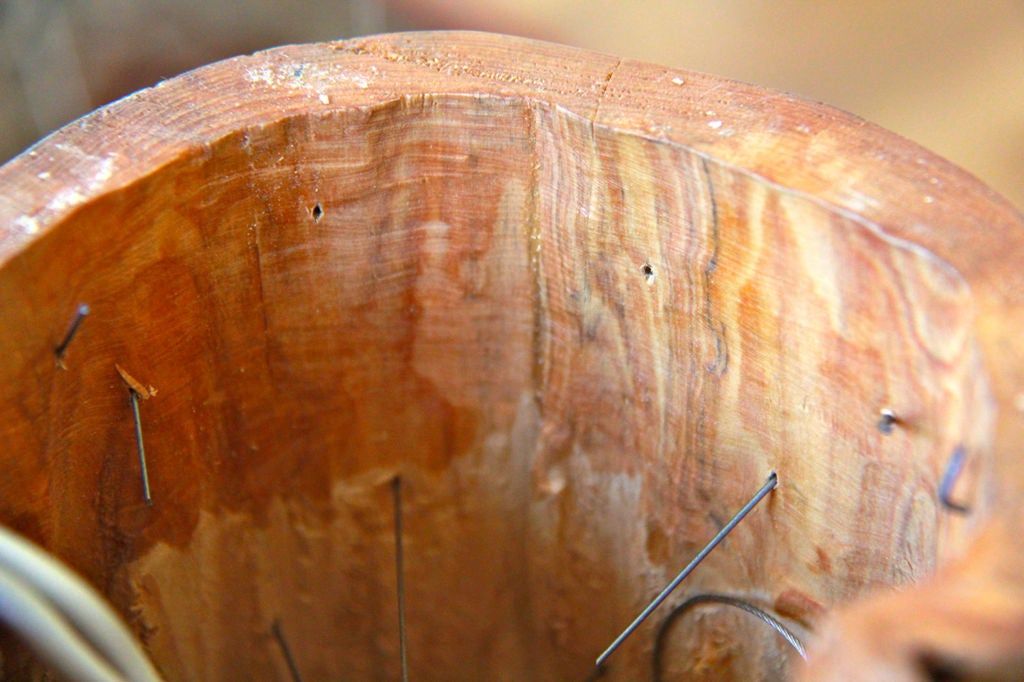
- Go to the hardware store and get several lengths of thin steel rod called "piano wire" or "piano rod."
- Next, take a drill bit that matches the diameter, or is slightly larger than, your piano cable.
- Check the different thicknesses of piano wire available in the store to see what will support your sheets.
- I chose to hang a sprayed leaf on each wire, so I just put it on the wire from the hardware store and bought the wire that supported the leaf.
- Very good in the length I wanted – 6″ to 12″.
- Take the drill bit and drill many small holes through the wooden shell.
- My pattern was a little random, but it was spaced more or less evenly across the trunk.
- Shoot as many holes as there are leaves you have collected and distribute them up and down, and around the log.
#7: Insert the piano cable
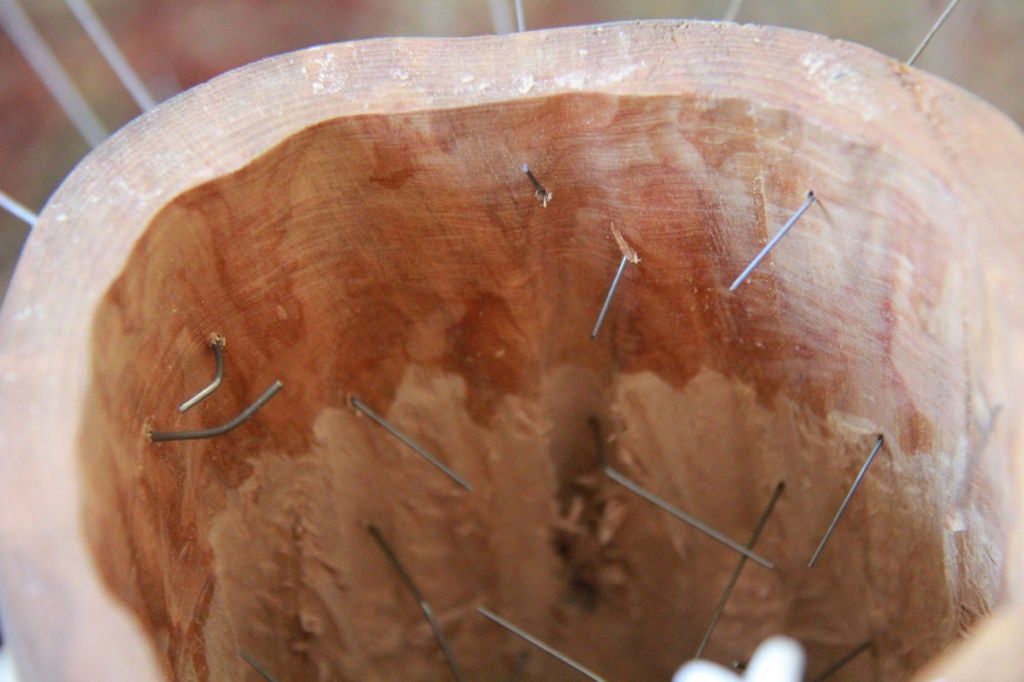
- Insert the piano wire into the holes you just drilled, bending the wires inside the wooden casing with a small "L" shape so they don't come out.
- Start at the deepest part of the trunk first (top of the wood screen).
- Then work your way toward the shallow end (bottom of the wood screen) so you don't end up scraping all the ends of the wire with your hands as you reach.
- Trust me, I learned the hard way.
- Cut the piano wire to different lengths of your choice using a wire cutter. You want them to be somewhat random and artistically arranged so that the leaves don't end up on the same plane.
#8: Glue the leaves to the wire
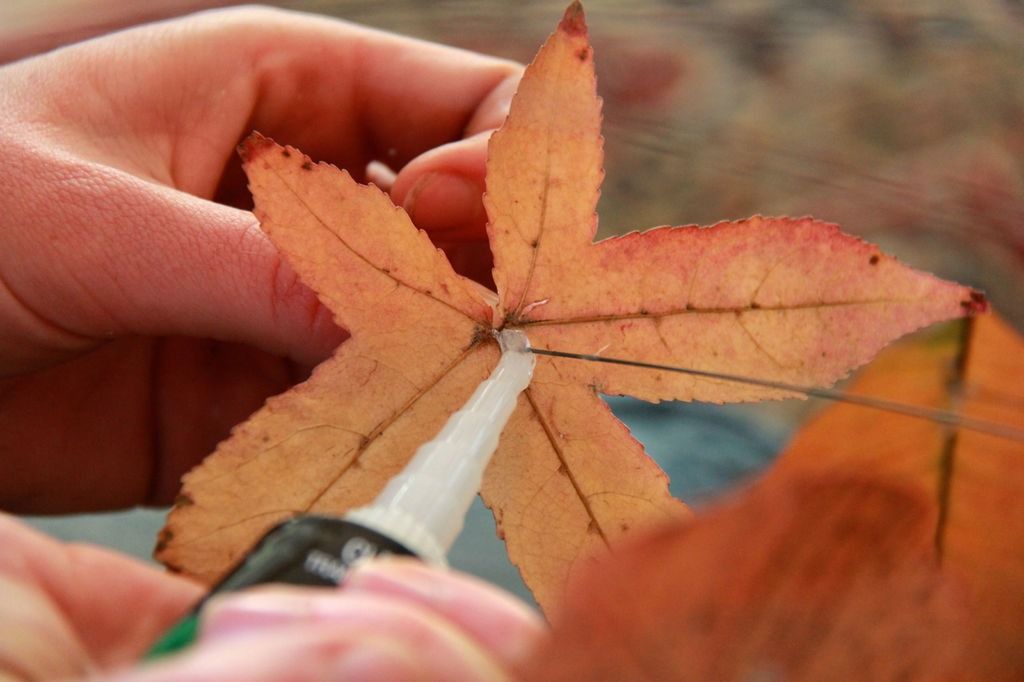
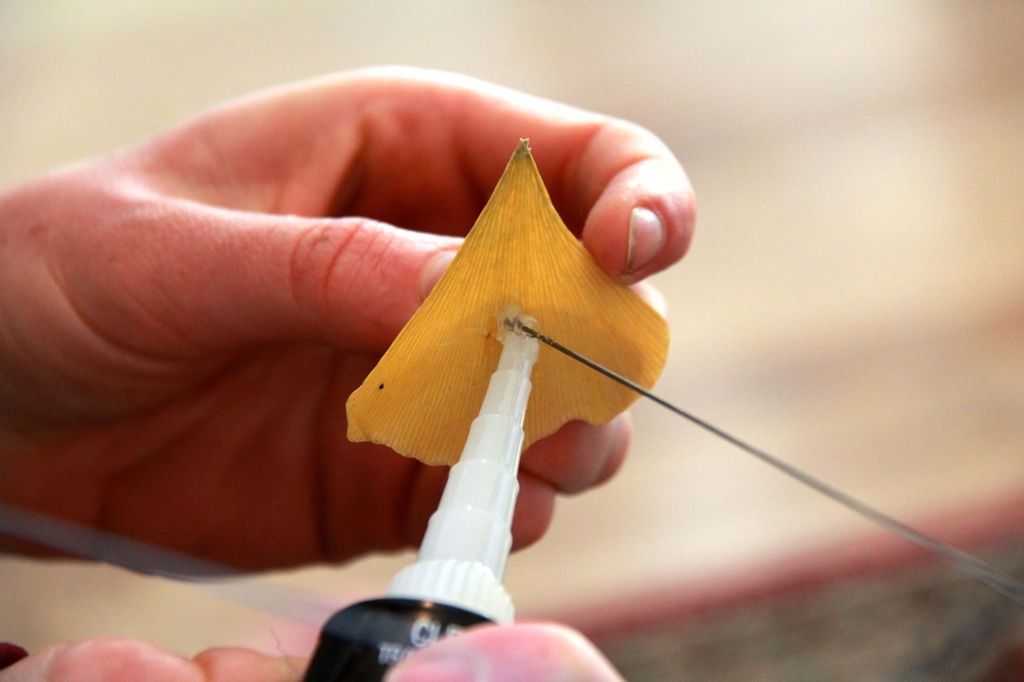

- Using a silicone adhesive such as DAP All-Purpose Adhesive Sealant, glue the sheets to the ends of the piano cables by sticking the wire through a fleshy portion of the sheet and then placing a small amount of silicone on the back of the sheet.
- I have found that silicone glue is the best adhesive to use since you are bonding metal to an enamel coated sheet.
- Hot glue here is a definite NO as the strings created when removing the weapon will wreak havoc on the lamp and your sanity.
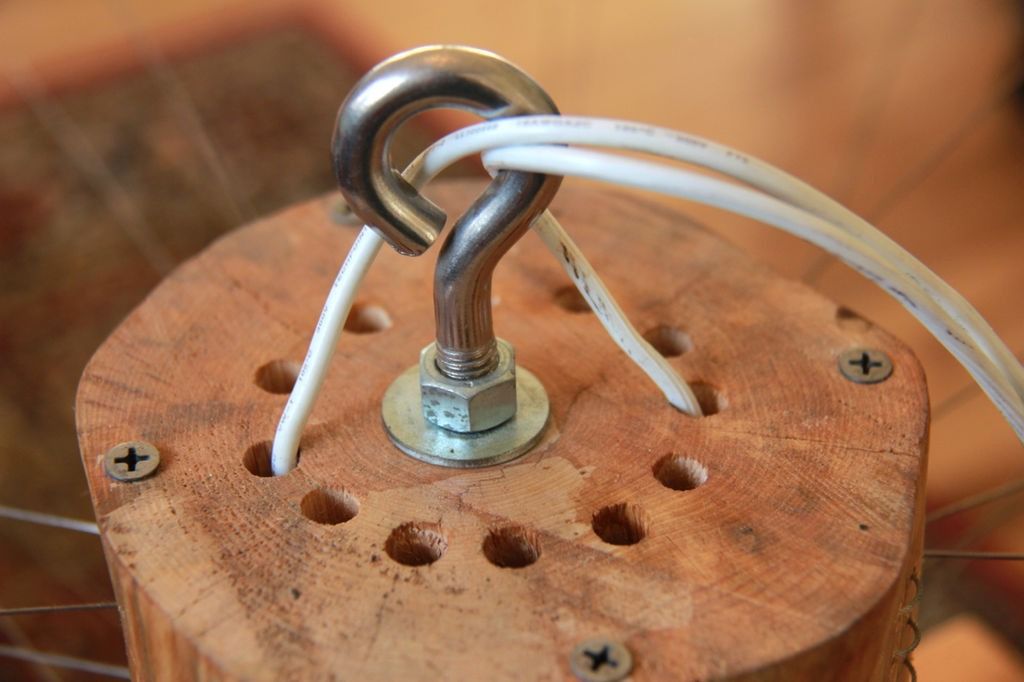
#9: Wire in the accessory

- Pass an IKEA HEMMA light cord through the screw eye, tying it in place if desired.
- Then run the lamp wire through one of the vent holes you drilled in step 3.
- You will need to remove the cable from the IKEA Cabeza accessory to do this, but that is easily done using a screwdriver.
- Once the wires are through and inside the wood shade, rewire the fixture head and install a light bulb.
- I used a CF bulb so it wouldn't generate too much heat...
- Something I was a little worried about due to the wooden lampshade and the relatively close quarters of the entire fixture.
#10: Screw the slice into position
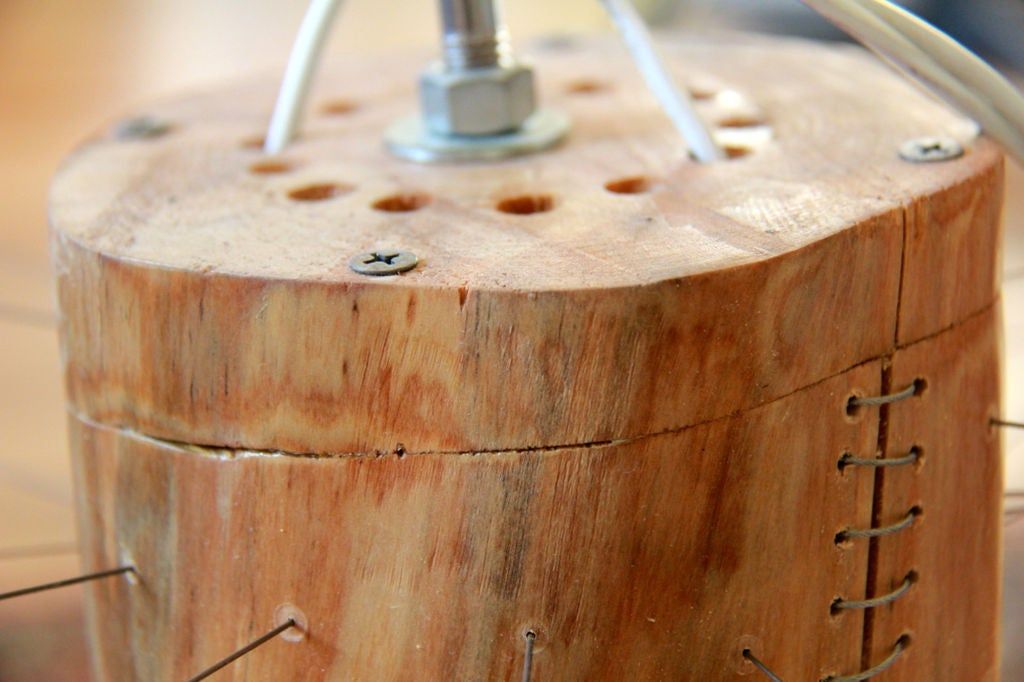
- Using the registration mark you made earlier in step 3, align and screw the backing slice onto the top of the lamp.
- Drill pilot holes for your screws so you don't break the thin wooden lampshade.
At this point, the lamp is built and you just need to hang it somewhere in your home.
This is how to make an autumn leaf lamp. Thanks for reading and leaving comments in the comments section. Greetings.
Don't forget to follow us on our social networks for more news!
Popular Content
How to make a rocket stove for outdoors
Cardboard Drawers Lined with Jeans
Bedroom furniture with secret compartments!
Latest Articles
How to make a refrigerator out of insulating material: Practical step-by-step guide
How to make a Kilim for the Home: Complete Step by Step Guide
How to protect ourselves from accidents in our workplace: Complete prevention and safety guide
Related Content
Building an Incredible and Unique Ladies' Powder Room!
20 Incredible Concrete Lamp Designs!
Projects Made from Reclaimed Wood
Turn Bottle Caps into Unique Items
Creative Home Decor Ideas to Transform Every Space
Refreshing your home starts with smart design choices that combine comfort, personality, and functionality. Whether you want to modernize a small apartment, upgrade outdoor areas, or create cozy rustic interiors, these trending ideas can completely change the atmosphere of your space.
Outdoor Spaces That Increase Style and Functionality
Outdoor living continues to dominate modern home trends. Homeowners are increasingly investing in practical entertainment zones inspired by these BBQ shed ideas, which create the perfect setup for gatherings and weekend cooking sessions.
First impressions also matter when designing exteriors. Elegant farm entrance gates design ideas help properties stand out while improving privacy and curb appeal.
Compact living solutions are also gaining popularity. These inspiring 16x40 shed house interior design ideas show how smaller spaces can still feel luxurious and functional.
To enhance patios and entryways, homeowners are adding stylish protection with these creative porch awning exterior DIY ideas that blend aesthetics with practicality.

Rustic and Cozy Interior Design Trends
Warm and natural interiors remain timeless. These charming rustic decor ideas combine wood textures, vintage accents, and earthy tones to create welcoming spaces.
Bedrooms are becoming more personalized with curated wall arrangements. Many homeowners use these stylish picture wall ideas for bedroom spaces to display memories and artwork creatively.
Textured wall treatments are another major trend. Installing a board and batten wall adds architectural character while keeping interiors elegant and modern.
Similarly, bold accent wall ideas can instantly transform plain rooms into eye-catching focal points without requiring a full renovation.
Smart Kitchen and Organization Inspiration
Functional kitchens are essential for modern homes. These practical kitchen wall cabinet ideas maximize storage while maintaining a clean and stylish appearance.
Organization also starts at the entrance. Well-designed mud room ideas help families keep shoes, coats, and daily essentials neatly arranged.
Colorful and Personalized Home Styling
Vibrant interiors are becoming increasingly popular thanks to playful dopamine decor ideas that use bright colors and joyful accessories to improve mood and energy.
Gallery walls also continue to evolve as a major decorative feature. These trendy gallery wall inspiration ideas offer creative ways to combine prints, photos, and statement art.
Young renters and new homeowners are especially embracing these stylish first apartment aesthetic ideas to create sophisticated interiors on a budget.
Finally, selecting the right shades can dramatically influence any room’s atmosphere. These modern trendy color ideas help homeowners choose palettes that feel fresh, elegant, and timeless.
Final Thoughts
From rustic charm and colorful interiors to outdoor entertaining areas and functional storage solutions, today’s home decor trends focus on creating spaces that feel both beautiful and livable. By combining smart layouts, modern textures, and personalized decorative elements, any home can become more stylish, comfortable, and inspiring.


