


If you are a drink lover and looking to surprise your guests, then learn how to how to make an electric beverage dispenser.
I've seen a lot of cardboard dispensers out there, so I was inspired to make a beverage dispenser using slightly more durable materials, because I want to use them at parties and barbecues in the future!

Video of how to make an electric cardboard beverage dispenser:
Click to see the Video.
Supply List:
- Submersible pumps
- LED strips
- Momentary pushbuttons
- Plug
- Shrink tubes
- Wood veneer (whatever you like)
- Plastic tubes
- 1 cm plywood
- Aluminum roll
- Aluminum mesh
- Aluminum angles
- Acrylic glass
Tools used:
- Welder
- Sierra
- Hot glue
- Band saw
- Heat gun
- Knife
- Hacksaw
- Jigsaw
- Drill
Step by step on how to make an electric beverage dispenser:
Step 1: Planning the Project
I always start new projects with a few sketches, trying to figure out all the components I need, what materials to use, etc.
I also find it helpful to draw a schematic beforehand, although it usually ends up with some adjustments later, plus taking the correct measurements for each part.
The original plan was to be able to connect a 1.5L bottle to the pump directly, but I'll show you why I didn't do that later.


Step 2: Cut the plywood


The first step I did was to create the entire box out of 1cm thick plywood.
I haven't worked with this type of wood before, but I really liked it, since it is easy to cut and quite resistant.
If you are interested in the measurements, you can find them in the sketches above.
I tried the side pieces first, just clamping them together and using a hand planer and file to make them match up perfectly.
I prepared the other plywood pieces as well.
Step 3: Assembling the Box


With a little tape, I was able to keep the side pieces attached to the back when attaching the front pieces.
I'm not going to attach the back piece as it will be used as a swing door to access the drink containers.
I secured the pieces properly with wood glue and nails.
Step 4: Make a swing door


The rear door will be held in place by two hinges.
On the other side, I simply used two hooks and latches.
I used two to make it more rigid, and because the wood was slightly warped, which solved the problem.
Step 5: Cover everything with sheet metal


Now whate the main shape was finished, I could cover it all with this beautiful veneer.
It's incredibly thin, so thin you could cut it with scissors.
It wasn't a problem to attach it. I only used contact glue, which you apply to the two pieces you are gluing and allow to dry for 10 minutes before fusing them together.
It made it much easier to flatten it when I used a plastic squeegee, so I really recommend using one.
Step 6: Water drainage and aluminum mesh


I wanted to create a water drain, so in addition to having a plastic box that would collect all the spill under the tubes, I wanted to cover that box with this aluminum mesh.
I marked the size and tried using cutting pliers at first, but that would take a long time.
It's not impossible by any means, it's just a bit of work, so I decided to use a rotary tool.
Step 7: Covering the background


I hadn't decided if I wanted to use wood as a floor or as a piece of aluminum, but I finally went with plywood.
Again, wood glue and nails.
In retrospect, it might have been a good idea to cover the entire inside of the bin room with metal, as this will not rot if there is a spill.
I'm not too worried about that though.
Step 8: Adding Aluminum Details


I ordered this thin aluminum roll a long time ago, and I hadn't used it yet, so this was a perfect opportunity to try it.
It was thin enough to be cut with scissors, which made it easy to cut and shape how I wanted.
The contact glue worked here too, again using the plastic squeegee to flatten it.
I noticed that the aluminum mesh was bent slightly, and to correct that, I added an aluminum angle under the inside edge to give it some support.
It was easily cut with a hacksaw. Let's move on to the plastic water collector.
Step 9: Acrylic water collection box


For the front of it, I used opaque white acrylic that I cut with a scroll saw.
You can also use a scoring knife to make straight cuts like this, it's not really necessary for a saw.
After cleaning it up a bit, I drilled two holes so I could attach the aluminum handle.
For the rest of the box I used normal acrylic and sealed it with hot glue.
I think acrylic fuse glue might be a better option for sealing it, but I haven't experienced any leaks with hot glue alone, so I'm not worried about spills.
I also used the remains of the aluminum rolls as decoration on the sides.
Step 10: Aluminum label holders


Since I want to be able to change liquids for parties and for daily use, I have to change the labels from time to time, and these label holders will do the trick.
I found some perfect aluminum angles that will fit the acrylic front piece, as well as give a little space for whatever label I want to put inside.
I used a metal band to cut everything just because it was convenient, but it could definitely be done with a hacksaw.
By cutting 45 degree angles, I was able to make some nice looking squares that I could fit around an acrylic. They just had to clean themselves a little first.
Regular super glue was enough to fix the aluminum to the acrylic.
Step 11: More details, finishing the exterior


Before I glued anything on, I applied some finishing oil to the wood, and it looks amazing.
Next, I'll cut some aluminum angles that I could add to the design, just for aesthetic reasons.
Again, make 45 degree angles where necessary and clean them with the filing.
I tried to be as precise as possible when adding those label holders, marking the correct distance between them and the top and bottom, otherwise it won't look very good in the end.
Step 12: The activation mechanism


I could have gone with a simple button as an activation mechanism to make the liquid flow, but I really just wanted to be able to push a glass over it and activate it that way. I still had some opaque acrylic I could use, and I cut 4 narrow rectangles with the scroll saw.
In case I needed to adjust the position later, I made a hole in the top so I could insert an elastic that I could pull back.
It will be clearer later.
Marking the same height on all of them, you could glue a short metal pipe to all of them, and this will help keep them in position.
Step 13: Drill Holes for Tubes, Buttons and Power Plug


It might have been smarter to drill these holes before building them, but at the same time, they might not have been placed as well as they are now.
There are 4 holes for the plastic tubes that the liquids will flow through, and 4 holes for the acrylic hands that will be pushed in.
While I was at it, I also cut a hole for the power plug.
Step 14: The electronic components


It's time to deal with electronics. See the schematic above for details on how they should be connected.
The reason I chose to use these submersible pumps instead of a vacuum pump is that they are cheaper and the liquid flow is much faster.
For my use and design, they are perfect.
I have had some concerns about the safety rating of the food though, but as long as I make sure to clean it properly after each use, I don't think it should be a problem.
They will be easy to replace anyway, and I might look into vacuum pumps in the future.
The pumps will be directly connected to four LED strips of different colors, and the LED strips will be connected in turn to the momentary switch button and the power supply.
That way the LEDs and pump will only light up when the button is pressed, and that's what the acrylic hands are for.
They will be held in place by some small squares of plywood.
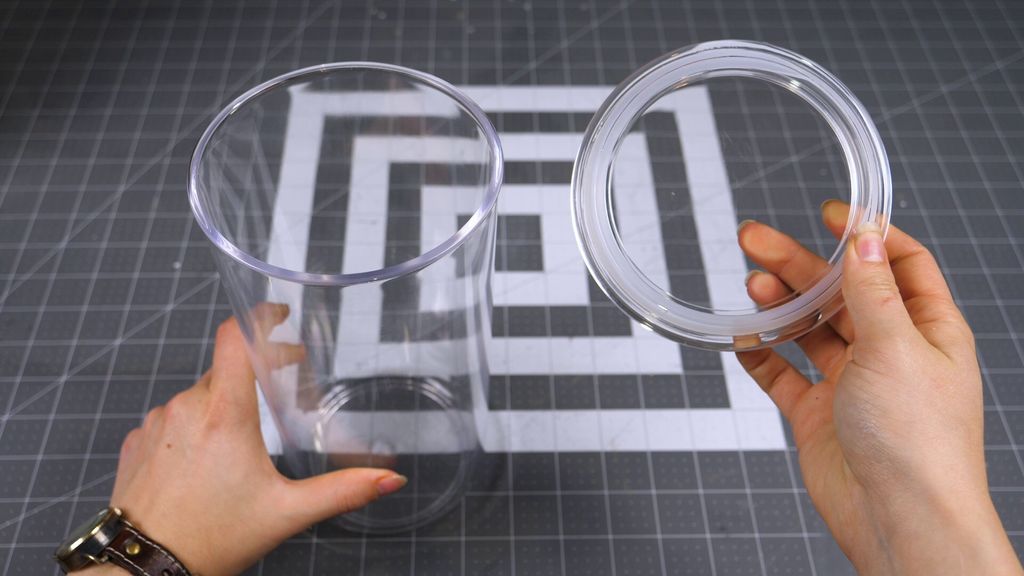
The containers I found were perfect. 4 of them fit snugly next to each other inside the dispenser, and are made of hard plastic.
Each one can hold a little more than 1.5L. The main reason I decided not to use plastic bottles is that with these I can put ice cubes inside.
A small detail, but an important one for me, at least.
Step 15: Wiring!


First, I glued the switch button to one of the little pieces of plywood.
I then connected a short wire to the normally open pin and protected it with shrink tubing. I needed to drill two holes in the lid;
A smaller one to place the pump cables and a larger one for the plastic tube.
I ran the wires through the hole and finally I was able to connect the rest of the electronics.
Again, I am soldering the pump directly to the LED strip and switch button.
Step 16: Add the plastic tube

It's time to push the tube through the hole, cover and connect it to the pump!
Step 17: Soldering the components to the power cable


Okay, so the first picture is the power cord wire, and it should be connected with the common ground on the LED strip, and the positive wire on the switch button.
It is easy to see in the diagram.
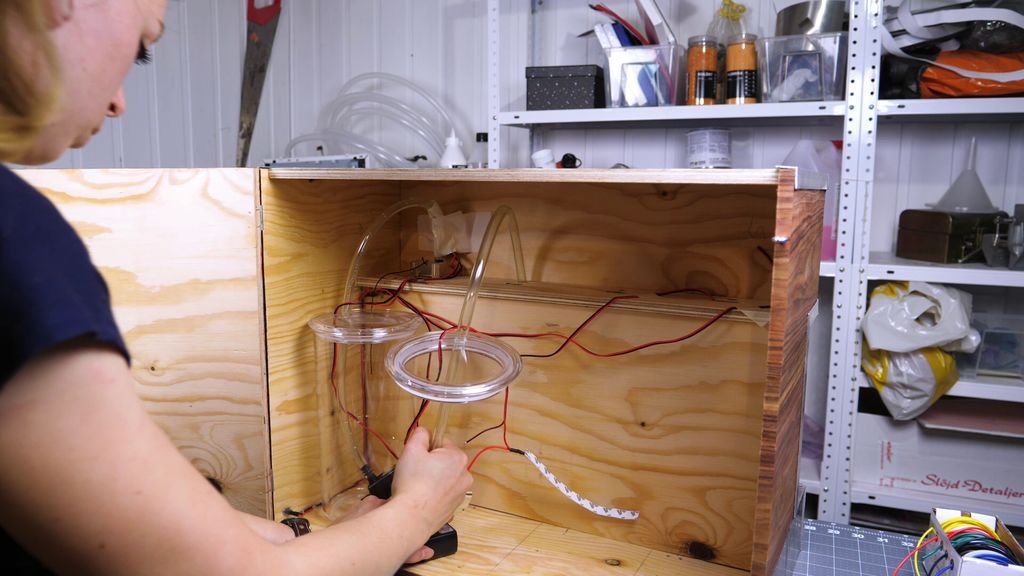
Now comes the difficult part, which was placing the acrylic hand correctly.
I placed it inside the hole and adjusted the plywood tips back and forth until the push button felt right and then hot glued them together.
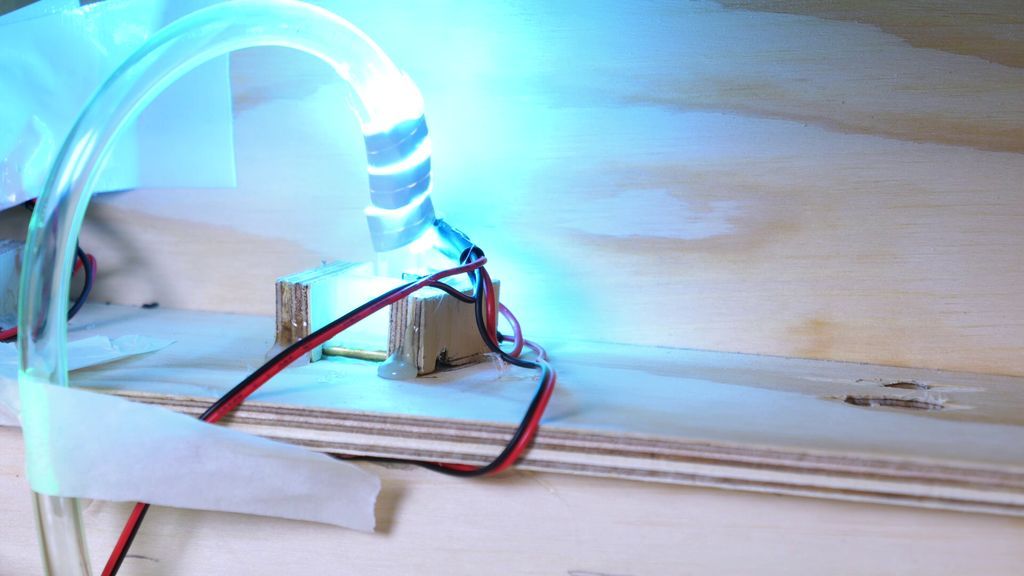
EndI was able to glue the LED strip around the tube.
Step 18: Pour the drinks!
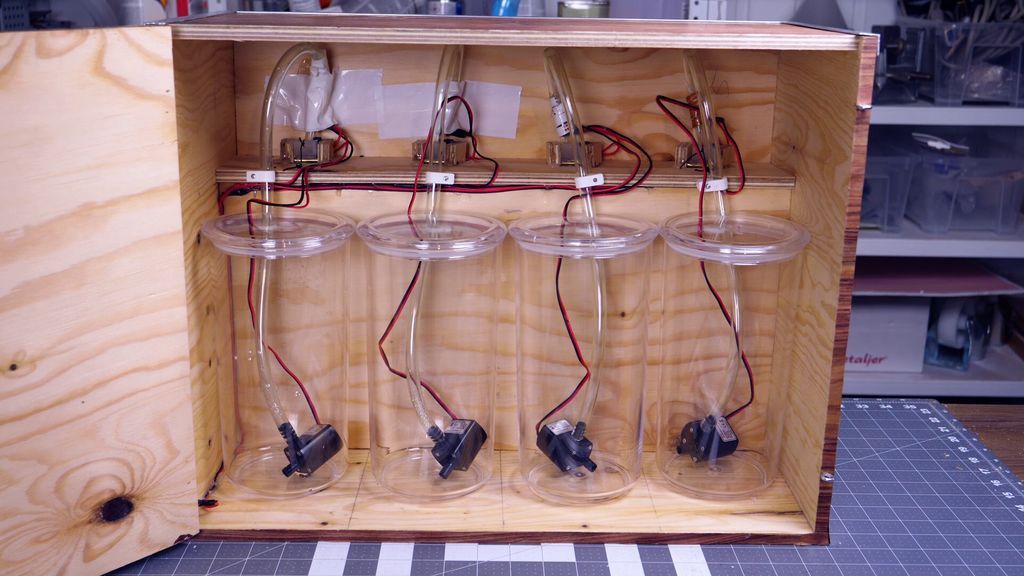


This is what it looks like on the inside after cleaning everything.
I had to use elastics on two of the hands, so good that I added those holes. Now all that's left is to fill those containers and try it!
It's pretty easy to slide the pump in there, and the lid seals very well.
If I want to switch to a different drink in a container, I make sure to wash the container first and pump some water through the tube so there isn't any residue.
If I put soda in there, I can use the label on the bottle to mark the correct tube!
In addition, it is very easy to fill it out. Very practical at parties, for example.
Step 19: Final Thoughts


Pumps remove a lot of the carbonation from soda because the liquid has to go through the motor, but I don't mind since I'll be using it for mostly non-carbonated drinks.
If you are more of a soda drinker, a vacuum pump might be a better option for you. I am currently looking to change the pumps, just for cleaning purposes.
The design will fit either pump.
Final Tip If possible, try to grab food grade tubing and pumps.
I hope you enjoyed the build, and thanks for reading!
Popular Content
How to make a rocket stove for outdoors
Cardboard Drawers Lined with Jeans
Ideas and Advantages of Window Grilles for the Home!
Latest Articles
How to make a refrigerator out of insulating material: Practical step-by-step guide
How to make a Kilim for the Home: Complete Step by Step Guide
How to protect ourselves from accidents in our workplace: Complete prevention and safety guide
Related Content
Know How to Make a Rustic Style Sliding Door!
Wooden Storage Drawers with Slides!
Handmade Personalized Screwdriver
Ways to Decorate with Wooden Boxes
Creative Home Decor Ideas to Transform Every Space
Refreshing your home starts with smart design choices that combine comfort, personality, and functionality. Whether you want to modernize a small apartment, upgrade outdoor areas, or create cozy rustic interiors, these trending ideas can completely change the atmosphere of your space.
Outdoor Spaces That Increase Style and Functionality
Outdoor living continues to dominate modern home trends. Homeowners are increasingly investing in practical entertainment zones inspired by these BBQ shed ideas, which create the perfect setup for gatherings and weekend cooking sessions.
First impressions also matter when designing exteriors. Elegant farm entrance gates design ideas help properties stand out while improving privacy and curb appeal.
Compact living solutions are also gaining popularity. These inspiring 16x40 shed house interior design ideas show how smaller spaces can still feel luxurious and functional.
To enhance patios and entryways, homeowners are adding stylish protection with these creative porch awning exterior DIY ideas that blend aesthetics with practicality.

Rustic and Cozy Interior Design Trends
Warm and natural interiors remain timeless. These charming rustic decor ideas combine wood textures, vintage accents, and earthy tones to create welcoming spaces.
Bedrooms are becoming more personalized with curated wall arrangements. Many homeowners use these stylish picture wall ideas for bedroom spaces to display memories and artwork creatively.
Textured wall treatments are another major trend. Installing a board and batten wall adds architectural character while keeping interiors elegant and modern.
Similarly, bold accent wall ideas can instantly transform plain rooms into eye-catching focal points without requiring a full renovation.
Smart Kitchen and Organization Inspiration
Functional kitchens are essential for modern homes. These practical kitchen wall cabinet ideas maximize storage while maintaining a clean and stylish appearance.
Organization also starts at the entrance. Well-designed mud room ideas help families keep shoes, coats, and daily essentials neatly arranged.
Colorful and Personalized Home Styling
Vibrant interiors are becoming increasingly popular thanks to playful dopamine decor ideas that use bright colors and joyful accessories to improve mood and energy.
Gallery walls also continue to evolve as a major decorative feature. These trendy gallery wall inspiration ideas offer creative ways to combine prints, photos, and statement art.
Young renters and new homeowners are especially embracing these stylish first apartment aesthetic ideas to create sophisticated interiors on a budget.
Finally, selecting the right shades can dramatically influence any room’s atmosphere. These modern trendy color ideas help homeowners choose palettes that feel fresh, elegant, and timeless.
Final Thoughts
From rustic charm and colorful interiors to outdoor entertaining areas and functional storage solutions, today’s home decor trends focus on creating spaces that feel both beautiful and livable. By combining smart layouts, modern textures, and personalized decorative elements, any home can become more stylish, comfortable, and inspiring.


